


Baichuan2 模型部署
本章将介绍三类部署 Baichuan2 模型的方法:
利用 HuggingFace 原生方式部署;
利用 vLLM 框架部署;
利用基于 TensorRT_LLM backend 的 Triton Inference Server 部署。对这三类部署方式,我们还分别介绍加载量化和非量化模型的方法。这些方式既可以在 Amazon SageMaker 的 notebook 上进行部署,也可以在 Amazon EC2 上进行部署。
加载/合并 LoRA 模型
如果使用 LoRA 方法微调 Baichuan2 模型,会额外生成一个比较小的 LoRA 模型文件,我们可以使用 peft 来加载这个模型。如果要对模型进行量化,还需要先将 LoRA 模型与基础模型进行合并。当然现在也有 QLoRA 的方式可以直接以量化的方式微调大语言模型,这里暂不讨论。可以采用下面的代码来合并 LoRA 模型与基础模型:
Bash
#!/bin/bash
pip install peft
Python
# filename merge_lora.py
# -*- coding: utf-8 -*-
import torch
from transformers import AutoModelForCausalLM, AutoTokenizer
from transformers.generation.utils import GenerationConfig
from peft import AutoPeftModelForCausalLM
import time
import os
import argparse


if __name__ == '__main__':
    parser = argparse.ArgumentParser()
    parser.add_argument("--lora_model_dir", type=str, default='lora_model')
    parser.add_argument("--baichuan_model_dir", type=str, default='Baichuan2-13B-Chat')
    parser.add_argument("--merged_model_dir", type=str, default='Baichuan2-13B-Chat-Merged')
    args = parser.parse_args()


    start = time.time()
    tokenizer = AutoTokenizer.from_pretrained(args.lora_model_dir, use_fast=False, trust_remote_code=True, local_files_only=True)
    model = AutoPeftModelForCausalLM.from_pretrained(args.lora_model_dir, trust_remote_code=True, local_files_only=True)


    model.generation_config = GenerationConfig.from_pretrained(args.baichuan_model_dir, local_files_only=True)
    print('Load to CPU time:', time.time()-start)


    # 合并模型,并转换为float16
    start = time.time()
    model = model.merge_and_unload()
    model = model.half()
    print('Merge and half time:', time.time()-start)


    tokenizer.save_pretrained(args.merged_model_dir)
    model.save_pretrained(args.merged_model_dir)
Bash
#!/bin/bash


python merge_lora.py --lora_model_dir lora_model --baichuan_model_dir Baichuan2-13B-Chat --merged_model_dir Baichuan2-13B-Chat-Merged
HuggingFace 模型部署
BFloat16
利用 HuggingFace 部署 BFloat16 模型比较简单,只需要使用如下代码加载模型,利用 Flask 提供服务。注意对于不同大小的模型,所需要的显卡资源是不一样的,例如对于 7B 模型,一张 A10G 卡(24G 显存,建议使用 ml.g5.2xlarge)就可以,但是对于 13B 模型,需要 2 张 A10G 卡(建议使用 ml.g5.12xlarge)。
Python
# filename flask_service.py


from flask import Flask, render_template, request, jsonify, Response
from transformers import AutoTokenizer, AutoModelForCausalLM, GenerationConfig
import argparse
import torch
import os


parser = argparse.ArgumentParser()
parser.add_argument("--port", type=int, default=8005)
parser.add_argument("--model_dir", type=str, default='./Baichuan2-13B-Chat')
parser.add_argument("--quant_type", type=str, default='int8')


args = parser.parse_args()


app = Flask(__name__)


def load_model(model_dir, quant_type):
    tokenizer = AutoTokenizer.from_pretrained(model_dir, use_fast=False, trust_remote_code=True, local_files_only=True)
    if quant_type == 'int8':
        model = AutoModelForCausalLM.from_pretrained(model_dir, device_map="cuda:1", trust_remote_code=True, local_files_only=True)
    elif quant_type == 'bf16':
        model = AutoModelForCausalLM.from_pretrained(model_dir, torch_dtype=torch.bfloat16, device_map="auto", trust_remote_code=True, local_files_only=True)

    model.generation_config = GenerationConfig.from_pretrained(model_dir, local_files_only=True)
    return model, tokenizer


model, tokenizer = load_model(args.model_dir, args.quant_type)


def generate_response(messages):
    prev_sentence = ""


    for sentence in model.chat(tokenizer, messages, stream=True):
        new_sentence = sentence[len(prev_sentence):]
        prev_sentence = sentence
        yield new_sentence


@app.route('/inference', methods=['POST'])
def inference():
    messages = request.json.get('messages', [])
    print(messages)


    try:
        if request.args.get('streaming') == 'true':
            return Response(generate_response(messages), content_type='text/plain')


        return ''.join(generate_response(messages))


    except Exception as e:
        return str(e)


if __name__ == '__main__':


    app.run(host="0.0.0.0", port=args.port)
通过下面的代码,可以在 8000 端口启动 Baichuan2-13B-Chat 模型的服务。
Bash
#!/bin/bash


python flask_service.py --port 8000 --model_dir Baichuan2-13B-Chat --quant_type bf16
如果出现下面的结果则表示启动成功。
* Running on all addresses (0.0.0.0)
* Running on http://127.0.0.1:8000
* Running on http://172.16.13.141:8000
服务启动后,可以通过如下命令调用该服务。
Bash
#!/bin/bash


curl -X POST \
  -H "Content-Type: application/json" \
  -d '{"messages": [{"role": "user", "content": "你是谁?"}]}' \
  "http://localhost:8000/inference"
如果返回如下类似的文本则说明模型服务部署成功。
我是百川大模型,是由百川智能的工程师们创造的大语言模型,我可以和人类进行自然交流、解答问题、协助创作,帮助大众轻松、普惠的获得世界知识和专业服务。如果你有任何问题,可以随时向我提问。INT8
INT8 模型可以在保证效果没有明显下降的情况下减少需要的 GPU 资源,例如,加载 Baichuan2-13B-Chat INT8 量化的模型只需要 1 张 A10G 卡,但加载 BFloat16 模型需要 2 张 A10G 卡。若需要部署 INT8 模型,首先需要将 BFloat16 的模型量化为 INT8 模型。HuggingFace 提供了一种 bitsandbytes 的量化方案,可以采用如下代码将 BFloat16 的模型量化为 INT8 模型:
Python
# filename convert_to_int8.py


# -*- coding: utf-8 -*-
import torch
from transformers import AutoModelForCausalLM, AutoTokenizer
from transformers.generation.utils import GenerationConfig
from peft import AutoPeftModelForCausalLM


import time
import argparse
import os


def quantize(model_dir, output_dir):

    os.makedirs(output_dir, exist_ok=True)
    # 在CPU上以int8加载模型
    start = time.time()
    tokenizer = AutoTokenizer.from_pretrained(model_dir, use_fast=False, trust_remote_code=True, local_files_only=True)
    model = AutoModelForCausalLM.from_pretrained(model_dir, load_in_8bit=True, trust_remote_code=True, local_files_only=True)  # , torch_dtype=torch.bfloat16, device_map="auto"
    # model.generation_config = GenerationConfig.from_pretrained("Baichuan2-7B-Chat-Fine-tuned", local_files_only=True)
    print('Load to CPU time:', time.time()-start)


    start = time.time()
    tokenizer.save_pretrained(output_dir)
    print('Save tokenizer time:', time.time()-start)


    start = time.time()
    model.save_pretrained(output_dir)
    print('Save model time:', time.time()-start)


    messages = []
    messages.append({"role": "user", "content": "请把如下英文翻译成中文:Shall I compare thee to a summer’s day? "})
    response = model.chat(tokenizer, messages)
    print(response)


if __name__ == '__main__':

    parser = argparse.ArgumentParser()
    parser.add_argument('--model_dir',
                        type=str,
                        required=True,
                        help='Specify model directory')
    parser.add_argument('--output_dir',
                        type=str,
                        required=True,
                        help='Specify output directory')


    args = parser.parse_args()

    quantize(args.model_dir, args.output_dir)
量化及启动模型服务的代码如下:
Bash
#!/bin/bash


# Convert to int8
python convert_to_int8.py --model_dir Baichuan2-13B-Chat --output_dir Baichuan2-13B-Chat-Int8


# Start the flask service
python flask_service.py --port 8000 --model_dir Baichuan2-13B-Chat-Int8 --quant_type int8
vLLM 部署
使用 HuggingFace 原生的部署方式虽然简单,但推理速度较慢,而且由于不支持批量推理,吞吐率也比较低。为了提高推理速度及吞吐率,可以考虑使用 vLLM 框架进行部署。vLLM 是 Woosuk Kwon 等人提出的一种针对 LLM 推理加速的框架[1],其中采用了 KV cache、Paged Attention 等技术,实现了 continuous batching,可以达到比较高的推理速度和吞吐率。根据[2]在 LLaMA-7B 和 LLaMA-13B 上的结果,vLLM 部署方案的吞吐率可以达到 HuggingFace 部署方案吞吐率的 24 倍,我们在 Baichuan2 模型上的测试也有类似的结果。
BFloat16
可以使用下面的步骤来用 vLLM 部署 BFloat16 模型。
Step 1. 安装 vLLM 并启动服务。
Bash
#!/bin/bash


# 安装 vllm
pip install vllm


# 启动服务
# 下面的代码实现启动一个类似 openai api 的接口,其中 template_baichuan.jinja 可以从 vllm 官方代码里找到,
# 代码地址 https://github.com/vllm-project/vllm.git,路径 examples/template_baichuan.jinja


python -m vllm.entrypoints.openai.api_server \
    --model Baichuan2-13B-Chat \
    --trust-remote-code \
    --chat-template template_baichuan.jinja
如果出现如下类似结果,则说明服务启动成功。
WARNING 02-26 05:24:25 tokenizer.py:64] Using a slow tokenizer. This might cause a significant slowdown. Consider using a fast tokenizer instead.
INFO:     Started server process [46663]
INFO:     Waiting for application startup.
INFO:     Application startup complete.
INFO:     Uvicorn running on http://0.0.0.0:8000 (Press CTRL+C to quit)
INFO 02-26 05:24:35 metrics.py:161] Avg prompt throughput: 0.0 tokens/s, Avg generation throughput: 0.0 tokens/s, Running: 0 reqs, Swapped: 0 reqs, Pending: 0 reqs, GPU KV cache usage: 0.0%, CPU KV cache usage: 0.0%
Step 2. 调用 vLLM 服务。可以利用 OpenAI 类似的客户端函数调用 vLLM 服务。
Bash
#!bash


# Install openai
pip install openai
Python
# filename make_request.py


# Python code to make request
from openai import OpenAI
# Set OpenAI's API key and API base to use vLLM's API server.
openai_api_key = "EMPTY"
openai_api_base = "http://localhost:8000/v1"


client = OpenAI(
    api_key=openai_api_key,
    base_url=openai_api_base,
)


models = client.models.list()
model_id = models.data[0].id


chat_response = client.chat.completions.create(
    model=model_id,
    messages=[
#        {"role": "system", "content": "You are a helpful assistant."},
        {"role": "user", "content": "你是谁?"},
    ]
)


print("Chat response:", chat_response)
Bash
#!/bin/bash


python make_request.py
如果回复如下,则表示部署成功。
Chat response: ChatCompletion(id='cmpl-84ba0352ccf94a9e8ab55f07cd8e1b01', choices=[Choice(finish_reason='stop', index=0, logprobs=None, message=ChatCompletionMessage(content='\n我是一个大型语言模型,由百川智能的工程师们创造,我可以和人类进行自然语言交流,可以帮助你解答问题、为你提供帮助,这就是我主要的职责。', role='assistant', function_call=None, tool_calls=None))], created=95005, model='checkpoint/Baichuan2-7B-Chat-Finetuned', object='chat.completion', system_fingerprint=None, usage=CompletionUsage(completion_tokens=36, prompt_tokens=8, total_tokens=44))INT4
同样,可以现对模型进行量化,减少显存的使用。整体部署方式与 BFloat16 相同,只需先利用 AutoAWQ 对模型进行量化。
Bash
#!/bin/bash


pip install autoawq
使用下面的代码将 BFloat16 模型量化为 INT4(目前 AutoAWQ 只支持 INT4 量化,不支持 INT8 量化):
Python
# filename quant_awq.py
import argparse
from awq import AutoAWQForCausalLM
from transformers import AutoTokenizer


if __name__ == '__main__':

    parser = argparse.ArgumentParser()
    parser.add_argument('--model_dir',
                        type=str,
                        required=True,
                        help='Specify model directory')
    parser.add_argument('--output_dir',
                        type=str,
                        required=True,
                        help='Specify output directory')


    args = parser.parse_args()

    model_path = args.model_dir
    quant_path = args.output_dir

    quant_config = { "zero_point": True, "q_group_size": 128, "w_bit": 4, "version": "GEMM" }

    # Load model
    model = AutoAWQForCausalLM.from_pretrained(model_path, **{"low_cpu_mem_usage": True})
    tokenizer = AutoTokenizer.from_pretrained(model_path, trust_remote_code=True)


    # Quantize
    model.quantize(tokenizer, quant_config=quant_config)


    # Save quantized model
    model.save_quantized(quant_path)
    tokenizer.save_pretrained(quant_path)
Bash
#!/bin/bash


python quant_awq.py --model_dir Baichuan2-13B-Chat --output_dir Baichuan2-13B-Chat-Int4
TensorRT-LLM 部署
TensorRT-LLM 是英伟达提出的一个针对大语言模型的推理加速框架,其中融合了像 kernel fusion、KV cache、paged-attention 等方法,支持 in-flight batching,可以实现与 vLLM 相当或者更快的推理速度和更高的吞吐率。
BFloat16
采用如下步骤来部署 TensorRT-LLM 模型。
Step 1. 下载 TensorRT-LLM 的代码,建议使用一个稳定的 tag 版本,并且跟后面使用的 tensorrt_llm backend 的版本相同,这里使用 v.0.7.1 版本。
Bash
#!/bin/bash


git clone git@github.com:NVIDIA/TensorRT-LLM.git
git checkout v0.7.1
# Suggest to create a new branch based on v0.7.1 to keep later commits.
git checkout -b dev-v0.7.1
Step 2. 构建 TensorRT-LLM 容器镜像,并在容器中将 HuggingFace 的 checkpoint 转换为 TensorRT-LLM engine。
Bash
#!/bin/bash


# TensorRT-LLM uses git-lfs, which needs to be installed in advance.
apt-get update && apt-get -y install git git-lfs
git lfs install


git clone https://github.com/NVIDIA/TensorRT-LLM.git
cd TensorRT-LLM
git submodule update --init --recursive
git lfs pull


# Build the docker image.
make -C docker release_build


# Run the docker image.
make -C docker release_run


# Change directory
cd examples/baichuan


# Build TensorRT-LLM engine
python build.py --model_version v2_13b \
                --model_dir=path_to_huggingface_checkpoint \
                --world_size=2 \
                --max_batch_size 16 \
                --dtype bfloat16 \
                --use_inflight_batching \
                --use_gemm_plugin bfloat16 \
                --use_gpt_attention_plugin bfloat16 \
                --paged_kv_cache \
                --output_dir=./tmp/trt_engine_bf16
Step 3. 下载 tensorrt_llm backend 代码,同样切换到 v0.7.1 版本。
Bash
#!/bin/bash


git clone git@github.com:triton-inference-server/tensorrtllm_backend.git
git checkout v0.7.1
# Suggest to create a new branch based on v0.7.1 to keep later commits.
git checkout -b dev-v0.7.1
Step 4. 将 Step 2 构建的 engine 放到对应的目录,并且修改目录中的配置参数。
Bash
#!/bin/bash
# Create the model repository that will be used by the Triton server
cd tensorrtllm_backend
mkdir triton_model_repo
# Copy the example models to the model repository
cp -r all_models/inflight_batcher_llm/* triton_model_repo/
# Copy the TRT engine to triton_model_repo/tensorrt_llm/1/
cp path_to_trt_engine triton_model_repo/tensorrt_llm/1
# Copy the tokenization configurations to a file in all_models
mkdir all_models/Baichuan2-13B-Chat
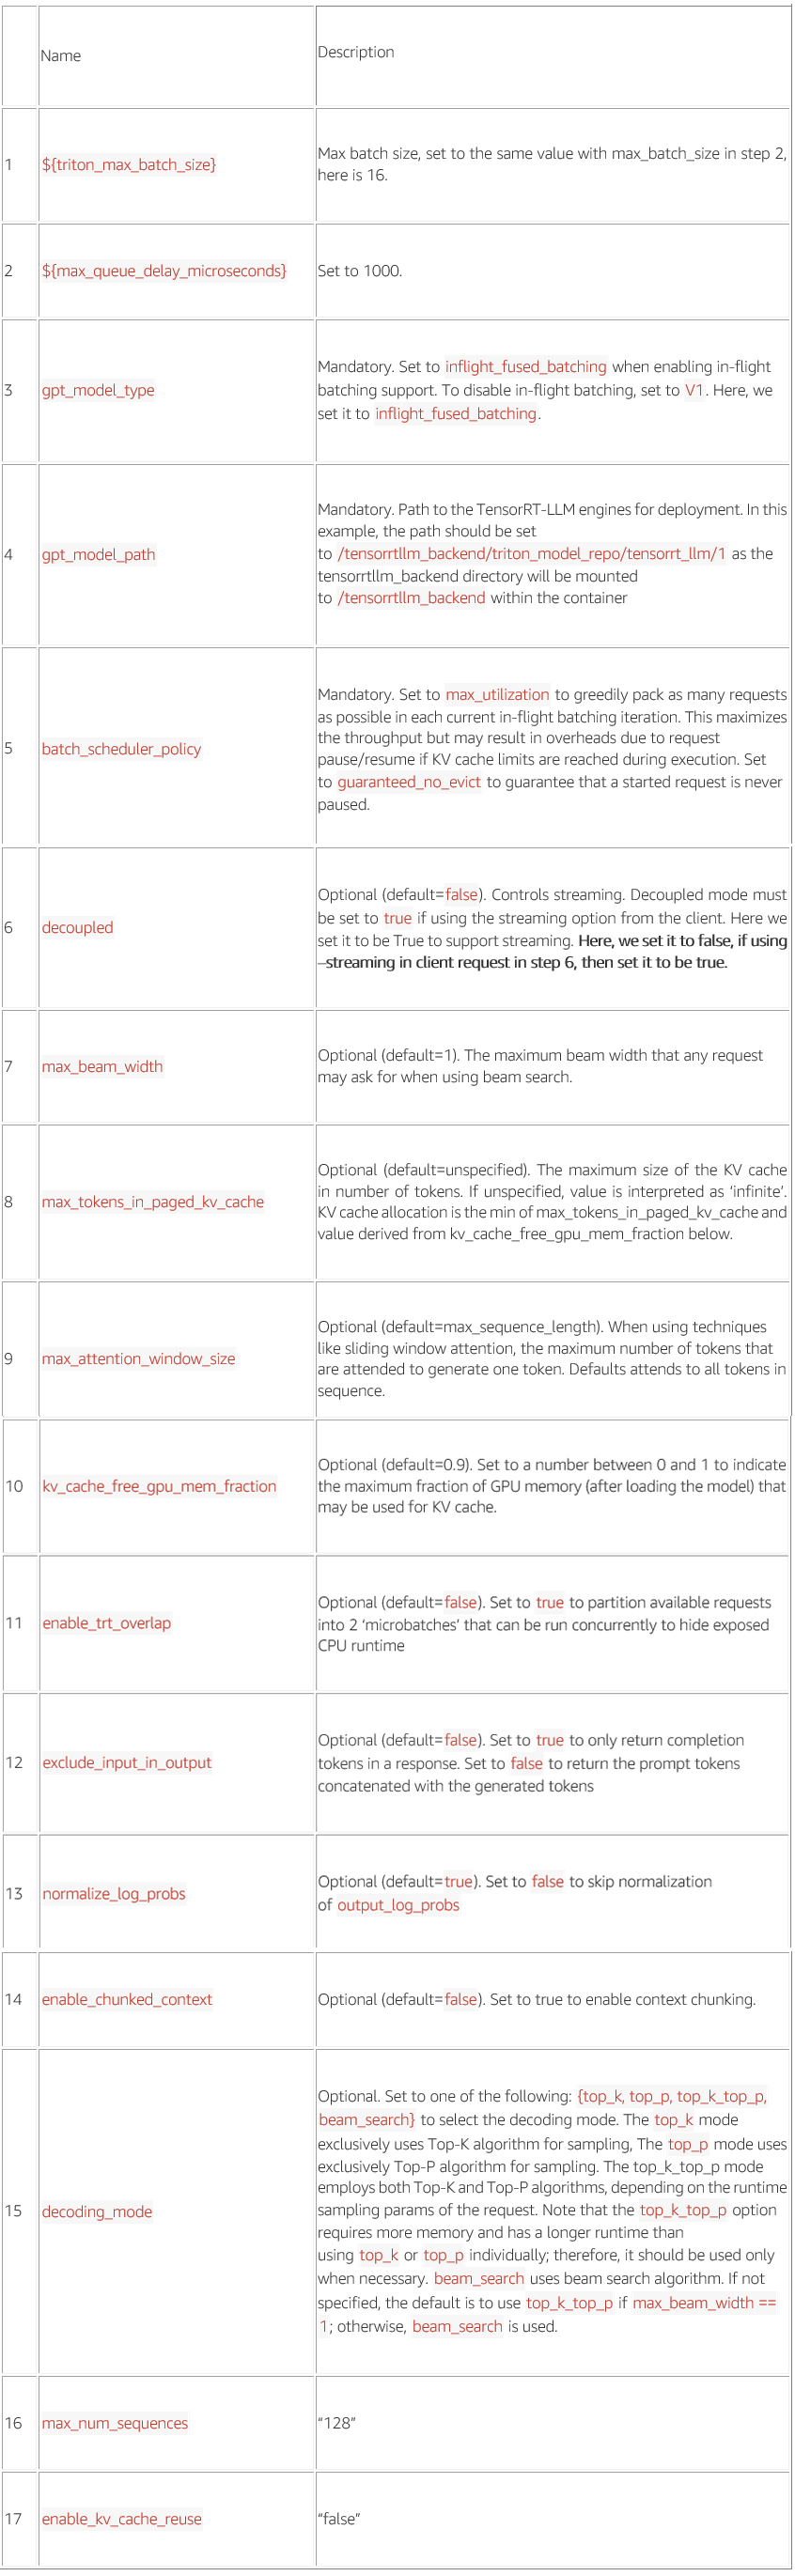
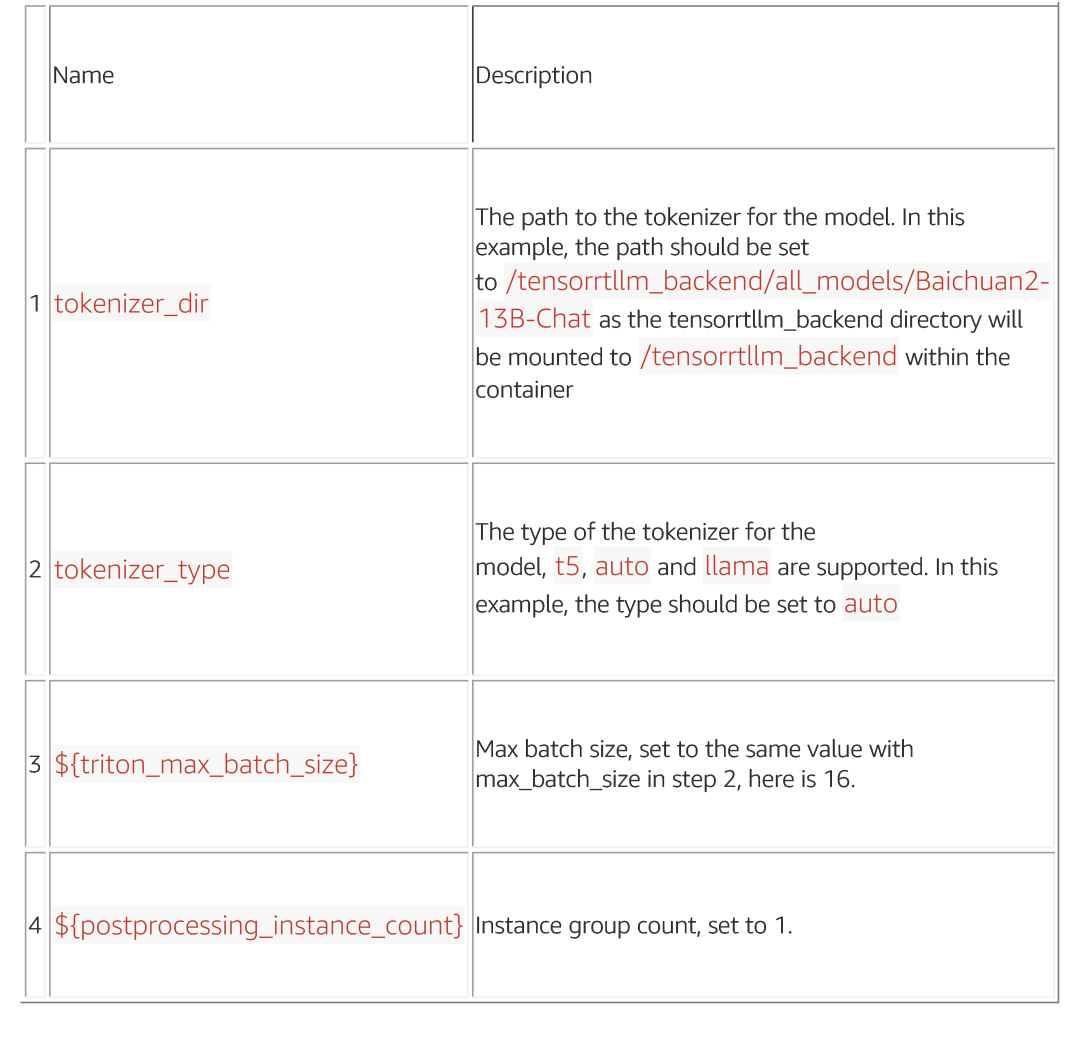
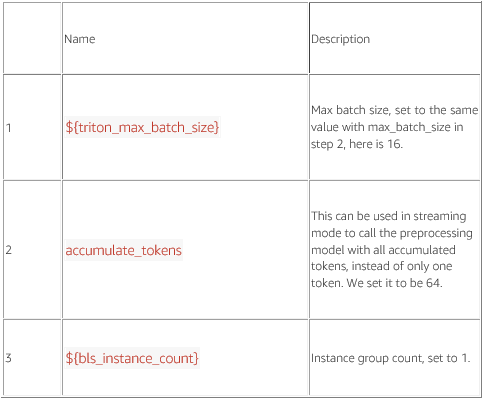
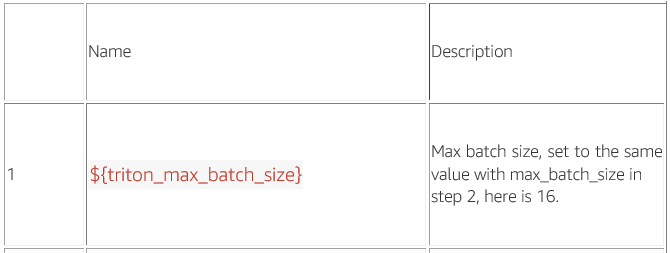
cp path_to_Baichuan2-13B-Chat/token* path_to_Baichuan2-13B-Chat/special_tokens_map.json all_models/Baichuan2-13B-Chat/修改配置参数,注意在下面的配置文件中,所有用${}表示的参数都需要填写值,不能保留${},否者在启动 triton server 服务时会出错。
triton_model_repo/preprocessing/config.pbtxt
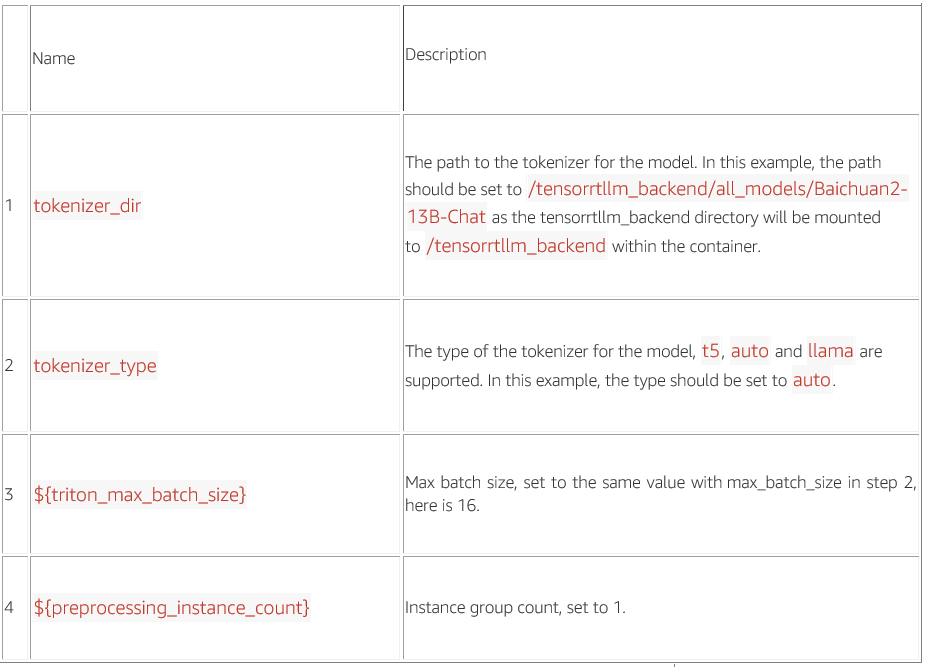
triton_model_repo/tensorrt_llm/config.pbtxt
triton_model_repo/postprocessing/config.pbtxt
triton_model_repo/tensorrt_llm_bls/config.pbtxt
triton_model_repo/ensemble/config.pbtxt
Step 5. 下载并运行 tensorrt_llm backend 的 tritonserver 容器,并在容器中启动 Baichuan2 模型的 triton server。
Bash
#!/bin/bash


# Download the docker image for tritonserver
docker pull nvcr.io/nvidia/tritonserver:24.01-trtllm-python-py3


# Run the docker container
docker run -itd --net host --shm-size=2g --ulimit memlock=-1 --ulimit stack=67108864 --gpus '"device=0, 1"' -v abs_path_to_tensorrtllm_backend:/tensorrtllm_backend nvcr.io/nvidia/tritonserver:24.01-trtllm-python-py3 bash


# To obtain the container_id, run
docker ps


# Get inside the container
docker exec -it container_id bash


# Install necessary packages
pip install sentencepiece
pip install transformers==4.33.1


# Change to the tensorrtllm_backend directory
cd /tensorrtllm_backend


# --world_size is the number of GPUs you want to use for serving
python3 scripts/launch_triton_server.py --world_size=2 --model_repo=/tensorrtllm_backend/triton_model_repo
如果出现如下结果,则说明 triton server 启动成功。
I0227 10:07:40.839677 3454 grpc_server.cc:2519] Started GRPCInferenceService at 0.0.0.0:8001
I0227 10:07:40.839915 3454 http_server.cc:4623] Started HTTPService at 0.0.0.0:8000
I0227 10:07:40.881049 3454 http_server.cc:315] Started Metrics Service at 0.0.0.0:8002
可以通过 curl 命令发送请求测试模型的推理。
Bash
curl -X POST localhost:8000/v2/models/ensemble/generate -d '{"text_input": "你是谁?", "max_tokens": 512, "bad_words": "", "stop_words": "", "end_id": 2}'如果返回如下类似结果,表示服务启动成功。
{"cum_log_probs":0.0,"model_name":"ensemble","model_version":"1","output_log_probs":[0.0,0.0,0.0,0.0,0.0,0.0,0.0,0.0,0.0,0.0,0.0,0.0,0.0,0.0,0.0,0.0,0.0,0.0,0.0,0.0,0.0,0.0,0.0,0.0,0.0,0.0,0.0,0.0,0.0,0.0,0.0,0.0,0.0,0.0,0.0,0.0,0.0,0.0,0.0,0.0,0.0,0.0,0.0,0.0,0.0,0.0,0.0,0.0,0.0,0.0,0.0,0.0],"sequence_end":false,"sequence_id":0,"sequence_start":false,"text_output":"你是谁?\n\n作为一个大语言模型,我叫百川大模型,是由百川智能的工程师们创造,我可以和人类进行自然交流、解答问题、协助创作,帮助大众轻松、普惠的获得世界知识和专业服务。如果你有任何问题,可以随时向我提问"}Step 6. 下载并运行 triton client 容器,在 triton client 容器中测试 triton server 部署的服务。
Bash
#!/bin/bash


# Download triton client docker image
docker pull nvcr.io/nvidia/tritonserver:24.01-py3-sdk


# Run the client docker container
docker run -itd --net host --shm-size=2g --ulimit memlock=-1 --ulimit stack=67108864 --gpus all -v abs_path_to_tensorrtllm_backend:/tensorrtllm_backend nvcr.io/nvidia/tritonserver:24.01-py3-sdk bash


# To obtain the container_id, run
docker ps


# Get inside the container
docker exec -it container_id bash


# Install necessary packages
pip install transformers==4.33.1
pip install sentencepiece


# 切换到/tensorrtllm_backend目录
cd /tensorrtllm_backend


# 测试client及server服务
python inflight_batcher_llm/client/inflight_batcher_llm_client.py --text "你是谁?" --request-output-len 200 --tokenizer-dir /tensorrtllm_backend/all_models/Baichuan2-13B-Chat
如果模型输出以下类似内容,则说明部署成功。
=========
Input sequence: [92067, 68]
Got completed request
Input: 你是谁?
Output beam 0:


作为一个大语言模型,我叫百川大模型,是由百川智能的工程师们创造,我可以和人类进行自然交流、解答问题、协助创作,帮助大众轻松、普惠的获得世界知识和专业服务。如果你有任何问题,可以随时向我提问
Output sequence: [92067, 68, 5, 5, 17823, 92366, 5002, 9528, 65, 45779, 70335, 92366, 9528, 65, 10879, 70335, 3932, 92333, 8832, 92414, 5034, 65, 28756, 92385, 5243, 1697, 2559, 3341, 69, 10474, 1754, 69, 9036, 7356, 65, 2716, 7499, 4892, 69, 24816, 92333, 2693, 2089, 23672, 1940, 1760, 66, 4173, 23181, 1754, 65, 65351, 39975, 14590]
INT8
可以用 TensorRT-LLM 部署量化模型,整体流程与上面相同,只是在上面 Step 2 中采用下面的代码对模型进行 INT8 量化。
Bash
#!/bin/bash


# 使用--use_weight_only对模型的权重进行INT8量化
python build.py --model_version v2_13b \
                 --model_dir=path_to_huggingface_checkpoint \
                 --dtype float16 \
                 --use_inflight_batching \
                 --use_gemm_plugin float16 \
                 --use_gpt_attention_plugin float16 \
                 --paged_kv_cache \
                 --use_weight_only \
                 --output_dir=./tmp/trt_engine_int8
推理性能对比
下面我们对 HuggingFace、vLLM、TensorRT-LLM 这三种部署方式的推理性能做一些对比,由于这三种部署方式支持的量化方法不一样,为了公平起见,我们只对这三种部署方式在 BFloat16 数据格式下的推理性能进行对比,不同方式均使用 2 张 A10G 卡部署 Baichuan2-13B-Chat 模型。
输入 512 token,输出 128 token
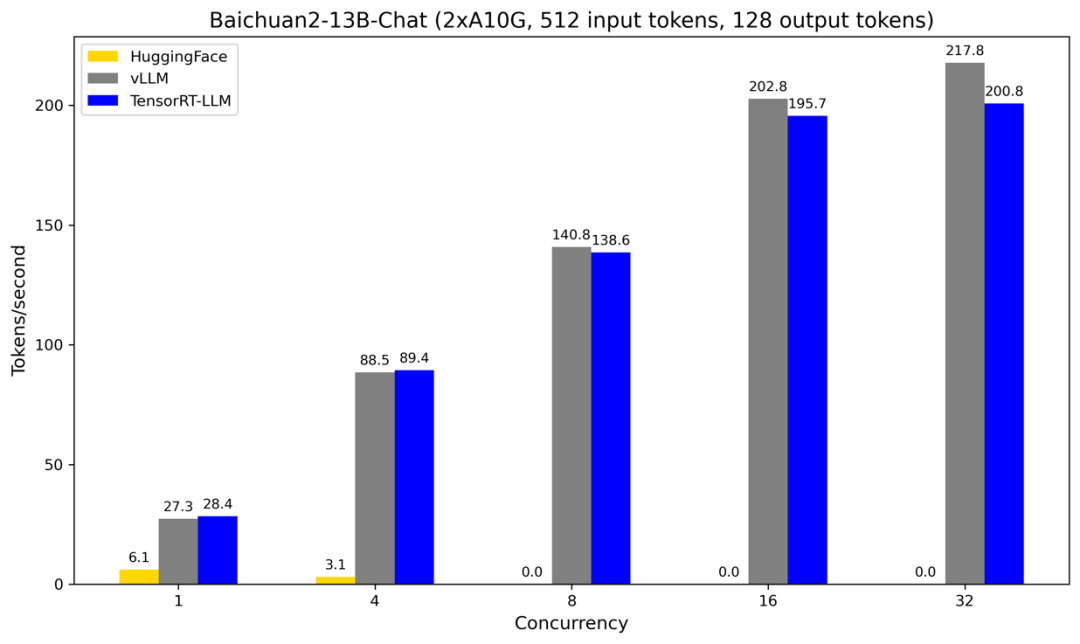
图 1
在图 1 中,HuggingFace 的部署方式之所以在 Concurrency>=8 时的吞吐率为 0 是因为 GPU 缓存已经溢出。从图 1 可以看出 vLLM 和 TensorRT-LLM 部署方式的吞吐率比较接近,并且均远高于 HuggingFace 的部署方式。例如,在 Concurrency=1 时,vLLM 和 TensorRT-LLM 的吞吐率比 HuggingFace 的吞吐率分别提高了 3.48 和 3.66 倍,在 Concurrency=4 时,分别提高了 27.55 和 27.84 倍。在 Concurrency<=4 时,TensorRT-LLM 的吞吐率比 vLLM 的吞吐率略高,而在 Concurrency>=8 时,vLLM 的吞吐率逐渐高于 TensorRT-LLM 的吞吐率,并且差距逐渐拉大。可能的原因是 vLLM 有更好的批量推理管理器,在并发调用量比较高时可以同时处理更多请求。
输入 512 token,输出 256 token
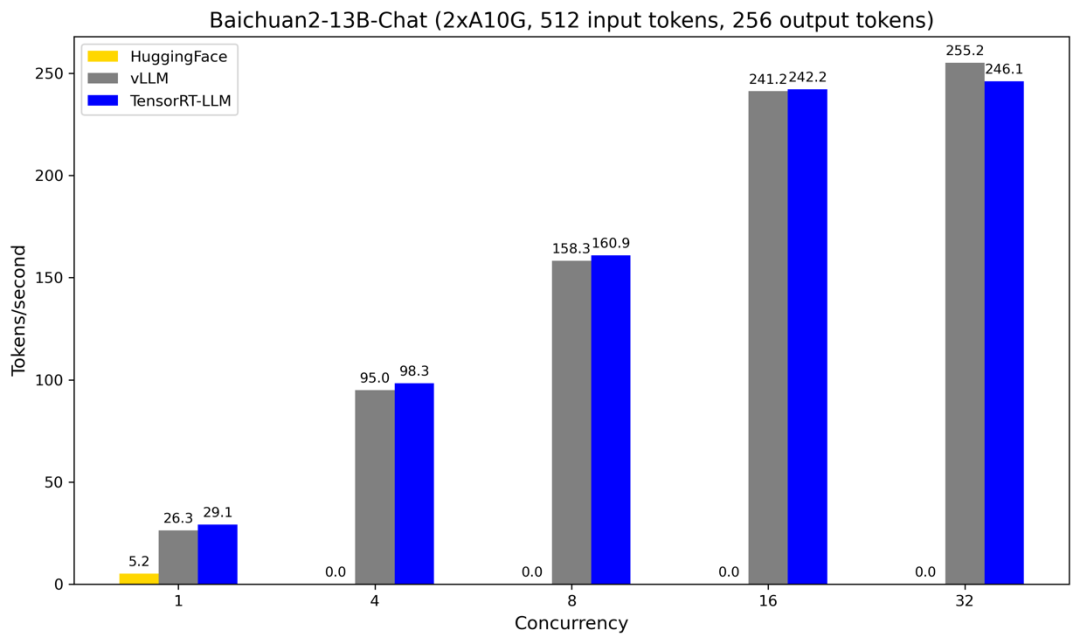
图 2
图 2 的结果与图 1 的结果类似,只是输出长度从 128 token 增加到了 256 token。HuggingFace 在 Concurrency>=4 时吞吐率为 0 同样是因为 GPU 缓存溢出。vLLM 的吞吐率和 TensorRT-LLM 的吞吐率相当,在 Concurrency 比较小时低于 TensorRT-LLM 的吞吐率,但随着 Concurrency 的增加,vLLM 的吞吐率与 TensorRT-LLM 的吞吐率的差距逐渐减小,并且在 Concurrency>=32 时高于 TensorRT-LLM 的吞吐率。
总结
本文主要介绍了 Baichuan2 系列模型的微调和部署方法。在微调部分,我们介绍了两种微调方法:LoRA 微调和全量微调。在部署部分,我们介绍了三类部署方法:HuggingFace 原生的部署方法(BFloat16、INT8)、vLLM 部署方法(BFloat16、INT4),以及 TensorRT-LLM 部署方法(BFloat16、INT8)。希望通过本文的介绍,可以帮助读者对 Baichuan2 系列大模型的微调和部署方式有更深的理解,并且也可以将上面的方法应用到自己的工作实践之中。
系列博客
Amazon SageMaker 上的 Baichuan2 模型微调及部署(一)微调部分:
https://aws.amazon.com/cn/blogs/china/baichuan2-model-fine-tuning-and-deployment-on-amazon-sagemaker-part-one/
参考文献
[1] Efficient Memory Management for Large Language Model Serving with PagedAttention, Woosuk Kwon, Zhuohan Li, Siyuan Zhuang, et al.
[2] https://blog.vllm.ai/2023/06/20/vllm.html
[3] https://github.com/baichuan-inc/Baichuan2/tree/main
[4] https://github.com/vllm-project/vllm
[5] https://github.com/NVIDIA/TensorRT-LLM
[6]https://github.com/triton-inference-server/tensorrtllm_backend
本篇作者
张闯
亚马逊云科技应用科学家,长期从事生成式 AI、自然语言处理、计算机视觉等领域的研究和开发工作。支持 GenAI 实验室项目,在大语言模型、多模态模型、强化学习、智能客服、内容安全等方向有丰富的算法开发以及落地实践经验。

魏亦豪
亚马逊云科技应用科学家,长期从事生成式 AI、自然语言处理、多模态预训练等领域的研究和开发工作。支持 GenAI 实验室项目,在对话系统、智能客服、虚拟陪伴、预训练、多模态模型等方向有丰富的算法开发以及落地实践经验。

蔡天勤
亚马逊云科技应用科学家,长期从事生成式 AI、自然语言处理、多模态预训练等领域的研究和开发工作。支持 GenAI 实验室项目,在广告推荐、搜索排序、预训练、多模态模型等方向有丰富的算法开发以及落地实践经验。

冉晨伟
亚马逊云科技应用科学家,长期从事生成式 AI、自然语言处理、信息检索等领域的研究和开发工作。支持 GenAI 实验室项目,在大语言模型、搜索排序、预训练、多模态模型等方向有丰富的算法开发以及落地实践经验。
王鹤男
亚马逊云科技资深应用科学家,负责数据实验室项目,熟悉计算机视觉、自然语言处理、传统机器学习模型等领域,领导了首汽约车语音降噪、LiveMe 直播场景反欺诈等项目,为企业客户提供云上的人工智能和机器学习赋能。曾任汉迪推荐算法工程师,神州优车集团人工智能实验室负责人等职位。

星标不迷路,开发更极速!
关注后记得星标「亚马逊云开发者」

听说,点完下面4个按钮
就不会碰到bug了!


 9202
9202

 被折叠的 条评论
为什么被折叠?
被折叠的 条评论
为什么被折叠?
 到【灌水乐园】发言


