android开发游记:弹出窗和底部弹出窗的实现和动画效果

安卓自带的弹出窗简直是丑到不能直视,许多应用都是使用自己自定义的弹出窗,这里我总结下弹出窗的实现方法和弹出动画:比如中间渐隐式弹出窗底部弹出式的弹出窗

先上效果图:

这里写图片描述 这里写图片描述

之前看过一篇文章,使用Activity来实现弹出窗的效果,感觉这样做实在太过了,其实只要自己自定义Dialog类就可以了,实现思路也相对简单,也方便进行拓展作出各种动画和效果。

下面说下实现思路:

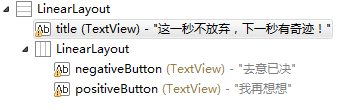
首先,我需要一个弹出窗的界面效果,自己新建一个布局,做出自己想要的样子,如我的:
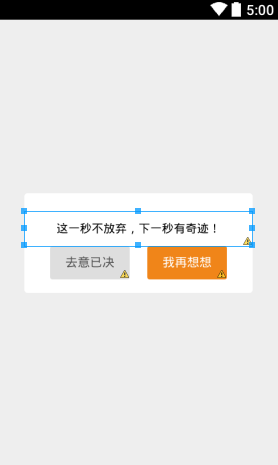
这里写图片描述

自己按照自己思路布局就可以了 
贴上格式和代码:

这里写图片描述

<LinearLayout xmlns:android="http://schemas.android.com/apk/res/android"
    android:layout_width="match_parent"
    android:layout_marginLeft="30dp"
    android:layout_marginRight="30dp"
    android:layout_height="wrap_content"
    android:layout_gravity="center"
    android:background="@drawable/shape_rect_btn_white"
    android:orientation="vertical" >

    <TextView
        android:id="@+id/title"
        android:layout_width="match_parent"
        android:layout_height="40dp"
        android:layout_marginTop="20dp"
        android:gravity="center"
        android:text="这一秒不放弃,下一秒有奇迹!"
        android:textColor="#000000"
        android:layout_weight="1"
        android:textSize="13dp" />

    <LinearLayout
        android:layout_width="match_parent"
        android:layout_height="wrap_content"
        android:layout_marginBottom="15dp"
        android:layout_gravity="bottom"
        android:gravity="center"
        android:layout_weight="1"
        android:orientation="horizontal" >

        <TextView
            android:id="@+id/negativeButton"
            android:layout_width="wrap_content"
            android:layout_height="38dp"
            android:layout_marginRight="20dp"
            android:background="@drawable/shape_rect_btn_off"
            android:gravity="center"
            android:paddingLeft="17dp"
            android:paddingRight="17dp"
            android:text="去意已决"
            android:textColor="#555555"
            android:textSize="14dp" />

        <TextView
            android:id="@+id/positiveButton"
            android:layout_width="wrap_content"
            android:layout_height="38dp"
            android:background="@drawable/shape_rect_btn_orage"
            android:gravity="center"
            android:paddingLeft="17dp"
            android:paddingRight="17dp"
            android:text="我再想想"
            android:textColor="#FFFFFF"
            android:textSize="14dp" />
    </LinearLayout>

</LinearLayout>
   
   
  • 1
  • 2
  • 3
  • 4
  • 5
  • 6
  • 7
  • 8
  • 9
  • 10
  • 11
  • 12
  • 13
  • 14
  • 15
  • 16
  • 17
  • 18
  • 19
  • 20
  • 21
  • 22
  • 23
  • 24
  • 25
  • 26
  • 27
  • 28
  • 29
  • 30
  • 31
  • 32
  • 33
  • 34
  • 35
  • 36
  • 37
  • 38
  • 39
  • 40
  • 41
  • 42
  • 43
  • 44
  • 45
  • 46
  • 47
  • 48
  • 49
  • 50
  • 51
  • 52
  • 53
  • 54
  • 55
  • 56

布局中用了些图片,自己本地没有就随便换个颜色代替吧

然后在style.xml文件中,新增一个弹出窗风格,继承自Theme.Dialog:

    <style name="MyDialog" parent="@android:Theme.Dialog">
        <item name="android:windowFrame">@null</item>
        <item name="android:windowBackground">@drawable/none</item>
        <item name="android:windowNoTitle">true</item>
        <item name="android:windowIsFloating">true</item>
        <item name="android:windowContentOverlay">@null</item>
    </style>
   
   
  • 1
  • 2
  • 3
  • 4
  • 5
  • 6
  • 7

我们重写了其中一些风格,每一行的意思是:没有边框;没有背景色;没有标题;窗口浮动;没有阴影 
我们取消了多少自带的风格,来尽可能实现自定义。这个MyDialog的风格将作为我们自定义风格的父类,我们需要一个消息弹出窗的风格,则再新建一个MsgDialog来继承他:

    <style name="MsgDialog" parent="@style/MyDialog">
    </style>
   
   
  • 1
  • 2

这样我们就有MsgDialog的风格了 
接着我们新建一个java类,继承Dialog为父类,并在构造方法里设置上面定义的MsgDialog为该弹出窗的风格属性:

public class MsgDialog extends Dialog {

    public MsgDialog(Context context){
        super(context,R.style.MsgDialog);
    }
}
   
   
  • 1
  • 2
  • 3
  • 4
  • 5
  • 6

我们接着需要在构造方法里面加入代码把之前的布局设置到这个Dialog上就好了,创建一个初始化方法,在构造方法里调用它:

public class MsgDialog extends Dialog {

    public MsgDialog(Context context){
        super(context,R.style.MsgDialog);
        setMsgDialog();
    }

    private void setMsgDialog() {
        View mView = LayoutInflater.from(getContext()).inflate(R.layout.dialog_msg, null);
        TextView title = (TextView) mView.findViewById(R.id.title);
        TextView positiveButton = (TextView) mView.findViewById(R.id.positiveButton);
        TextView negativeButton = (TextView) mView.findViewById(R.id.negativeButton);
        if(positiveButton!=null) positiveButton.setOnClickListener(listener);
        if(negativeButton!=null) negativeButton.setOnClickListener(listener);
        super.setContentView(mView);
    }
}
   
   
  • 1
  • 2
  • 3
  • 4
  • 5
  • 6
  • 7
  • 8
  • 9
  • 10
  • 11
  • 12
  • 13
  • 14
  • 15
  • 16
  • 17

setMsgDialog里不光设置了视图,同时还设置里监听器,我们这里给了一个默认的实现:点击之后对话框消失。

    private View.OnClickListener listener = new View.OnClickListener() {
        @Override
        public void onClick(View v) {
            MsgDialog.this.dismiss();
        }
    };
   
   
  • 1
  • 2
  • 3
  • 4
  • 5
  • 6

为了符合自定义点击事件,我们需要给出设置监听的公共方法:

    /**
     * 确定键监听器
     * @param listener
     */ 
    public void setOnPositiveListener(View.OnClickListener listener){ 
        positiveButton.setOnClickListener(listener); 
    } 
    /**
     * 取消键监听器
     * @param listener
     */ 
    public void setOnNegativeListener(View.OnClickListener listener){ 
        negativeButton.setOnClickListener(listener); 
    }
   
   
  • 1
  • 2
  • 3
  • 4
  • 5
  • 6
  • 7
  • 8
  • 9
  • 10
  • 11
  • 12
  • 13
  • 14

这里,就可以了,下面在Activity中调用它:

new MsgDialog(this).show();
   
   
  • 1

运行出来,你会发现实际效果和我们布局的效果差太多,宽度和高度都更布局中设置的不一样,为什么呢? 
原来android中对dialog的宽高有严格的控制,为了不让其超出屏幕,所有我们在布局中设置的并不会起效。真正的宽高需要在调用dialog.show()之后调用Window.setAttributes(LayoutParams a)来设置,既然这样,我们就重新我们的dialog的show()方法,使它自适应屏幕的宽高:

    @Override
    public void show() {
        super.show();
        Window dialogWindow = this.getWindow();  
        WindowManager.LayoutParams lp = dialogWindow.getAttributes(); 
        /////////获取屏幕宽度
        DisplayMetrics dm = new DisplayMetrics();
        WindowManager wm = (WindowManager)getContext().getSystemService(Context.WINDOW_SERVICE);;
        wm.getDefaultDisplay().getMetrics(dm);
        int screenWidth = dm.widthPixels;
        /////////设置高宽
        lp.width = (int) (screenWidth * 0.75); // 宽度  
        lp.height = (int) (lp.width*0.65);     // 高度  
        dialogWindow.setAttributes(lp);  
    }
   
   
  • 1
  • 2
  • 3
  • 4
  • 5
  • 6
  • 7
  • 8
  • 9
  • 10
  • 11
  • 12
  • 13
  • 14
  • 15

解释下上面的方法: 
先获取当前设备屏幕的宽度screenWidth 
然后再设置窗口宽度为屏幕宽度的75%:lp.width = (int) (screenWidth * 0.75); 
接着再设置窗口高度为窗口宽度的65%:lp.height = (int) (lp.width * 0.65); 
这样就能构建一个宽高比为 1:0.65 的弹出窗,这个值不是绝对的,可以根据自己需要进行设置

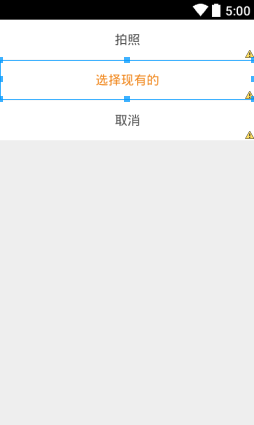
这样弹出窗就完成了,默认的弹出动画是放大并带渐隐效果,同时背景变黑。我们可以自己配置这个动画效果来实现底部弹出窗的风格,这样我们就不能用这个居中的布局了,我们新建一个布局:

这里写图片描述

<LinearLayout xmlns:android="http://schemas.android.com/apk/res/android"
    android:layout_width="match_parent"
    android:layout_height="wrap_content"
    android:gravity="center"
    android:background="@color/white"
    android:orientation="vertical" >

    <TextView
        android:id="@+id/text_pop_identy_camera"
        style="@style/text_big_blank"
        android:layout_width="match_parent"
        android:layout_height="50dp"
        android:background="@drawable/hot_lay_item_dark"
        android:gravity="center"
        android:padding="10dp"
        android:text="拍照" />

    <ImageView
        android:layout_width="match_parent"
        android:layout_height="wrap_content"
        android:src="@drawable/line" />

    <TextView
        android:id="@+id/text_pop_identy_photo"
        style="@style/text_big_orage"
        android:layout_width="match_parent"
        android:layout_height="50dp"
        android:background="@drawable/hot_lay_item_dark"
        android:gravity="center"
        android:padding="10dp"
        android:text="选择现有的" />

    <ImageView
        android:layout_width="match_parent"
        android:layout_height="wrap_content"
        android:src="@drawable/line" />

    <TextView
        android:id="@+id/text_pop_identy_cancel"
        style="@style/text_big_blank"
        android:layout_width="match_parent"
        android:layout_height="50dp"
        android:background="@drawable/hot_lay_item_dark"
        android:gravity="center"
        android:padding="10dp"
        android:text="取消" />

</LinearLayout>
   
   
  • 1
  • 2
  • 3
  • 4
  • 5
  • 6
  • 7
  • 8
  • 9
  • 10
  • 11
  • 12
  • 13
  • 14
  • 15
  • 16
  • 17
  • 18
  • 19
  • 20
  • 21
  • 22
  • 23
  • 24
  • 25
  • 26
  • 27
  • 28
  • 29
  • 30
  • 31
  • 32
  • 33
  • 34
  • 35
  • 36
  • 37
  • 38
  • 39
  • 40
  • 41
  • 42
  • 43
  • 44
  • 45
  • 46
  • 47
  • 48

替换掉原来的布局(布局中使用了一些图片和色彩资源本地没有自行替换)

接着配置弹出和收回动画: 
在anim文件夹下新建2个xml文件:push_bottom_in.xml、push_bottom_out.xml,内容如下:

push_bottom_in.xml

<?xml version="1.0" encoding="utf-8"?>  
<!-- 上下滑入式 -->  
<set xmlns:android="http://schemas.android.com/apk/res/android"
    android:interpolator="@android:anim/decelerate_interpolator" >  
    <translate  
        android:duration="200"  
        android:fromYDelta="100%p"  
        android:toYDelta="0%p" />        
</set>  
    
    
  • 1
  • 2
  • 3
  • 4
  • 5
  • 6
  • 7
  • 8
  • 9

push_bottom_out.xml

<?xml version="1.0" encoding="utf-8"?>
<!-- 上下滑出式 -->
<set xmlns:android="http://schemas.android.com/apk/res/android"
    android:interpolator="@android:anim/accelerate_interpolator" >
    <translate
        android:duration="200"
        android:fromYDelta="0%p"
        android:toYDelta="100%p" />
</set>
    
    
  • 1
  • 2
  • 3
  • 4
  • 5
  • 6
  • 7
  • 8
  • 9

接着在style.xml里配置入场\出场动画,继承自@android:style/Animation:

    <style name="AnimBottom" parent="@android:style/Animation">
        <item name="android:windowEnterAnimation">@anim/push_bottom_in</item>
        <item name="android:windowExitAnimation">@anim/push_bottom_out</item>
    </style>
   
   
  • 1
  • 2
  • 3
  • 4

再新建一个底部弹出窗口的风格PopupDialog,继承自我们之前的弹出窗父风格MyDialog:

    <style name="PopupDialog" parent="@style/MyDialog">
        <item name="android:windowAnimationStyle">@style/AnimBottom</item>
    </style>
   
   
  • 1
  • 2
  • 3

然后在我们继承的Dialog java类中构造函数中设置PopupDialog为该弹出窗的风格就可以了:

    public PopupDialogMedia(Context context){
        super(context,R.style.PopupDialog);
        this.context = context;
        setMsgDialog();
    }
   
   
  • 1
  • 2
  • 3
  • 4
  • 5

底部弹出窗我们就不用重新show()方法了,直接在setMsgDialog()方法中设置其宽度填满、高度自适应就可以了:

    private void setMsgDialog() {
        View mView = LayoutInflater.from(getContext()).inflate(R.layout.dialog_identy_photo, null);
        text_cancel = (TextView) mView.findViewById(R.id.text_pop_identy_cancel);
        text_photo = (TextView) mView.findViewById(R.id.text_pop_identy_photo);
        text_camera = (TextView) mView.findViewById(R.id.text_pop_identy_camera);
        text_cancel.setOnClickListener(listener);
        text_photo.setOnClickListener(listener);
        text_camera.setOnClickListener(listener);


        this.setCanceledOnTouchOutside(true);                 //点击外部关闭窗口

        Window win = this.getWindow();
        win.setGravity(Gravity.BOTTOM);                       //从下方弹出
        win.getDecorView().setPadding(0, 0, 0, 0);
        WindowManager.LayoutParams lp = win.getAttributes();
        lp.width = WindowManager.LayoutParams.MATCH_PARENT;   //宽度填满
        lp.height = WindowManager.LayoutParams.WRAP_CONTENT;  //高度自适应
        win.setAttributes(lp);

        super.setContentView(mView);
    }
   
   
  • 1
  • 2
  • 3
  • 4
  • 5
  • 6
  • 7
  • 8
  • 9
  • 10
  • 11
  • 12
  • 13
  • 14
  • 15
  • 16
  • 17
  • 18
  • 19
  • 20
  • 21
  • 22

这样底部弹出效果就完成了。


  • 0
    点赞
  • 3
    收藏
    觉得还不错? 一键收藏
  • 0
    评论
评论
添加红包

请填写红包祝福语或标题

红包个数最小为10个

红包金额最低5元

当前余额3.43前往充值 >
需支付:10.00
成就一亿技术人!
领取后你会自动成为博主和红包主的粉丝 规则
hope_wisdom
发出的红包
实付
使用余额支付
点击重新获取
扫码支付
钱包余额 0

抵扣说明:

1.余额是钱包充值的虚拟货币,按照1:1的比例进行支付金额的抵扣。
2.余额无法直接购买下载,可以购买VIP、付费专栏及课程。

余额充值