


FastDFS(分布式文件系统)
纯C实现,支持Linux、FreeBSD等UNIX系统– 类google FS,不是通用的文件系统,只能通过专有API访问,目前提供了C、Java和PHP API– 为互联网应用量身定做,解决大容量文件存储
问题,追求高性能和高扩展性– FastDFS可以看做是基于文件的key value pair存储系统,称作分布式文件存储服务更为合适
FastDFS提供的功能
• upload:上传普通文件,包括主文件
• upload_appender:上传appender文件,后续可以对其进行append操作
• upload_slave:上传从文件
• download:下载文件
• delete:删除文件
• append:在已有文件后追加内容
• set_metadata:设置文件附加属性
• get_metadata:获取文件附加属性
FastDFS的特点
• 分组存储,灵活简洁
• 对等结构,不存在单点
• 文件ID由FastDFS生成,作为文件访问凭证。FastDFS不需要传统的name server
• 和流行的web server无缝衔接,FastDFS已提供apache和nginx扩展模块
• 大、中、小文件均可以很好支持,支持海量小文件存储
• 支持多块磁盘,支持单盘数据恢复
• 支持相同文件内容只保存一份,节省存储空间
• 存储服务器上可以保存文件附加属性
• 下载文件支持多线程方式,支持断点续传
架构示意图、文件上传流程、文件下载流程


文件上传流程:
客户端上传文件后存储服务器将文件ID返回给客户端,此文件ID用于以后访问该文件的索引信息。文件索引信息包括:组名,虚拟磁盘路径,数据两级目录,文件名。

- 组名:文件上传后所在的storage组名称,在文件上传成功后有storage服务器返回,需要客户端自行保存。
- 虚拟磁盘路径:storage配置的虚拟路径,与磁盘选项store_path*对应。如果配置了store_path0则是M00,如果配置了store_path1则是M01,以此类推。
- 数据两级目录:storage服务器在每个虚拟磁盘路径下创建的两级目录,用于存储数据文件。
- 文件名:与文件上传时不同。是由存储服务器根据特定信息生成,文件名包含:源存储服务器IP地址、文件创建时间戳、文件大小、随机数和文件拓展名等信息。
文件下载流程:

图片服务器的搭建
搭建的图片服务器的架构

下载FastDFS
tracker和storage使用相同的安装包,下载地址:FastDFS download | SourceForge.net 或https://github.com/happyfish100/FastDFS(推荐)
本教程下载:FastDFS_v5.05.tar.gz

安装环境
CentOS6.4 32位
需要gcc的编译环境
需要libevent的包。
yum -y install libevent安装步骤
Tracker的安装
第一步:把源码包上传到linux系统。
第二步:解压缩libfastcommonV1.0.7.tar.gz包。
第三步:进入/root/libfastcommon-1.0.7文件夹执行./**make.sh、****./**make.sh install
第四步:把/usr/lib64/libfastcommon.so文件向/usr/lib文件夹下复制一份。
第五步:把FastDFS_v5.05.tar.gz解压缩。
第六步:进入/root/FastDFS目录执行:
./make.sh、./make.sh install第七步:配置trackerServer。
- 把/root/FastDFS/conf目录下的所有的文件复制到/etc/fdfs目录下。
- 编辑/etc/fdfs/tracker.conf

第八步:启动tracker服务
/usr/bin/fdfs_trackerd /etc/fdfs/tracker.conf restartStorage服务的安装
如果storage和tracker不在同一台服务上需要重复执行3.5.4.1Tracker的安装的第一步到第六步。
配置Storage服务:
需要修改/etc/fdfs/storage.conf文件。
vim /etc/profile/storage.conf
启动服务:
/usr/bin/fdfs_storaged /etc/fdfs/storage.conf测试上传服务
可以使用fdfs_test测试上传。
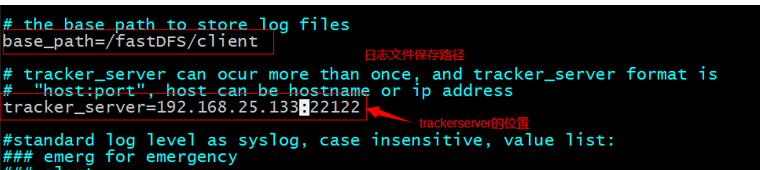
第一步:修改客户端的配置文件。
vim /etc/fdfs/client.conf
第二步:上传文件。
/usr/bin/fdfs_test client.conf upload anti-steal.jpg
访问图片
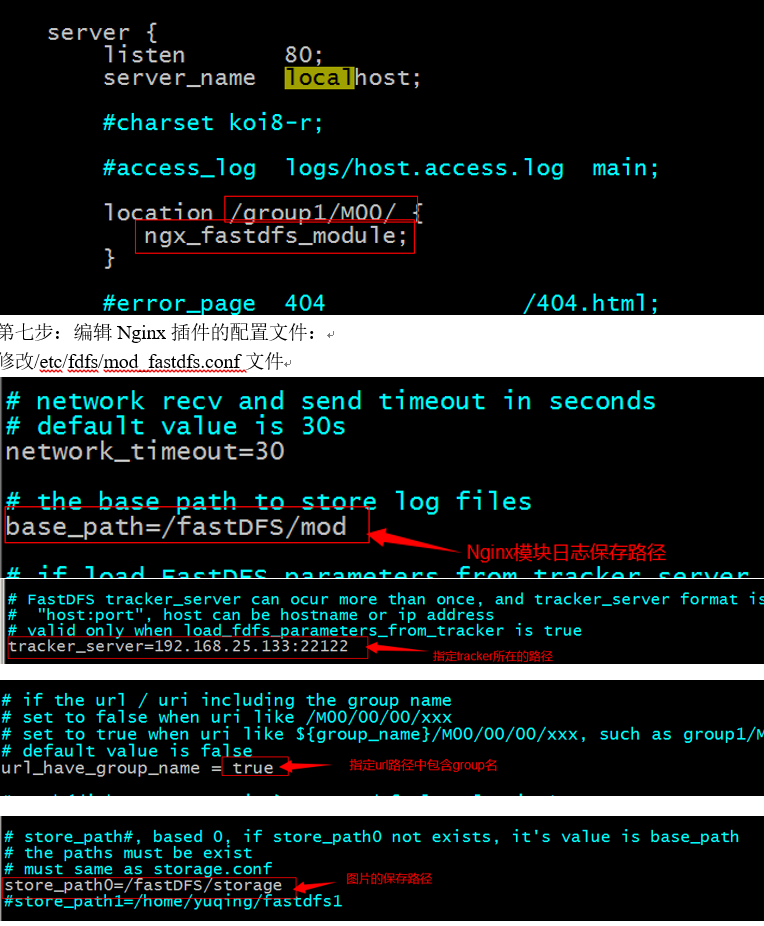
使用FastDFS的Nginx插件和Nginx配合,实现图片的访问。Nginx需要安装到storage服务所在的服务器。
需要使用fastdfs-nginx-module_v1.16.tar.gz
安装步骤:
第一步:把插件包解压缩。fastdfs-nginx-module_v1.16.tar.gz
第二步:编辑/root/fastdfs-nginx-module/src/config文件。
删除其中的local字样。

第三步:把/root/fastdfs-nginx-module/src/mod_fastdfs.conf文件复制到/etc/fdfs目录下。
第四步:把/usr/lib64/libfdfsclient.so文件复制到/usr/lib目录下
第五步:编译Nginx
对Nginx进行config:
./configure \
--prefix=/usr/local/nginx \
--pid-path=/var/run/nginx/nginx.pid \
--lock-path=/var/lock/nginx.lock \
--error-log-path=/var/log/nginx/error.log \
--http-log-path=/var/log/nginx/access.log \
--with-http_gzip_static_module \
--http-client-body-temp-path=/var/temp/nginx/client \
--http-proxy-temp-path=/var/temp/nginx/proxy \
--http-fastcgi-temp-path=/var/temp/nginx/fastcgi \
--http-uwsgi-temp-path=/var/temp/nginx/uwsgi \
--http-scgi-temp-path=/var/temp/nginx/scgi \
--add-module=/usr/java/fastdfs/fastdfs-nginx-module/src
配置Nginx
启动:
tracker
/usr/bin/fdfs_trackerd /etc/fdfs/tracker.conf restart
启动的日志显示先停止5619进程(实际环境不是5619)再启动,如下图:

注意:如果没有显示上图要注意是否正常停止原有进程。
设置开机自动启动。
vim /etc/rc.d/rc.local
将运行命令行添加进文件:
/usr/bin/fdfs_trackerd /etc/fdfs/tracker.conf restart
storage
/usr/bin/fdfs_storaged /etc/fdfs/storage.conf restart
启动的日志显示先停止8931进程(实际环境不是8931)再启动,如下图:

注意:如果没有显示上图要注意是否正常停止原有进程。
设置开机自动启动 vim /etc/rc.d/rc.local
将运行命令行添加进文件:
/usr/bin/fdfs_storaged /etc/fdfs/storage.conf restart
配置文件内容和启动Nginx
server{

  listen       80;

        server_name  localhost;

        location /group1/M00/ {

        fastdfs-nginx-module;

        }

}

server{

  listen       80;

        server_name  localhost;

        location / {

            proxy_pass [http://server_ls](http://server_ls/);

            index  index.html index.htm;

        }

    }

upstream server_lb{

    server 127.0.0.1:8080;

}


server{

        listen       81;

        server_name  localhost;

        location /image/ {

            root   /usr/images;

}

server {

        listen       80;

        server_name   [http://server_lb](http://server_lb/);

        location / {

            proxy_pass [http://server_lb](http://server_lb/);

            index  index.html index.htm;

        }

}
使用java客户端上传图片
@Service
public class PictureService {

     @Value("${IMAGE_SERVER_URL}")

     **private** String ImageServerURL;

     **public**Map uploadFile(MultipartFile uploadFile) {

         //在此实现图片上传

         **try** {

              FastDFSClient client = **new** FastDFSClient("classpath:resource/client.conf");

              //取图片的原始名称

              String filename = uploadFile.getOriginalFilename();

              //取扩展名

              String ext = filename.substring(filename.lastIndexOf(".") + 1);

              String url = client.uploadFile(uploadFile.getBytes(), ext);

              //拼接url

              url = ImageServerURL + url;

              //返回Map数据

              Mapresult = **new** HashMap<>();

              result.put("error", 0);

              result.put("url", url);

              **return**result;

         } **catch** (Exception e) {

              e.printStackTrace();

              //返回Map数据

              Mapresult = **new** HashMap<>();

              result.put("error", 1);

              result.put("message", "上传失败");


              **return**result;

         }

     }

}
安装FastDFSjava客户端

把工程导入到workspace中,然后maven install

linux 安装FastDFS实现分布式文件服务器
上传图片
开发步骤:
第一步:在pom文件中添加jar包的依赖。
第二步:创建一个测试类。
第三步:创建一个上传文件使用的配置文件。需要知道trackerServer的位置。
第四步:加载配置文件。
第五步:创建一个TrackerClient对象,直接new。
第六步:通过TrackerClient对象获得一个TrackerServer对象。
第七步:创建一个StorageServer的引用。Null
第八步:创建StorageClient对象
第九步:使用StorageClient对象上传文件
配置文件的内容:
tracker_server=192.168.25.133:22122代码实现:
publicclass TestFastDFS {
@Test

 **publicvoid** testUpload() **throws** Exception {

     // 第一步:在pom文件中添加jar包的依赖。

     // 第二步:创建一个测试类。

     // 第三步:创建一个上传文件使用的配置文件。需要知道trackerServer的位置。

     // 第四步:加载配置文件。

     ClientGlobal.*init*("D:/workspaces/web/src/main/resources/resource/client.conf");

     // 第五步:创建一个TrackerClient对象,直接new。

     TrackerClient trackerClient = **new** TrackerClient();

     // 第六步:通过TrackerClient对象获得一个TrackerServer对象。

     TrackerServer trackerServer = trackerClient.getConnection();

     // 第七步:创建一个StorageServer的引用。Null

     StorageServer storageServer = **null**;

     // 第八步:创建StorageClient对象

     StorageClient storageClient = **new** StorageClient(trackerServer, storageServer);

     // 第九步:使用StorageClient对象上传文件

     String[] strings = storageClient.upload\_appender\_file("D:/Documents/Pictures/images/2f2eb938943d.jpg", "jpg", **null**);

     **for** (String string : strings) {

          System.***out***.println(string);

     }

     trackerServer.close();

 }
}
使用封装的工具类上传 FastDFSClient
package com.liwei.controller.utils;
import org.csource.common.NameValuePair;
import org.csource.fastdfs.ClientGlobal;
import org.csource.fastdfs.StorageClient1;
import org.csource.fastdfs.StorageServer;
import org.csource.fastdfs.TrackerClient;
import org.csource.fastdfs.TrackerServer;
public class FastDFSClient {

    private TrackerClient trackerClient = null;

    private TrackerServer trackerServer = null;

    private StorageServer storageServer = null;

    private StorageClient1 storageClient = null;

    public FastDFSClient(String conf) throws Exception {

        if (conf.contains("classpath:")) {

            conf = conf.replace("classpath:", this.getClass().getResource("/").getPath());

        }

        ClientGlobal.init(conf);

        trackerClient = new TrackerClient();

        trackerServer = trackerClient.getConnection();

        storageServer = null;

        storageClient = new StorageClient1(trackerServer, storageServer);

    }

    **

     * 上传文件方法

     * <p>Title: uploadFile</p>

     * <p>Description: </p>

     * @param fileName 文件全路径

     * @param extName 文件扩展名,不包含(.)

     * @param metas 文件扩展信息

     * @return

     * @throws Exception

     */

    public String uploadFile(String fileName, String extName, NameValuePair[] metas) throws Exception {

        String result = storageClient.upload\_file1(fileName, extName, metas);

        return result;

    }

    public String uploadFile(String fileName) throws Exception {

        return uploadFile(fileName, null, null);

    }

    public String uploadFile(String fileName, String extName) throws Exception {

        return uploadFile(fileName, extName, null);

    }

  /**

     * 上传文件方法

     * <p>Title: uploadFile</p>

     * <p>Description: </p>

     * @param fileContent 文件的内容,字节数组

     * @param extName 文件扩展名

     * @param metas 文件扩展信息

     * @return

     * @throws Exception

     */

    public String uploadFile(byte[] fileContent, String extName, NameValuePair[] metas) throws Exception {

        String result = storageClient.upload\_file1(fileContent, extName, metas);

        return result;

    }

    public String uploadFile(byte[] fileContent) throws Exception {

        return uploadFile(fileContent, null, null);

    }

    public String uploadFile(byte[] fileContent, String extName) throws Exception {

        return uploadFile(fileContent, extName, null);

    }

}

@Test

     **publicvoid** testUtilUpload() **throws** Exception {

         FastDFSClient client = **new** FastDFSClient("D:/workspaces/web/src/main/resources/resource/client.conf");

         String string = client.uploadFile("D:/Documents/Pictures/images/2010051018445059.jpg", "jpg", **null**);

         System.***out***.println(string);

     }


 575
575

 被折叠的 条评论
为什么被折叠?
被折叠的 条评论
为什么被折叠?
 到【灌水乐园】发言


