


Installation - The Rust Programming Language https://doc.rust-lang.org/book/ch01-01-installation.html
一 安装
安装了几个组件
curl --proto '=https' https://sh.rustup.rs -sSf | sh
info: profile set to 'default'
info: default host triple is x86_64-unknown-linux-gnu
info: syncing channel updates for 'stable-x86_64-unknown-linux-gnu'
info: latest update on 2022-09-22, rust version 1.64.0 (a55dd71d5 2022-09-19)
info: downloading component 'cargo'
info: downloading component 'clippy'
info: downloading component 'rust-docs'
 18.8 MiB /  18.8 MiB (100 %)   9.8 MiB/s in  2s ETA:  0s
info: downloading component 'rust-std'
 27.4 MiB /  27.4 MiB (100 %)   9.7 MiB/s in  3s ETA:  0s
info: downloading component 'rustc'
 54.2 MiB /  54.2 MiB (100 %)   9.7 MiB/s in  6s ETA:  0s
info: downloading component 'rustfmt'
info: installing component 'cargo'
info: installing component 'clippy'
info: installing component 'rust-docs'
 18.8 MiB /  18.8 MiB (100 %)   6.1 MiB/s in  2s ETA:  0s
info: installing component 'rust-std'
 27.4 MiB /  27.4 MiB (100 %)   8.7 MiB/s in  3s ETA:  0s
info: installing component 'rustc'
 54.2 MiB /  54.2 MiB (100 %)   9.7 MiB/s in  6s ETA:  0s
info: installing component 'rustfmt'
info: default toolchain set to 'stable-x86_64-unknown-linux-gnu'

  stable-x86_64-unknown-linux-gnu installed - rustc 1.64.0 (a55dd71d5 2022-09-19)


Rust is installed now. Great!

To get started you may need to restart your current shell.
This would reload your PATH environment variable to include
Cargo's bin directory ($HOME/.cargo/bin).

To configure your current shell, run:
source "$HOME/.cargo/env"
后面加上!是宏的调用。
Second, println! calls a Rust macro. If it had called a function instead, it would be entered as println (without the !). We’ll discuss Rust macros in more detail in Chapter 19. For now, you just need to know that using a ! means that you’re calling a macro instead of a normal function, and that macros don’t always follow the same rules as functions.
几个命令
$cargo build (编译成二进制) cargo build --release (优化编译,在最终交付/benchmark时可以加该选项)
[josephus.ftt@ /home/josephus.ftt/rust-lang/projects/hello_cargo]
$md5sum target/release/hello_cargo
56907fd015c9ae20f93d4f2176a3607d  target/release/hello_cargo

[josephus.ftt@ /home/josephus.ftt/rust-lang/projects/hello_cargo]
$md5sum target/debug/hello_cargo
6c4f3afea08af6c9dd6f6ef5dec5100b  target/debug/hello_cargo
$cargo run (编译后运行)
$cargo check (只尝试编译但不真正编译,减少浪费在编译上的开发时间)
In Rust, variables are immutable by default, meaning once we give the variable a value, the value won't change.
第一个gusse game :
use std::io;
use rand::Rng;
use std::cmp::Ordering;


fn main() {
    println!("Guess the number!");

    let secret_number = rand::thread_rng().gen_range(1..=100);

    //println!("The secret number is: {secret_number}");

    loop {

        println!("Please input your guess.");

        let mut guess = String::new();

        io::stdin()
            .read_line(&mut guess)
            .expect("Failt to real line");

        let guess: u32 = match guess.trim().parse() {
            Ok(num) => num,
            Err(_) => continue,

        };

        println!("You guessed: {guess}");

        match guess.cmp(&secret_number) {
            Ordering::Less => println!("Too small!"),
            Ordering::Greater => println!("Too big!"),
            Ordering::Equal => {
                println!("You win!");
                break;
            }

        }
    }
}

~
chapter3
变量的默认不可变:
fn main() {
    let x = 5;
    println!("The value of x is: {x}");
    x = 6;
    println!("The value of x is: {x}");
}
~
编译会报错,如果要让他可变,可以加mut
fn main() {
    let mut x = 5;
    println!("The value of x is: {x}");
    x = 6;
    println!("The value of x is: {x}");
}
~
shadowing: 注意和shadow的区别:
fn main() {
    let x = 5;

    let x = x + 1;

    {
        let x = x * 2;
        println!("The value of x in the inner scope is: {x}");
    }

    println!("The value of x is: {x}");
}
let将之前的变量重新定义了,只不过用了一个相同的名字(这其实已经不是同一个变量了,而是两个变量,只不过两个变量前后名字一样)。 let关键字会重新定义一个变量。
这样的好处是可以节省一些变量的定义。
let space = " ";
let space = space.len();
println!("Space is: {space}");
就不用再定义一个 let space_len这个变量了。
另外如果是:
    let mut space =  "    ";
    space = space.len();
    println!("Space is: {space}");
这样就不合法了,因为都是一个变量,而他们前后的格式会不一致了。
very value in Rust is of a certain data type, which tells Rust what kind of data is being specified so it knows how to work with that data. We’ll look at two data type subsets: scalar and compound.
rust是静态类型语言,必须在编译时候就要明确知道每个变量的类型:
Keep in mind that Rust is a statically typed language, which means that it must know the types of all variables at compile time.
rust里面有tuple和array
tuples have a fixed length: once declared, they cannot grow or shrink in size.
    let tup:(i32, f64,u8) = (500, 6.4,1);

    let (x,y,z) = tup;

    println!("The value of y is {y}");
We can also access a tuple element directly by using a period (.) followed by the index of the value we want to access. For example:
fn main() {
    let x: (i32, f64, u8) = (500, 6.4, 1);

    let five_hundred = x.0;

    let six_point_four = x.1;

    let one = x.2;
}
这样five_hundred赋值为tuple里面的第0个元素,以此类推。
Unlike a tuple, every element of an array must have the same type. Unlike arrays in some other languages, arrays in Rust have a fixed length.
fn main() {
    let a = [1, 2, 3, 4, 5];
}
Arrays are useful when you want your data allocated on the stack rather than the heap (we will discuss the stack and the heap more in Chapter 4) or when you want to ensure you always have a fixed number of elements
如果只是在栈上使用,array就很有帮助了。
function:
In function signatures, you must declare the type of each parameter. This is a deliberate decision in Rust’s design: requiring type annotations in function definitions means the compiler almost never needs you to use them elsewhere in the code to figure out what type you mean. The compiler is also able to give more helpful error messages if it knows what types the function expects.
在rust中区分statments和expression是重要的,statments不会返回值,而expression会返回值。
特殊地,如果将expression后面加上一个';',就让其变为了statments。
在函数中,最后一个没有;就是返回值:
fn main() {
    let x = plus_one(5);

    println!("The value of x is: {x}");
}

fn plus_one(x: i32) -> i32 {
    x + 1       //没有;号
}
flow control
fn main() {
    let condition = true;

    let number = if condition { 5 } else { "six" };

    println!("The value of number is: {number}");
}
这个为什么不行,为啥会报错:因为rust是静态类型域名,需要在编译时候就知道变量的类型,但这里 在编译时候其实对number的类型是一个运行时才能判断的类型,所以会报错了。只有在compile期间就知道了类型,那么也就能够判断在其他使用该变量的地方是否是OK的,这样就增加了程序的健壮性。
his won’t work because variables must have a single type, and Rust needs to know at compile time what type the number variable is, definitively. Knowing the type of number lets the compiler verify the type is valid everywhere we use number. Rust wouldn’t be able to do that if the type of number was only determined at runtime; the compiler would be more complex and would make fewer guarantees about the code if it had to keep track of multiple hypothetical types for any variable.
换言之,如果只能在运行时才能判断出变量类型 那对代码的健壮性就大打折扣了。而且还要在运行时对任何变量的类型都要进行跟踪。
循环:
The safety and conciseness of for loops make them the most commonly used loop construct in Rust. Even in situations in which you want to run some code a certain number of times, as in the countdown example that used a while loop in Listing 3-3, most Rustaceans would use a for loop. The way to do that would be to use a Range, provided by the standard library, which generates all numbers in sequence starting from one number and ending before another number.
for循环比较安全是最常见的选择:
chatper 4
Ownership is Rust’s most unique feature and has deep implications for the rest of the language. It enables Rust to make memory safety guarantees without needing a garbage collector, so it’s important to understand how ownership works. In this chapter, we’ll talk about ownership as well as several related features: borrowing, slices, and how Rust lays data out in memory.
Ownership is a set of rules that governs how a Rust program manages memory. All programs have to manage the way they use a computer’s memory while running. Some languages have garbage collection that regularly looks for no-longer used memory as the program runs; in other languages, the programmer must explicitly allocate and free the memory. Rust uses a third approach: memory is managed through a system of ownership with a set of rules that the compiler checks. If any of the rules are violated, the program won’t compile. None of the features of ownership will slow down your program while it’s running.
All data stored on the stack must have a known, fixed size. Data with an unknown size at compile time or a size that might change must be stored on the heap instead.
ownership其实就是管理堆上的内存分配问题
keeping track of what parts of code are using what data on the heap, minimizing the amout of duplicate data on the heap, and cleaning up unsed data on the heap so you don't run out of space are all problems that ownership address.
Once you understand onwnership, you wont' need to think about the stack and the heap very often, but knowing that the main purpose of wonership is to manage heap data canl help explain why it works the way it does.
Rust takes a different path: the memory is automatically returned once the variable that owns it goes out of scope.
when a variable goes out of scope, Rust automatically calls the drop function and cleans up the heap memory for that variable. [ownership是针对heap空间】


To ensure memory safety, after the line let s2 = s1, Rust considers s1 as no longer valid. Therefore, Rust doesn’t need to free anything when s1 goes out of scope. Check out what happens when you try to use s1 after s2 is created; it won’t work:
这里注意了,s1此时就用不了了。。
所有默认的copy都是浅copy(rust里面叫做move)
we would say that s1 was moved into s2
所以对于rust而言,这种分配在堆上的空间在任何时刻只能有一个对它的指向(全局),当这个指向被回收时(一般是在stack上,函数退出stack自动回收),跟随的这个heap空间就被自动回收掉。 【否则多个指向都存在就无法做到这点了】
这里很好懂的就是,这种“变长类型”是浅copy, 而这种:
由于在编译期间就已经知道了size,所以变量都是分配在栈(stack)上,所以不会存在有move情况。The reason is that types such as integers that have a known size at compile time are stored entirely on the stack, so copies of the actual values are quick to make. That means there’s no reason we would want to prevent x from being valid after we create the variable y. In other words, there’s no difference between deep and shallow copying here, so calling clone wouldn’t do anything different from the usual shallow copying and we can leave it out.
另外,如果要针对string等类型进行deepcopy,其实有clone可以使用:

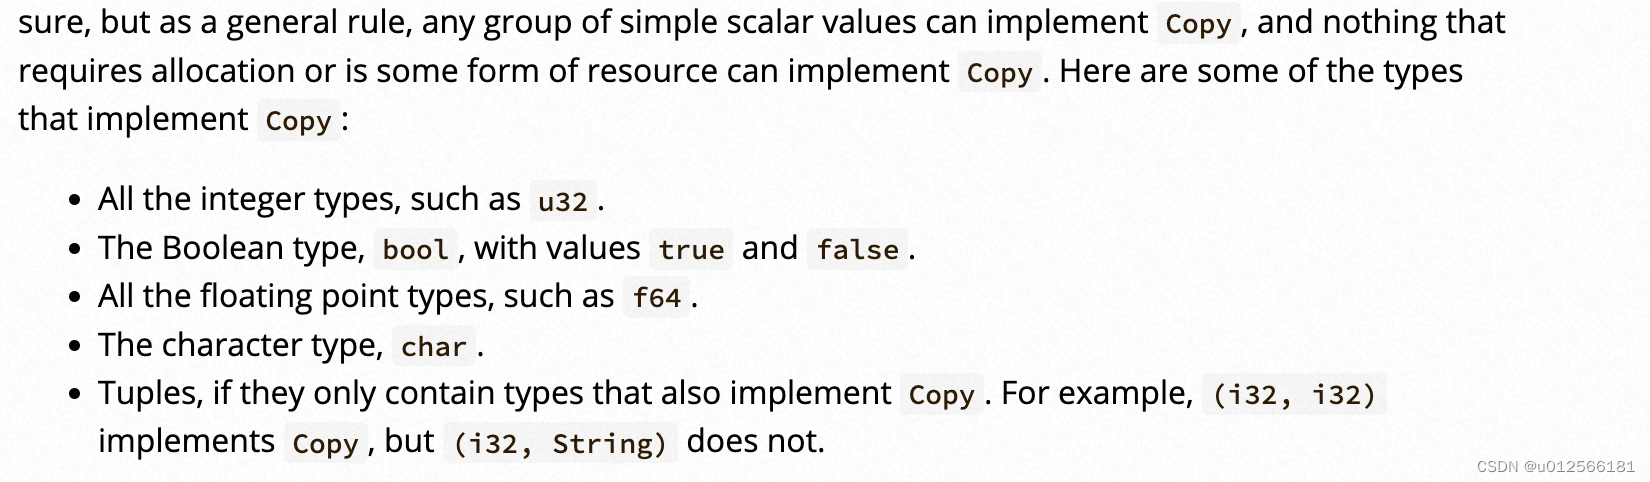
对于一些fixsize的类型,他们的复制其实是deepcopy:,在rust里面也称为copy(区别于move)
在函数调用中,这种ownership的流转非常常见:
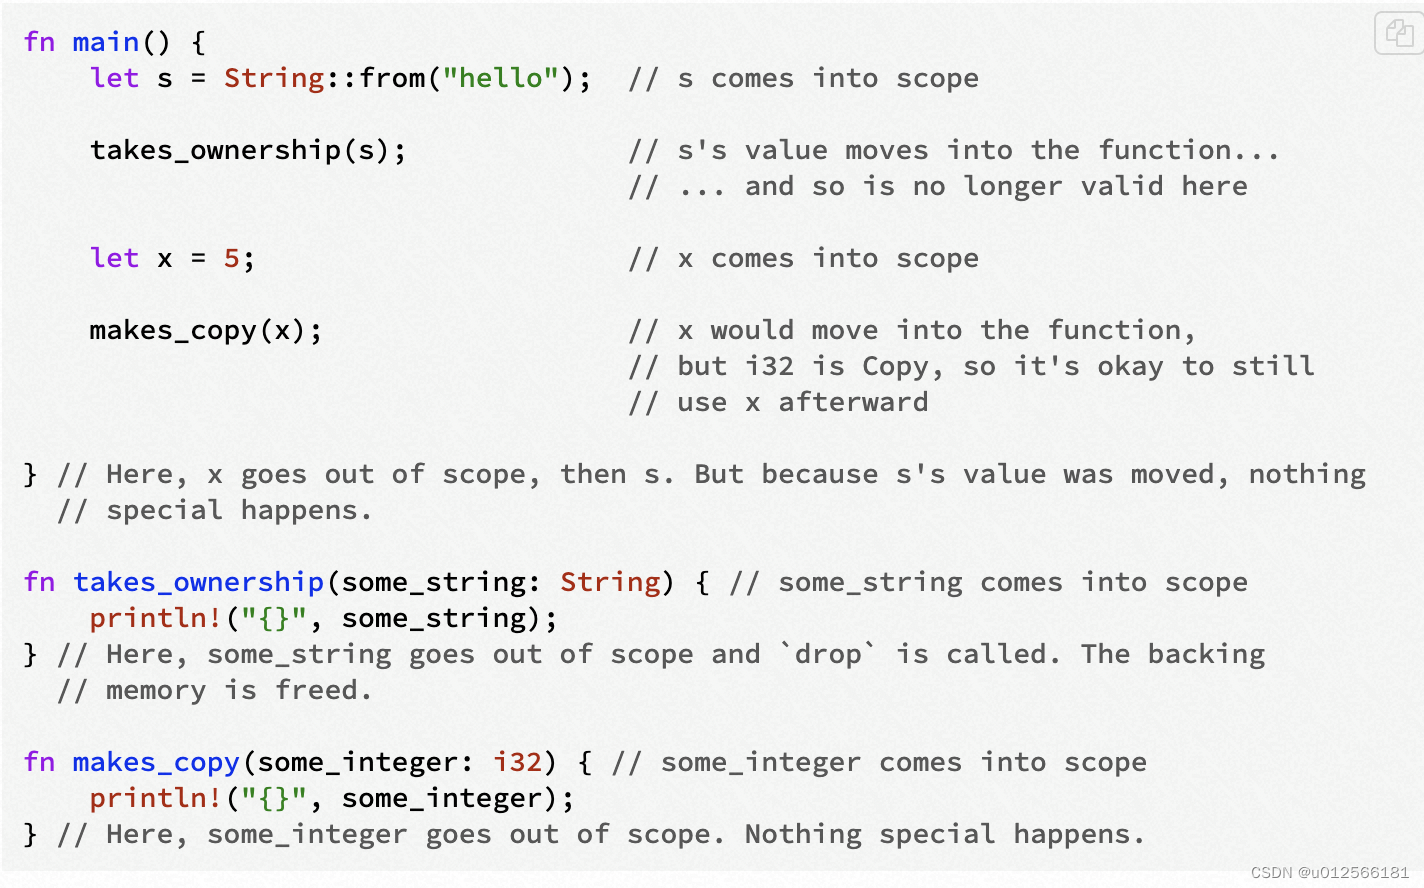
每一次函数调用就是一次ownership的transfer:
这种机制就成就了:
The ownership of a variable follows the same pattern every time: assigning a value to another variable moves it. When a variable that includes data on the heap goes out of scope, the value will be cleaned up by drop unless ownership of the data has been moved to another variable.
但这种也导致了一个问题
What if we want to let a function use a value but not take ownership? It’s quite annoying that anything we pass in also needs to be passed back if we want to use it again, in addition to any data resulting from the body of the function that we might want to return as well.
但这种太麻烦了,而且这种操作需求是非常常见的,而rust里面有更为一般的做法:
ut this is too much ceremony and a lot of work for a concept that should be common. Luckily for us, Rust has a feature for using a value without transferring ownership, called references.
在不tranfering ownership的情况下做到:用references
References and Borrowing
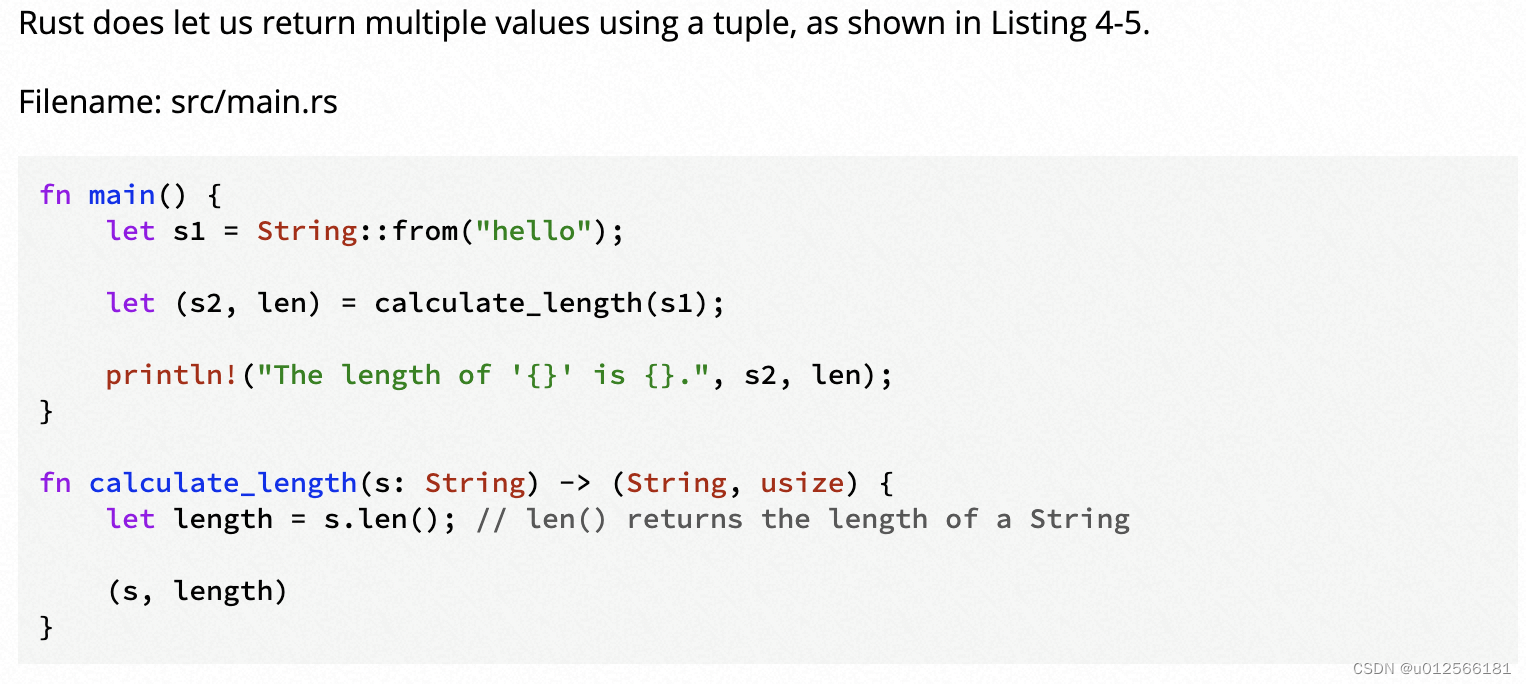
The issue with the tuple code in Listing 4-5 is that we have to return the String to the calling function so we can still use the String after the call to calculate_length, because the String was moved into calculate_length. Instead, we can provide a reference to the String value. A reference is like a pointer in that it’s an address we can follow to access the data stored at that address; that data is owned by some other variable. Unlike a pointer, a reference is guaranteed to point to a valid value of a particular type for the life of that reference.
Here is how you would define and use a calculate_length function that has a reference to an object as a parameter instead of taking ownership of the value:
在不转移onwership的情况下,用refererence实现:
fn main() {
    let s1 = String::from("hello");

    let len = calculate_length(&s1);

    println!("The length of '{}' is {}.", s1, len);
}

fn calculate_length(s: &String) -> usize {
    s.len()
}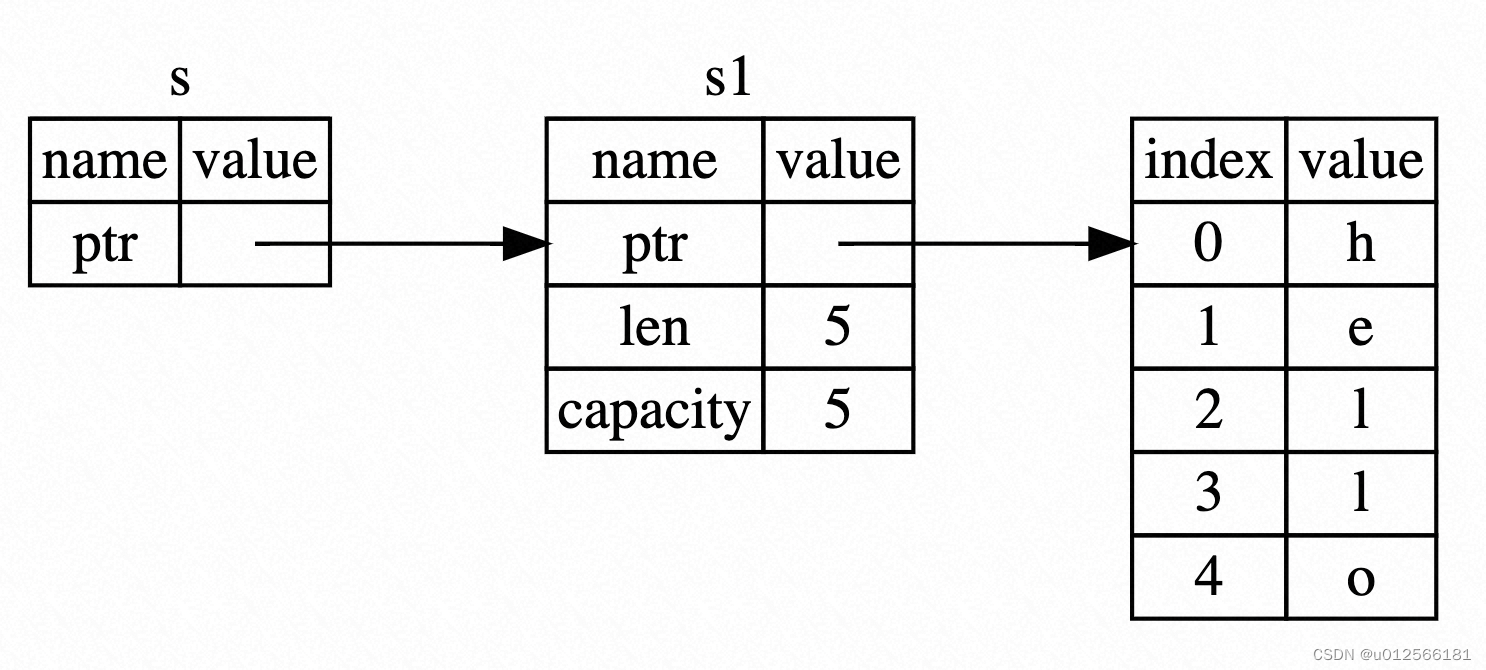
s是s1的referernce
the &s1 syntax let us create a reference that refers to the value of s1 but does not own it. because it does not own it , the value it points to will not be dropped when the reference stops being used.
Likewise, the signature of the function uses & to indicate that the type of the parameter s is a reference. Let’s add some explanatory annotations:
fn calculate_length(s: &String) -> usize { // s is a reference to a String
    s.len()
} // Here, s goes out of scope. But because it does not have ownership of what
  // it refers to, it is not dropped.
The scope in which the variable s is valid is the same as any function parameter’s scope, but the value pointed to by the reference is not dropped when s stops being used because s doesn’t have ownership. When functions have references as parameters instead of the actual values, we won’t need to return the values in order to give back ownership, because we never had ownership.
We call the action of creating a reference borrowing. As in real life, if a person owns something, you can borrow it from them. When you’re done, you have to give it back. You don’t own it.
So what happens if we try to modify something we’re borrowing? Try the code in Listing 4-6. Spoiler alert: it doesn’t work!
fn main() {
    let s = String::from("hello");

    change(&s);
}

fn change(some_string: &String) {
    some_string.push_str(", world");
}
会报错:

Just as variables are immutable by default, so are references. We’re not allowed to modify something we have a reference to. (后面会说如何做这种可变的referere)
Mutable References
We can fix the code from Listing 4-6 to allow us to modify a borrowed value with just a few small tweaks that use, instead, a mutable reference:
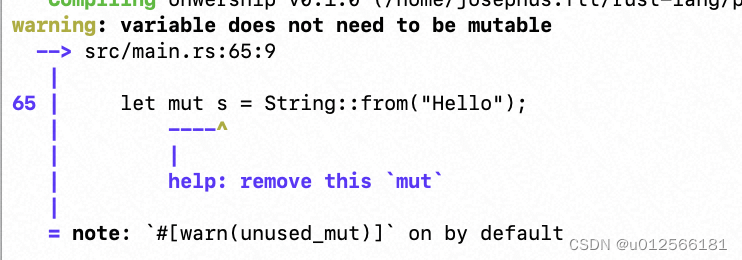
First, we change s to be mut. Then we create a mutable reference with &mut s where we call the change function, and update the function signature to accept a mutable reference with some_string: &mut String. This makes it very clear that the change function will mutate the value it borrows.
fn main() {
    let mut s = String::from("hello");
    change(&mut s);
}

fn change(some_string: &mut String) {
    some_string.push_str(", world");
}
First, we change s to be mut. Then we create a mutable reference with &mut s where we call the change function, and update the function signature to accept a mutable reference with some_string: &mut String. This makes it very clear that the change function will mutate the value it borrows
这里有一个暗示:如果是mut referernce,那么referer的变量也应该要是mut的。 而如果是非mut的referers,则指向的不一定非得是非mut的变量,也可以是mut的变量,而且还可以是多个指向(毕竟不会尝试修改它)
    let mut s = String::from("Hello");
    let r1 = &s;
    let r2 = &s;
    read_var(r1);
    read_var(r2);
这个不会报错,但编译器会告知你最好将s的mut去掉 :)
rust里面有一个规定:不能有两个(+)mut referer同时referer同一个变量
Mutable references have one big restriction: if you have a mutable reference to a value, you can have no other references to that value. This code that attempts to create two mutable references to s will fail:
    let mut s = String::from("hello");

    let r1 = &mut s;
    let r2 = &mut s;

    println!("{}, {}", r1, r2);
为何rust要做这种限制:也会为了在编译期间就防止掉 date race。:
The restriction preventing multiple mutable references to the same data at the same time allows for mutation but in a very controlled fashion. It’s something that new Rustaceans struggle with, because most languages let you mutate whenever you’d like. The benefit of having this restriction is that Rust can prevent data races at compile time. A data race is similar to a race condition and happens when these three behaviors occur:
- Two or more pointers access the same data at the same time.
- At least one of the pointers is being used to write to the data.
- There’s no mechanism being used to synchronize access to the data.
Data races cause undefined behavior and can be difficult to diagnose and fix when you’re trying to track them down at runtime; Rust prevents this problem by refusing to compile code with data races!
不过,如果不是同时referer的,而是有先后顺序,也是可以的。:
As always, we can use curly brackets to create a new scope, allowing for multiple mutable references, just not simultaneous ones:
    let mut s = String::from("hello");

    {
        let r1 = &mut s;
    } // r1 goes out of scope here, so we can make a new reference with no problems.

    let r2 = &mut s;
而且,Rust enforces a similar rule for combining mutable and immutable references. This code results in an error:
fn main() {
    let mut s = String::from("hello");

    let r1 = &s; // no problem
    let r2 = &s; // no problem
    let r3 = &mut s; // BIG PROBLEM

    println!("{}, {}, and {}", r1, r2, r3);
}
很好理解,读写是互斥的(用互斥可理解)。
另外这里还有一点:注意referere的scope范围:Note that a reference’s scope starts from where it is introduced and continues through the last time that reference is used. For instance, this code will compile because the last usage of the immutable references, the println!, occurs before the mutable reference is introduced:
    let mut s = String::from("hello");

    let r1 = &s; // no problem
    let r2 = &s; // no problem
    println!("{} and {}", r1, r2);
    // variables r1 and r2 will not be used after this point

    let r3 = &mut s; // no problem
    println!("{}", r3);
The scopes of the immutable references r1 and r2 end after the println! where they are last used, which is before the mutable reference r3 is created. These scopes don’t overlap, so this code is allowed. The ability of the compiler to tell that a reference is no longer being used at a point before the end of the scope is called Non-Lexical Lifetimes (NLL for short), and you can read more about it in The Edition Guide.
(这点确实有点。。。反直觉了)
Dangling References
In languages with pointers, it’s easy to erroneously create a dangling pointer--a pointer that references a location in memory that may have been given to someone else--by freeing some memory while preserving a pointer to that memory. In Rust, by contrast, the compiler guarantees that references will never be dangling references: if you have a reference to some data, the compiler will ensure that the data will not go out of scope before the reference to the data does.
Let’s try to create a dangling reference to see how Rust prevents them with a compile-time error:
(在rust里面,做到了没有野指针( 野 refererence)的情况:
References and Borrowing - The Rust Programming Language (回头来看这个最后一点,感觉不太好理解)
The Slice Type - The Rust Programming Language
String Slices
A string slice is a reference to part of a String, and it looks like this:
    let s = String::from("hello world");

    let hello = &s[0..5];
    let world = &s[6..11];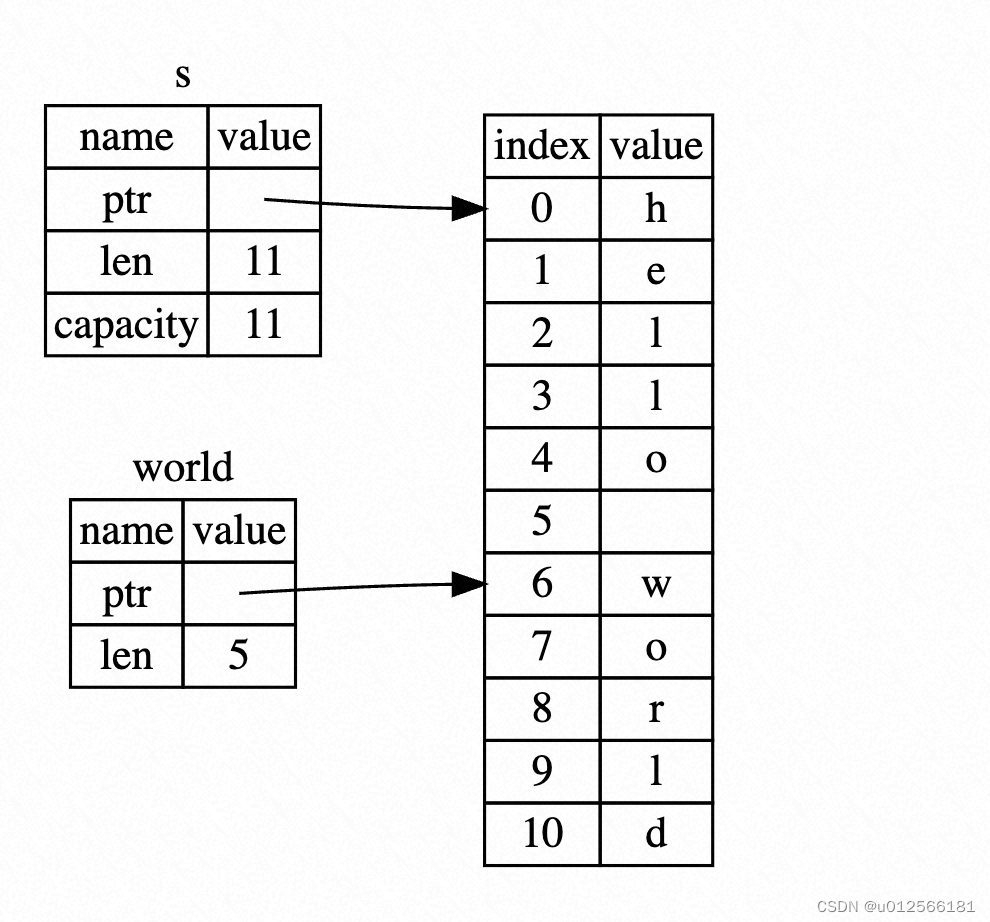
这种语法和python的类似:
值得注意的是,对于string slice的type是: &str
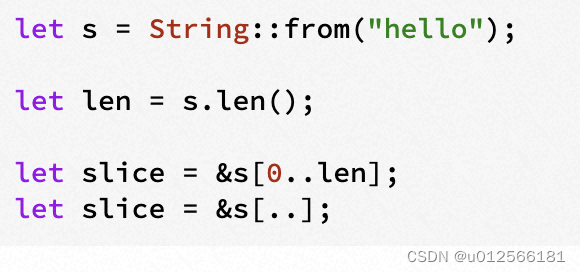
With all this information in mind, let’s rewrite first_word to return a slice. The type that signifies “string slice” is written as &str:
fn first_word(s: &String) -> &str {   //string slice的type 是 &str
    let bytes = s.as_bytes();

    for (i, &item) in bytes.iter().enumerate() {
        if item == b' ' {
            return &s[0..i];
        }
    }

    &s[..]
}Recall that we talked about string literals being stored inside the binary. Now that we know about slices, we can properly understand string literals:
let s = "Hello, world!";The type of s here is &str: it’s a slice pointing to that specific point of the binary. This is also why string literals are immutable; &str is an immutable reference.
进一步,将string slice当作参数可以让函数更具有通用性:
If we have a string slice, we can pass that directly. If we have a String, we can pass a slice of the String or a reference to the String. This flexibility takes advantage of deref coercions, a feature we will cover in the “Implicit Deref Coercions with Functions and Methods” section of Chapter 15. Defining a function to take a string slice instead of a reference to a String makes our API more general and useful without losing any functionality:
fn first_word(s: &str) -> &str {也就是说,传递 &String 也能够兼容 String slice的类型:

另外还有其他类型的slice
Other Slices
String slices, as you might imagine, are specific to strings. But there’s a more general slice type, too. Consider this array:
let a = [1, 2, 3, 4, 5];
Just as we might want to refer to a part of a string, we might want to refer to part of an array. We’d do so like this:
let a = [1, 2, 3, 4, 5];
let slice = &a[1..3];
assert_eq!(slice, &[2, 3]);
This slice has the type &[i32]. It works the same way as string slices do, by storing a reference to the first element and a length. You’ll use this kind of slice for all sorts of other collections. We’ll discuss these collections in detail when we talk about vectors in Chapter 8.
Summary
The concepts of ownership, borrowing, and slices ensure memory safety in Rust programs at compile time. The Rust language gives you control over your memory usage in the same way as other systems programming languages, but having the owner of data automatically clean up that data when the owner goes out of scope means you don’t have to write and debug extra code to get this control.
Ownership affects how lots of other parts of Rust work, so we’ll talk about these concepts further throughout the rest of the book. Let’s move on to Chapter 5 and look at grouping pieces of data together in a struct.
Struct
Our area function is now defined with one parameter, which we’ve named rectangle, whose type is an immutable borrow of a struct Rectangle instance. As mentioned in Chapter 4, we want to borrow the struct rather than take ownership of it. This way, main retains its ownership and can continue using rect1, which is the reason we use the & in the function signature and w
here we call the function.
struct Rectangle {
    width: u32,
    height: u32,
}

fn main() {
    let rect1 = Rectangle {
        width: 30,
        height: 50,
    };

    println!(
        "The area of the rectangle is {} square pixels.",
        area(&rect1)
    );
}

fn area(rectangle: &Rectangle) -> u32 {
    rectangle.width * rectangle.height
}
Method Syntax
and their first parameter is always self
struct Rectangle {
    width: u32,
    height: u32,
}

impl Rectangle {
    fn area(&self) -> u32 {
        self.width * self.height
    }
}

fn main() {
    let rect1 = Rectangle {
        width: 30,
        height: 50,
    };

    println!(
        "The area of the rectangle is {} square pixels.",
        rect1.area()
    );
}
In the signature for area, we use &self instead of rectangle: &Rectangle. The &self is actually short for self: &Self. Within an impl block, the type Self is an alias for the type that the impl block is for. Methods must have a parameter named self of type Self for their first parameter, so Rust lets you abbreviate this with only the name self in the first parameter spot. Note that we still need to use the & in front of the self shorthand to indicate this method borrows the Self instance, just as we did in rectangle: &Rectangle. Methods can take ownership of self, borrow self immutably as we’ve done here, or borrow self mutably, just as they can any other parameter.
We’ve chosen &self here for the same reason we used &Rectangle in the function version: we don’t want to take ownership, and we just want to read the data in the struct, not write to it.
(这段也很好说明了为何我们要使用&, 我们不想要take ownership的时候就用这个,我们只是想read下,因为onwership是有代价的:只有一个地方拥有该空间的ownership,你如果不转交给别人 这个就会随着你自己的回收释放而释放了,所有后面程序就不能再继续使用这个空间了,如果有,在编译期间就会被发现进而规避了内存泄漏问题)
所以一般在functin/method等调用着,一般都不需要take ownership,一般都是使用&,:你如果只是读数据,直接用&,如果想要修改数据,用 &mut. 但是不要丢了&(否则ownership转移了)
We’ve chosen &self here for the same reason we used &Rectangle in the function version: we don’t want to take ownership, and we just want to read the data in the struct, not write to it. If we wanted to change the instance that we’ve called the method on as part of what the method does, we’d use &mut self as the first parameter. Having a method that takes ownership of the instance by using just self as the first parameter is rare; this technique is usually used when the method transforms self into something else and you want to prevent the caller from using the original instance after the transformation.
reading (&ins), mutating (&mut ins), or consuming (ins)
只读、修改、消费
所以只要你将onwership转移出去了(除非转移出去后会再转移回来),你后面就不能继续再使用了(因为再次回来时已经被释放了,编译器会监测到并不通过)
fn main() {
    let rect1 = Rectangle {
        width: 30,
        height: 50,
    };
    let rect2 = Rectangle {
        width: 10,
        height: 40,
    };
    let rect3 = Rectangle {
        width: 60,
        height: 45,
    };

    println!("Can rect1 hold rect2? {}", rect1.can_hold(&rect2));
    println!("Can rect1 hold rect3? {}", rect1.can_hold(&rect3));
}
impl Rectangle {
    fn area(&self) -> u32 {
        self.width * self.height
    }

    fn can_hold(&self, other: &Rectangle) -> bool {
        self.width > other.width && self.height > other.height
    }
}
We know we want to define a method, so it will be within the impl Rectangle block. The method name will be can_hold, and it will take an immutable borrow of another Rectangle as a parameter. We can tell what the type of the parameter will be by looking at the code that calls the method: rect1.can_hold(&rect2) passes in &rect2, which is an immutable borrow to rect2, an instance of Rectangle. This makes sense because we only need to read rect2 (rather than write, which would mean we’d need a mutable borrow), and we want main to retain ownership of rect2 so we can use it again after calling the can_hold method.
Associated Functions
一些不带self参数的imple就是这种,之前看到的类似 String::from("hello");其实就是这个的一种实现:
impl Rectangle {
    fn square(size: u32) -> Self {
        Self {
            width: size,
            height: size,
        }
    }
}
The Self keywords in the return type and in the body of the function are aliases for the type that appears after the impl keyword, which in this case is Rectangle.
To call this associated function, we use the :: syntax with the struct name; let sq = Rectangle::square(3); is an example. This function is namespaced by the struct: the :: syntax is used for both associated functions and namespaces created by modules. We’ll discuss modules in Chapter 7.
Managing Growing Projects with Packages, Crates, and Modules - The Rust Programming Language
- Packages: A Cargo feature that lets you build, test, and share crates
- Crates: A tree of modules that produces a library or executable
- Modules and use: Let you control the organization, scope, and privacy of paths
- Paths: A way of naming an item, such as a struct, function, or module
A crate can come in one of two forms: a binary crate or a library crate. Binary crates are programs you can compile to an executable that you can run, such as a command-line program or a server. Each must have a function called main that defines what happens when the executable runs. All the crates we’ve created so far have been binary crates.
. Most of the time when Rustaceans say “crate”, they mean library crate, and they use “crate” interchangeably with the general programming concept of a “library".
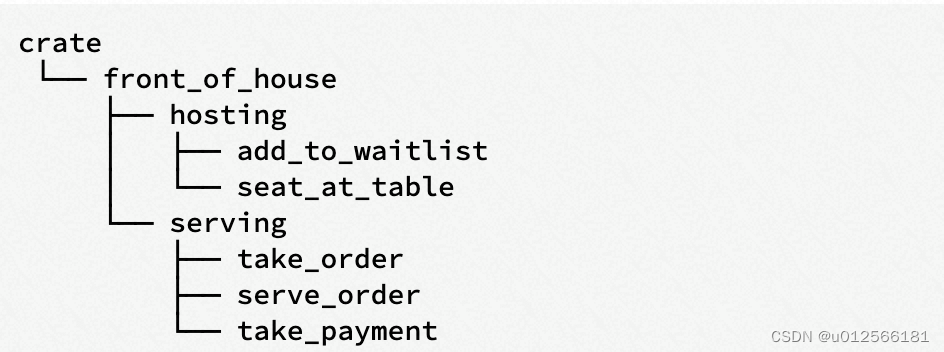
类似linux中文件系统的曾经,最顶层的是 crate 这个module,和 / 有些类似,注意它是隐式的。
所以对于调用一个function来说,既可以通过相对路径,也可以通过绝对路径来引用到。(不过一般建议用绝对路径)
mod front_of_house {
    mod hosting {
        fn add_to_waitlist() {}

        fn seat_at_table() {}
    }

    mod serving {
        fn take_order() {}
        fn server_order() {}
        fn take_payment() {}
    }
}

pub fn eat_at_restaurant() {
    //absolute path
    crate::front_of_house::hosting::add_to_waitlist();

    //relative path
    front_of_house::hosting::add_to_waitlist();
}
In Rust, all items (functions, methods, structs, enums, modules, and constants) are private to parent modules by default. If you want to make an item like a function or struct private, you put it in a module.
Items in a parent module can’t use the private items inside child modules, but items in child modules can use the items in their ancestor modules. This is because child modules wrap and hide their implementation details, but the child modules can see the context in which they’re defined. To continue with our metaphor, think of the privacy rules as being like the back office of a restaurant: what goes on in there is private to restaurant customers, but office managers can see and do everything in the restaurant they operate. (默认父不能访问子模块【子对父是private的】,子可以访问父模块(父对子public)
If we use pub before a struct definition, we make the struct public, but the struct’s fields will still be private. We can make each field public or not on a case-by-case basis.
(也就是struct里面,如果struct是pub的,但他的成员如果没有pub,则还是private的,就是还是需要对每个field进行pub。)
mod back_of_house {
    pub struct Breakfast {
        pub toast: String,
        seasonal_fruit: String,
    }

    impl Breakfast {
        pub fn summer(toast: &str) -> Breakfast {
            Breakfast {
                toast: String::from(toast),
                seasonal_fruit: String::from("peaches"),
            }
        }
    }
}
但在enum类型下,只需要pub该enum即可,无需对成员进行pub此时所有的成员都是pub的:
In contrast, if we make an enum public, all of its variants are then public. We only need the pub before the enum keyword,
mod back_of_house {
    pub enum Appetizer {
        Soup,
        Salad,
    }
}

pub fn eat_at_restaurant() {
    let order1 = back_of_house::Appetizer::Soup;
    let order2 = back_of_house::Appetizer::Salad;
}
至于为何有这个区别:对于enum来说如果它不pub几乎没啥意义了,如果要对每个成员pub显得啰嗦。而对struct而言,成员默认是private则是非常常见(也是隔离/模块化的重要手段)
Enums aren’t very useful unless their variants are public; it would be annoying to have to annotate all enum variants with pub in every case, so the default for enum variants is to be public. Structs are often useful without their fields being public, so struct fields follow the general rule of everything being private by default unless annotated with pub.
关键字use:
从上面例子中能够看如果要引用使用某个函数,要么从绝对路径调用、要么从相对路径调用。但这样也许显得有些麻烦了:(feel inconvenient and repetitive.),有一个简单的方法是使用use关键字来缩短:
Fortunately, there’s a way to simplify this process: we can create a shortcut to a path with the use keyword once, and then use the shorter name everywhere else in the scope. 例子:
mod front_of_house {
    pub mod hosting {
        pub fn add_to_waitlist() {}
    }
}

use crate::front_of_house::hosting;

pub fn eat_at_restaurant() {
    hosting::add_to_waitlist();
}
如果没用use,以往调用add_to_waitlist要用: front_of_house:hosting:add_to_waitlist.
而由于: use crate::front_of_house:::hosting. 现在调用只需要:
hosting::add_to_waitlist(). 相当于了一个别名。
但注意use也是有scope的:
Note that use only creates the shortcut for the particular scope in which the use occurs. Listing 7-12 moves the eat_at_restaurant function into a new child module named customer, which is then a different scope than the use statement, so the function body won’t compile:
mod front_of_house {
    pub mod hosting {
        pub fn add_to_waitlist() {}
    }
}

use crate::front_of_house::hosting;

mod customer {
    pub fn eat_at_restaurant() {
        hosting::add_to_waitlist();
    }
}
这样就有问题了:customer下面的scope不是和。。一个scope(TODO)
这里有个问题:既然可以直接用use,那为何不直接一路到底:
mod front_of_house {
    pub mod hosting {
        pub fn add_to_waitlist() {}
    }
}

use crate::front_of_house::hosting::add_to_waitlist;

pub fn eat_at_restaurant() {
    add_to_waitlist();
}
这样确实可以编译通过,但这种做法并不是最佳做法: Bringing the function’s parent module into scope with use means we have to specify the parent module when calling the function. Specifying the parent module when calling the function makes it clear that the function isn’t locally defined while still minimizing repetition of the full path. The code in Listing 7-13 is unclear as to where add_to_waitlist is defined.
然后对于function是这种到上一级为好,而对于结构体、enums、还有其他等等:
On the other hand, when bringing in structs, enums, and other items with use, it’s idiomatic to specify the full path
Listing 7-14 shows the idiomatic way to bring the standard library’s HashMap struct into the scope of a binary crate.
use std::collections::HashMap;

fn main() {
    let mut map = HashMap::new();
    map.insert(1, 2);
}
如果有很多这种use,可以简写:
// --snip--
use std::cmp::Ordering;
use std::io;
// --snip--
==>
// --snip--
use std::{cmp::Ordering, io};
// --snip--
use std::io;
use std::io::Write;==》
use std::io::{self, Write};
( 不过我看deno的写法,好像没有这么做,而是直接use,deno/ops.rs at main · denoland/deno · GitHub 这样反而看上去更明确)
Separating Modules into Different Files - The Rust Programming Language
This technique lets you move modules to new files as they grow in size.
在src/lib.rs中,一般定义出要使用哪些module,进而告知编译器。
deno/lib.rs at main · denoland/deno · GitHub 参考:
Common Collections - The Rust Programming Language
Rust’s standard library includes a number of very useful data structures called collections. Most other data types represent one specific value, but collections can contain multiple values. Unlike the built-in array and tuple types, the data these collections point to is stored on the heap, which means the amount of data does not need to be known at compile time and can grow or shrink as the program runs.
- A vector allows you to store a variable number of values next to each other.
- A string is a collection of characters. We’ve mentioned the
Stringtype previously, but in this chapter we’ll talk about it in depth. - A hash map allows you to associate a value with a particular key. It’s a particular implementation of the more general data structure called a map.
Vector
创建一个新的:
let v: Vec<i32> = Vec::new();直接赋值:literal
let v = vec![1, 2, 3];修改:
   let mut v = Vec::new();

    v.push(5);
    v.push(6);
    v.push(7);
    v.push(8);
String
Many of the same operations available with Vec<T> are available with String as well, because String is actually implemented as a wrapper around a vector of bytes with some extra guarantees, restrictions, and capabilities.
A String is a wrapper over a Vec<u8>.
HashMap
   use std::collections::HashMap;

    let mut scores = HashMap::new();

    scores.insert(String::from("Blue"), 10);
    scores.insert(String::from("Yellow"), 50);

    for (key, value) in &scores {
        println!("{}: {}", key, value);
    }
Error Handling
有两类错误, recoverable and unrecoverable errors.。
Most languages don’t distinguish between these two kinds of errors and handle both in the same way, using mechanisms such as exceptions. Rust doesn’t have exceptions. Instead, it has the type Result<T, E> for recoverable errors and the panic! macro that stops execution when the program encounters an unrecoverable error
use std::fs::File;

fn main() {
    let greeting_file_result = File::open("hello.txt");

    let greeting_file = match greeting_file_result {
        Ok(file) => file,
        Err(error) => panic!("Problem opening the file: {:?}", error),
    };
}
==> 如果是进一步,需要判断是否错误类型,以做决策是否要panic:
Matching on Different Errors
use std::fs::File;
use std::io::ErrorKind;

fn main() {
    let greeting_file_result = File::open("hello.txt");

    let greeting_file = match greeting_file_result {
        Ok(file) => file,
        Err(error) => match error.kind() {
            ErrorKind::NotFound => match File::create("hello.txt") {
                Ok(fc) => fc,
                Err(e) => panic!("Problem creating the file: {:?}", e),
            },
            other_error => {
                panic!("Problem opening the file: {:?}", other_error);
            }
        },
    };
}
上面写法可以但是有些繁琐:更进一步可以有更好的写法:用closure的方式(clousere后面讲到)
use std::fs::File;
use std::io::ErrorKind;

fn main() {
    let greeting_file = File::open("hello.txt").unwrap_or_else(|error| {
        if error.kind() == ErrorKind::NotFound {
            File::create("hello.txt").unwrap_or_else(|error| {
                panic!("Problem creating the file: {:?}", error);
            })
        } else {
            panic!("Problem opening the file: {:?}", error);
        }
    });
}
继续,如果想要把error传给上层去决策呢,如何?
use std::fs::File;
use std::io::{self, Read};

fn read_username_from_file() -> Result<String, io::Error> {
    let username_file_result = File::open("hello.txt");

    let mut username_file = match username_file_result {
        Ok(file) => file,
        Err(e) => return Err(e),
    };

    let mut username = String::new();

    match username_file.read_to_string(&mut username) {
        Ok(_) => Ok(username),
        Err(e) => Err(e),
    }
}
返回类型定义为了 Result<String, io::Error> ,里面蕴含了如果是成功的,则Result里面String包括的结果,如果失败了则io:Error包含了结果。
(注意最后没有;,表示返回了的写法用到了)
而其实,对于这种操作,在rust里面有更为简便的写法:用?号来表示了:
use std::fs::File;
use std::io;
use std::io::Read;

fn read_username_from_file() -> Result<String, io::Error> {
    let mut username_file = File::open("hello.txt")?;
    let mut username = String::new();
    username_file.read_to_string(&mut username)?;
    Ok(username)
}
第一个File::open跟着的?表示,如果OK,则将值赋值给username_file,如果失败,则直接整个函数返回错误了。同样第二个?也是一样的。
The ? placed after a Result value is defined to work in almost the same way as the match expressions we defined to handle the Result values in Listing 9-6. If the value of the Result is an Ok, the value inside the Ok will get returned from this expression, and the program will continue. If the value is an Err, the Err will be returned from the whole function as if we had used the return keyword so the error value gets propagated to the calling code.
其实还有进一步的便捷写法:
use std::fs::File;
use std::io;
use std::io::Read;

fn read_username_from_file() -> Result<String, io::Error> {
    let mut username = String::new();

    File::open("hello.txt")?.read_to_string(&mut username)?;

    Ok(username)
}
?看到如果调用失败了就直接返回了。。
另外对于这种从文件中读内容的操作如此场景,rust里面将其作为标准库的一部分了:
use std::fs;
use std::io;

fn read_username_from_file() -> Result<String, io::Error> {
    fs::read_to_string("hello.txt")
}
Reading a file into a string is a fairly common operation, so the standard library provides the convenient fs::read_to_string function that opens the file, creates a new String, reads the contents of the file, puts the contents into that String, and returns it. Of course, using fs::read_to_string doesn’t give us the opportunity to explain all the error handling, so we did it the longer way first.
什么情况下可以用 ‘?’符号:
Note that you can use the ? operator on a Result in a function that returns Result, and you can use the ? operator on an Option in a function that returns Option, but you can’t mix and match. The ? operator won’t automatically convert a Result to an Option or vice versa; in those cases, you can use methods like the ok method on Result or the ok_or method on Option to do the conversion explicitly.
什么时候使用panic or Result type:
Therefore, returning Result is a good default choice when you’re defining a function that might fail.
Generic Types, Traits, and Lifetimes - The Rust Programming Languagej
泛型-生命周期-
(开头的一段需要好好读下)
Finally, we’ll discuss lifetimes: a variety of generics that give the compiler information about how references relate to each other. Lifetimes allow us to give the compiler enough information about borrowed values so that it can ensure references will be valid in more situations than it could without our help.
例子很好的解释:找最大的元素:
fn largest(list: &[i32]) -> &i32 {
    let mut largest = &list[0];

    for item in list {
        if item > largest {
            largest = item;
        }
    }

    largest
}

fn main() {
    let number_list = vec![34, 50, 25, 100, 65];

    let result = largest(&number_list);
    println!("The largest number is {}", result);

    let number_list = vec![102, 34, 6000, 89, 54, 2, 43, 8];

    let result = largest(&number_list);
    println!("The largest number is {}", result);
}
这是找i32列表中,如果换为找char列表:看上去相同的逻辑又重复了一遍:
fn largest_i32(list: &[i32]) -> &i32 {
    let mut largest = &list[0];

    for item in list {
        if item > largest {
            largest = item;
        }
    }

    largest
}

fn largest_char(list: &[char]) -> &char {
    let mut largest = &list[0];

    for item in list {
        if item > largest {
            largest = item;
        }
    }

    largest
}

fn main() {
    let number_list = vec![34, 50, 25, 100, 65];

    let result = largest_i32(&number_list);
    println!("The largest number is {}", result);

    let char_list = vec!['y', 'm', 'a', 'q'];

    let result = largest_char(&char_list);
    println!("The largest char is {}", result);
}
在这种情况下就轮到泛型出场了:
fn largest<T>(list: &[T]) -> &T {这样 函数名称后面加了一个 <T> ,用T来代替所有类型:
==> (注意 还需要完善trait,目前还不能compile,但大致意思是这么个意思。
fn largest<T>(list: &[T]) -> &T {
    let mut largest = &list[0];

    for item in list {
        if item > largest {
            largest = item;
        }
    }

    largest
}

fn main() {
    let number_list = vec![34, 50, 25, 100, 65];

    let result = largest(&number_list);
    println!("The largest number is {}", result);

    let char_list = vec!['y', 'm', 'a', 'q'];

    let result = largest(&char_list);
    println!("The largest char is {}", result);
}
上面说的是函数的泛型,其实不止有函数泛型,包括struct、enum、method等都有泛型:
struct:
struct Point<T> {
    x: T,
    y: T,
}

fn main() {
    let integer = Point { x: 5, y: 10 };
    let float = Point { x: 1.0, y: 4.0 };
}
==> 注意 x/y类型在这里定义为同一个泛型了,所以下面这种赋值不能compile
struct Point<T> {
    x: T,
    y: T,
}

fn main() {
    let wont_work = Point { x: 5, y: 4.0 };
}
另外,在struct中,每个成员都可以有自己的泛型:
struct Point<T, U> {
    x: T,
    y: U,
}

fn main() {
    let both_integer = Point { x: 5, y: 10 };
    let both_float = Point { x: 1.0, y: 4.0 };
    let integer_and_float = Point { x: 5, y: 4.0 };
}
enum:
最常见的enum泛型可能是 Option了,在这里就可以看懂之前的option想代码了:
enum Option<T> {
    Some(T),
    None,
}
This definition should now make more sense to you. As you can see, the Option<T> enum is generic over type T and has two variants: Some, which holds one value of type T, and a None variant that doesn’t hold any value. By using the Option<T> enum, we can express the abstract concept of an optional value, and because Option<T> is generic, we can use this abstraction no matter what the type of the optional value is.
当然enum也有多个泛型可以,最典型的就是Result了: 这也是使用最广泛的泛型了:
enum Result<T, E> {
    Ok(T),
    Err(E),
}
The Result enum is generic over two types, T and E, and has two variants: Ok, which holds a value of type T, and Err, which holds a value of type E. This definition makes it convenient to use the Result enum anywhere we have an operation that might succeed (return a value of some type T) or fail (return an error of some type E). In fact, this is what we used to open a file in Listing 9-3, where T was filled in with the type std::fs::File when the file was opened successfully and E was filled in with the type std::io::Error when there were problems opening the file.
method: (其实差不多,不过method还可以指定那种类型的泛型:
struct Point<T> {
    x: T,
    y: T,
}

impl<T> Point<T> {
    fn x(&self) -> &T {
        &self.x
    }
}

fn main() {
    let p = Point { x: 5, y: 10 };

    println!("p.x = {}", p.x());
}
==》 指定类型:
impl Point<f32> {
    fn distance_from_origin(&self) -> f32 {
        (self.x.powi(2) + self.y.powi(2)).sqrt()
    }
}
那么泛型的性能如何(看上去会有runtime的开销)。其实不会,rust在compile期间就将其单例化了(monomorphization)。其实就是根据具体的type将泛型代码再copy了一份进行compile(只不过这个copy不是我们copy罢了)
When Rust compiles this code, it performs monomorphization. During that process, the compiler reads the values that have been used in Option<T> instances and identifies two kinds of Option<T>: one is i32 and the other is f64. As such, it expands the generic definition of Option<T> into two definitions specialized to i32 and f64, thereby replacing the generic definition with the specific ones.
When the code runs, it performs just as it would if we had duplicated each definition by hand. The process of monomorphization makes Rust’s generics extremely efficient at runtime.
所以rust里面泛型没有任何开销
Trait
上面的find_largest目前还不能编译,是因为缺少了相关的定义Trait:如果某几个类型同时定义了相同的signature的方法,就说这个是一种trait,有点类似于go里面的interface
定义了一个trait为Summary,其中的方法为summarize,这样可以为各种类型自定义相关的summzrize的方法了 ( 一般在rust中,method/function等小写or分割_写,struct/enum/trait/type类型等大小or驼峰写,变量名称小写)。
pub trait Summary {
    fn summarize(&self) -> String;    //注意直接是;无{}
}

pub struct NewsArticle {
    pub headline: String,
    pub location: String,
    pub author: String,
    pub content: String,
}

impl Summary for NewsArticle {
    fn summarize(&self) -> String {
        format!("{}, by {} ({})", self.headline, self.author, self.location)
    }
}

pub struct Tweet {
    pub username: String,
    pub content: String,
    pub reply: bool,
    pub retweet: bool,
}

impl Summary for Tweet {
    fn summarize(&self) -> String {
        format!("{}: {}", self.username, self.content)
    }
}

fn main() {
    let tweet = Tweet {
        username: String::from("horse_ebooks"),
        content: String::from(
            "of course, as you probably already know, people",
        ),
        reply: false,
        retweet: false,
    };

    println!("1 new tweet: {}", tweet.summarize());
}
表面上看没有为struct tweet定义方法summarize,但其实通过trait Summary定义了。
另外如果要对每个类型都需要完善其方法会有一些繁琐,如果能够针对性地提供default实现:trait支持这种使用:
pub trait Summary {
    fn summarize(&self) -> String {
        String::from("(Read more..)")
    }
}

impl Summary for NewsArticle{}


let article = NewsArticle{
        headline: String::from("Penguins win the Stanley Cup Championship!"),
        location: String::from("Pittsburgh, pA, USA"),
        author: String::from("Iceurgh"),
        content: String::from(
                "The pittsubg once again are the best \
                hocky team in the NHL.",
                ),
};

println!("New article available! {}", article.summarize());
即summarize不再是空 的,而是有默认实现。另外需要使用这种默认实现的type,就不要再自己实现了,而只是空写即可:上面的 impl Summary for NewsArticle{} 即是。
另外在trait中还可以互相调用:比如在Summary中,定义两个方法:
pub trait Summary {
    fn summarize_author(&self) -> String;  //留个类型自己去实现

    fn summarize(&self) -> String {
        format!("(Read more from {}...)", self.summarize_author())  //默认方法
    }
}

impl Summary for Tweet {
    fn summarize_author(&self) -> String { //类型自己实现
        format!("@{}", self.username)
    }
}

fn main() {

let tweet = Tweet {
        username: String::from("horse_ebooks"),
        content: String::from(
            "of course, as you probably already know, people",
        ),
        reply: false,
        retweet: false,
    };
 println!("1 new tweet: {}", tweet.summarize()); // 再使用时使用默认方法
}
Traits: Defining Shared Behavior - The Rust Programming Language
这部分的后面 着实玩的有点花了。。后面再看看。
Validating References with Lifetimes - The Rust Programming Language
The main aim of lifetimes is to prevent dangling references, which cause a program to reference data other than the data it’s intended to reference. 防止野reference
fn main() {
    let r;

    {
        let x = 5;
        r = &x;
    }

    println!("r: {}", r);
}
类似于这种,x的生命周期到了,但r还reference它肯定是有问题的,不会被compile。
另外目前只需要考虑reference的lifetime,至于为何需要leftime:为了保证referernce的实体的生命周期要比reference要长,否则该reference就是个dangling reference了。
This is because references can't live longer than the object they come from.
比如:
fn returns_reference() -> &str {
    let my_string = String::from("I am a string");
    &my_string // ⚠️
}

fn main() {}
由于返回了reference而该referernce的指向object 在函数返回后就回收了,所以该referrer返回后就是一个dangling reference了。
所以:在任何返回了 referernce的地方,都需要注意lifetime:而且compile报错也是针对这种返回reference的场景:
13 | fn logest(x: &str, y: &str) -> &str {
   |              ----     ----     ^ expected named lifetime parameter
   |
   = help: this function's return type contains a borrowed value, but the signature does not say whether it is borrowed from `x` or `y`
help: consider introducing a named lifetime parameter
   |
而为了让compile知道我在干什么,需要告知compile(GitHub - Dhghomon/easy_rust: Rust explained using easy EnglishRust explained using easy English. Contribute to Dhghomon/easy_rust development by creating an account on GitHub. https://github.com/Dhghomon/easy_rust#lifetimes
now fn returns_str() -> &'static str tells Rust: "don't worry, we will only return a string literal". String literals live for the whole program, so Rust is happy. You'll notice that this is similar to generics. When we tell the compiler something like <T: Display>, we promise that we will only use inputs with Display.。
Lifetimes are similar: we are not changing any variable lifetimes. We are just telling the compiler what the lifetimes of the inputs will be.
(所以 我们并不是改变lifetime,而只是告知rust而已)
lieftime回头再来看看。。。
Test测试
#[cfg(test)]
mod tests {
    use super::*;

    #[test]
    fn it_works_well() {
        let result = add(2, 2);
        assert_eq!(result, 4);
    }

    #[test]
    fn another() {
        panic!("Make this test fail");
    }
}
每个测试case前面都加一个 #[test]表示这是一个test case。
运行: cargo test
$cargo test
   Compiling adder v0.1.0 (/)
    Finished test [unoptimized + debuginfo] target(s) in 0.35s
     Running unittests src/lib.rs (target/debug/deps/adder-7763e46d5dd299a3)

running 2 tests
test tests::it_works_well ... ok
test tests::another ... FAILED

failures:

---- tests::another stdout ----
thread 'tests::another' panicked at 'Make this test fail', src/lib.rs:17:9
note: run with `RUST_BACKTRACE=1` environment variable to display a backtrace


failures:
    tests::another

test result: FAILED. 1 passed; 1 failed; 0 ignored; 0 measured; 0 filtered out; finished in 0.00s

error: test failed, to rerun pass '--lib'
可以看到panic!就会让其失败。
常用到的几个宏:
assert!
struct Rectangle {
    width: u32,
    height: u32,
}

impl Rectangle {
    fn can_hold(&self, other: &Rectangle) -> bool {
        self.width > other.width && self.height > other.height
    }
}


  #[test]
    fn large_can_hold_smaller() {
        let larger = Rectangle {
            width: 8,
            height: 7,
        };

        let smaller = Rectangle {
            width: 5,
            height: 1,
        };

        assert!(larger.can_hold(&smaller));
    }

    #[test]
    fn smaller_cannot_hold_larger() {
        let larger = Rectangle {
            width: 8,
            height: 7,
        };

        let smaller = Rectangle {
            width: 5,
            height: 1,
        };

        assert!(!smaller.can_hold(&larger));
    }
assert_eq! (本质上其实也是用 assert! 与 == != 的结合
You could do this using the assert! macro and passing it an expression using the == operator. However, this is such a common test that the standard library provides a pair of macros—assert_eq! and assert_ne!—to perform this test more conveniently.
assert_ne!
The assert_ne! macro will pass if the two values we give it are not equal and fail if they’re equal. This macro is most useful for cases when we’re not sure what a value will be, but we know what the value definitely shouldn’t be.
    #[test]
    fn it_adds_two() {
        assert_eq!(4, add_two(2));
    }
Under the surface, the assert_eq! and assert_ne! macros use the operators == and !=, respectively. When the assertions fail, these macros print their arguments using debug formatting, which means the values being compared must implement the PartialEq and Debug traits. All primitive types and most of the standard library types implement these traits. For structs and enums that you define yourself, you’ll need to implement PartialEq to assert equality of those types. You’ll also need to implement Debug to print the values when the assertion fails. Because both traits are derivable traits, as mentioned in Listing 5-12 in Chapter 5, this is usually as straightforward as adding the #[derive(PartialEq, Debug)] annotation to your struct or enum definition. See Appendix C,
在使用比较的时候,需要该type能够相互比较(即实现了 PartialEq 属性),目前大部分标准的type都有实现,如果你自定义的struct/enum的话,则需要自己实现。
测试可以并行,也可以串行(会慢一些),这样可以保证各个测试互不干扰。
cargo test -- --test-threads=1 //指定跑测试的线程数量
We set the number of test threads to 1, telling the program not to use any parallelism. Running the tests using one thread will take longer than running them in parallel, but the tests won’t interfere with each other if they share state.
cargo test -- --show-output // 可以将运行过程中pass的case细节也输出出来
rust的测试有一个方便的地方就是 他的测试完全可以写在和代码在一起。写个方法后就可以写点测试放在下面。类似于这种:
  #[test]
  fn terminate_execution_webassembly() {
    let (mut runtime, _dispatch_count) = setup(Mode::Async);
    let v8_isolate_handle = runtime.v8_isolate().thread_safe_handle();

    // Run an infinite loop in Webassemby code, which should be terminated.
    let promise = runtime.execute_script("infinite_wasm_loop.js",
                                 r#"
                                 (async () => {
                                  const wasmCode = new Uint8Array([
                                      0,    97,   115,  109,  1,    0,    0,    0,    1,   4,    1,
                                      96,   0,    0,    3,    2,    1,    0,    7,    17,  1,    13,
                                      105,  110,  102,  105,  110,  105,  116,  101,  95,  108,  111,
                                      111,  112,  0,    0,    10,   9,    1,    7,    0,   3,    64,
                                      12,   0,    11,   11,
                                  ]);
                                  const wasmModule = await WebAssembly.compile(wasmCode);
                                  globalThis.wasmInstance = new WebAssembly.Instance(wasmModule);
                                  })()
                                      "#).unwrap();
    futures::executor::block_on(runtime.resolve_value(promise)).unwrap();
    let terminator_thread = std::thread::spawn(move || {
      std::thread::sleep(std::time::Duration::from_millis(1000));

      // terminate execution
      let ok = v8_isolate_handle.terminate_execution();
      assert!(ok);
    });
    let err = runtime
      .execute_script(
        "infinite_wasm_loop2.js",
        "globalThis.wasmInstance.exports.infinite_loop();",
      )
      .unwrap_err();
    assert_eq!(err.to_string(), "Uncaught Error: execution terminated");
    // Cancel the execution-terminating exception in order to allow script
    // execution again.
    let ok = runtime.v8_isolate().cancel_terminate_execution();
    assert!(ok);

    // Verify that the isolate usable again.
    runtime
      .execute_script("simple.js", "1 + 1")
      .expect("execution should be possible again");

    terminator_thread.join().unwrap();
  }

  #[test]
  fn terminate_execution() {
    let (mut isolate, _dispatch_count) = setup(Mode::Async);
    let v8_isolate_handle = isolate.v8_isolate().thread_safe_handle();

    let terminator_thread = std::thread::spawn(move || {
      // allow deno to boot and run
      std::thread::sleep(std::time::Duration::from_millis(100));

      // terminate execution
而且还有一个好处就是可以选定跑哪些case。因为默认跑所有case时间就比较耗时了。
    #[test]
    fn it_adds_two() {
        assert_eq!(4, add_two(2));
    }

    #[test]
    fn add_two_and_two() {
        assert_eq!(4, add_two(2));
    }

    #[test]
    fn add_three_and_two() {
        assert_eq!(5, add_two(3));
    }

    #[test]
    fn one_hundred() {
        assert_eq!(102, add_two(100));
    }
指定名称,就跑这个
$cargo test add_three_and_tw
    Finished test [unoptimized + debuginfo] target(s) in 0.01s
     Running unittests src/lib.rs (target/debug/deps/adder-7763e46d5dd299a3)

running 1 test
test tests::add_three_and_two ... ok

test result: ok. 1 passed; 0 failed; 0 ignored; 0 measured; 6 filtered out; finished in 0.00s
也可以指定名字跑一组(只有名字里面包含了):
$cargo test add_
    Finished test [unoptimized + debuginfo] target(s) in 0.01s
     Running unittests src/lib.rs (target/debug/deps/adder-7763e46d5dd299a3)

running 2 tests
test tests::add_two_and_two ... ok
test tests::add_three_and_two ... ok

test result: ok. 2 passed; 0 failed; 0 ignored; 0 measured; 5 filtered out; finished in 0.00s
另外,如果有些case比较耗时,需要先不跑,此时可以先讲起ingron掉:
#[test]
fn it_works() {
    assert_eq!(2 + 2, 4);
}

#[test]
#[ignore]
fn expensive_test() {
    // code that takes an hour to run
}
这样再次指向cargo test是你,就会忽略掉该case了。而且如果需要跑这些ingore的case,可以
cargo test -- --ignored 这样又能够只跑这些ignore的case了 (比如你有时间了需要跑下)
The expensive_test function is listed as ignored. If we want to run only the ignored tests, we can use cargo test -- --ignored:
另外还可以 将ingnore和一起再跑:
If you want to run all tests whether they’re ignored or not, you can run
cargo test -- --include-ignored.
测试框架:一般分为unit test / ingrate test
一般unit test都放在src目录下module同个文件,定义tests模块,用#[cfg(test)]开头表示是测试模块
. The convention is to create a module named tests in each file to contain the test functions and to annotate the module with cfg(test)
because unit tests go in the same files as the code, you’ll use #[cfg(test)] to specify that they shouldn’t be included in the compiled result.
#[cfg(test)]
mod tests {
    #[test]
    fn it_works() {
        let result = 2 + 2;
        assert_eq!(result, 4);
    }
}
单元测试一般都测试的单个模块功能。
而integration测试 In Rust, integration tests are entirely external to your library. They use your library in the same way any other code would, which means they can only call functions that are part of your library’s public API. Their purpose is to test whether many parts of your library work together correctly.
Units of code that work correctly on their own could have problems when integrated, so test coverage of the integrated code is important as well. To create integration tests, you first need a tests directory.
集成测试一般放在test目录下面:
adder
├── Cargo.lock
├── Cargo.toml
├── src
│   └── lib.rs
└── tests
    └── integration_test.rs
可以每个集成测试一个单独的文件。另外跑测试也是和unit 测试一样也是遵循类似的规则。
集成测试就是确保各个模块间的api调用是符合预期的。
use adder;

#[test]
fn it_adds_two() {
    assert_eq!(4, adder::add_two(2));
}
这种测试主要是为了减少逻辑bug。Even though Rust’s type system and ownership rules help prevent some kinds of bugs, tests are still important to reduce logic bugs having to do with how your code is expected to behave.


 5万+
5万+


 被折叠的 条评论
为什么被折叠?
被折叠的 条评论
为什么被折叠?
 到【灌水乐园】发言


