


在开发中很多时候回遇到这种情况,我们在一般情况下不需要在界面上显示那么多控件,但是这些控件在特殊情况下又是需要被显示的,此时ViewStub就派上用场了,话不多说,直接代码讲解
首先我们定义一个布局(就是那个时而隐藏时而显示的布局啦 ) viewstub.xml
<?xml version="1.0" encoding="utf-8"?>
<LinearLayout xmlns:android="http://schemas.android.com/apk/res/android"
    android:layout_width="match_parent"
    android:layout_height="match_parent"
    android:orientation="vertical" >

    <EditText
        android:id="@+id/text1"
        android:hint="@string/moremsg"
        android:layout_width="fill_parent"
        android:layout_height="wrap_content"/>

    <EditText
        android:id="@+id/text2"
        android:hint="@string/moremsg"
        android:layout_width="fill_parent"
        android:layout_marginTop="10dp"
        android:layout_height="wrap_content"/>

    <EditText
        android:id="@+id/text3"
        android:hint="@string/moremsg"
        android:layout_width="fill_parent"
        android:layout_marginTop="10dp"
        android:layout_height="wrap_content"/>

</LinearLayout>
效果很简单,就是三个垂直排列的输入框。
接下来开始定义主布局(注意ViewStub只是一个控件,所以他的用法和Button这些没什么不同)
<LinearLayout xmlns:android="http://schemas.android.com/apk/res/android"
    xmlns:tools="http://schemas.android.com/tools"
    android:layout_width="match_parent"
    android:layout_height="match_parent"
    android:orientation="vertical"
    android:id="@+id/linear"
    tools:context="com.example.viewstub.MainActivity" >

    <EditText
        android:hint="输入姓名"
        android:layout_width="fill_parent"
        android:layout_height="wrap_content"/>

    <EditText
        android:hint="在此输入电话"
        android:layout_marginTop="10dp"
        android:layout_width="fill_parent"
        android:layout_height="wrap_content"/>


    <Button
        android:id="@+id/more"
        android:textSize="25sp"
        android:layout_width="fill_parent"
        android:layout_height="wrap_content"
        android:text="加载更多"/>

    <ViewStub
        android:id="@+id/viewstub"
        android:layout_width="fill_parent"
        android:layout="@layout/viewstub"
        android:layout_height="wrap_content"/>

</LinearLayout>
然后开始在主函数调用:
package com.example.viewstub;

import android.support.v7.app.ActionBarActivity;
import android.os.Bundle;
import android.view.Menu;
import android.view.MenuItem;
import android.view.View;
import android.view.View.OnClickListener;
import android.view.ViewStub;
import android.widget.Button;
import android.widget.EditText;
import android.widget.LinearLayout;

public class MainActivity extends ActionBarActivity {

	private ViewStub viewstub;
	private EditText text1, text2, text3;
	private Button more;
	private int flag; // 标记是否已经展开隐藏项 1代表是
	private View layout;

	@Override
	protected void onCreate(Bundle savedInstanceState) {
		super.onCreate(savedInstanceState);
		setContentView(R.layout.activity_main);
		viewstub = (ViewStub) findViewById(R.id.viewstub);
		this.more = (Button) findViewById(R.id.more);
		flag = 0;
		this.more.setOnClickListener(new OnClickListener() {

			@Override
			public void onClick(View v) {
				// TODO Auto-generated method stub
				if (flag == 0) {
					// viewstub.setVisibility(View.VISIBLE);
					if (viewstub != null) {
						View view = viewstub.inflate();
						text1 = (EditText) view.findViewById(R.id.text1);
						text2 = (EditText) view.findViewById(R.id.text2);
						text3 = (EditText) view.findViewById(R.id.text3);
						view = null;
					}
					flag = 1;
					more.setText("收起更多");
				} else {
					flag = 0;
					viewstub.setVisibility(View.INVISIBLE);
					more.setText("加载更多");
				}

			}
		});
	}

}
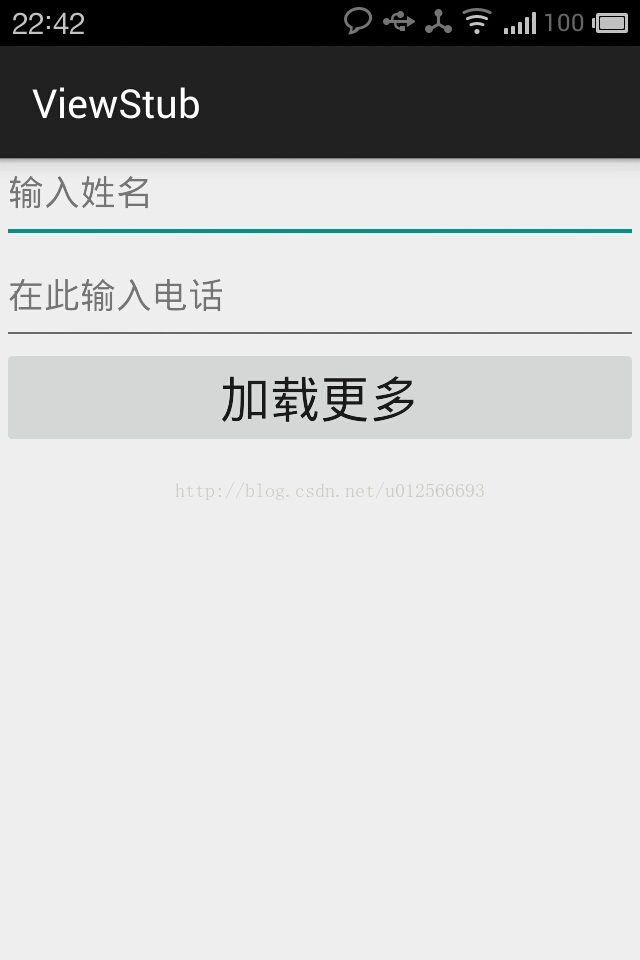
效果图如下:


 被折叠的 条评论
为什么被折叠?
被折叠的 条评论
为什么被折叠?
 到【灌水乐园】发言


