


上文已经写了如何去搭建注册中心,仅有注册中心是远远不够的,所以我们需要注册到注册中心并提供服务的节点,这里称为注册服务提供者
前提
阅读上文,并成功搭建注册中心,环境无需改变
项目搭建
这里我们需要新建一个maven项目,项目名称之前没有起好,这里就参考一下,我的是SpringCloudDemo,不要在意这些细节!
修改pom文件,参考如下:
注意:请看好这些jar包的版本号,文末我会贴出之前我搭建的两个比较简单的demo的github路径
<?xml version="1.0" encoding="UTF-8"?>
<project xmlns="http://maven.apache.org/POM/4.0.0" xmlns:xsi="http://www.w3.org/2001/XMLSchema-instance"
    xsi:schemaLocation="http://maven.apache.org/POM/4.0.0 http://maven.apache.org/xsd/maven-4.0.0.xsd">
    <modelVersion>4.0.0</modelVersion>

    <groupId>com.hellxz</groupId>
    <artifactId>SpringCloudDemo</artifactId>
    <version>0.0.1-SNAPSHOT</version>
    <packaging>jar</packaging>

    <name>SpringCloudDemo</name>
    <description>Demo project for Spring Boot</description>

    <parent>
        <groupId>org.springframework.boot</groupId>
        <artifactId>spring-boot-starter-parent</artifactId>
        <version>1.5.9.RELEASE</version>
        <relativePath/> <!-- lookup parent from repository -->
    </parent>
    <dependencyManagement>
        <dependencies>
            <dependency>
                <groupId>org.springframework.cloud</groupId>
                <artifactId>spring-cloud-dependencies</artifactId>
                <version>Camden.SR3</version>
                <type>pom</type>
                <scope>import</scope>
            </dependency>
        </dependencies>
    </dependencyManagement>

    <properties>
        <project.build.sourceEncoding>UTF-8</project.build.sourceEncoding>
        <project.reporting.outputEncoding>UTF-8</project.reporting.outputEncoding>
        <java.version>1.8</java.version>
    </properties>

    <dependencies>
        <dependency>
            <groupId>org.springframework.boot</groupId>
            <artifactId>spring-boot-starter-web</artifactId>
        </dependency>
        <dependency>
            <groupId>org.springframework.boot</groupId>
            <artifactId>spring-boot-starter-test</artifactId>
            <scope>test</scope>
        </dependency>
        <!--用于监控项目,提供项目中的状态信息-->
        <dependency>
            <groupId>org.springframework.boot</groupId>
            <artifactId>spring-boot-starter-actuator</artifactId>
        </dependency>
        <!--junit测试-->
        <dependency>
            <groupId>junit</groupId>
            <artifactId>junit</artifactId>
            <version>4.8.2</version>
        </dependency>
        <dependency>
            <groupId>org.springframework.cloud</groupId>
            <artifactId>spring-cloud-starter-eureka</artifactId>
        </dependency>
        <dependency>
            <groupId>org.springframework.cloud</groupId>
            <artifactId>spring-cloud-config-server</artifactId>
        </dependency>
    </dependencies>


    <build>
        <plugins>
            <plugin>
                <groupId>org.springframework.boot</groupId>
                <artifactId>spring-boot-maven-plugin</artifactId>
            </plugin>
            <plugin>
                <groupId>org.apache.maven.plugins</groupId>
                <artifactId>maven-compiler-plugin</artifactId>
                <configuration>
                    <source>1.8</source>
                    <target>1.8</target>
                </configuration>
            </plugin>

        </plugins>
    </build>

</project>
虽然版本号不同于EurekaServer注册中心项目,但是经实践是可以正常使用的,请放心
新建一个启动类(每个springboot项目中都有)
 1 package com.hellxz.springcloudhelloworld;
 2
 3 import org.springframework.boot.SpringApplication;
 4 import org.springframework.boot.autoconfigure.SpringBootApplication;
 5 import org.springframework.cloud.client.discovery.EnableDiscoveryClient;
 6
 7 /**
 8  * @Author : Hellxz
 9  * @Description: EurekaClient
10  * @Date : 2018/4/13 16:57
11  */
12 @EnableDiscoveryClient
13 @SpringBootApplication
14 public class SpringCloudDemoApplication {
15
16     public static void main(String[] args) {
17         SpringApplication.run(SpringCloudDemoApplication.class, args);
18     }
19 }
新建一个controller类,留作之后测试
 1 package com.hellxz.springcloudhelloworld;
 2
 3 import org.apache.log4j.Logger;
 4 import org.springframework.beans.factory.annotation.Autowired;
 5 import org.springframework.cloud.client.ServiceInstance;
 6 import org.springframework.cloud.client.discovery.DiscoveryClient;
 7 import org.springframework.web.bind.annotation.RequestMapping;
 8 import org.springframework.web.bind.annotation.RequestMethod;
 9 import org.springframework.web.bind.annotation.RestController;
10
11 /**
12  * @Author : Hellxz
13  * @Description: 服务提供者
14  * @Date : 2018/4/12 11:36
15  */
16 @RestController
17 public class SpringbootController {
18
19     @Autowired
20     private DiscoveryClient client; //注入发现客户端
21
22     private final Logger logger = Logger.getLogger(SpringbootController.class);
23
24     @RequestMapping(value = "/hello", method = RequestMethod.GET)
25     public String hello(){
26         //获取服务实例,作用为之后console显示效果
27         ServiceInstance serviceInstance = client.getLocalServiceInstance();
28         logger.info("/hello host:"+serviceInstance.getHost()+" service_id:" +serviceInstance.getServiceId());
29         return "hello";
30     }
31 }
在src/resources文件夹下创建application.yml 这次使用yaml进行配置,如果想尝试properties文件方式,请参考上文,此处配置的提供服务地址请参考注册中心的配置
server:
  port: 8080
spring:
  application:
    name: hello-service
eureka:
  client:
    serviceUrl:
      defaultZone:
        http://localhost:1111/eureka/
好了,我们将这个项目跑在8080端口,并可以去注册中心注册服务了
先启动注册中心的项目,待其启动完毕之后,在来启动本项目。
测试
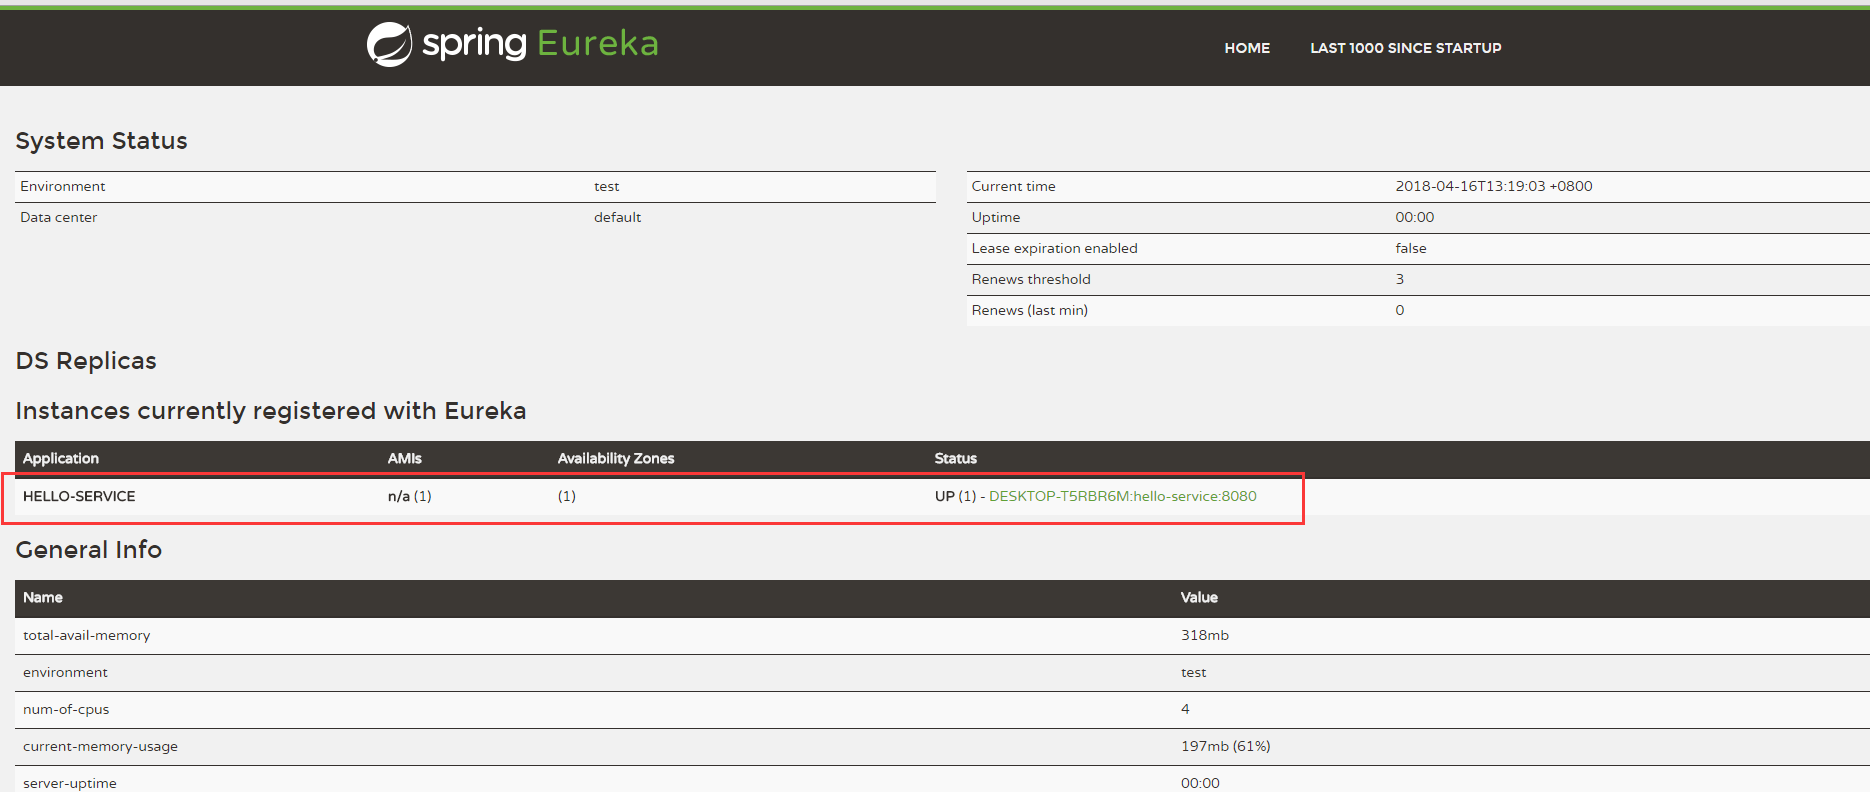
输入注册中心的url查看:localhost:1111
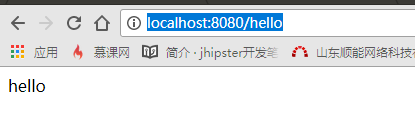
访问刚才配置的controller路径: http://localhost:8080/hello

如右图所示,注册成功。
此时我们就可以使用这个项目进行提供服务了
示例demo:
https://github.com/HellxZ/EurekaServer
https://github.com/HellxZ/EurekaClient


 274
274


 被折叠的 条评论
为什么被折叠?
被折叠的 条评论
为什么被折叠?
 到【灌水乐园】发言


