


最近手感不错,老想写点轮子。正好周末外卖点得多,就仿一仿“饿了么”好了。先上图吧,这样的订单页面是不是很眼熟:
右边的listview分好组以后,在左边的Tab页建立索引。可以直接导航,是不是很方便。关键在于右边滑动,左边也会跟着滑;而点击左边呢,也能定位右边的项。它们存在这样一种特殊的交互。像这种联动的效果,还有些常见的例子呢,比如知乎采用了常见的tabLayout+viewPager的联动,只不过是上下布局:
再看看点评,它的城市选择页面也有这种联动的影子,只是稍微弱一点。侧边栏可以对listview进行索引,这最早是在微信好友列表里出现的把:
趁着周末,我也撸一个。就拓展性而言,应该可以适配以上所有情况吧。我称其为LinkedLayout,看下效果图:

我把右边按5个一组,可以看到,左边的索引 = 右边/5
特点
- 右边滑动,左边跟着动
- 左边滑动到边界,右边跟着动
- 点击左边tab项,右边滑动定位到相应的group
源码
github 传送门: https://github.com/fashare2015/LinkedScrollDemo
知识点
做之前先罗列一下知识点,或者说我们能从这个demo里收获到什么。
- 面向抽象/接口编程
- 自定义 view
- 代理模式
- UML类图
- 复习 listview && recyclerview 的细节
感觉做完以后收获最大的还是第一点,面向接口编程。事实上,完成功能的时间只占了一半,后边的时间一直在抽象和重构;哎,一步到位太难了,还是老老实实写具体类,再抽取基类把。
构思
UI部分
LinkedLayout
要做的呢是两个相互关联的列表,在左边的作为tab页,右边的作为content页。先不考虑交互,我们来打个界面:搞一个叫做LinkedLayout的类,用来盛放tab和content:
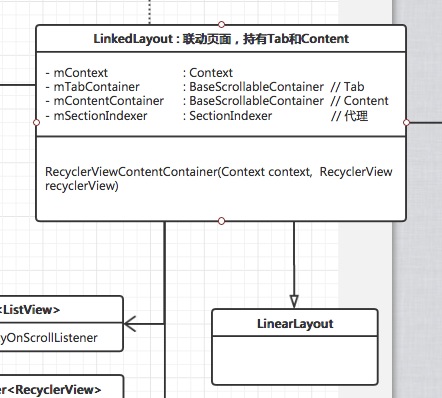
public class LinkedLayout extends LinearLayout {
    private Context mContext;
    private BaseScrollableContainer mTabContainer;
    private BaseScrollableContainer mContentContainer;
    private SectionIndexer mSectionIndexer; // 代理
    ...
}- 1
- 2
- 3
- 4
- 5
- 6
- 7
我们让它继承了LinearLayout,同时持有两个Container的东东,还有一个上帝对象mContext,以及一个分组用的SectionIndexer。
BaseScrollableContainer
先别管这些,主要看两个Container,从名字上看一个是tab页,一个是content页,嘿嘿。因为它们都能scroll嘛,干脆搞一个BaseScrollableContainer把。取名为Container呢,当然是致敬Fragment啦。我们来定义一下这个类:
初步一想,无非有一个 mContext, 一个 viewGroup, 还有一些 Listener 嘛:
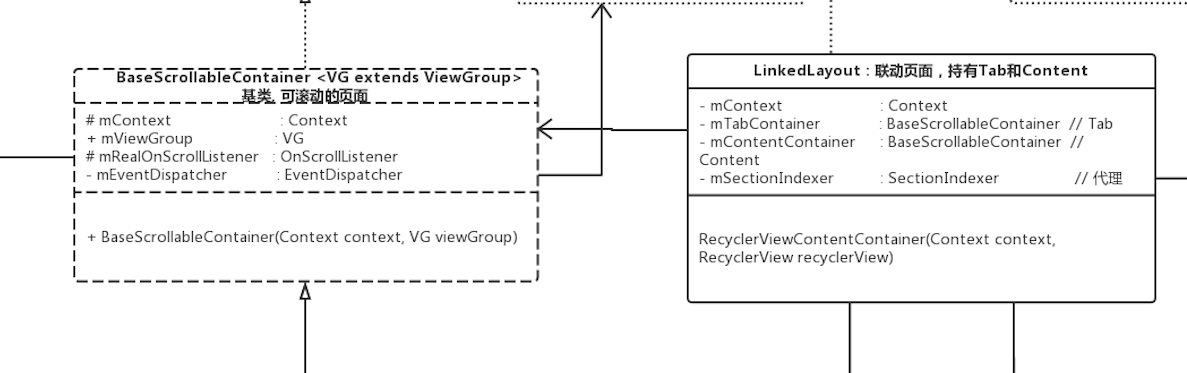
public abstract class BaseScrollableContainer<VG extends ViewGroup> {
    protected Context mContext;
    public VG mViewGroup;

    protected RealOnScrollListener mRealOnScrollListener;
    private EventDispatcher mEventDispatcher;
    ...
}- 1
- 2
- 3
- 4
- 5
- 6
- 7
- 8
和我们预想的差不多嘛,mContext上下文,mViewGroup基本就是指代我们的两个listview了吧。当然,我之后可是要做tablayout+viewpager的,肯定得依赖抽象,不能直接写listview啦。余下两个是Listener,等我们界面搭好,写交互的时候在看把。
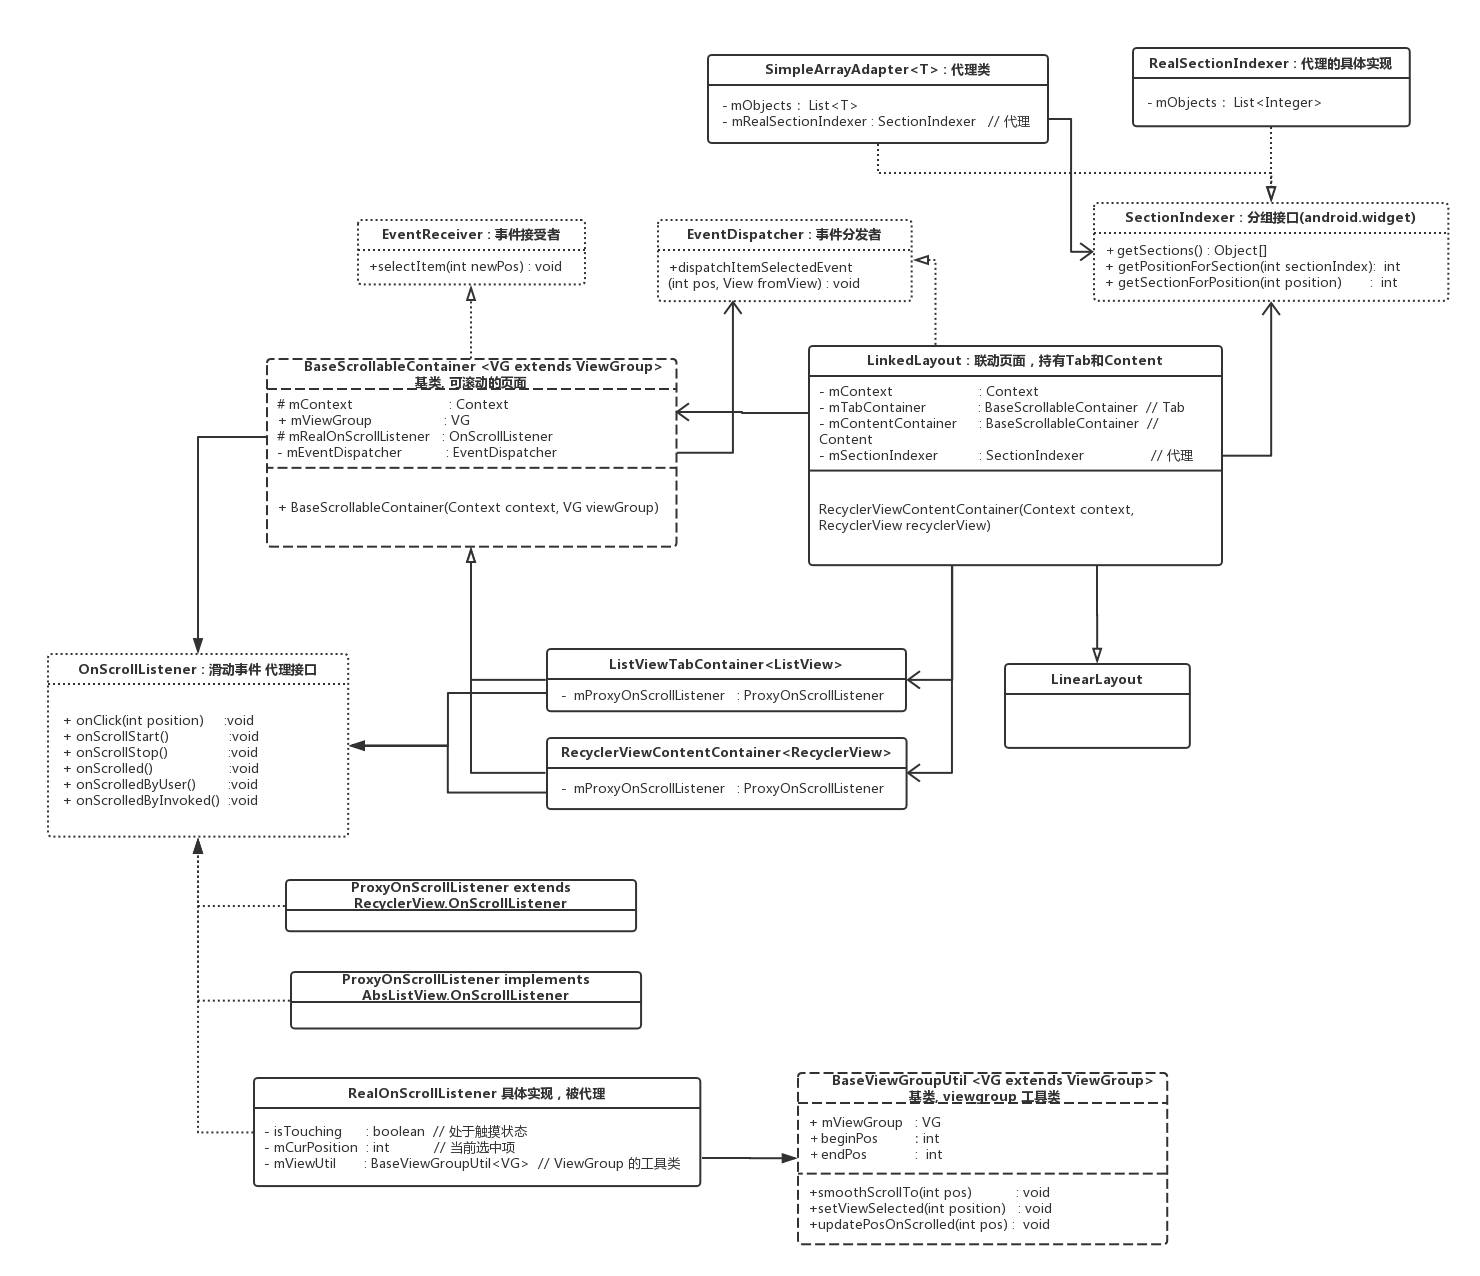
看来UML图还是有好处的,继承和依赖关系一目了然。
自定义View && 动态布局
好了到了自定义view地环节了。我们已经有了一个LinkedLayout,这是我们的activity_main.xml布局代码:
<?xml version="1.0" encoding="utf-8"?>
<RelativeLayout
    xmlns:android="http://schemas.android.com/apk/res/android"
    xmlns:tools="http://schemas.android.com/tools"
    android:layout_width="match_parent"
    android:layout_height="match_parent">

    <com.fashare.linkedscrolldemo.ui.LinkedLayout
        android:id="@+id/linked_layout"
        android:layout_width="match_parent"
        android:layout_height="match_parent"
        android:orientation="horizontal"/>
</RelativeLayout>- 1
- 2
- 3
- 4
- 5
- 6
- 7
- 8
- 9
- 10
- 11
- 12
- 13
擦,就没了嘛?剩下的得靠java代码来搞啦。回到LinkedLayout咱们来布局UI~:
public class LinkedLayout extends LinearLayout {
    ...
    private static final int MEASURE_BY_WEIGHT = 0;
    private static final float WEIGHT_TAB = 1;
    private static final float WEIGHT_CONTENT = 3;

    public void setContainers(BaseScrollableContainer tabContainer, BaseScrollableContainer contentContainer) {
        mTabContainer = tabContainer;
        mContentContainer = contentContainer;
        mTabContainer.setEventDispatcher(this);
        mContentContainer.setEventDispatcher(this);

        // 设置 LayoutParams
        mTabContainer.mViewGroup.setLayoutParams(new LinearLayout.LayoutParams(
                MEASURE_BY_WEIGHT,
                ViewGroup.LayoutParams.WRAP_CONTENT,
                WEIGHT_TAB
        ));

        mContentContainer.mViewGroup.setLayoutParams(new LinearLayout.LayoutParams(
                MEASURE_BY_WEIGHT,
                ViewGroup.LayoutParams.MATCH_PARENT,
                WEIGHT_CONTENT
        ));

        this.addView(mTabContainer.mViewGroup);
        this.addView(mContentContainer.mViewGroup);
        this.setOrientation(HORIZONTAL);
    }
}- 1
- 2
- 3
- 4
- 5
- 6
- 7
- 8
- 9
- 10
- 11
- 12
- 13
- 14
- 15
- 16
- 17
- 18
- 19
- 20
- 21
- 22
- 23
- 24
- 25
- 26
- 27
- 28
- 29
- 30
搞了个setContainers用来注入我们的Container,里边有一些像layout_height,layout_width,layout_weight,orientation之类的,很眼熟吧,和xml没差。顺便一提的是,我们用了weight属性来控制这个比例1:3,一直感觉这个属性比较神奇。。。
注入ViewGroup, 使用自定义的LinkedLayout
到这里为止,LinkedLayout已经布局好了,我们分别注入ViewGroup就可以用了。我这里分别用listview作tab,recyclerview作content。想像力有限,用来用去好像也就这么几个控件。。。这部分代码很简单,在MainActivity里,就不贴了。
子类化 BaseScrollableContainer
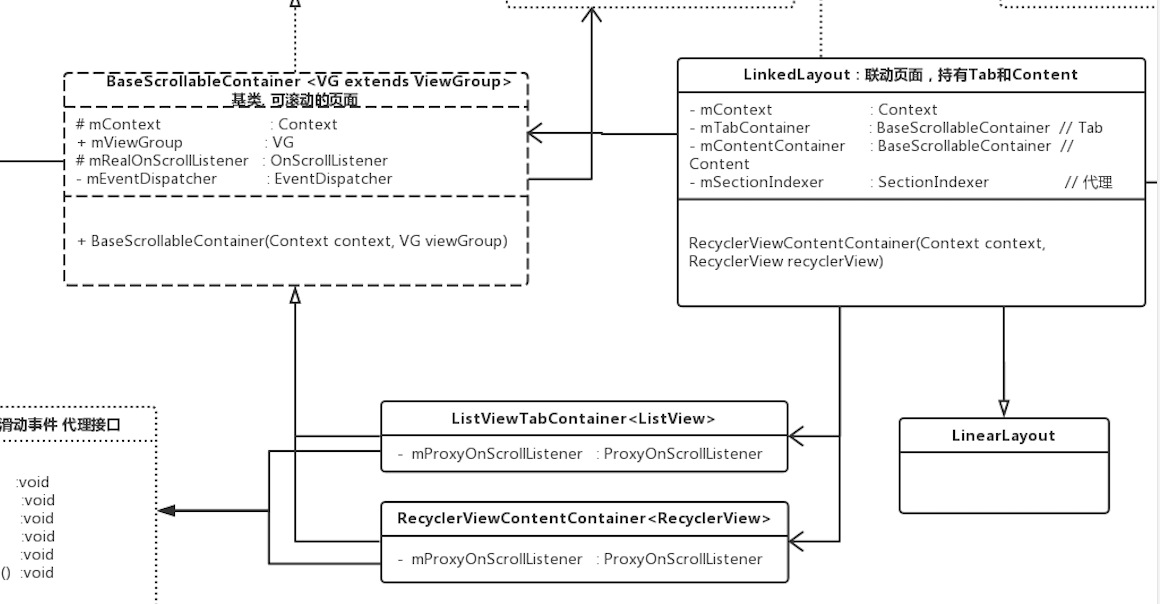
按照常理,下边应该实现基类了吧。前面的MainActivity中,我们是这样实例化的:
mTabContainer = new ListViewTabContainer(this, mListView);
mContentContainer = new RecyclerViewContentContainer(this, mRecyclerView);
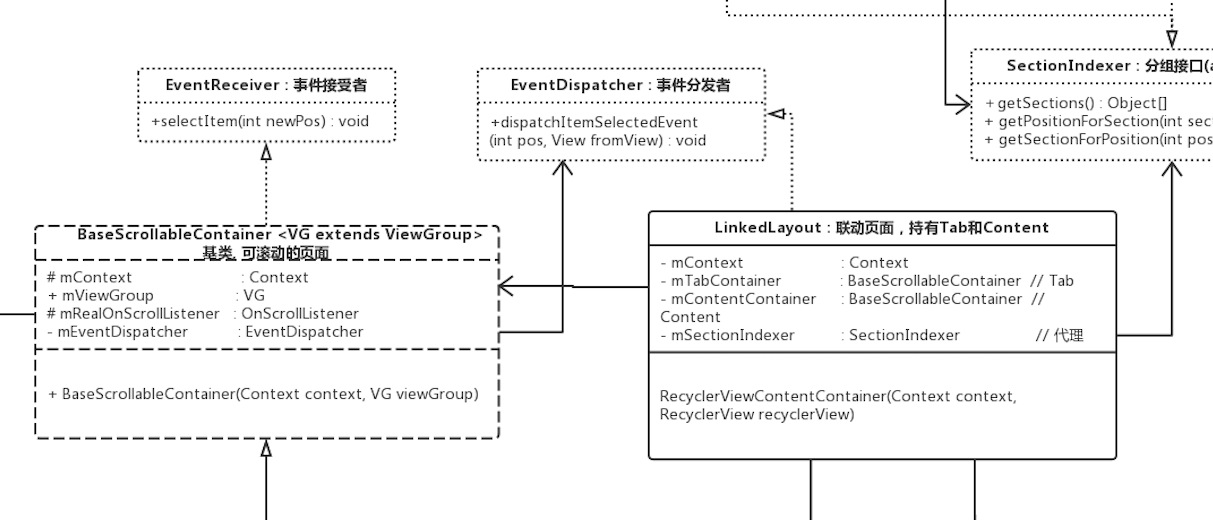
看名字一个是listview填充的tab,一个是recyclerview填充的content。就先实现这两个类吧,从图中可以看到,它们分别继承于BaseScrollableContainer,并被LinkedLayout所持有:
交互部分
与用户的交互:OnScrollListener 与 代理模式
终于到了交互部分,既然是滑动,那少不了定义监听器啦。然而,麻烦在于listview和recyclerview各自的OnScrollListener还不一样,这个时候如果各自实现的话,既麻烦,又有冗余。像这样子:
// RecyclerView
public class RecyclerViewContentContainer extends BaseScrollableContainer<RecyclerView> {
    ...
    @Override
    protected void setOnScrollListener() {
        mViewGroup.addOnScrollListener(new ProxyOnScrollListener());
    }

    private class ProxyOnScrollListener extends RecyclerView.OnScrollListener {
        @Override
        public void onScrollStateChanged(RecyclerView recyclerView, int newState) {
            if(newState == RecyclerView.SCROLL_STATE_IDLE) {            // 停止滑动
                1.停止时的逻辑...
            }else if(newState == RecyclerView.SCROLL_STATE_DRAGGING){   // 按下拖动
                2.刚刚拖动时的逻辑...
            }
        }

        @Override
        public void onScrolled(RecyclerView recyclerView, int dx, int dy) { // 滑动
            3.滑动时的逻辑...
        }
    }
}

// ListView
public class ListViewTabContainer extends BaseScrollableContainer<ListView> {
    ...
    @Override
    protected void setOnScrollListener() {
        mViewGroup.setOnScrollListener(new ProxyOnScrollListener());
        ...
    }

    public class ProxyOnScrollListener implements AbsListView.OnScrollListener{
        @Override
        public void onScrollStateChanged(AbsListView view, int scrollState) {
            if(scrollState == SCROLL_STATE_IDLE) {              // 停止滑动
                1.停止时的逻辑...
            }else if(scrollState == SCROLL_STATE_TOUCH_SCROLL)  // 按下拖动
                2.刚刚拖动时的逻辑...
        }

        @Override
        public void onScroll(AbsListView view, int firstVisibleItem, int visibleItemCount, int totalItemCount) {
            3.滑动时的逻辑...                // 滑动
        }
    }
}- 1
- 2
- 3
- 4
- 5
- 6
- 7
- 8
- 9
- 10
- 11
- 12
- 13
- 14
- 15
- 16
- 17
- 18
- 19
- 20
- 21
- 22
- 23
- 24
- 25
- 26
- 27
- 28
- 29
- 30
- 31
- 32
- 33
- 34
- 35
- 36
- 37
- 38
- 39
- 40
- 41
- 42
- 43
- 44
- 45
- 46
- 47
- 48
- 49
那该怎么办呢,虽然各自的OnScrollListener差异挺大,但是仔细观察可以发现其实很多逻辑都是类似的,可以共用的。这时恰恰可以用代理模式来做重构。我抽取了1、2、3处的逻辑,由于在抽象意义上是一致的,可以整理成接口:
public interface OnScrollListener {
    // tab 点击事件
    void onClick(int position);

    // 1.滑动开始
    void onScrollStart();

    // 2.滑动结束
    void onScrollStop();

    // 3.触发 onScrolled()
    void onScrolled();

    // 用户手动滑, 触发的 onScrolled()
    void onScrolledByUser();

    // 程序调用 scrollTo(), 触发的 onScrolled()
    void onScrolledByInvoked();
}- 1
- 2
- 3
- 4
- 5
- 6
- 7
- 8
- 9
- 10
- 11
- 12
- 13
- 14
- 15
- 16
- 17
- 18
- 19
与此同时,RecyclerView和ListView各自的监听器便分别作为代理类,把1、2、3的逻辑都委托给某个接盘侠,不必自己去实现,倒也落的轻松自在。如图所示:
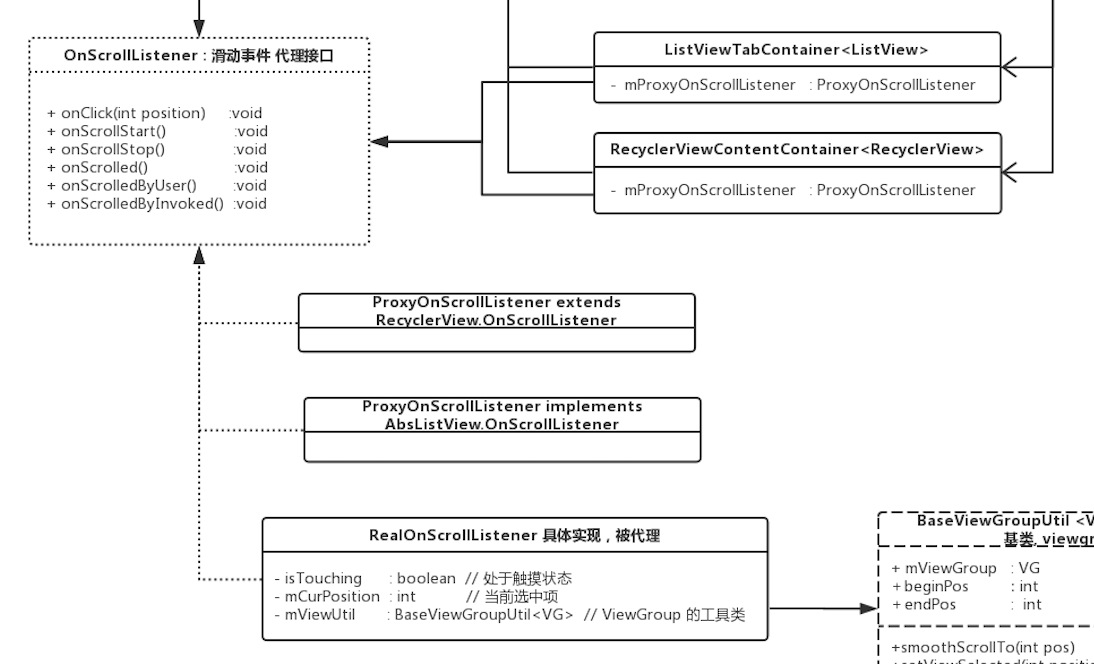
然后,让我们来看看这个接盘侠:RealOnScrollListener。。。
不愧是一个老实类,它老实地接盘了OnScrollListener的所有接口,并被两个代理类Proxy…所持有(图中并未画出。。)。
具体实现就不贴了,大家可以下源码来看。这里大致分析一下,它有三个成员:
public class RealOnScrollListener implements OnScrollListener {
    public boolean isTouching = false;  // 处于触摸状态
    private int mCurPosition = 0;       // 当前选中项
    private BaseViewGroupUtil<VG> mViewUtil; // ViewGroup 工具类
    ...
}- 1
- 2
- 3
- 4
- 5
- 6
isTouching:
为啥要维护这个触摸状态呢?这是由于我们的效果是联动的。这就比较讨厌了,当onScrolled()被调用,我们分不清是用户的滑动,还是来自另一个列表滑动时的联动效果。那我们记录一下isTouching状态呢,就能区分开这两种情况了。
更改isTouching的逻辑在onScrollStart()和onScrollStop()里边。mCurPosition:
这个很好解释,我们每次滑动需要记录当前位置,然后通知另一个列表进行联动。
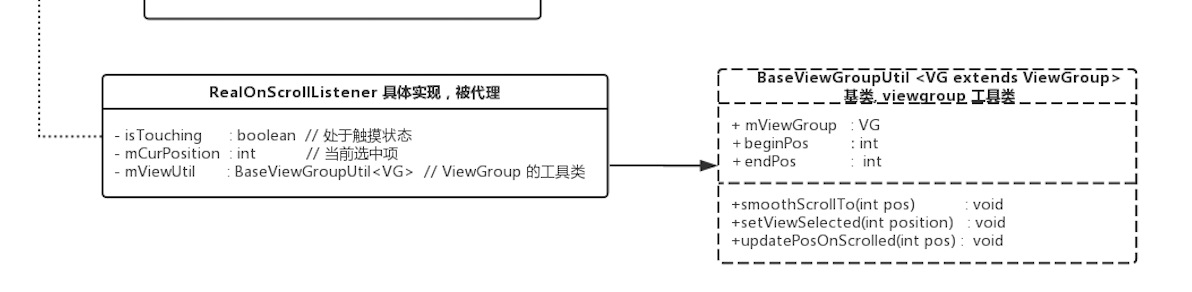
这段逻辑在onScrolled()里边。mViewUtil:
一个工具库,用于简化逻辑。大概有scrollTo(),setViewSelected(),UpdatePosOnScrolled()等方法,如图:
两个Container之间的交互
之前都是对用户的交互,终于到联动部分了。不急着实现,先回答我一个问题:假设我一个Activity里持有两个Fragment,问它们之间如何通信?
- A同学大声道:用广播
- B同学:EventBus !!!
- C同学:看我 RxBus 。。。
别闹好吗。。。给我老老实实用Listener。显然,我们这里面临的是同样的场景。LinkedLayout=Activity,Container=Fragment。
动手前先定义Listener吧,要取个中二点的名字:
/*
 * 事件分发者
 */
public interface EventDispatcher {
    /**
     * 分发事件: fromView 中的 pos 被选中
     * @param pos
     * @param fromView
     */
    void dispatchItemSelectedEvent(int pos, View fromView);
}

/*
 * 事件接受者
 */
public interface EventReceiver {
    /**
     * 收到事件: 立即选中 newPos
     * @param newPos
     */
    void selectItem(int newPos);
}- 1
- 2
- 3
- 4
- 5
- 6
- 7
- 8
- 9
- 10
- 11
- 12
- 13
- 14
- 15
- 16
- 17
- 18
- 19
- 20
- 21
- 22
然后LinkedLayout作为父级元素,肯定是分发者的角色,应当实现EventDispatcher;而BaseScrollableContainer作为子元素,接受该事件,应当实现EventReceiver。看下类图:
看下相应的实现(EventReceiver):
public abstract class BaseScrollableContainer<VG extends ViewGroup>
        implements EventReceiver {
    protected RealOnScrollListener mRealOnScrollListener;
    private EventDispatcher mEventDispatcher; // 持有分发者
    ...
    public void setEventDispatcher(EventDispatcher eventDispatcher) {
        mEventDispatcher = eventDispatcher;
    }

    // 掉用 mEventDispatcher,也就是 LinkedLayout
    protected void dispatchItemSelectedEvent(int curPosition){
        if(mEventDispatcher != null)
            mEventDispatcher.dispatchItemSelectedEvent(curPosition, mViewGroup);
    }

    @Override
    public void selectItem(int newPos) {
        mRealOnScrollListener.selectItem(newPos);
    }

    // OnScrollListener: 代理模式
    public class RealOnScrollListener implements OnScrollListener {
        ...
        public void selectItem(int position){
            mCurPosition = position;
            Log.d("setitem", position + "");
            // 来自另一边的联动事件
            mViewUtil.smoothScrollTo(position);
//            if(mViewUtil.isVisiblePos(position))    // curSection 可见时, 不滚动
                mViewUtil.setViewSelected(position);
        }

        @Override
        public void onClick(int position) {
            isTouching = true;
            mViewUtil.setViewSelected(mCurPosition = position);
            dispatchItemSelectedEvent(position);  // 点击tab,分发事件
            isTouching = false;
        }
        ...
        @Override
        public void onScrolled() {
            mCurPosition = mViewUtil.updatePosOnScrolled(mCurPosition);
            if(isTouching)          // 来自用户, 通知 对方 联动
                onScrolledByUser();
            else                    // 来自对方, 被动滑动不响应
                onScrolledByInvoked();
        }

        @Override
        public void onScrolledByUser() {
            dispatchItemSelectedEvent(mCurPosition);    // 来自用户, 通知 对方 联动
        }
    }
}- 1
- 2
- 3
- 4
- 5
- 6
- 7
- 8
- 9
- 10
- 11
- 12
- 13
- 14
- 15
- 16
- 17
- 18
- 19
- 20
- 21
- 22
- 23
- 24
- 25
- 26
- 27
- 28
- 29
- 30
- 31
- 32
- 33
- 34
- 35
- 36
- 37
- 38
- 39
- 40
- 41
- 42
- 43
- 44
- 45
- 46
- 47
- 48
- 49
- 50
- 51
- 52
- 53
- 54
- 55
再看(EventDispatcher):
public class LinkedLayout extends LinearLayout implements EventDispatcher {
    private BaseScrollableContainer mTabContainer;
    private BaseScrollableContainer mContentContainer;
    private SectionIndexer mSectionIndexer; // 分组接口
    ...

    @Override
    public void dispatchItemSelectedEvent(int pos, View fromView) {
        if (fromView == mContentContainer.mViewGroup) { // 来自 content, 转发给 tab
            int convertPos = mSectionIndexer.getSectionForPosition(pos);
            mTabContainer.selectItem(convertPos);
        } else {                    // 来自 tab, 转发给 content
            int convertPos = mSectionIndexer.getPositionForSection(pos);
            mContentContainer.selectItem(convertPos);
        }
    }
}- 1
- 2
- 3
- 4
- 5
- 6
- 7
- 8
- 9
- 10
- 11
- 12
- 13
- 14
- 15
- 16
- 17
总结
到此为止,有没有一种酣畅淋漓的感觉?不管怎么说,面向对象是信仰,定义好接口以后,实现起来怎么写怎么舒服。
// TODO: 之前说了,这个联动是通用的。之后有时间会继续实现一个tablayout+viewPager的联动…
彩蛋
高清无码类图:(完整)


 1598
1598

 被折叠的 条评论
为什么被折叠?
被折叠的 条评论
为什么被折叠?
 到【灌水乐园】发言


