


原创文章,转载请注明来处
1、硬件抽象层的编写规范
Android系统的硬件抽象层以模块的形式来管理各个硬件访问接口。每一个硬件模块都对应有一个动态链接库文件。在系统内部,每一个硬件抽象层模块都使用结构体hw_module_t来描述,而硬件设备则使用结构体hw_device_t来描述
typedef struct fingerprint_module {
    struct hw_module_t common;
} fingerprint_module_t;

#define FINGERPRINT_HARDWARE_MODULE_ID "fingerprint"
#define HAL_MODULE_INFO_SYM_AS_STR "HMI"

fingerprint_module_t HAL_MODULE_INFO_SYM = {
    .common = {
        .tag                	= HARDWARE_MODULE_TAG,
        .module_api_version 	= FINGERPRINT_MODULE_API_VERSION_2_0,
        .hal_api_version    	= HARDWARE_HAL_API_VERSION,
        .id                 	= FINGERPRINT_HARDWARE_MODULE_ID,
        .name                   = "Demo Fingerprint HAL",
        .author             	= "The Android Open Source Project",
        .methods            	= &fingerprint_module_methods,
    },
};
2、硬件抽象层的加载过程
Android中实现调用HAL是通过hw_get_module实现的
int hw_get_module(const char *id, const struct hw_module_t **module)
{
	……
    /* First try a property specific to the class and possibly instance */
    snprintf(prop_name, sizeof(prop_name), "ro.hardware.%s", name);
    if (property_get(prop_name, prop, NULL) > 0) {
        if (hw_module_exists(path, sizeof(path), name, prop) == 0) {
            goto found;
        }
    }
    /* Loop through the configuration variants looking for a module */
    for (i=0 ; i<HAL_VARIANT_KEYS_COUNT; i++) {
        if (property_get(variant_keys[i], prop, NULL) == 0) {
            continue;
        }
        if (hw_module_exists(path, sizeof(path), name, prop) == 0) {
            goto found;
        }
    }
    /* Nothing found, try the default */
    if (hw_module_exists(path, sizeof(path), name, "default") == 0) {//这里默认加载system/lib/hw/xxx.default.so
        goto found;
    }
    return -ENOENT;
found:
    /* load the module, if this fails, we're doomed, and we should not try
     * to load a different variant. */
    return load(class_id, path, module); //load函数是关键,调用load函数打开动态链接库
}
static int load(const char *id,
        const char *path,
        const struct hw_module_t **pHmi)
{
……
    handle = dlopen(path, RTLD_NOW);// 打开一个动态链接库,获取其句柄
……
    const char *sym = HAL_MODULE_INFO_SYM_AS_STR;
    hmi = (struct hw_module_t *)dlsym(handle, sym);//根据动态链接库操作句柄与符号,返回符号对应的地址
	……
    /* Check that the id matches */
    if (strcmp(id, hmi->id) != 0) {//与所要求加载的硬件抽象层模块ID对比
        ALOGE("load: id=%s != hmi->id=%s", id, hmi->id);
        status = -EINVAL;
        goto done;
    }
	……
}
这里有个宏#define HAL_MODULE_INFO_SYM_AS_STR "HMI"
其中 hmi = (struct hw_module_t *)dlsym(handle, sym);
这里是查找“HMI”这个导出符号,转换为一个hw_module_t结构体指针,获得了这个hw_module_t结构体指针之后,调用strcmp函数来验证加载得到的硬件抽象层模块ID是否与所要求加载的硬件抽象层模块ID一致。Hal层就是通过这种方式来加载动态库的。
3、hal层指纹库的兼容
知道了库的加载过程之后,对于不用指纹所用的不同库如何兼容这个问题就很好办了。
我们只需将不同指纹库的模块ID分别用不同的名字命名,利用不同指纹设备会在dev底下生成不同的设备节点来判断需要加载哪一个指纹库即可,代码如下
int64_t FingerprintDaemonProxy::openHal() {
int err;
const hw_module_t *hw_module = NULL;
int i;
const char *fingerprint_id = "fingerprint";
int len = sizeof(fingerprint_list) / sizeof(fingerprint_dev_t);
for (i = 0;i < len; i++) {
if (!access(fingerprint_list[i].dev_name, F_OK)) {
fingerprint_id = fingerprint_list[i].dev_id;
property_set("sys.fingerprint.chip", fingerprint_list[i].chip_name);
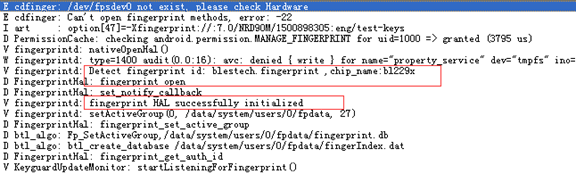
ALOG(LOG_VERBOSE, LOG_TAG, "Detect fingerprint id: %s ,chip_name:%s\n", fingerprint_id,fingerprint_list[i].chip_name);
}
}
if (0 != (err = hw_get_module(fingerprint_id, &hw_module))) {
ALOGE("Can't open fingerprint [%s] HW Module, error: %d", fingerprint_id, err);
if (0 != (err = hw_get_module(FINGERPRINT_HARDWARE_MODULE_ID, &hw_module))) {
ALOGE("Can't open fingerprint HW Module, error: %d", err);
return 0;
}
}
if (NULL == hw_module) {
ALOGE("No valid fingerprint module");
return 0;
}
typedef struct fingerprint_dev {
const char *dev_name;
const char *dev_id;
const char *chip_name;
} fingerprint_dev_t;
fingerprint_dev_t fingerprint_list[] = {
{
.dev_name = "/dev/goodix_fp",
.dev_id = "fingerprint",
.chip_name = "goodix",
},
{
.dev_name = "/dev/bl229x",
.chip_name = "bl229x",
},
}


 2592
2592


 被折叠的 条评论
为什么被折叠?
被折叠的 条评论
为什么被折叠?
 到【灌水乐园】发言


