


react native实现登录功能,包括ui的封装、网络请求的封装、导航器的实现、点击事件。
demo下载:react-native 完整实现登录功能
后台如果是springmvc实现的需要配置上如下代码
<!--加入multipart 的解析器,这个必须配置,一会在controller里抓取上传文件时要用。否则会报错。-->
<bean id="multipartResolver" class="org.springframework.web.multipart.commons.CommonsMultipartResolver">
<property name="maxUploadSize" value="102400"></property>
<property name="defaultEncoding" value="utf-8"/><!--属性:编码-->
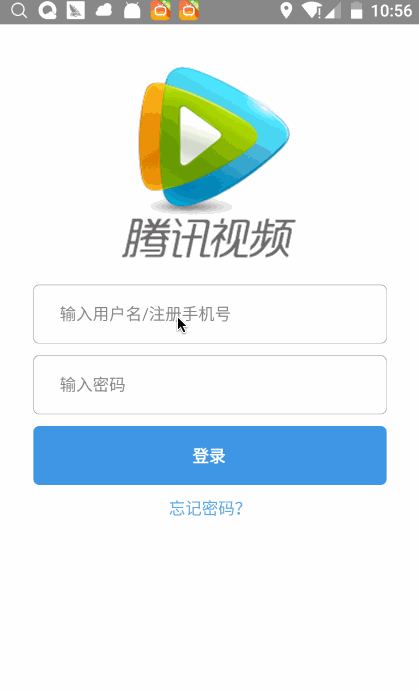
</bean>1.实现的界面
2.完整目录

3.主界面的代码实现
import React, { Component } from 'react';
import {
  ToolbarAndroid,
  AppRegistry,
  StyleSheet,
  Text,
  View,
  Image,
  TextInput,
  TouchableOpacity
} from 'react-native';
import EditView from '../lib/EditView';
import LoginButton from '../lib/LoginButton';
import LoginSuccess from '../ui/LoginSuccess';
import NetUitl from '../lib/NetUtil';
export default class LoginActivity extends Component {
  constructor(props) {
    super(props);
    this.userName = "";
    this.password = "";
  }

  render() {
      return (

    <View style={LoginStyles.loginview}>
     <View   style={{flexDirection: 'row',height:100,marginTop:1,
        justifyContent: 'center',
        alignItems: 'flex-start',}}>
       <Image source={require('../image/login.png')}/>
     </View>
     <View style={{marginTop:80}}>
       <EditView  name='输入用户名/注册手机号' onChangeText={(text) => {
            this.userName = text;
        }}/>
       <EditView name='输入密码' onChangeText={(text) => {
            this.password = text;
        }}/>
        <LoginButton name='登录' onPressCallback={this.onPressCallback}/>
        <Text style={{color:"#4A90E2",textAlign:'center',marginTop:10}} >忘记密码?</Text>
      </View>
     </View>
   )
  }


  onPressCallback = () => {
    let formData = new FormData();
    formData.append("loginName",this.userName);
    formData.append("pwd",this.password);
    let url = "http://localhost:8080/loginApp";
    NetUitl.postJson(url,formData,(responseText) => {
          alert(responseText);
          this.onLoginSuccess();
    })


  };

  //跳转到第二个页面去
    onLoginSuccess(){
     const { navigator } = this.props;
     if (navigator) {
       navigator.push({
         name : 'LoginSuccess',
         component : LoginSuccess,
       });
     }
   }

}

class loginLineView extends Component {
  render() {
    return (
        <Text >
            没有帐号
          </Text>
    );
  }
}

const LoginStyles = StyleSheet.create({
  loginview: {
    flex: 1,
    padding: 30,
      backgroundColor: '#ffffff',
  },
});
说明:
1.使用了线性布局,从上往下依次Image,EditView,LoginButton,Text
2.EditView和LoginButton 为自定义控件,实现输入框,和按钮的封装。
4.EditView.js
import React, { Component } from 'react';
import {
  ToolbarAndroid,
  AppRegistry,
  StyleSheet,
  Text,
  View,
  Image,
  TextInput,
  TouchableOpacity
} from 'react-native';
export default class EditView extends Component {
  constructor(props) {
   super(props);
   this.state = {text: ''};
 }

  render() {
    return (
      <View style={LoginStyles.TextInputView}>
       <TextInput style={LoginStyles.TextInput}
         placeholder={this.props.name}
         onChangeText={
           (text) => {
             this.setState({text});
             this.props.onChangeText(text);
           }
        }
       />
       </View>
    );
  }
}


const LoginStyles = StyleSheet.create({
  TextInputView: {
    marginTop: 10,
    height:50,
    backgroundColor: '#ffffff',
    borderRadius:5,
    borderWidth:0.3,
    borderColor:'#000000',
    flexDirection: 'column',
    justifyContent: 'center',
  },

  TextInput: {
    backgroundColor: '#ffffff',
    height:45,
    margin:18,
  },
});
说明:
1.利用TextInput的onChangeText 方法获取到输入框中输入的数据,在利用EditView 传入的onChangeText回调方法,把数据回调出封装的EditView,在外部获取到TextInput输入的数据。
5.LoginButton.js
import React, { Component } from 'react';
import {
  ToolbarAndroid,
  AppRegistry,
  StyleSheet,
  Text,
  View,
  Image,
  TextInput,
  TouchableOpacity
} from 'react-native';
export default class LoginButton extends Component {
  constructor(props) {
   super(props);
   this.state = {text: ''};
  }
  render() {
    return (
      <TouchableOpacity onPress={this.props.onPressCallback} style={LoginStyles.loginTextView}>
        <Text style={LoginStyles.loginText} >
            {this.props.name}
        </Text>
      </TouchableOpacity>
    );
  }
}
const LoginStyles = StyleSheet.create({

  loginText: {
    color: '#ffffff',
     fontWeight: 'bold',
     width:30,
  },
  loginTextView: {
    marginTop: 10,
    height:50,
    backgroundColor: '#3281DD',
    borderRadius:5,
    flexDirection: 'row',
    justifyContent: 'center',
    alignItems:'center',
  },
});
说明:
1.利用TouchableOpacity包住Text实现点击效果,onPress是点击时调用,当点击时onPress触发,调用外部传入的onPressCallback 方法实现触发事件在封装的LoginButton外部定义触发的效果。
6.NetUtil.js
let NetUtil = {
  postJson(url, data, callback){
        var fetchOptions = {
          method: 'POST',
          headers: {
            'Accept': 'application/json',
            'Content-Type': 'multipart/form-data;boundary=6ff46e0b6b5148d984f148b6542e5a5d'
          },
          body:data
        };

        fetch(url, fetchOptions)
        .then((response) => response.text())
        .then((responseText) => {
         //  callback(JSON.parse(responseText));
           callback(responseText);
        }).done();
  },
}
export default NetUtil;
说明:网络方法,依次传入请求地址,请求参数,成功回调事件
7.LoginSuccess.js
import React from 'react';
import {
    View,
    Navigator,
    TouchableOpacity,
    ToolbarAndroid,
    Text
} from 'react-native';
export default class LoginSuccess extends React.Component {
    constructor(props){
        super(props);
        this.state = {};

    }
    //回到第一个页面去
    onJump(){
        const { navigator } = this.props;
        if (navigator) {
            navigator.pop();
        }
    }

    render(){
        return (

            <View >
                <TouchableOpacity onPress = {this.onJump.bind(this)}>
                    <Text> 登录成功,点击返回登录页面 </Text>
                </TouchableOpacity>
            </View>


        );

    }

}
说明:登录成功后跳转的界面
8.navigator.js
导航器控制类。利用name,component 实现导航(可以自己随便定义命名,只要后面的类中访问同样的命名即可,课参考LoginSuccess.js 中的返回功能)
/**
 * Sample React Native App
 * https://github.com/facebook/react-native
 * @flow
 */

import React, { Component } from 'react';
import {
  AppRegistry,
  StyleSheet,
  Text,
  View,
  Navigator
} from 'react-native';
import Main from './ui/main';
export default class navigator extends Component {
   constructor(props) {
     super(props);
   }
   render() {
    let defaultName = 'Main';
    let defaultComponent = Main;
    return (
      <Navigator
        initialRoute = {{name : defaultName , component: defaultComponent}}
        configureScene = {(route) => {
          return Navigator.SceneConfigs.VerticalDownSwipeJump;
        }}
        renderScene={(route,navigator) => {
            let Component = route.component;
            return <Component {...route.params} navigator = {navigator} />
        }}
        />
    );
  }

};
8.index.android.js
规定的类
/**
 * Sample React Native App
 * https://github.com/facebook/react-native
 * @flow
 */
import React, { Component } from 'react';
import {
  ToolbarAndroid,
  AppRegistry,
  StyleSheet,
  Text,
  View,
  Image,
  TextInput,
  TouchableOpacity
} from 'react-native';
import Navigator from './app/navigator';
AppRegistry.registerComponent('AwesomeProject', () => Navigator);


 1万+
1万+

 被折叠的 条评论
为什么被折叠?
被折叠的 条评论
为什么被折叠?
 到【灌水乐园】发言


