


Routing模式,官方的解释是Receiving messages selectively,它的结构是
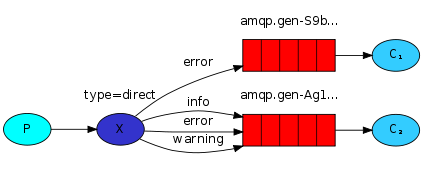
消费者各自监控自己的队列;交换机确定生产者的消息放入那个队列。其实这就是用Diret类型的交换机实现
接上个博客的项目过来..包括对应的配置,
6、配置文件。增加类DirectRabbitConfig,编制代码为
package com.rabbitMq.Routing;

import org.springframework.amqp.core.Binding;
import org.springframework.amqp.core.BindingBuilder;
import org.springframework.amqp.core.DirectExchange;
import org.springframework.amqp.core.Queue;
import org.springframework.context.annotation.Bean;
import org.springframework.context.annotation.Configuration;

/**Routing 模式.配置类
 * @author Administrator
 *
 */
@Configuration
public class DirectRabbitConfig {

    @Bean
    public Queue AMessage() {
        return new Queue("direct.A");
    }

    @Bean
    public Queue BMessage() {
        return new Queue("direct.B");
    }

    @Bean
    DirectExchange directExchange() {
        return new DirectExchange("directExchange");
    }

    @Bean
    Binding bindingExchangeMessage(Queue AMessage, DirectExchange exchange) {
        return BindingBuilder.bind(AMessage).to(exchange).with("orange");
    }

    @Bean
    Binding bindingExchangeMessageBOfBlack(Queue BMessage, DirectExchange exchange) {
        return BindingBuilder.bind(BMessage).to(exchange).with("black");
    }

    @Bean
    Binding bindingExchangeMessageBOfGreen(Queue BMessage, DirectExchange exchange) {
        return BindingBuilder.bind(BMessage).to(exchange).with("green");
    }

}
A、定于两个队列
B、定义一个Direct交换机
C、三个绑定策略
7、消息发送。增加类DirectSender,编制代码为
package com.rabbitMq.Routing;

import org.slf4j.Logger;
import org.slf4j.LoggerFactory;
import org.springframework.amqp.core.AmqpTemplate;
import org.springframework.beans.factory.annotation.Autowired;
import org.springframework.stereotype.Component;

@Component
public class DirectSender {


    protected static Logger logger=LoggerFactory.getLogger(DirectSender.class);

    @Autowired
    private AmqpTemplate rabbitTemplate;
    public void sendOrange() {
        String context = "hi, i am message orange";
        logger.debug("Sender : " + context);
        this.rabbitTemplate.convertAndSend("directExchange", "orange", context);
    }

    public void sendBlack() {
        String context = "hi, i am messages black";
        logger.debug("Sender : " + context);
        this.rabbitTemplate.convertAndSend("directExchange", "black", context);
    }

    public void sendGreen() {
        String context = "hi, i am messages green";
        logger.debug("Sender : " + context);
        this.rabbitTemplate.convertAndSend("directExchange", "green", context);
    }
}
两个对应的执行类.
package com.rabbitMq.Routing;

import org.slf4j.Logger;
import org.slf4j.LoggerFactory;
import org.springframework.amqp.rabbit.annotation.RabbitHandler;
import org.springframework.amqp.rabbit.annotation.RabbitListener;
import org.springframework.stereotype.Component;

@Component
@RabbitListener(queues = "direct.A")
public class DirectReceiverA {

    protected static Logger logger=LoggerFactory.getLogger(DirectReceiverA.class);

    @RabbitHandler
    public void process(String message) {
        logger.debug("direct.A Receiver  : " + message);
    }

}
package com.rabbitMq.Routing;

import org.slf4j.Logger;
import org.slf4j.LoggerFactory;
import org.springframework.amqp.rabbit.annotation.RabbitHandler;
import org.springframework.amqp.rabbit.annotation.RabbitListener;
import org.springframework.stereotype.Component;

@Component
@RabbitListener(queues = "direct.B")
public class DirectReceiverB {

    protected static Logger logger=LoggerFactory.getLogger(DirectReceiverB.class);

    @RabbitHandler
    public void process(String message) {
        logger.debug("direct.B Receiver   : " + message);
    }

}
package com.rabbitMq.Routing;

import org.springframework.beans.factory.annotation.Autowired;
import org.springframework.web.bind.annotation.RequestMapping;
import org.springframework.web.bind.annotation.RestController;

/**感觉这个模式和第一个那个好像很像,不过区分细一点总是好的.
 * @author Administrator
 *
 */
@RestController
@RequestMapping("/routing")
public class DirectController {

	@Autowired
	private DirectSender directSender;

	@RequestMapping("/send1")
	public String send1() {
		directSender.sendOrange();
		return "send1 orange ok";
	}

	@RequestMapping("/send2")
	public String send2() {
		directSender.sendBlack();
		return "send2  black ok";
	}

	@RequestMapping("/send3")
	public String send3() {
		directSender.sendGreen();
		return "send3 green ok";
	}
}
运行看对应的输入日志
浏览器上依次访问:http://localhost:8080/routing/send2
- 13、小结
-
- A、在配置文件中,定义了一个DirectExchange,然后对两个队列,分别配置了绑定规则。(变更绑定规则测试时,先停止命令行的spring-boot,再删除rabbitmq management中的队列)。
- B、发送器,发送send1会匹配到第一个Receiver收到消息,发送send2、send3都匹配到Receiver2收到消息。
- 发送器在发送消息时,使用的方法是需要传入一个特定的交换机的,以及路由规则
- C、接收器,依然各自监控自己的队列;


 1379
1379

 被折叠的 条评论
为什么被折叠?
被折叠的 条评论
为什么被折叠?
 到【灌水乐园】发言


