


一,Spring AOP
–1,概述
是面向切面编程,扩展了面向对象的不足.
切面Aspect: 其实就是一个类, 要用@Aspect注解
通知Advice: 就是类里的方法, 分为:前置通知 后置通知 环绕通知 返回后通知 异常通知
切点Pointcut: 就是定义了方法的触发时间,切入点表达式
–2,使用步骤
加入jar包
<dependencies>
     <!--添加aop依赖包-->
     <dependency>
         <groupId>org.springframework.boot</groupId>
         <artifactId>spring-boot-starter-aop</artifactId>
     </dependency>
 </dependencies>
–3,创建切面
package cn.tedu.service;
import org.aspectj.lang.JoinPoint;
import org.aspectj.lang.ProceedingJoinPoint;
import org.aspectj.lang.annotation.*;
import org.springframework.stereotype.Component;
@Component
@Aspect //切面:通知 + 切点
public class Timer {
    //2,切点表达式,通过execution属性声明
    //* cn.tedu.service.*.*(..) 方法返回值 包名.类名.方法名(参数列表)
    @Pointcut("execution(* cn.tedu.controller.*.*(..))")
    public void pointcut(){}
    //1,通知:分类: 前置通知  后置通知  环绕通知  返回后通知  异常通知
    //前置通知:在调用你的目标方法前,就要执行
    @Before("pointcut()")
    public void beforeMethod(JoinPoint joinPoint){
        System.out.println("我是前置通知~~~~~");
        //常见的使用场景:权限   缓存  开启事务  日志
    }
    //后置通知:在调用你的目标方法后,就要执行
    @After("pointcut()")
    public void afterMethod(JoinPoint joinPoint){
        System.out.println("我是后置通知~~~~~");
        //常见的使用场景:结束事务  日志  释放资源
    }
    //环绕通知:在调用你的目标方法之前和之后,都要执行
    @Around("pointcut()")
    public Object doAround(ProceedingJoinPoint joinPoint) throws Throwable {
        long start = System.currentTimeMillis();//计时开始
        Object o = joinPoint.proceed();//继续执行你的目标方法
        long end = System.currentTimeMillis();//计时结束

        System.out.println("aop统计的总耗时是:"+(end-start));
        return o;//放回给调用者,继续执行方法
    }
}
–4,测试
创建启动类
package cn.tedu;

import org.springframework.boot.SpringApplication;
import org.springframework.boot.autoconfigure.SpringBootApplication;

@SpringBootApplication
public class RunApp {
    public static void main(String[] args) {
        SpringApplication.run(RunApp.class);
    }
}
创建HelloController 类
package cn.tedu.controller;

import org.springframework.web.bind.annotation.RequestMapping;
import org.springframework.web.bind.annotation.RestController;
@RestController//Controller + ResponseBody
@RequestMapping("hello")
public class HelloController {
    @RequestMapping("hello")
    public String hello(){
        for (int i = 0; i <100 ; i++) {
            System.out.println("=");
        }
        return "恭喜您,访问成功~";
    }
    //统计hello()方法的性能
    //缺点:目前只能统计hello()方法的性能,想要统计其他方法的性能--AOP
    //AOP思想好处:让程序员更加关注业务本身,把通用的代码形成切面
    @RequestMapping("hello2")
    public String hello2(){
        long start = System.currentTimeMillis();
        hello();
        long end = System.currentTimeMillis();
        return "访问时间:"+(end-start) ;
    }

}
测试
访问HelloController 里的每个方法,都会执行对应的通知
二,两个框架的整合
–1,需求
获取汽车数据
–2,开发步骤
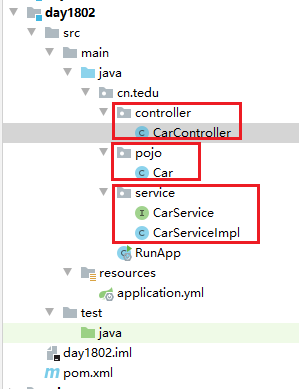
0,项目结构

1,RunApp启动类
package cn.tedu;

import org.springframework.boot.SpringApplication;
import org.springframework.boot.autoconfigure.SpringBootApplication;

@SpringBootApplication
public class RunApp {
    public static void main(String[] args) {
        SpringApplication.run(RunApp.class);
    }
}
2,application.yml改端口
server:
  port: 8090
3,Car类,封装数据
package cn.tedu.pojo;
import org.springframework.stereotype.Component;
//模型层,用来封装数据
@Component//交给spring框架进行ioc
public class Car {
    private Integer id;
    private String name;
    private String color;
    private Double price;
    //get set tostring
    @Override
    public String toString() {
        return "Car{" +
                "id=" + id +
                ", name='" + name + '\'' +
                ", color='" + color + '\'' +
                ", price=" + price +
                '}';
    }

    public Integer getId() {
        return id;
    }

    public void setId(Integer id) {
        this.id = id;
    }

    public String getName() {
        return name;
    }

    public void setName(String name) {
        this.name = name;
    }

    public String getColor() {
        return color;
    }

    public void setColor(String color) {
        this.color = color;
    }

    public Double getPrice() {
        return price;
    }

    public void setPrice(Double price) {
        this.price = price;
    }
}
4,CarService接口,定义抽象方法
package cn.tedu.service;
import cn.tedu.pojo.Car;
import java.util.List;
//接口里都是抽象方法
//jdk1.8也可以有static或者default的普通方法
public interface CarService {
    //简写形式,public abstract
    List<Car> get();//获取Car数据

}
5,CarServiceImpl实现类,重写抽象方法
package cn.tedu.service;

import cn.tedu.pojo.Car;
import org.springframework.stereotype.Component;
import org.springframework.stereotype.Service;

import java.util.ArrayList;
import java.util.List;

//实现类实现了接口要重写抽象方法,否则就是一个抽象类
@Service//和Component一样,都可以完成ioc,只是更好的表示了是service层的代码
public class CarServiceImpl implements CarService{
    //重写的要求:方法声明和父类一样,有权限
    public List<Car> get(){
        Car c1 = new Car();//空对象,属性都是默认值null
        c1.setId(10);c1.setName("bmw");c1.setColor("red");c1.setPrice(9.9);

        Car c2 = new Car();//空对象,属性都是默认值null
        c2.setId(20);c2.setName("audi");c2.setColor("black");c2.setPrice(6.6);

        List<Car> list = new ArrayList<>();
        list.add(c1);
        list.add(c2);
        return list;//给调用者返回list数据
    }
}
6,CarController,接受请求
package cn.tedu.controller;
import cn.tedu.pojo.Car;
import cn.tedu.service.CarService;
import org.springframework.beans.factory.annotation.Autowired;
import org.springframework.web.bind.annotation.RequestMapping;
import org.springframework.web.bind.annotation.RestController;
import java.util.List;
@RestController
@RequestMapping("car")
public class CarController {
    //1,调用CarServiceImpl里准备好的汽车数据--DI
    @Autowired
    private CarService carService;
    //2,提供方法,给浏览器返回汽车数据
    @RequestMapping("get")
    public List<Car> get(){
   //调用service的功能,service会把结果返回来
        return carService.get() ;
    }
}
–3,测试

–4,总结


三,改造前端代码
–1,使用axios语法发起请求
<!DOCTYPE html>
<html>
	<head>
		<meta charset="utf-8">
		<title>前后端整合起来</title>

		<!-- 1.导入js文件 -->
		<script src="js/vue.js"></script>
		<script src="js/axios.min.js"></script>
	</head>
	<body>
		<!-- 2.准备数据渲染区 -->
		<div id="app">
			<!-- 按钮的点击事件 -->
			<button @click="get()">点我获取汽车数据</button>
		</div>
		<!-- 3.创建Vue对象 -->
		<script>
			new Vue({
				el : "#app" , //挂载点
				methods : { //定义函数
					get(){
						//使用axios技术,访问后端服务器
						axios.get("http://localhost:8090/car/get").then(
							//a是服务器的返回值交给a变量保存 箭头函数
							//data属性用来获取数据, a.data就是获取a的数据
							a => { console.log(a.data)  }
						)
					}
				}
			})
		</script>
	</body>
</html>
–2,修改后端服务器的Controller,加一个特殊的注解,@CrossOrigin
package cn.tedu.controller;
import cn.tedu.pojo.Car;
import cn.tedu.service.CarService;
import cn.tedu.service.CarServiceImpl;
import org.springframework.beans.factory.annotation.Autowired;
import org.springframework.web.bind.annotation.CrossOrigin;
import org.springframework.web.bind.annotation.RequestMapping;
import org.springframework.web.bind.annotation.RestController;
import java.util.List;
@RestController
@RequestMapping("car")
@CrossOrigin//放行js的访问请求
public class CarController {
    @Autowired
    private CarService carService;
    @RequestMapping("get")
    public List<Car> get(){
        return carService.get() ;
    }
}
四,Vue路由
–1,测试
<!DOCTYPE html>
<html>
	<head>
		<meta charset="utf-8">
		<title>测试 vue路由</title>
		<!-- 1.导入js文件,要注意顺序 -->
		<script src="js/vue.js"></script>
		<script src="js/vue-router.js"></script>
	</head>
	<body>
		<!-- 2.准备数据渲染区 -->
		<div id="app">
			<!-- 4.使用路由 router-link被HTML翻译成a标签,to属性被翻译成href属性-->
			<router-link to="/test1">点我显示主页</router-link>
			<router-link to="/test2">点我显示帮助页</router-link>

			<!-- 5.展示路由匹配到的组件效果 -->
			<router-view></router-view>
		</div>
		<!-- 3.创建Vue对象 -->
		<script>
			//3.3.定义组件
			var home = { template : "<h1>我是主页</h1>" }
			var help = { template : "<h1>我是帮助页</h1>" }
			//3.2.创建路由实例
			var luyou = new VueRouter({
				routes : [ //属性用来定义路由规则
					//规定哪个路径匹配哪个名字的组件
					{ path:"/test1" , component:home },
					{ path:"/test2" , component:help }
				]
			})
			new Vue({
				el : "#app", //挂载点
				router : luyou //3.1.通过router属性配置路由
			})
		</script>
	</body>
</html>
–2,总结


 4852
4852


 被折叠的 条评论
为什么被折叠?
被折叠的 条评论
为什么被折叠?
 到【灌水乐园】发言


