


1.0 本篇实现的功能是:状态栏通知点击后将进入下一个界面。
在实现弹出状态栏通知的基础上,去点击该通知条的时候,你会发现没有任何效果。不像我们平时见到的会有某种响应(比如点击手机QQ的状态栏通知,就会进入QQ软件相应的界面)
2.0 本篇代码将基于上一篇博文中Notificationtest项目的基础上进行改编。
相关链接如下:
【Android】23.0 手机多媒体(一)——通知(Notification)(1):状态栏显示通知
关于通知(Notification)相关的知识点,会通过层层递进的原则,拆封成4-5篇文章,大抵分为:
- 发出状态栏通知
- 响应状态栏通知点击事件
- 通知进阶篇
- 通知高级篇
这样可以让理解整个知识,变得很容易,迅速掌握。
3.0 响应状态栏通知点击事件,只需要一个知识点:PendingIntent
PendingIntent估计是Intent的“表兄弟”。不同点在于:
-
Intent倾向于立即执行某个动作 -
PendingIntent更加倾向于在某个合适的时机去执行某个动作 - 可以把
PendingIntent简单理解为:延迟执行的Intent
4.0 PendingIntent的用法:用法也很简单。
4.1 它主要通过几个静态方法获得 PendingIntent实例
-
getActivity( )响应活动 -
getBroadcast( )响应广播 -
getService( )响应服务 - 等等(可能有其他,没去查文档)
4.2 这几个方法需要接收的参数是相同的:
比如:PendingIntent.getActivity(Contex,RequestCode,Intent,Flags) 接收4个参数:
- 第1个参数是
Context,没什么多说的 - 第2个参数一般用不到,传0即可
- 第3个参数是一个
Intent对象,可以通过这个Intent对象构建出PendingIntent的意图。
本篇项目中的Intent表达了我要启动NotificationManager活动的企图,很简单。 - 第4个参数是用于确定
PendingIntent的行为,有4个默认值,通常情况下传入0即可。
4.3 还是科普一下这4个参数吧(可以跳过去不看,不是重点):
- 1.0 FLAG_CANCEL_CURRENT:    如果当前系统中已经存在一个相同的 PendingIntent 对象,
        那么就将先将已有的 PendingIntent 取消,然后重新生成一个 PendingIntent 对象。

- 2.0 FLAG_NO_CREATE:    如果当前系统中不存在相同的 PendingIntent 对象,
       系统将不会创建该 PendingIntent 对象而是直接返回 null 。

- 3.0 FLAG_ONE_SHOT:    该 PendingIntent 只作用一次。

- 4.0 FLAG_UPDATE_CURRENT:    如果系统中已存在该 PendingIntent 对象,
       那么系统将保留该 PendingIntent 对象,但是会使用新的 Intent 来更新之前
       PendingIntent 中的 Intent 对象数据,例如更新 Intent 中的 Extras 。
5.0 在Notificationtest项目中,右击com.example.notificationtest包→New→Activity→Empty Activity,新建NotificationTest,布局名称起名为activity_notification_test.xml(事实上,我用的完全是系统自己的默认命名)
修改activity_notification_test.xml中的代码,里面就只有一个很简答的文本显示控件,如下所示:
<?xml version="1.0" encoding="utf-8"?>
<android.support.constraint.ConstraintLayout xmlns:android="http://schemas.android.com/apk/res/android"
    xmlns:app="http://schemas.android.com/apk/res-auto"
    xmlns:tools="http://schemas.android.com/tools"
    android:layout_width="match_parent"
    android:layout_height="match_parent"
    tools:context=".NotificationTest">

    <TextView
        android:layout_width="wrap_content"
        android:layout_height="wrap_content"
        android:text="这是一个通知布局"
        android:textSize="24sp"
        app:layout_constraintBottom_toBottomOf="parent"
        app:layout_constraintEnd_toEndOf="parent"
        app:layout_constraintStart_toStartOf="parent"
        app:layout_constraintTop_toTopOf="parent" />
</android.support.constraint.ConstraintLayout>
NotificationTest.java就搞定了。
6.0 修改MainActivity中的代码:
package com.example.notificationtest;

import android.app.Notification;
import android.app.NotificationChannel;
import android.app.NotificationManager;
import android.app.PendingIntent;
import android.content.Intent;
import android.graphics.BitmapFactory;
import android.os.Build;
import android.support.annotation.RequiresApi;
import android.support.v4.app.NotificationCompat;
import android.support.v7.app.AppCompatActivity;
import android.os.Bundle;
import android.view.View;
import android.widget.Button;

public class MainActivity extends AppCompatActivity implements View.OnClickListener {
    private String id = "channel_001";
    private String name = "name";

    @Override
    protected void onCreate(Bundle savedInstanceState) {
        super.onCreate(savedInstanceState);
        setContentView(R.layout.activity_main);
        Button sendNotice = (Button) findViewById(R.id.send_notice);
        sendNotice.setOnClickListener(this);
    }

    @RequiresApi(api = 26)
    @Override
    public void onClick(View v) {
        switch (v.getId()) {
            case R.id.send_notice:
                Intent intent = new Intent(this, NotificationTest.class);
                //PendingIntent.getActivity 接收4个参数
                // 第1个参数是Context
                // 第2个参数一般用不到,传0即可
                // 第3个参数是一个Intent对象,可以通过这个对象构建出PendingIntent的意图
                // 这里的Intent表达了我要启动NotificationManager活动的企图
                // 第4个参数是用于确定PendingIntent的行为,有4个默认值,通常情况下传入0即可
                PendingIntent pi = PendingIntent.getActivity(this, 0, intent, 0);

                //第一步:获取状态通知栏管理:
                NotificationManager manager =
                        (NotificationManager) getSystemService(NOTIFICATION_SERVICE);
                Notification notification = null;
                //第二步:实例化通知栏构造器NotificationCompat.Builder:
                if (Build.VERSION.SDK_INT >= Build.VERSION_CODES.O) {//判断API
                    NotificationChannel mChannel = new NotificationChannel(id, name,
                            NotificationManager.IMPORTANCE_LOW);
                    manager.createNotificationChannel(mChannel);
                }
                notification = new NotificationCompat.Builder(this, id)
                        .setContentTitle("这是一个内容标题")//设置通知栏标题
                        .setContentText("这是一个内容文本") //设置通知栏显示内容
                        .setWhen(System.currentTimeMillis())//通知产生的时间。
                        // 会在通知信息里显示,通常是系统获取到的时间
                        .setSmallIcon(R.mipmap.ic_launcher)//设置通知小ICON
                        .setLargeIcon(BitmapFactory.decodeResource(getResources()
                                , R.mipmap.ic_launcher))//设置通知大ICON
                        .setContentIntent(pi)
                        .setAutoCancel(true)
                        .build();
                //第三步:对Builder进行配置:
                manager.notify(1, notification);
                break;
            default:
                break;
        }
    }
}
本质上就增加了4行代码:
- 代码块备注:
//第一步:获取状态通知栏管理:上面有2句,还有一堆注释,不再赘述。 -
notification = new NotificationCompat.Builder(this, id)...里面最后的.build();前面家了1句.setContentIntent(pi)和1句.setAutoCancel(true)-
.setContentIntent(pi)这句话的意思是:我,“伟大的PendingIntent大人”需要接收一个PendingIntent对象,当用户点击状态栏那条通知的时候,我就会执行里面相应的逻辑(打开NotificationTest活动界面) -
.setAutoCancel(true):这个涉及到一个独立的知识点,在8.0里面单独讲解
-
7.0 我们先把.setAutoCancel(true) 注释掉,执行项目,结果如下:
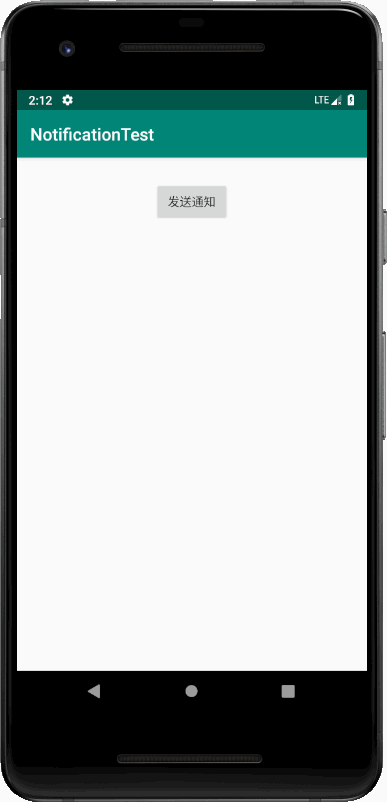
2019-02-21_221238.png
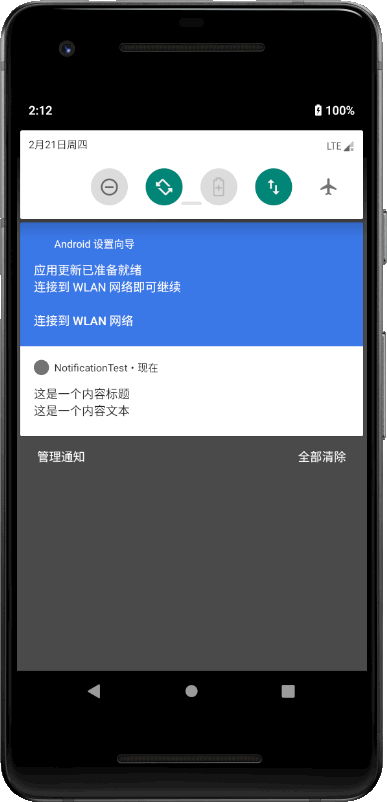
2019-02-21_221244.png
点击状态栏的通知条:

2019-02-21_221252.png
8.0 这里有一个细节,大家可能没注意到:
在上面第三张图片中,状态栏通知点击事件明明已经成功响应了,但是通知并没有消失(注意右上角,那个“小白点”一直在,下拉查看一下,的确该通知执行完之后并没有“听话地"消失掉)
解决方案有两个:
- 一是上面的第
6.0最后的.setAutoCancel(true),加了这个,点击通知后,进入新的界面,通知栏那条通知消失。 - 二是显式调用
NotificationManager的cancel( )方法。实现的方式是在NotificationTest.java中增加两行代码:
package com.example.notificationtest;

import android.app.NotificationManager;
import android.support.v7.app.AppCompatActivity;
import android.os.Bundle;

public class NotificationTest extends AppCompatActivity {

    @Override
    protected void onCreate(Bundle savedInstanceState) {
        super.onCreate(savedInstanceState);
        setContentView(R.layout.activity_notification_test);
        //就是下面这2行:
        NotificationManager manager = (NotificationManager)getSystemService(NOTIFICATION_SERVICE);
        manager.cancel(1);
    }
}
解释一下,我们在cancel( )方法中传入1,这个1的意思是:
- 还记得在创建通知是给每条通知指定的
id么

- 当时给这条通知设定的
id就是1,所以如果你想取消哪条通知,就在cancel( )方法中传入那个通知的id就行了。
END


 被折叠的 条评论
为什么被折叠?
被折叠的 条评论
为什么被折叠?
 到【灌水乐园】发言


