


参考链接
https://codex.wordpress.org/Installing_WordPress#Famous_5-Minute_Installation
以下贴出官方原文,进行关键部分的翻译:
Codex
Codex tools: Log in
Interested in functions, hooks, classes, or methods? Check out the new WordPress Code Reference!
Installing WordPress
Languages: English • Español • Deutsch • বাংলা • Français • Italiano • Nederlands • のインストール 日本語 한국어 • Português • Português do Brasil • Русский • Slovenčina • Српски • ไทย • 中文(简体) • 中文(繁體) • (Add your language)
Contents
- 1 Things to Know Before Installing WordPress
- 2 Famous 5-Minute Installation
- 3 Detailed Instructions
- 4 Common Installation Problems
- 5 Automated Installation
- 6 Installation Instructions in Other Languages
- 7 Installing Multiple Blogs
- 8 Installing WordPress on your own Computer
- 9 Installing WordPress at popular Hosting Companies
- 10 Installing through wp-cli
- 11 Moving an Existing WordPress Blog
WordPress is well-known for its ease of installation. Under most circumstances, installing WordPress is a very simple process and takes less than five minutes to complete. Many web hosts now offer tools (e.g. Fantastico) to automatically install WordPress for you. However, if you wish to install WordPress yourself, the following guide will help. Now with Automatic Upgrade, upgrading is even easier.
The following installation guide will help you, whether you go for the Famous 5 Minute Installation, or require the more detailed installation guide.
- Things to Know Before You Begin Installing WordPress
- The Famous 5-Minute Installation
- Detailed Installation Instructions
- Common Installation Problems
- Automated Installation
- WordPress in Your Language
- Installing WordPress in Your Language
- How to Install Multiple Blogs
- How to Install on Your Own Computer
- Easy 5 Minute WordPress Installation on Windows
- How to Install with Amazon's Web Services (AWS)
- How to Install at Digital Ocean on Ubuntu 14.04 LTS
- Unattended (automated) installation of WordPress on Ubuntu 16.04 LTS
- Getting Started with WordPress (much more installation info)
Things to Know Before Installing WordPress
Before you begin the install, there are a few things you need to have and do.
These are:
- Access to your web server (via FTP or shell)
- Ability to create MySQL databases
- A text editor
- An FTP Client
- Your web browser of choice
Things You Need to Do to Install WordPress
Begin your installation by:
- Checking to ensure that you and your web host have the minimum requirements to run WordPress.
- Downloading the most current version of WordPress.
- Unzipping the downloaded file to a folder on your hard drive.
- Creating a secure password for your Secret Key
- Keeping this webpage open so you have it handy during the installation.
Famous 5-Minute Installation
Here's the quick version of the instructions for those who are already comfortable with performing such installations. More detailed instructions follow.
If you are not comfortable with renaming files, step 3 is optional and you can skip it as the install program will create the wp-config.php file for you.
- Download and unzip the WordPress package if you haven't already.
- Create a database for WordPress on your web server, as well as a MySQL (or MariaDB) user who has all privileges for accessing and modifying it.
- (Optional) Find and rename wp-config-sample.php to wp-config.php, then edit the file (see Editing wp-config.php) and add your database information.
- Upload the WordPress files to the desired location on your web server:
- If you want to integrate WordPress into the root of your domain (e.g. http://example.com/), move or upload all contents of the unzipped WordPress directory (excluding the WordPress directory itself) into the root directory of your web server.
- If you want to have your WordPress installation in its own subdirectory on your website (e.g. http://example.com/blog/), create the blog directory on your server and upload the contents of the unzipped WordPress package to the directory via FTP.
- Note: If your FTP client has an option to convert file names to lower case, make sure it's disabled.
- Run the WordPress installation script by accessing the URL in a web browser. This should be the URL where you uploaded the WordPress files.
- If you installed WordPress in the root directory, you should visit: http://example.com/
- If you installed WordPress in its own subdirectory called blog, for example, you should visit: http://example.com/blog/
That's it! WordPress should now be installed.
Detailed Instructions
Step 1: Download and Extract
Download and unzip the WordPress package from https://wordpress.org/download/.
- If you will be uploading WordPress to a remote web server, download the WordPress package to your computer with a web browser and unzip the package.
- If you will be using FTP, skip Step 2 and go to the next step - uploading files is covered later.
- If you have shell access to your web server, and are comfortable using console-based tools, you may wish to download WordPress directly to your web server using wget (or lynx or another console-based web browser) if you want to avoid FTPing:
- wget https://wordpress.org/latest.tar.gz
- Then unzip the package using:
tar -xzvf latest.tar.gz
The WordPress package will extract into a folder called wordpress in the same directory that you downloaded latest.tar.gz.
Step 2: Create the Database and a User
If you are using a hosting provider, you may already have a WordPress database set up for you, or there may be an automated setup solution to do so. Check your hosting provider's support pages or your control panel for clues about whether or not you'll need to create one manually.
If you determine that you'll need to create one manually, follow the instructions for accessing phpMyAdmin on various servers, or follow the instructions for Using Plesk, Using cPanel or Using phpMyAdmin below.
If you are installing WordPress on your own web server, follow the Using phpMyAdmin or Using the MySQL Client instructions below to create your WordPress username and database.
If you have only one database and it is already in use, you can install WordPress in it - just make sure to have a distinctive prefix for your tables to avoid over-writing any existing database tables.
Using Plesk
Note: Plesk recommends all users to install and manage WordPress using the WordPress Toolkit. However, if you wish to install WordPress manually, follow these steps to create a database:
Plesk的话,我曾经测试过用windows机器去搭建,发现会有问题,问了官方也没鸟我,我就测试再centos7.4下去搭建,发现居然成功了,建议你先去plesk申请了测试授权,申请成功后它会给你一封邮件怎么安装,按照linux版本安装即可。
- Log in to Plesk.
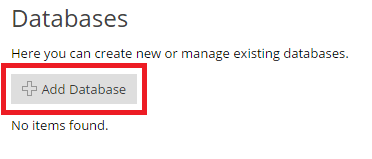
- In the upper right corner of the screen, click Databases.

- Click Add Database.
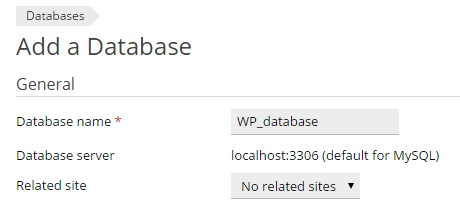
- Type in the database name.
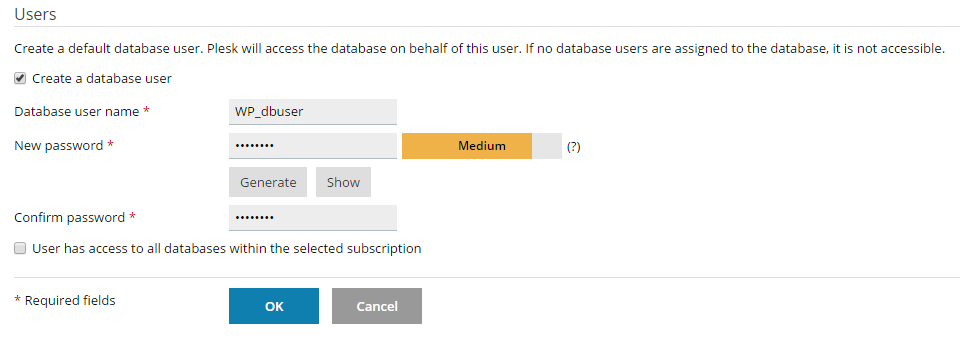
- Type in the database user name and password, and then click Ok.


Once the database has been created, click Connection info to see the information you will need to connect to the database (database server hostname and port, database name, and the database user name). 

Using cPanel
If your hosting provider supplies the cPanel hosting control panel, you may follow these simple instructions to create your WordPress username and database. A more complete set of instructions for using cPanel to create the database and user can be found in Using cPanel.
- Log in to your cPanel.
- Click MySQL Database Wizard icon under the Databases section.
- In Step 1. Create a Database enter the database name and click Next Step.
- In Step 2. Create Database Users enter the database user name and the password. Make sure to use a strong password. Click Create User.
- In Step 3. Add User to Database click the All Privileges checkbox and click Next Step.
- In Step 4. Complete the task note the database name and user. Write down the values of hostname, username, databasename, and the password you chose. (Note that hostname will usually be localhost.)
Using Lunarpages.com's custom cPanel (LPCP)
Lunarpages has developed their own version of cPanel.
- Log in to your account.
- Go to Control Panel.
- Click on the button on the left panel labeled 'Go to LPCP'.
- Go to MySQL Manager.
- Add the user name and database name but leave the host name as the default IP number.
- Note the IP address of the database on the right which is different from the default IP number of the host indicated in the above step.
- When modifying the wp-config.php file, use the DB IP number, not 'LOCALHOST'.
- When modifying the wp-config.php file, be sure to use the full name of the database and user name, typically 'accountname_nameyoucreated'.
- Refer to http://wiki.lunarpages.com/Create_and_Delete_MySQL_Users_in_LPCP for more info.
Using phpMyAdmin
If your web server has phpMyAdmin installed, you may follow these instructions to create your WordPress username and database. If you work on your own computer, on most Linux distributions you can install PhpMyAdmin automatically.
Note: These instructions are written for phpMyAdmin 4.4; the phpMyAdmin user interface can vary slightly between versions.
- If a database relating to WordPress does not already exist in the Database dropdown on the left, create one:
- Choose a name for your WordPress database: 'wordpress' or 'blog' are good, but most hosting services (especially shared hosting) will require a name beginning with your username and an underscore, so, even if you work on your own computer, we advise that you check your hosting service requirements so that you can follow them on your own server and be able to transfer your database without modification. Enter the chosen database name in the Create database field and choose the best collation for your language and encoding. In most cases it's better to choose in the "utf8_" series and, if you don't find your language, to choose "utf8mb4_general_ci" (Reference: [1]).

- Click the phpMyAdmin icon in the upper left to return to the main page, then click the Users tab. If a user relating to WordPress does not already exist in the list of users, create one:

-
- Click Add user.
- Choose a username for WordPress ('wordpress' is good) and enter it in the User name field. (Be sure Use text field: is selected from the dropdown.)
- Choose a secure password (ideally containing a combination of upper- and lower-case letters, numbers, and symbols), and enter it in the Password field. (Be sure Use text field: is selected from the dropdown.) Re-enter the password in the Re-type field.
- Write down the username and password you chose.
- Leave all options under Global privileges at their defaults.
- Click Go.
- Return to the Users screen and click the Edit privileges icon on the user you've just created for WordPress.
- In the Database-specific privileges section, select the database you've just created for WordPress under the Add privileges to the following database dropdown, and click Go.
- The page will refresh with privileges for that database. Click Check All to select all privileges, and click Go.
- On the resulting page, make note of the host name listed after Server: at the top of the page. (This will usually be localhost.)

Using the MySQL Client
You can create MySQL/MariaDB users and databases quickly and easily by running mysql from the shell. The syntax is shown below and the dollar sign is the command prompt:
$ mysql -u adminusername -p
Enter password:
Welcome to the MySQL monitor.  Commands end with ; or \g.
Your MySQL connection id is 5340 to server version: 3.23.54

Type 'help;' or '\h' for help. Type '\c' to clear the buffer.

mysql> CREATE DATABASE databasename;
Query OK, 1 row affected (0.00 sec)

mysql> GRANT ALL PRIVILEGES ON databasename.* TO "wordpressusername"@"hostname"
    -> IDENTIFIED BY "password";
Query OK, 0 rows affected (0.00 sec)

mysql> FLUSH PRIVILEGES;
Query OK, 0 rows affected (0.01 sec)

mysql> EXIT
Bye
$
The example shows:
- that root is also the adminusername. It is a safer practice to choose a so-called "mortal" account as your mysql admin, so that you are not entering the command "mysql" as the root user on your system. (Any time you can avoid doing work as root you decrease your chance of being exploited.) The name you use depends on the name you assigned as the database administrator using mysqladmin.
- wordpress or blog are good values for databasename.
- wordpress is a good value for wordpressusername but you should realize that, since it is used here, the entire world will know it, too.
- hostname will usually be localhost. If you don't know what this value should be, check with your system administrator if you are not the admin for your WordPress host. If you are the system admin, consider using a non-root account to administer your database.
- password should be a difficult-to-guess password, ideally containing a combination of upper- and lower-case letters, numbers, and symbols. One good way of avoiding the use of a word found in a dictionary is to use the first letter of each word in a phrase that you find easy to remember.
If you need to write these values somewhere, avoid writing them in the system that contains the things protected by them. You need to remember the value used for databasename, wordpressusername, hostname, and password. Of course, since they are already in (or will be shortly) your wp-config.php file, there is no need to put them somewhere else, too.
Using DirectAdmin
a. If you're a regular User of a single-site webhosting account, you can log in normally. Then click MySQL Management. (If this is not readily visible, perhaps your host needs to modify your "package" to activate MySQL.) Then follow part "c" below.
b. Reseller accounts Admin accounts may need to click User Level. They must first log in as Reseller if the relevant domain is a Reseller's primary domain... or log in as a User if the domain is not a Reseller's primary domain. If it's the Reseller's primary domain, then when logged in as Reseller, simply click User Level. However if the relevant domain is not the Reseller's primary domain, then you must log in as a User. Then click MySQL Management. (If not readily visible, perhaps you need to return to the Reseller or Admin level, and modify the "Manage user package" or "Manage Reseller package" to enable MySQL.)
c. In MySQL Management, click on the small words: Create new database. Here you are asked to submit two suffixes for the database and its username. For maximum security, use two different sets of 4-6 random characters. Then the password field has a Random button that generates an 8-character password. You may also add more characters to the password for maximum security. Click Create. The next screen will summarize the database, username, password and hostname. Be sure to copy and paste these into a text file for future reference.
Step 3: Set up wp-config.php
You can either create and edit the wp-config.php file yourself, or you can skip this step and let WordPress try to do this itself when you run the installation script (step 5) (you’ll still need to tell WordPress your database information).
你既可以手动创建个wp-config.php 文件,你也可以先跳过这个步骤并让WordPress再step5中自行执行它(但你仍旧会需要告诉WordPress关于数据库的信息,这是避免不了的)
(For more extensive details, and step by step instructions for creating the configuration file and your secret key for password security, please see Editing wp-config.php.)
Return to where you extracted the WordPress package in Step 1, rename the file wp-config-sample.php to wp-config.php, and open it in a text editor.
回到step1中你解压出来的WordPress包,将wp-config-sample.php重命名为wp-config.php,并进行编辑
Enter your database information under the section labeled
// ** MySQL settings - You can get this info from your web host ** //
DB_NAME
The name of the database you created for WordPress in Step 2.
DB_USER
The username you created for WordPress in Step 2.
DB_PASSWORD
The password you chose for the WordPress username in Step 2.
DB_HOST
The hostname you determined in Step 2 (usually localhost, but not always; see some possible DB_HOST values). If a port, socket, or pipe is necessary, append a colon (:) and then the relevant information to the hostname.
DB_CHARSET
The database character set, normally should not be changed (see Editing wp-config.php).
DB_COLLATE
The database collation should normally be left blank (see Editing wp-config.php).
Enter your secret key values under the section labeled在下面标签部分输入你的密钥值,不是很理解,有时候真的无法理解开发人员的思维
* Authentication Unique Keys.
我查看了下默认配置文件的内容:

是填写下面的值内容,乍一看,挺多的,made,填哪一个啊?
感觉像是cookies那一块的,我暂时不管,因为我输入了那个命令,发现报错。
Save the wp-config.php file.
Step 4: Upload the files
Now you will need to decide where on your domain you'd like your WordPress-powered site to appear:
现在你将需要决定WordPress-powered的域放在哪:
- In the root directory of your website. (For example, http://example.com/)
- In a subdirectory of your website. (For example, http://example.com/blog/)
Note: The location of your root web directory in the filesystem on your web server will vary across hosting providers and operating systems. Check with your hosting provider or system administrator if you do not know where this is.
注意:放在根目录的情况下,将会使主机跟操作系统发生变化。
In the Root Directory
- If you need to upload your files to your web server, use an FTP client to upload all the contents of the wordpress directory (but not the directory itself) into the root directory of your website.
- 如果你需要上传你的文件到你的web服务器,使用ftp客户端上传到WordPress目录下的所有内容(除了这个目录本身,我的理解就是目录名必需是wordpress)到你网站的根目录。
- If your files are already on your web server, and you are using shell access to install WordPress, move all of the contents of the wordpress directory (but not the directory itself) into the root directory of your website.
- 如果你的文件已经在你的web服务器上,并且你正在使用shell的连接来安装WordPress,那么你需要移动WordPress目录下的所有文件(除了该目录本身,我理解就是不能直接移动WordPress目录)到你网站的根目录。
In a Subdirectory
- If you need to upload your files to your web server, rename the wordpress directory to your desired name, then use an FTP client to upload the directory to your desired location within the root directory of your website.
- 如果你需要上传你自有的文件到web服务器,将WordPress目录名改为你需要的名字,然后使用ftp客户端上传这个目录(已改好名的目录)到你需要的位置
- If your files are already on your web server, and you are using shell access to install WordPress, move the wordpress directory to your desired location within the root directory of your website, and rename the directory to your desired name.
- 如果你的文件已经在web服务器上,并且你正在使用shell连接来安装WordPress,移动WordPress目录到你需要的位置,然后再改成你需要的目录名
Note: If your FTP client has an option to convert file names to lower case, make sure it's disabled.对大小写敏感
Step 5: Run the Install Script
Point a web browser to start the installation script.
- If you placed the WordPress files in the root directory, you should visit: http://example.com/wp-admin/install.php
- 这里指的是在plesk那里设置的domain name,我没有加www,一开始我想了好久,原来是这个

- 我说出现这个界面,到底要我干什么?我肯定不会再重装WordPress啊,无法理解。所以我搞不懂这一步骤为了什么,我猜想应该是跟step3有关,因为我上面已经做了数据库的信息,所以这一步我就忽略了
- If you placed the WordPress files in a subdirectory called blog, for example, you should visit: http://example.com/blog/wp-admin/install.php
Setup configuration file
If WordPress can't find the wp-config.php file, it will tell you and offer to try to create and edit the file itself. (You can also do this directly by loading wp-admin/setup-config.php in your web browser.) WordPress will ask you the database details and write them to a new wp-config.php file. If this works, you can go ahead with the installation; otherwise, go back and create, edit, and upload the wp-config.php file yourself (step 3).

Finishing installation
The following screenshots show how the installation progresses. Notice that in entering the details screen, you enter your site title, your desired user name, your choice of a password (twice), and your e-mail address. Also displayed is a check-box asking if you would like your blog to appear in search engines like Google and Technorati. Leave the box unchecked if you would like your blog to be visible to everyone, including search engines, and check the box if you want to block search engines, but allow normal visitors. Note all this information can be changed later in your Administration Screens.
安装后我没出现下面的图,所以我要去找这些设置好的信息。只是我忘了,重新进去plesk就可以查看了

Note: You should not use "admin" as a user id as shown above!
注意:你不应该使用admin作为user id,正如上面所示
If you successfully install the WordPress, login prompt will be displayed.
Install script troubleshooting
- If you get an error about the database when you run the install script:
- 安装是完成了,下一步怎么搞,一头雾水


 3282
3282

 被折叠的 条评论
为什么被折叠?
被折叠的 条评论
为什么被折叠?
 到【灌水乐园】发言


