


使用TextInputLayout创建一个登陆界面
介绍
Google在2015的IO大会上,给我们带来了更加详细的Material Design设计规范,同时,也给我们带来了全新的Android Design Support Library,在这个support库里面,Google给我们提供了更加规范的MD设计风格的控件。最重要的是,Android Design Support Library的兼容性更广,直接可以向下兼容到Android 2.2。这不得不说是一个良心之作。
- 使用TextInputLayout
- 创建一个新的工程
在Android Studio中,从File菜单中,选择New > New project ,填入必要的信息配置并创建工程。在我的实例中使用了API 7,这个是Design Support Library支持的最低等级。这样设置,可以让你的设备尽可能运行在更多设备上,我已经把MainActivity改成LoginActivity,布局文件activity_login.xml。
工程设置号以后,去掉自动生成的onCreateOptionsMenu()和onOptionsItemSelected (),同时删除res/menu下面对应的xml(因为用不到menu这块)。 -
导入支持库
使用TextInputLayout 控件需要导入两个库,一个是appcompat-v7,保证material styles可以向下兼容。另一个是Design Support Library。
在项目的build.gradle文件中,添加下面的依赖(dependencies):dependencies { compile fileTree(dir: ‘libs‘, include: [‘*.jar‘]) compile ‘com.android.support:design:22.2.0‘ compile ‘com.android.support:appcompat-v7:22.2.0‘ }如果gralde没有自动要求同步(synchronize)工程,从build菜单选择
Make module ‘app‘或者按F9,这样AS会自动获取必要的资源。 -
设计UI
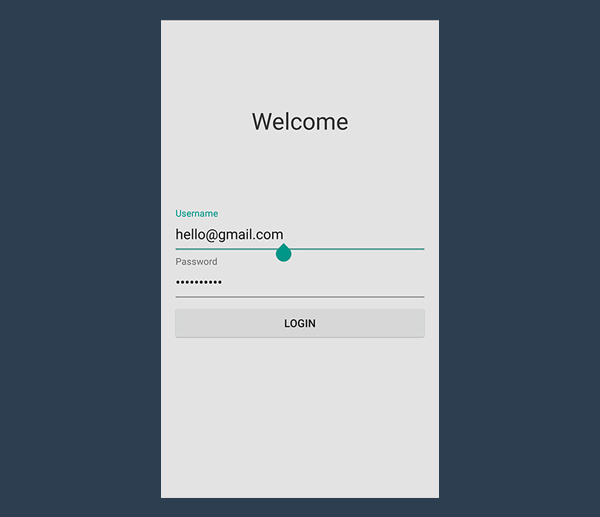
UI很简单,一个welcome的标签(后期可以很方便的替换成图片)和两个EditText (用户名,密码框),不居中再加上一个登陆按钮。再选个漂亮的背景色。
另一个需要注意的细节是设置好两个输入框的inputType ,第一个框设置为textEmail ,第二个框设置为textPassword,布局如下所示。<linearlayout xmlns:android="http://schemas.android.com/apk/res/android" xmlns:tools="http://schemas.android.com/tools" android:background="#e3e3e3" android:layout_width="match_parent" android:layout_height="match_parent" android:padding="@dimen/activity_horizontal_margin" tools:context=".LoginActivity" android:orientation="vertical"> <relativelayout android:layout_width="match_parent" android:layout_height="wrap_content" android:layout_weight="0.5" android:orientation="vertical"> <textview android:layout_width="match_parent" android:layout_height="wrap_content" android:layout_centerInParent="true" android:gravity="center" android:text="Welcome" android:textSize="30sp" android:textColor="#333333"></textview> </relativelayout> </linearlayout><linearlayout android:layout_width="match_parent" android:layout_height="wrap_content" android:layout_weight="0.5" android:orientation="vertical"> <edittext android:id="@+id/username" android:layout_width="match_parent" android:layout_height="wrap_content" android:inputType="textEmailAddress"></edittext> <edittext android:id="@+id/password" android:layout_width="match_parent" android:layout_height="wrap_content" android:inputType="textPassword"></edittext> <button android:id="@+id/btn" android:layout_marginTop="4dp" android:layout_width="match_parent" android:layout_height="wrap_content" android:text="Login"></button> </linearlayout>
你可能还想去掉应用栏(app bar),也就是之前说的action bar,修改下style.xml就可以了
<style name="AppTheme" parent="Theme.AppCompat.Light.NoActionBar">
</style>
-
使用TextInputLayout
终于到了教程中最有趣的部分了,TextInputLayout 控件表现得就像LinearLayout 一样,它是一个容器。TextInputLayout 中只能放一个子元素,和ScrollView有点类似,并且子元素必须是EditText 。<android .support.design.widget.TextInputLayout android:id="@+id/usernameWrapper" android:layout_width="match_parent" android:layout_height="wrap_content"> <edittext android:id="@+id/username" android:layout_width="match_parent" android:layout_height="wrap_content" android:inputType="textEmailAddress" android:hint="Username"></edittext> </android>
注意到了么,我在EditText设置一个属性-hint。这个属性大家都很熟悉了,EditText没有输入的时候,hint会显示,当输入第一个字母上去的时候,hint就消失了。这个体验不是太好。
感谢TextInputLayout,这个马上就不是问题了。当EditText中输入第一个字母要隐藏hint的时候,TextInputLayout中会出现一个悬浮的标签来显示这个hint,还负责一个炫酷的的material 动画。
下面,我们给password也来一个。
<android .support.design.widget.TextInputLayout
    android:id="@+id/passwordWrapper"
    android:layout_width="match_parent"
    android:layout_height="wrap_content"
    android:layout_below="@id/usernameWrapper"
    android:layout_marginTop="4dp">

    <edittext android:id="@+id/password"
        android:layout_width="match_parent"
        android:layout_height="wrap_content"
        android:inputType="textPassword"
        android:hint="Password"></edittext>

</android>
如果现在运行程序,啥效果都木有。当然,EditText 的hint效果除外。辣么,为啥会木有动画捏?我们还缺了点代码。
- 设置提示信息(hints)
在setContentView()下面,初始化TextInputLayout 的引用。
final TextInputLayout usernameWrapper = (TextInputLayout) findViewById(R.id.usernameWrapper);
final TextInputLayout passwordWrapper = (TextInputLayout) findViewById(R.id.passwordWrapper);
想要看到hint浮动的动画,还需要调用setHint
usernameWrapper.setHint("Username");
passwordWrapper.setHint("Password");
做完这个以后,这个应用已经完全符合material design了,运行程序,然后你会看到登录界面。
处理错误
TextInputLayout另一个很赞的功能是,可以处理错误情况。通过验证用户输入,你可以防止用户输入错误的邮箱,或者输入不符合规则的密码。
有些输入验证,验证是在后台做得,产生错误后会反馈给前台,最后展示给用户。非常耗时而且用户体验差。最好的办法是在请求后台前做校验。
-
实现onClick 方法
首先处理点击事件,处理点击事件的方法也有很多种,在XML中设置方法名,然后Activity完善这个方法。或者setOnClickListener。写文章的哥们儿比较喜欢后面这种。btn.setOnClickListener(new View.OnClickListener() { @Override public void onClick(View v) { // STUB } });其实,当这个方法被调用以后,就不需要键盘了。但是不幸的是,Android不会自动隐藏。怎么办呢?调用下面的方法吧。
private void hideKeyboard() { View view = getCurrentFocus(); if (view != null) { ((InputMethodManager) getSystemService(Context.INPUT_METHOD_SERVICE)). hideSoftInputFromWindow(view.getWindowToken(), InputMethodManager.HIDE_NOT_ALWAYS); } } -
验证用户输入
在设置错误标签前,我们先明确下什么是错误,什么不是错误。我们假设用户名验证邮箱是否正确。
验证邮箱稍微有些复杂,我们可以用Apache Commons library 来做这个事。我这里用一个维基百科里的正则表达式。/^[a-zA-Z0-9#_~!$&‘()*+,;=:."(),:;<>@\[\]\\]+@[a-zA-Z0-9-]+(\.[a-zA-Z0-9-]+)*$/为啥这么写,就不做解释了。。。。。
既然我们想验证一个string,我们必须依赖Pattern and Matcher,它们在java.util.regex下面。在Activity中导入它们。private static final String EMAIL_PATTERN = "^[a-zA-Z0-9#_~!$&‘()*+,;=:.\"(),:;<>@\\[\\]\\\\]+@[a-zA-Z0-9-]+(\\.[a-zA-Z0-9-]+)*$"; private Pattern pattern = Pattern.compile(EMAIL_PATTERN); private Matcher matcher; public boolean validateEmail(String email) { matcher = pattern.matcher(email); return matcher.matches(); }密码验证相对简单,不同的组织有不同的验证方式。但是大都有最小长度限制。最合理的规则就是至少输入六位字符。
public boolean validatePassword(String password) { return password.length() > 5; } -
接收数据
之前已说过,TextInputLayout只是一个容器。不像LinearLayout and ScrollView,你可以直接获取它的子元素通过特定的方法(getEditText)。根本木有必要使用findViewById。
如果TextInputLayout 中没有EditText,getEditText 会返回null,你得注意下NPE了。public void onClick(View v) { hideKeyboard(); String username = usernameWrapper.getEditText().getText().toString(); String password = usernameWrapper.getEditText().getText().toString(); // TODO: Checks // TODO: Login } -
显示错误
TextInputLayout 错误处理简单而迅速。相关的方法有setErrorEnabled和setError。
setError会弹出红色的提示消息同时显示在EditText下面,如果传入的错误消息是null,之前的消息会被清除掉。这个方法还会使EditText 也变红色。
setErrorEnabled 是控制这个功能的。这会直接影响layout的大小。请自行脑补。。。。
还有一个需要注意的是,如果没有调用setErrorEnabled(true)但是调用了setError 方法并且传入了非空的消息,setErrorEnabled(true) 会被自动调用。
正确和错误情况我们已经说明了,下面就实现onClick 方法。
public void onClick(View v) {
    hideKeyboard();
    String username = usernameWrapper.getEditText().getText().toString();
    String password = usernameWrapper.getEditText().getText().toString();
    if (!validateEmail(username)) {
        usernameWrapper.setError("Not a valid email address!");
    } else if (!validatePassword(password)) {
        passwordWrapper.setError("Not a valid password!");
    } else {
        usernameWrapper.setErrorEnabled(false);
        passwordWrapper.setErrorEnabled(false);
        doLogin();
    }
}
下面是空的登录方法:
public void doLogin() {
    Toast.makeText(getApplicationContext(), "OK! I‘m performing login.", Toast.LENGTH_SHORT).show();
    // TODO: login procedure; not within the scope of this tutorial.
}
-
修改TextInputLayout背景
<style name="AppTheme" parent="Theme.AppCompat.Light.NoActionBar">
    <item name="colorAccent">#3498db</item>
</style>

总结
感谢Design Support Library给我们带来了TextInputLayout。
下面的不想翻译了,好好学习,天天向上吧。
The design paradigm that this widget implements allows users to never never lose context of the information they are entering and it was actually introduced by Google last year, along with Material Design.
At that time, there was no support library giving developers the possibility to put this widget into action in their projects, until Google I/O 2015. Now, if your application expects some sort of data input, you will finally be truly material design compliant.
转载自:http://www.mamicode.com/info-detail-965904.html


 1289
1289

 被折叠的 条评论
为什么被折叠?
被折叠的 条评论
为什么被折叠?
 到【灌水乐园】发言


