


前言
通常我们在学习一个框架时,会先去了解这个框架的整体结构,它的基本工作方式是如何的,然后再去了解是如何使用的,最后也是不少初级程序员止步的地方,深入源码了解其实现以及实现的意图。在这篇文章中,我们主要介绍在服务器启动项目过程中,Spring MVC框架的创建过程。首先我们先来了解一下Spring MVC的整体结构
Spring MVC整体结构
从整体看,Spring MVC可以看成是一个由各司其职的Servlet组成的“大Servlet”,因而我们有必要了解一下Spring MVC 中核心Servlet的继承结构,如下图:
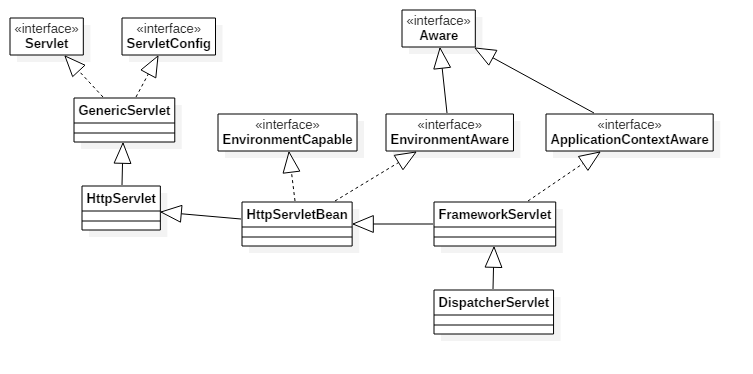
从上图我们可以看到Servlet的继承结构一共有5个类,其中GenericServlet、HttpServlet类在Java中,其余的三个类HttpServletBean、FrameworkServlet和DispatcherServlet是Spring MVC中的。下面我们将通过设置断点跟踪的方式来探索一下SpringMVC的创建过程。
1. 设置断点
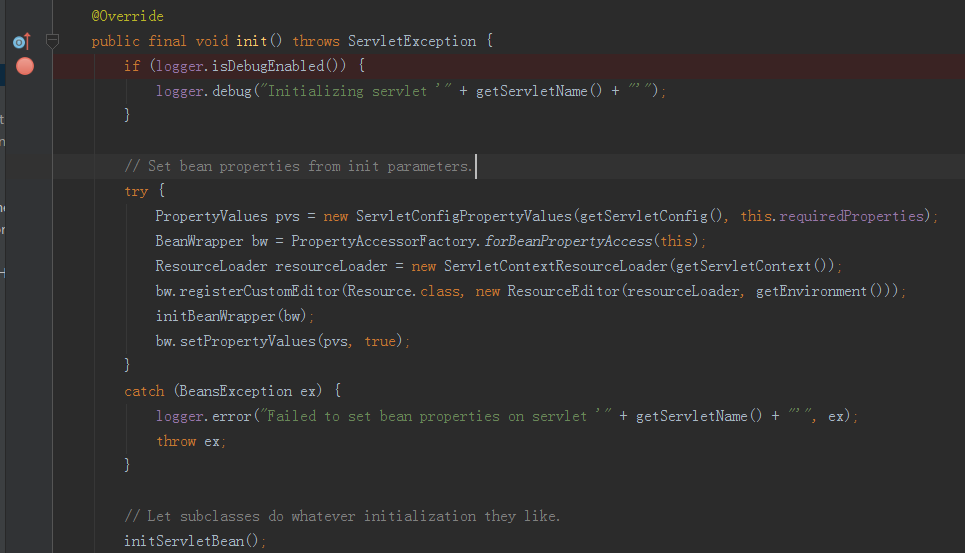
根据Spring MVC核心Servlet结构图我们可以看出与Java的Servlet有直接关联的是HttpservletBean类,它继承了HttpServlet类,而根据Servlet的生命周期,我们可以知道Servlet创建时可以直接调用无参数的init方法。因此我们在HttpServletBean的init方法中设置断点如下:
使用debug模式启动应用程序。
2. HttpServletBea 的初始化过程
HttpServletBean的init方法的源码如下:
public final void init() throws ServletException {
    if (logger.isDebugEnabled()) {
        logger.debug("Initializing servlet '" + getServletName() + "'");
    }
    try {
    //将Servlet中配置的参数封装到pvs变量中,
        PropertyValues pvs = new ServletConfigPropertyValues(getServletConfig(), this.requiredProperties);
        //调用静态方法构造器创建BeanWrapperImpl实例
        BeanWrapper bw = PropertyAccessorFactory.forBeanPropertyAccess(this);
        ResourceLoader resourceLoader = new ServletContextResourceLoader(getServletContext());
        bw.registerCustomEditor(Resource.class, new ResourceEditor(resourceLoader, getEnvironment()));
        //模板方法,子类调用,没有被实现,应该是为了未来的扩展
        initBeanWrapper(bw);
        //将配置的初始值(如contextConfigLocation)设置到DispatcherServlet中
        bw.setPropertyValues(pvs, true);
    }
    catch (BeansException ex) {
        logger.error("Failed to set bean properties on servlet '" + getServletName() + "'", ex);
        throw ex;
    }

    // Let subclasses do whatever initialization they like.
        initServletBean();
    if (logger.isDebugEnabled()) {
        logger.debug("Servlet '" + getServletName() + "' configured successfully");
    }
}
上述代码的过程主要的流程并不复杂,首先是将Servlet中配置的参数封装到pvs变量中,对应如下代码:
PropertyValues pvs = new ServletConfigPropertyValues(getServletConfig(), this.requiredProperties);requiredProperties为必需参数,如果没配置将报异常。我们通过debug进ServerConfigPropertyValues构造器,可以看到如下代码:
public ServletConfigPropertyValues(ServletConfig config, Set<String> requiredProperties)
    throws ServletException {
    Set<String> missingProps = (requiredProperties != null && !requiredProperties.isEmpty()) ?
                new HashSet<String>(requiredProperties) : null;

    Enumeration<String> en = config.getInitParameterNames();
    while (en.hasMoreElements()) {
        String property = en.nextElement();
        Object value = config.getInitParameter(property);
        addPropertyValue(new PropertyValue(property, value));
        if (missingProps != null) {
            missingProps.remove(property);
        }
    }
    // Fail if we are still missing properties.
    if (missingProps != null && missingProps.size() > 0) {
        throw new ServletException(
            "Initialization from ServletConfig for servlet '" + config.getServletName() +
            "' failed; the following required properties were missing: " +
            StringUtils.collectionToDelimitedString(missingProps, ", "));
    }
}
通过上述代码我们知道SpringMVC从config中获取Servlet配置的参数并构建为键值对的形式保存到MutablePropertyValues下的List中。
接下来调用PropertyAccessorFactory的静态方法构造器创建BeanWrapperImpl实例(是BeanWrapper的实现类,BeanWrapper是Spring提供的一个用来凑操作JavaBean属性的工具,可以使用它来直接修改一个对象的属性),用于将Servlet中配置的参数设置到DispatcherServlet的相关属性中,然后调用模板方法initServletBean,这意味着子类就是通过该方法进行初始化的。
概括一下HttpServletBean的创建过程如下:
首先将Servlet中配置的参数使用BeanWrapper设置到DispatcherServlet的相关属性中,然后调用模板方法initServletBean初始化子类。
3. FrameworkServlet的初始化过程
从上面的HttpServletBean中可知,FrameworkServlet的初始化入口方法是initServletBean,其代码如下:
protected final void initServletBean() throws ServletException {
    getServletContext().log("Initializing Spring FrameworkServlet '" + getServletName() + "'");
    if (this.logger.isInfoEnabled()) {
        this.logger.info("FrameworkServlet '" + getServletName() + "': initialization started");
    }
    long startTime = System.currentTimeMillis();

    try {
        this.webApplicationContext = initWebApplicationContext();
        initFrameworkServlet();
    }
    catch (ServletException ex) {
        this.logger.error("Context initialization failed", ex);
        throw ex;
    }
    catch (RuntimeException ex) {
        this.logger.error("Context initialization failed", ex);
        throw ex;
    }

    if (this.logger.isInfoEnabled()) {
        long elapsedTime = System.currentTimeMillis() - startTime;
        this.logger.info("FrameworkServlet '" + getServletName() + "': initialization completed in " +
                elapsedTime + " ms");
    }
}上述代码如果去除异常处理代码和日志处理代码,其实核心的代码只有两句:一句用于初始化WebApplicationContext,另一句用于初始化FrameworkServlet,而initFrameworkServlet方法是模板方法,子类可以覆盖然后在里面进行一些初始化工作的,但根据我们debug的情况,子类并没有使用它;由此可见,FrameworkServlet在构建的过程中的主要作用就是初始化了WebApplicationContext。
this.webApplicationContext = initWebApplicationContext();
initFrameworkServlet();
接下来我们来看一下initWebApplicationContext方法。
protected WebApplicationContext initWebApplicationContext() {
    WebApplicationContext rootContext =
        WebApplicationContextUtils.getWebApplicationContext(getServletContext());
    WebApplicationContext wac = null;

    if (this.webApplicationContext != null) {
        // A context instance was injected at construction time -> use it
        wac = this.webApplicationContext;
        if (wac instanceof ConfigurableWebApplicationContext) {
            ConfigurableWebApplicationContext cwac = (ConfigurableWebApplicationContext) wac;
            if (!cwac.isActive()) {
                // The context has not yet been refreshed -> provide services such as
                // setting the parent context, setting the application context id, etc
                if (cwac.getParent() == null) {
                    // The context instance was injected without an explicit parent -> set
                    // the root application context (if any; may be null) as the parent
                    cwac.setParent(rootContext);
                }
                configureAndRefreshWebApplicationContext(cwac);
            }
        }
    }
    if (wac == null) {
        // No context instance was injected at construction time -> see if one
        // has been registered in the servlet context. If one exists, it is assumed
        // that the parent context (if any) has already been set and that the
        // user has performed any initialization such as setting the context id
        wac = findWebApplicationContext();
    }
    if (wac == null) {
        //当在web.xml文件中的Servlet元素下没有设置Load-on-startup元素值的情况下,WebApplicationContext还没有创建,需要创建一个
        wac = createWebApplicationContext(rootContext);
    }

    if (!this.refreshEventReceived) {
        //只有使用第二种方式初始化时,才需要在这里调用onRefresh方法
        onRefresh(wac);
    }

    if (this.publishContext) {
        // Publish the context as a servlet context attribute.
        String attrName = getServletContextAttributeName();
        getServletContext().setAttribute(attrName, wac);
        if (this.logger.isDebugEnabled()) {
            this.logger.debug("Published WebApplicationContext of servlet '" + getServletName() +
                    "' as ServletContext attribute with name [" + attrName + "]");
        }
    }
    return wac;
}
由上面的代码我们知道initWebApplicationContext方法做了三件事:
1. 获取spring根容器rootContext(如果web.xml文件中servlet元素下的load-on-startup元素值没有设置1时,会为空)
获取根容器的原理是:默认情况下spring会将自己的容器设置成ServletContext的属性,默认根容器的key为org.springframework.web.context.WebApplicationContext.ROOT,定义在org.spriingframework.web.context.WebApplicationContext中,所以获取根容器只需要调用ServletContext的getAttribute即可。
2. 设置WebApplicationContext并根据情况调用onRefresh方法。
3. 将WebApplicationContext设置到ServletContext中。
根据publishContext标志来判断是否将webApplicationContext设置到ServletContext的属性中,publishContext标志可以在配置Servlet时通过init-param参数进行设置,其目的是为了方便获取。
对于设置WebApplicationContext一共有三种方法,下面我们将详细进行说明。
- 第一种方法是在构造器方法中已经传递webApplicationContext参数,这时只需要对其进行设置即可,这种方法主要用于Servlet3.0以后的环境,Servlet3.0之后可以在程序中使用ServletContext.addServlet方法注册Servlet。
- 第二种方法是webApplicationContext已经在ServletContext中(这需要在web.xml文件中的servlet元素下的load-on-startup元素值设置为1)
- 第三种方法是在前两个方法都失效的情况下调用
createWebApplicationContext(rootContext)方法创建一个
接下来我们来看一下createWebApplicationContext方法,其代码如下:
protected WebApplicationContext createWebApplicationContext(ApplicationContext parent) {
    //获取创建类型
    Class<?> contextClass = getContextClass();
    if (this.logger.isDebugEnabled()) {
        this.logger.debug("Servlet with name '" + getServletName() +
            "' will try to create custom WebApplicationContext context of class '" +
            contextClass.getName() + "'" + ", using parent context [" + parent + "]");
    }
    //检查创建类型
    if (!ConfigurableWebApplicationContext.class.isAssignableFrom(contextClass)) {
        throw new ApplicationContextException(
            "Fatal initialization error in servlet with name '" + getServletName() +
            "': custom WebApplicationContext class [" + contextClass.getName() +
            "] is not of type ConfigurableWebApplicationContext");
    }
    //调用BeanUtils.instantiateClass方法进行创建
    ConfigurableWebApplicationContext wac =
        (ConfigurableWebApplicationContext) BeanUtils.instantiateClass(contextClass);
    wac.setEnvironment(getEnvironment());
    wac.setParent(parent);
    //将设置的contextConfigLocation参数传入wac,默认传入WEB-INF/[ServletName]-Servlet.xml
    wac.setConfigLocation(getContextConfigLocation());
    configureAndRefreshWebApplicationContext(wac);
    return wac;
}上述代码首先调用getContextClass方法获取要创建的类型,它可以通过contextClass属性设置到Servlet中,默认使用org.springframework.web.context.support.Xml-WebApplication-Context,接着检查是否属于ConfiguragbleWebApplication 类型,不属于则抛出异常;接着通过BeanUtils.instantiateClass(contextClass)【底层实现是反射机制】进行创建,创建后将设置的contextConfigLocation传入,若没有设置,默认传入WEB-INF/[ServletName]-Servlet.xml,然后调用configureAndRefreshWebApplicationContext 进行配置。
在configureAndRefreshWebApplicationContext方法中需要注意的是给wac添加了监听器。
wac.addApplicationListener(new SourceFilteringListener(wac,new ContextRefreshListener()))其目的为了监听ContextRefreshEven事件,当接收到消息时调用FrameworkServlet的onApplicationEvent方法,在onApplicationEvent方法中调用一次onRefresh方法,并将refreshEventReceived标志设置为true,表示已经refresh过,而在initWebApplicationContext方法中,会根据refreshEventReceived标志来判断是否需要运行onRefresh。
注:不管是使用哪种方法调用,onRefresh方法最终肯定会而且只会调用一次,而DispatcherServlet恰恰是通过重写这个模板方法来实现初始化的
概括一下FrameworkServlet的初始化过程:
FrameworkServlet的初始化过程主要是初始化了WebApplicationContext,而自身的初始化工作子类并没实现,应该是为了未来功能扩展所保留的,而webApplicationContext的创建过程是:首先获取spring的根容器rootContext,接着设置webApplicationContext并根据情况调用onRefresh方法(实际上就是根据选择设置webApplicationContext的方式),接着根据publishContext标志判断是否将webApplicationContext设置到ServletContext属性中
4. DispatcherServlet的初始化过程
从上面FrameworkServlet的初始化过程中,我们知道DispatcherServlet的初始化入口方法是onRefresh方法。其代码如下:
protected void onRefresh(ApplicationContext context) {
    initStrategies(context);
}
protected void initStrategies(ApplicationContext context) {
    initMultipartResolver(context);
    initLocaleResolver(context);
    initThemeResolver(context);
    initHandlerMappings(context);
    initHandlerAdapters(context);
    initHandlerExceptionResolvers(context);
    initRequestToViewNameTranslator(context);
    initViewResolvers(context);
    initFlashMapManager(context);
}
从上面的代码我们可以知道onRefresh只是简单地调用了initStrategies方法,而在initStrategies方法中调用了9个初始化方法。可能有同学不理解为什么要这么写,为什么不将initStrategies的具体实现直接写到onRefresh方法中。我觉得其目的是为了分层,明确方法的职责,onRefresh是用于刷新容器的,initStrategies是用于初始化一些策略组件。当然直接把具体方法写到onRefresh方法中对于程序的运行并不影响,但这样方法的职责不明确,而且如果在别的地方也需要调用initStrategies方法,而initStrategies没有独立出来,就只能调用onRefresh,那样在onRefresh方法中增加新功能时就比较麻烦,另外将initStrategies写出来还可以被子类覆盖,使用新的模式进行初始化。
9个组件的具体初始化过程比较简单且类似,下面以初始化HandlerMapping为例来进行分析。
private void initHandlerMappings(ApplicationContext context) {
    this.handlerMappings = null;

    if (this.detectAllHandlerMappings) {
        Map<String, HandlerMapping> matchingBeans =
                BeanFactoryUtils.beansOfTypeIncludingAncestors(context, HandlerMapping.class, true, false);
        if (!matchingBeans.isEmpty()) {
            this.handlerMappings = new ArrayList<HandlerMapping>(matchingBeans.values());
            // We keep HandlerMappings in sorted order.
            OrderComparator.sort(this.handlerMappings);
        }
    }
    else {
        try {
        //从Context中获取
            HandlerMapping hm = context.getBean(HANDLER_MAPPING_BEAN_NAME, HandlerMapping.class);
            this.handlerMappings = Collections.singletonList(hm);
        }
        catch (NoSuchBeanDefinitionException ex) {
            // Ignore, we'll add a default HandlerMapping later.
        }
    }

    // Ensure we have at least one HandlerMapping, by registering
    // a default HandlerMapping if no other mappings are found.
    //如果没有配置则使用,使用默认策略
    if (this.handlerMappings == null) {
        this.handlerMappings = getDefaultStrategies(context, HandlerMapping.class);
        if (logger.isDebugEnabled()) {
            logger.debug("No HandlerMappings found in servlet '" + getServletName() + "': using default");
        }
    }
}初始化方式分两步:首先通过context.getBean 在容器里面按注册时的名称或类型(指LocaleResolver.class类型)进行查找,如果查找不到则调用getDefaultStrategy按照类型获取默认的组件。
接下来我们将进一步查看一下getDefaultStrategy方法是如何获取默认组件的。该方法代码如下:
protected <T> T getDefaultStrategy(ApplicationContext context, Class<T> strategyInterface) {
    List<T> strategies = getDefaultStrategies(context, strategyInterface);
    if (strategies.size() != 1) {
        throw new BeanInitializationException(
        "DispatcherServlet needs exactly 1 strategy for interface [" + strategyInterface.getName() + "]");
    }
    return strategies.get(0);
}
protected <T> List<T> getDefaultStrategies(ApplicationContext context, Class<T> strategyInterface) {
    String key = strategyInterface.getName();
    //从defaultStrategies中获取所需要策略的类型
    String value = defaultStrategies.getProperty(key);
    if (value != null) {
        //有多个默认值,以逗号分割为数组
        String[] classNames = StringUtils.commaDelimitedListToStringArray(value);
        List<T> strategies = new ArrayList<T>(classNames.length);
        //按获取到的类型初始化策略
        for (String className : classNames) {
            try {
                Class<?> clazz = ClassUtils.forName(className, DispatcherServlet.class.getClassLoader());
                    Object strategy = createDefaultStrategy(context, clazz);
                    strategies.add((T) strategy);
            }
            catch (ClassNotFoundException ex) {
                throw new BeanInitializationException(
                    "Could not find DispatcherServlet's default strategy class [" + className +
                        "] for interface [" + key + "]", ex);
            }
            catch (LinkageError err) {
                throw new BeanInitializationException(
                "Error loading DispatcherServlet's default strategy class [" + className +
                "] for interface [" + key + "]: problem with class file or dependent class", err);
            }
        }
        return strategies;
    }
    else {
        return new LinkedList<T>();
    }
}
从上述代码我们可以看出getDefaultStrategy调用了getDefaultStrategies方法,并返回返回值的第一个结果,后者返回一个List是因为HandlerMapping等组件可以有多个;getDefaultStrategies方法比较容易理解,其过程是:以传入进来的类型名称作为key,在defaultStrategies中获取对应的value,以value作为ClassUtil.forName方法参数进行实际的创建。那么defaultStrategies又是如何进行初始化的呢?我们从源码中可以知道defaultStrategies是一个静态final属性,在static块中初始化。其代码如下:
private static final Properties defaultStrategies;

static {
    // Load default strategy implementations from properties file.
    // This is currently strictly internal and not meant to be customized
    // by application developers.
    try {
        ClassPathResource resource = new ClassPathResource(DEFAULT_STRATEGIES_PATH, DispatcherServlet.class);
        defaultStrategies = PropertiesLoaderUtils.loadProperties(resource);
    }
    catch (IOException ex) {
        throw new IllegalStateException("Could not load 'DispatcherServlet.properties': " + ex.getMessage());
    }
}从上面的代码,我们可以看到,defaultStrategies是DispatcherServlet类所在目录下的DEFAULT_STRATEGIES_PATH 文件里所定义的属性,而DEFAULT_STRATEGIES_PATH 的值是DispatcherServlet.properties.因而defaultStrategies里存放的是org.springframework.web.DispatcherServlet.properties 里面所定义的的键值对。DispatcherServlet.properties文件里的内容如下:
# Default implementation classes for DispatcherServlet's strategy interfaces.
# Used as fallback when no matching beans are found in the DispatcherServlet context.
# Not meant to be customized by application developers.

org.springframework.web.servlet.LocaleResolver=org.springframework.web.servlet.i18n.AcceptHeaderLocaleResolver

org.springframework.web.servlet.ThemeResolver=org.springframework.web.servlet.theme.FixedThemeResolver

org.springframework.web.servlet.HandlerMapping=org.springframework.web.servlet.handler.BeanNameUrlHandlerMapping,\
    org.springframework.web.servlet.mvc.annotation.DefaultAnnotationHandlerMapping

org.springframework.web.servlet.HandlerAdapter=org.springframework.web.servlet.mvc.HttpRequestHandlerAdapter,\
    org.springframework.web.servlet.mvc.SimpleControllerHandlerAdapter,\
    org.springframework.web.servlet.mvc.annotation.AnnotationMethodHandlerAdapter

org.springframework.web.servlet.HandlerExceptionResolver=org.springframework.web.servlet.mvc.annotation.AnnotationMethodHandlerExceptionResolver,\
    org.springframework.web.servlet.mvc.annotation.ResponseStatusExceptionResolver,\
    org.springframework.web.servlet.mvc.support.DefaultHandlerExceptionResolver

org.springframework.web.servlet.RequestToViewNameTranslator=org.springframework.web.servlet.view.DefaultRequestToViewNameTranslator

org.springframework.web.servlet.ViewResolver=org.springframework.web.servlet.view.InternalResourceViewResolver

org.springframework.web.servlet.FlashMapManager=org.springframework.web.servlet.support.SessionFlashMapManager
从上面我们可以看出定义了8个不同类型的组件,处理上传组件MultipartResolver没有默认配置。
概括一下DispatcherServlet的初始化过程:
DispatcherServlet的初始化过程主要是初始化9大组件,而每个组件的初始化过程基本可以分成两步:首先通过context.getBean 在容器里按注册的名称和类型进行查找,如果查找不到就调用getDefaultStrategy按类型获取默认的组件,获取默认组件的过程如下:以类型的名称为key,从defaultStrategies(静态初始化时,将DispatcherServlet.properties文件里的键值对存储起来)获取相应的value,以value为参数利用反射机制进行创建。
小结
Spring MVC的创建过程,简单来说是Spring MVC的三个Servlet的初始化过程,这三个Servlet分成三个层次,HttpServletBean直接继承自Java的Httpservlet,将Servlet中配置的参数设置到相应的属性中;FrameworkServlet的初始化主要是初始化了webApplicationContext;而DispatcherServlet的初始化则是初始化了自身的9个组件。至此Spring MVC的创建过程已完成。


 286
286

 被折叠的 条评论
为什么被折叠?
被折叠的 条评论
为什么被折叠?
 到【灌水乐园】发言


