


android艺术开发探索之RemoteViews跨进程更新UI
RemoteViews表示的是一个view结构,它提供了一组基础的操作用于跨进程更新它的界面,常见的应用场景是通知栏和桌面小部件。在学习它之前我们先了解PendingIntent。
PendingIntent
PendingIntent表示一种处于pending状态的意图,是在将来的某个不确定的时刻发生,而Intent是立刻发生,PendingIntent是通过send和cancle方法来发送和取消待定的Intent.
PendingIntent的Flag
FLAG_NOE_SHOT
PendingIntent只能被调用一次,然后它会自动cancel,如果后续还有相同的PendingIntent,那么send方法会调用失败。
FLAG_NO_CREATE
PendingIntent不会主动创建如果当前PendingIntent之前不存在,那么getActivity、getService、getBroadcast方法会直接返回null,即获取PendingIntent失败。
FLAG_CANCEL_CURRENT
当前描述的PendingIntent已经存在,那么它们都会被cancel,然后系统会创建一个新的PendingIntent,对于那些被取消的通知单击后无法打开
FLAG_UPDATE_CURRENT
当前描述的PendingIntent如果已经存在,那么他们都会被更新,即他们的Intent的Extras会被替换成最新的。
PendingIntent的匹配规则
如果两个PendingIntent它们内部的Intent相同,并且requestCode也相同,那么这两个PendingIntent就是相同的。如果两个Intent的ComponentName和intent-filter都相同那么这两个Intent就是相同。
RemoteViews所支持的View
RemoteViews只支持几个set方法,没有提供findViewbyid,所以无法获取到RemoteViews的子view,同时它所支持的view也很少,有如下几个,除了一下View,其他的一概不支持:
Layout:
FrameLayout、LinearLayout、RelativeLayout、GridLayout
View:
AnalogClock,Button,Chronometer,ImageButton,ImageView,ProgressBar,TextView,ViewFlipper,ListView,GridView,StackView,AdapterViewFlipper,ViewSub
RemoteViews的工作原理
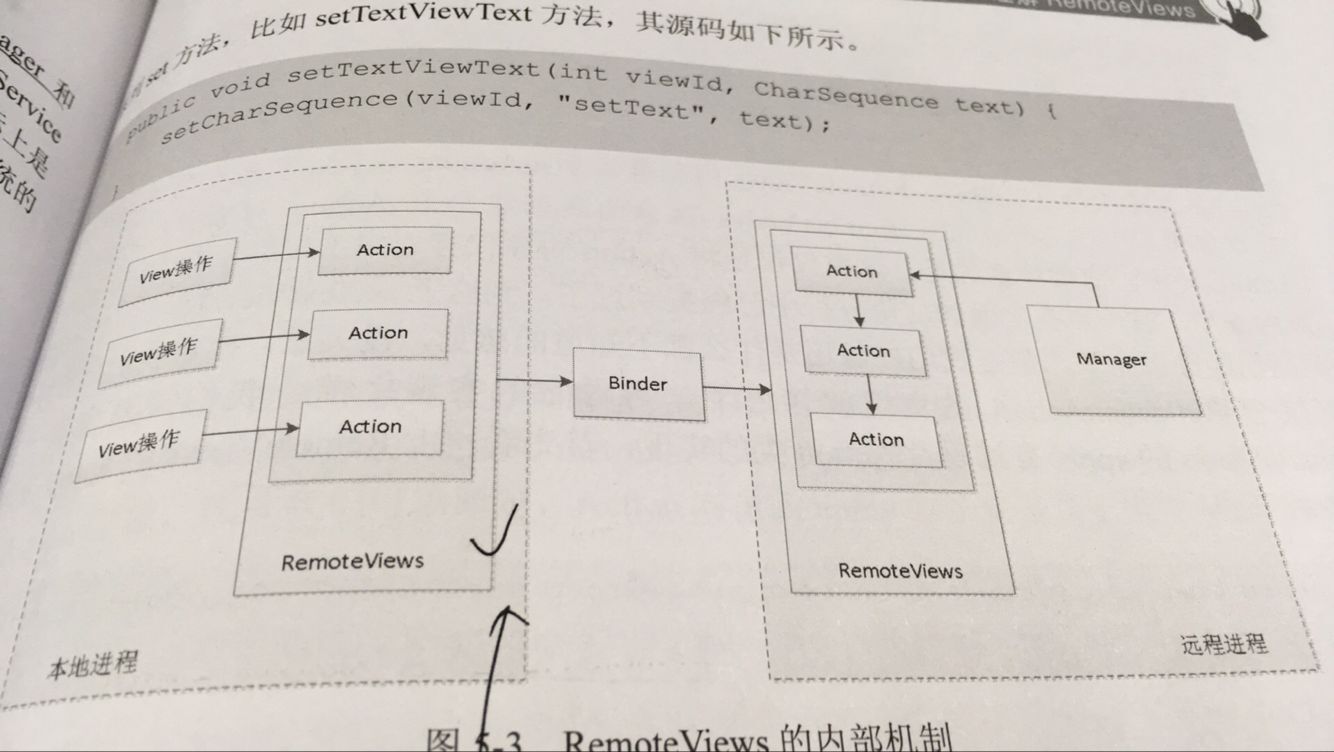
桌面小部件和通知都是由binder和SystemServer进程中的各自的服务进行通信的,这就构成了跨进程通信, RemoteViews实现了Parcelable,因此可以跨进程传输,当需要更新的时候就采用RemoteViews的一系列的set方法提交到SystemServer进程中的各自的服务去加载更新,大量的IPC操作会影响效率,因此一个view操作代表一个action,然后action实现了Parcelable,每调一次set方法, RemoteViews 就添加一个对应的action,当调用各自的manager提交的时候,这些action就会被传输到远程并在远程中依次执行,远程进程通过 RemoteViews的apply方法来进行view的更新,apply方法会遍历所有的action对象并调用它们的apply方法,避免了大量的IPC操作,提高了远程的性能。
RemoteViews的单击事件只支持发起PendingIntent,setOnClickPendingIntent用于给普通的view设置单击事件,但不能给Listview以及StackView这些控件的item设置点击事件,因为开销大系统禁用了这种方式,如果要给这些item设置则必须将setPendingIntentTemplate和setOnClickFillInIntent组合使用才可以。
RemoteViews的应用场景:
一个应用去更新另一个应用的中的某个界面,当更新频繁时这个时候有效率问题,可以采用RemoteViews和aidl实现,但是RemoteViews只支持常见的view.A中发广播并且把RemoteViews放在intent中传递到B中去,B中接受广播获取RemoteViews调用apply方法的到view并加以利用。但是RemoteViews实现两个应用之间的界面更新,如果将B中的布局文件的资源id传输到A中有可能是无效的。这时候需要两个应用提前约定好布局文件的名称,然后B中根据名称获取layoutId,然后根据layoutID找到view,然后调用reapply方法加载到B中,伪代码如下:
int layoutid=getResource().getIdentifier(“layoutid”,”layout”,getPackageName());
View view=getLayoutInfater().inflate(layoutid,mView,false);
remoteViews.reapply(this,view);
mView.addView(view);
RemoteViews在通知中的应用:
使用系统默认样式的通知
 Notification.Builder builder=new Notification.Builder(this);
 builder.setSmallIcon(R.mipmap.ic_launcher);
 builder.setTicker("测试");
 builder.setContentTitle("xxxx");
 builder.setContentText("yyyy");
 builder.setWhen(System.currentTimeMillis());
 Intent intent=new Intent(this,MainActivity.class);
 PendingIntent pendingIntent=PendingIntent.getActivity(this,0,intent,PendingIntent.FLAG_UPDATE_CURRENT);
 builder.setContentIntent(pendingIntent);
 Notification notification= builder.build();
 notification.flags=Notification.FLAG_AUTO_CANCEL;
 NotificationManager manager=(NotificationManager)getSystemService(Context.NOTIFICATION_SERVICE);
 manager.notify(1,notification);
使用自定义的样式通知
Notification.Builder builder=new Notification.Builder(this);
builder.setSmallIcon(R.mipmap.ic_launcher);
builder.setTicker("测试");
builder.setContentTitle("xxxx");
builder.setContentText("yyyy");
builder.setWhen(System.currentTimeMillis());
Intent intent=new Intent(this,MainActivity.class);
PendingIntent pendingIntent=PendingIntent.getActivity(this,0,intent,PendingIntent.FLAG_UPDATE_CURRENT);
builder.setContentIntent(pendingIntent);
RemoteViews remoteViews=new RemoteViews(getPackageName(),R.layout.noti);
remoteViews.setTextViewText(R.id.textView,"11111");
remoteViews.setImageViewResource(R.id.imageView,R.mipmap.aa);
//remoteViews.setOnClickPendingIntent(R.id.zy,pendingIntent);
builder.setContent(remoteViews);
Notification notification= builder.build();
notification.flags=Notification.FLAG_AUTO_CANCEL;
NotificationManager manager=(NotificationManager)getSystemService(Context.NOTIFICATION_SERVICE);
manager.notify(1,notification);
自定义桌面小控件
首先在layout下创建widght.xml,此为小控件的布局desk.x <?xml version="1.0" encoding="utf-8"?>
<RelativeLayout xmlns:android="http://schemas.android.com/apk/res/android"
android:layout_width="match_parent"
android:id="@+id/zy"
android:layout_height="match_parent"
>
<ImageView
android:layout_width="wrap_content"
android:layout_height="wrap_content"
android:src="@mipmap/aa"
android:layout_alignTop="@+id/textView"
android:layout_toRightOf="@+id/textView"
android:layout_toEndOf="@+id/textView"
android:layout_marginLeft="52dp"
android:layout_marginStart="52dp"
android:id="@+id/imageView" />
</RelativeLayout>在res/xml下新建appwidget_provider_info.xml,添加如下<appwidget-provider
android:initialLayout="@layout/desk"
android:minHeight="84dp"
android:minWidth="84dp"
android:updatePeriodMillis="864000"
xmlns:android="http://schemas.android.com/apk/res/android"><!-- updatePeriodMillis定义小工具的自动更新周期-->
</appwidget-provider>建一个类继承AppWidgetProvider类,实现onReceive,AppWidgetProvider的父类是一个广播类,因此需要在manifest注册。
AppWidgetProvider除了常用的onUpdate还有其他的方法onEnabled、onDisable、onDeleted以及onReceive,这些方法会被onReceive
合适的时间给分发掉。
onEnabled:当该小部件第一次添加到桌面时调用该方法,可添加多次但只在第一次调用
onUpdate:小部件被添加时或者每次更新时都会调用一次该方法,小部件的更新周期由updatePeriodMillis来指定,每个周期小部件会
自动更新一次。
onDeleted:每删除一次桌面小部件就调用一次。
onDisabled:当最后一个该类型的桌面小部件被删除时调用该方法,注意是最后一个。
onReceive:广播内置的方法,用于分发具体的事件给其他的方public class MyAppWidgetProvider extends AppWidgetProvider {
private static final String TAG="MyAppWidgetProvider";
private static final String Click_ACTION="site.zhangyun.appliction.Click";
@Override
public void onReceive(final Context context, Intent intent) {
super.onReceive(context, intent);
switch (intent.getAction()){
case Click_ACTION:
Toast.makeText(context,"2222", Toast.LENGTH_LONG).show();
new Thread(new Runnable() {
@Override
public void run() {
Bitmap bitmap= BitmapFactory.decodeResource(context.getResources(), R.mipmap.aa);
AppWidgetManager appWidgetManager=AppWidgetManager.getInstance(context);
for (int i=0;i<37;i++){
float degree=(i*10)%360;
RemoteViews remoteViews=new RemoteViews(context.getPackageName(),R.layout.desk);
remoteViews.setImageViewBitmap(R.id.imageView, rotateBitmap( bitmap,degree));
Intent clickIntent=new Intent();
clickIntent.setAction(Click_ACTION);
PendingIntent pendingIntent=PendingIntent.getBroadcast(context,0,clickIntent,0);
remoteViews.setOnClickPendingIntent(R.id.imageView,pendingIntent);
appWidgetManager.updateAppWidget(new ComponentName(context,MyAppWidgetProvider.class),remoteViews);
SystemClock.sleep(30);
}
}
}).start();
break;
}
}
@Override
public void onUpdate(Context context, AppWidgetManager appWidgetManager, int[] appWidgetIds) {
super.onUpdate(context, appWidgetManager, appWidgetIds);
final int length=appWidgetIds.length;
for (int i = 0; i < length; i++) {
onWidgetUpdate( context, appWidgetManager,appWidgetIds[i]);
}
}
private void onWidgetUpdate(Context context,AppWidgetManager appWidgetManager,int appWidgetId){
RemoteViews remoteViews=new RemoteViews(context.getPackageName(),R.layout.desk);
Intent intentClick=new Intent();
intentClick.setAction(Click_ACTION);
PendingIntent pendingIntent=PendingIntent.getBroadcast(context,0,intentClick,0);
remoteViews.setOnClickPendingIntent(R.id.imageView,pendingIntent);
appWidgetManager.updateAppWidget(appWidgetId,remoteViews);
}
private Bitmap rotateBitmap(Bitmap srcbBitmap,float degree){
Matrix matrix=new Matrix();
matrix.reset();
matrix.setRotate(degree);
Bitmap tmpBitmap=Bitmap.createBitmap(srcbBitmap,0,0,srcbBitmap.getWidth(),srcbBitmap.getHeight(),matrix,true);
return tmpBitmap;
}
}
Manifest中的配置如下:
<receiver android:name="com.robot.zhangyun.deme.md.MyAppWidgetProvider" >
<intent-filter>
<action android:name="android.appwidget.action.APPWIDGET_UPDATE" />//小部件的标示,必须存在
<action android:name="site.zhangyun.appliction.Click"/>//识别小部件的单击事件
</intent-filter>
<meta-data android:name="android.appwidget.provider"
android:resource="@xml/appwidget_provider_info" />
</receiver>


 4226
4226


 被折叠的 条评论
为什么被折叠?
被折叠的 条评论
为什么被折叠?
 到【灌水乐园】发言


