


神经网络白箱攻击实验记录
实验总览介绍
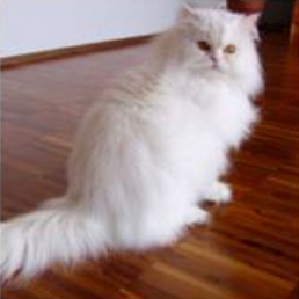
对目标图片正确识别后,利用生成对抗模型,对图片进行扰动后,生成新的扰动图片,再对新产生的图片进行识别,识别出来的结果完全不一样。这里实现的是将准确率为84%的猫的图片经过对抗攻击添加扰动后识别为95%准确率的面包机(toaster)。且原图片和对抗图片人眼看不出区别,但是成功欺骗模型。
实验步骤
1 使用识别模型对原图片识别,导入图片cat.png;代码:
# -*- coding: utf-8 -*-
import numpy as np
from keras.preprocessing import image
from keras.applications import inception_v3
import json

def decode_predictions(preds, top=5):
    """Decodes the prediction of an ImageNet model.

    # Arguments
        preds: Numpy tensor encoding a batch of predictions.
        top: Integer, how many top-guesses to return.

    # Returns
        A list of lists of top class prediction tuples
        `(class_name, class_description, score)`.
        One list of tuples per sample in batch input.

    # Raises
        ValueError: In case of invalid shape of the `pred` array
            (must be 2D).
    """
    CLASS_INDEX_PATH='imagenet_class_index.json'
    if len(preds.shape) != 2 or preds.shape[1] != 1000:
        raise ValueError('`decode_predictions` expects '
                         'a batch of predictions '
                         '(i.e. a 2D array of shape (samples, 1000)). '
                         'Found array with shape: ' + str(preds.shape))
    CLASS_INDEX = json.load(open(CLASS_INDEX_PATH))
    results = []
    for pred in preds:
        top_indices = pred.argsort()[-top:][::-1]
        result = [tuple(CLASS_INDEX[str(i)]) + (pred[i],) for i in top_indices]
        result.sort(key=lambda x: x[2], reverse=True)
        results.append(result)
    return results

# Load pre-trained image recognition model
model = inception_v3.InceptionV3()

# Load the image file and convert it to a numpy array
img = image.load_img("cat.png", target_size=(299, 299))
input_image = image.img_to_array(img)

# Scale the image so all pixel intensities are between [-1, 1] as the model expects
input_image /= 255.
input_image -= 0.5
input_image *= 2.

# Add a 4th dimension for batch size (as Keras expects)
input_image = np.expand_dims(input_image, axis=0)

# Run the image through the neural network
predictions = model.predict(input_image)

# Convert the predictions into text and print them
predicted_classes = decode_predictions(predictions, top=1)
imagenet_id, name, confidence = predicted_classes[0][0]
print("This is a {} with {:.4}% confidence!".format(name, confidence * 100))

识别率 84%为猫。

2 对抗攻击代码,生成对抗图片:
import numpy as np
from keras.preprocessing import image
from keras.applications import inception_v3
from keras import backend as K
from PIL import Image

# Load pre-trained image recognition model
model = inception_v3.InceptionV3()

# Grab a reference to the first and last layer of the neural net
model_input_layer = model.layers[0].input
model_output_layer = model.layers[-1].output

# Choose an ImageNet object to fake
# The list of classes is available here: https://gist.github.com/ageitgey/4e1342c10a71981d0b491e1b8227328b
# Class #859 is "toaster"
object_type_to_fake = 859

# Load the image to hack
img = image.load_img("cat.png", target_size=(299, 299))
original_image = image.img_to_array(img)

# Scale the image so all pixel intensities are between [-1, 1] as the model expects
original_image /= 255.
original_image -= 0.5
original_image *= 2.

# Add a 4th dimension for batch size (as Keras expects)
original_image = np.expand_dims(original_image, axis=0)

# Pre-calculate the maximum change we will allow to the image
# We'll make sure our hacked image never goes past this so it doesn't look funny.
# A larger number produces an image faster but risks more distortion.
max_change_above = original_image + 0.01
max_change_below = original_image - 0.01

# Create a copy of the input image to hack on
hacked_image = np.copy(original_image)

# How much to update the hacked image in each iteration
learning_rate = 0.1

# Define the cost function.
# Our 'cost' will be the likelihood out image is the target class according to the pre-trained model
cost_function = model_output_layer[0, object_type_to_fake]

# We'll ask Keras to calculate the gradient based on the input image and the currently predicted class
# In this case, referring to "model_input_layer" will give us back image we are hacking.
gradient_function = K.gradients(cost_function, model_input_layer)[0]

# Create a Keras function that we can call to calculate the current cost and gradient
grab_cost_and_gradients_from_model = K.function([model_input_layer, K.learning_phase()], [cost_function, gradient_function])

cost = 0.0

# In a loop, keep adjusting the hacked image slightly so that it tricks the model more and more
# until it gets to at least 80% confidence
while cost < 0.80:
    # Check how close the image is to our target class and grab the gradients we
    # can use to push it one more step in that direction.
    # Note: It's really important to pass in '0' for the Keras learning mode here!
    # Keras layers behave differently in prediction vs. train modes!
    cost, gradients = grab_cost_and_gradients_from_model([hacked_image, 0])

    # Move the hacked image one step further towards fooling the model
    hacked_image += gradients * learning_rate

    # Ensure that the image doesn't ever change too much to either look funny or to become an invalid image
    hacked_image = np.clip(hacked_image, max_change_below, max_change_above)
    hacked_image = np.clip(hacked_image, -1.0, 1.0)

    print("Model's predicted likelihood that the image is a toaster: {:.8}%".format(cost * 100))

# De-scale the image's pixels from [-1, 1] back to the [0, 255] range
img = hacked_image[0]
img /= 2.
img += 0.5
img *= 255.

# Save the hacked image!
im = Image.fromarray(img.astype(np.uint8))
im.save("hacked-image.png")
预测生成的图片为面包机的概率为88%


重新使用预测模型进行预测,更改猫的图片为生成的图片:

预测图片为面包机的概率95%

3 原图片(左)和生成图片(右)对比:

参考博文:
通俗理解神经网络的对抗攻击及keras代码实例:
https://blog.csdn.net/u010420283/article/details/83685140?depth_1-utm_source=distribute.pc_relevant.none-task-blog-BlogCommendFromBaidu-5&utm_source=distribute.pc_relevant.none-task-blog-BlogCommendFromBaidu-5


 228
228


 被折叠的 条评论
为什么被折叠?
被折叠的 条评论
为什么被折叠?
 到【灌水乐园】发言


