


Intent七大属性是指Intent的ComponentName、Action、Category、Data、Type、Extra以及Flag,七个属性,总体上可以分为3类:
第一类:启动,有ComponentName(显式),Action(隐式),Category(隐式)。
第二类:传值,有Data(隐式),Type(隐式),Extra(隐式、显式)。
第三类:启动模式,有Flag。
下面我们逐一来说。
1.ComponentName
Component本身有组件的意思,我们通过设置Component可以启动其他的Activity或者其他应用中的Activity,来看一个简单的实例:
启动同一个App中另外一个Activity:
intent = new Intent();
            intent.setComponent(new ComponentName(this, SecondActivity.class));
            startActivity(intent);
这中启动方式等同于以下两种启动方式:
intent = new Intent(this,SecondActivity.class);
            startActivity(intent);
intent = new Intent();
intent.setClass(this, SecondActivity.class);
startActivity(intent); 当然,通过设置ComponentName属性我们也可以启动其他App中的Activity,关于这一块的内容大家可以参考关于ComponentName的使用。下面我们看看隐式启动。
2.Action和Category
因为在实际开发中,Action大多时候都是和Category一起使用的,所以这里我们将这两个放在一起来讲解。Intent中的Action我们在使用广播的时候用的比较多,在Activity中,我们可以通过设置Action来隐式的启动一个Activity,比如我们有一个ThirdActivity,我们在清单文件中做如下配置:
<activity
    android:name=".ThirdActivity"
    android:label="@string/title_activity_third" >
    <intent-filter>
        <category android:name="android.intent.category.DEFAULT" />


        <action android:name="com.qf.ThirdActivity" />
    </intent-filter>
</activity>
当我们在清单文件中做了这样的配置之后,我们的ThirdActivity会就会响应这个动作,怎么那么怎么响应呢?看下面:
intent = new Intent();
intent.setAction("com.qf.ThirdActivity");
startActivity(intent);
当然,我们也可以写的更简单一些,如下:
intent = new Intent("com.qf.ThirdActivity");
            startActivity(intent);
通过这中方式我们也可以启动一个Activity,那么大家可能也注意到了,我们的清单文件中有一个category的节点,那么没有这个节点可以吗?不可以!!当我们使用这种隐式启动的方式来启动一个Activity的时候,必须要action和category都匹配上了,该Activity才会成功启动。如果我们没有定义category,那么可以暂时先使用系统默认的category,总之,category不能没有。这个时候我们可能会有疑问了,如果我有多个Activity都配置了相同的action,那么会启动哪个?看看下面这个熟悉的图片:
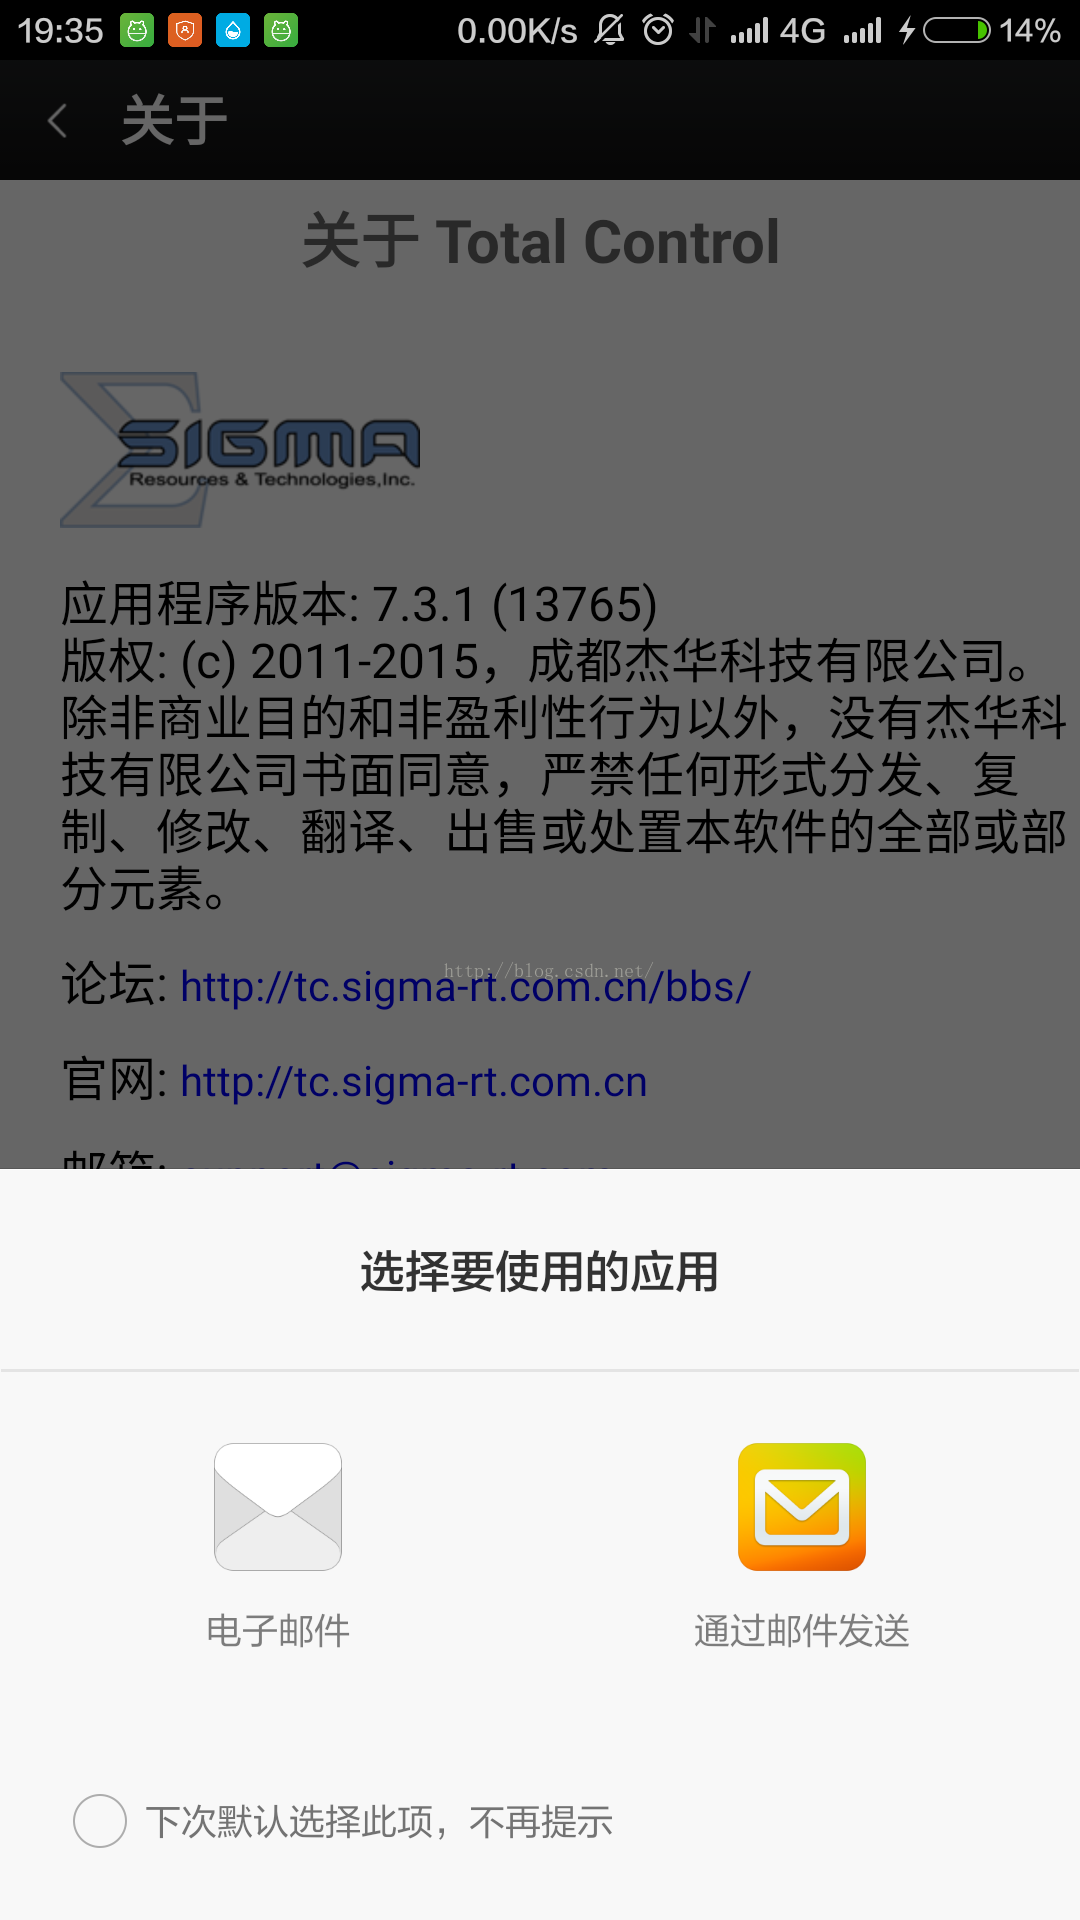
当我们有多个Activity配置了相同的action的时候,那么系统会弹出来一个选择框,让我们自己选择要启动那个Activity。
action我们只能添加一个,但是category却可以添加多个(至少有一个,没有就要设置为DEFAULT),如下:
<activity
    android:name=".ThirdActivity"
    android:label="@string/title_activity_third" >
    <intent-filter>
        <category android:name="android.intent.category.DEFAULT" />
        <category android:name="mycategory" />

        <action android:name="com.qf.ThirdActivity" />
    </intent-filter>
</activity>
相应的我们的启动方式也可以修改,如下:
intent = new Intent("com.qf.ThirdActivity");
            intent.addCategory("mycategory");
            startActivity(intent);
Action是一个动作的名字,而Category就是一个辨别条件。当有多个Activity匹配相同的Action时,就可以通过添加Category来找到特定的Activity。
3.Data
通过设置data,我们可以执行打电话,发短信,开发网页等等操作。究竟做哪种操作,要看我们的数据格式:
// 打开网页
intent = new Intent(Intent.ACTION_VIEW);
intent.setData(Uri.parse("http://www.baidu.com"));
startActivity(intent);
// 打电话
intent = new Intent(Intent.ACTION_VIEW);
intent.setData(Uri.parse("tel:18565554482"));
startActivity(intent);
当我们的data是一个http协议的时候,系统会自动去查找可以打开http协议的Activity,这个时候如果手机安装了多个浏览器,那么系统会弹出多个浏览器供我们选择。这是我们通过设置Data来启动一个Activity,同时,我们也可以通过设置一个Data属性来将我们的Activity发布出去供别人调用,怎么发布呢?
<activity
    android:name=".HttpActivity"
    android:label="@string/title_activity_http" >
    <intent-filter>
        <action android:name="android.intent.action.VIEW" />

        <category android:name="android.intent.category.DEFAULT" />

        <data
            android:scheme="http" />
    </intent-filter>
</activity>
在data节点中我们设置我们这个Activity可以打开的协议,我们这里设置为http协议,那么以后要打开一个http请求的时候,系统都会让我们选择是否用这个Activity打开。当然,我们也可以自己定义一个协议(自己定义的协议,由于别人不知道,所以只能由我们自己的程序打开)。比如下面这样:
<activity
    android:name=".HttpActivity"
    android:label="@string/title_activity_http" >
    <intent-filter>
        <action android:name="android.intent.action.VIEW" />

        <category android:name="android.intent.category.DEFAULT" />

        <data
            android:scheme="myhttp" />
    </intent-filter>
</activity>
那么我们怎么打开自己的Activity呢?
intent = new Intent();
            intent.setData(Uri.parse("myhttp://www.baidu.com"));
            startActivity(intent);
这个例子没有什么实际意义,我只是举一个自定义协议的栗子。
其实,说到这里,大家应该明白了为什么我们说data是隐式传值,比如我们打开一个网页,http协议后面跟的就是网页地址,我们不用再单独指定要打开哪个网页。
4.Type
type的存在,主要是为了对data的类型做进一步的说明,但是一般情况下,只有data属性为null的时候,type属性才有效,如果data属性不为null,系统会自动根据data中的协议来分析data的数据类型,而不会去管type,我们先来看看下面一段源码:
/**
 * Set the data this intent is operating on.  This method automatically
 * clears any type that was previously set by {@link #setType} or
 * {@link #setTypeAndNormalize}.
 *
 * <p><em>Note: scheme matching in the Android framework is
 * case-sensitive, unlike the formal RFC. As a result,
 * you should always write your Uri with a lower case scheme,
 * or use {@link Uri#normalizeScheme} or
 * {@link #setDataAndNormalize}
 * to ensure that the scheme is converted to lower case.</em>
 *
 * @param data The Uri of the data this intent is now targeting.
 *
 * @return Returns the same Intent object, for chaining multiple calls
 * into a single statement.
 *
 * @see #getData
 * @see #setDataAndNormalize
 * @see android.net.Uri#normalizeScheme()
 */
public Intent setData(Uri data) {
    mData = data;
    mType = null;
    return this;
}

/**
 * Set an explicit MIME data type.
 *
 * <p>This is used to create intents that only specify a type and not data,
 * for example to indicate the type of data to return.
 *
 * <p>This method automatically clears any data that was
 * previously set (for example by {@link #setData}).
 *
 * <p><em>Note: MIME type matching in the Android framework is
 * case-sensitive, unlike formal RFC MIME types.  As a result,
 * you should always write your MIME types with lower case letters,
 * or use {@link #normalizeMimeType} or {@link #setTypeAndNormalize}
 * to ensure that it is converted to lower case.</em>
 *
 * @param type The MIME type of the data being handled by this intent.
 *
 * @return Returns the same Intent object, for chaining multiple calls
 * into a single statement.
 *
 * @see #getType
 * @see #setTypeAndNormalize
 * @see #setDataAndType
 * @see #normalizeMimeType
 */
public Intent setType(String type) {
    mData = null;
    mType = type;
    return this;
}
当我们设置data的时候,系统会默认将type设置为null,当我们设置type的时候,系统会默认将data设置为null.也就是说,一般情况下,data和type我们只需要设置一个就行了,如果我们既想要设置data又想要设置type,那么可以使用
setDataAndType(Uri data, String type)
这个方法来完成。下面我们来看看通过给Intent设置type来打开一个音乐播放器。代码如下:
intent = new Intent();
            intent.setAction(Intent.ACTION_VIEW);
            Uri data = Uri.parse("file:///storage/emulated/0/xiami/audios/被动.mp3");
            intent.setDataAndType(data, "audio/mp3");
startActivity(intent); 如果我们要打开的是视频文件,那么type就要设置为”video/“,其中表示支持所有的视频文件。
5.Extra
Extra就比较好理解了,我们经常使用它来在Activity之间传递数据,Extra可以传递基本类型,String类型以及实现了Serializable或者Parcelable接口的类,具体用法不多说。
6.Flag
通过设置Flag,我们可以设定一个Activity的启动模式,这个和launchMode基本上是一样的
附《Intent调用常见系统组件方法》
// 调用浏览器

Uri webViewUri = Uri.parse("http://blog.csdn.net/zuolongsnail");

Intent intent = new Intent(Intent.ACTION_VIEW, webViewUri);

// 调用地图

Uri mapUri = Uri.parse("geo:100,100");

Intent intent = new Intent(Intent.ACTION_VIEW, mapUri);

// 播放mp3

Uri playUri = Uri.parse("file:///sdcard/test.mp3");

Intent intent = new Intent(Intent.ACTION_VIEW, playUri);

intent.setDataAndType(playUri, "audio/mp3");

// 调用拨打电话

Uri dialUri = Uri.parse("tel:10086");

Intent intent = new Intent(Intent.ACTION_DIAL, dialUri);

// 直接拨打电话,需要加上权限<uses-permission id="android.permission.CALL_PHONE" />

Uri callUri = Uri.parse("tel:10086");

Intent intent = new Intent(Intent.ACTION_CALL, callUri);

// 调用发邮件(这里要事先配置好的系统Email,否则是调不出发邮件界面的)

Uri emailUri = Uri.parse("mailto:zuolongsnail@163.com");

Intent intent = new Intent(Intent.ACTION_SENDTO, emailUri);

// 直接发邮件

Intent intent = new Intent(Intent.ACTION_SEND);

String[] tos = { "zuolongsnail@gmail.com" };

String[] ccs = { "zuolongsnail@163.com" };

intent.putExtra(Intent.EXTRA_EMAIL, tos);

intent.putExtra(Intent.EXTRA_CC, ccs);

intent.putExtra(Intent.EXTRA_TEXT, "the email text");

intent.putExtra(Intent.EXTRA_SUBJECT, "subject");

intent.setType("text/plain");

Intent.createChooser(intent, "Choose Email Client");

// 发短信

Intent intent = new Intent(Intent.ACTION_VIEW);

intent.putExtra("sms_body", "the sms text");

intent.setType("vnd.android-dir/mms-sms");

// 直接发短信

Uri smsToUri = Uri.parse("smsto:10086");

Intent intent = new Intent(Intent.ACTION_SENDTO, smsToUri);

intent.putExtra("sms_body", "the sms text");

// 发彩信

Uri mmsUri = Uri.parse("content://media/external/images/media/23");

Intent intent = new Intent(Intent.ACTION_SEND);

intent.putExtra("sms_body", "the sms text");

intent.putExtra(Intent.EXTRA_STREAM, mmsUri);

intent.setType("image/png");

// 卸载应用

Uri uninstallUri = Uri.fromParts("package", "com.app.test", null);

Intent intent = new Intent(Intent.ACTION_DELETE, uninstallUri);

// 安装应用

Intent intent = new Intent(Intent.ACTION_VIEW);

intent.setDataAndType(Uri.fromFile(new File("/sdcard/test.apk"), "application/vnd.android.package-archive");

// 在Android Market中查找应用

Uri uri = Uri.parse("market://search?q=愤怒的小鸟");

Intent intent = new Intent(Intent.ACTION_VIEW, uri); 


 392
392


 被折叠的 条评论
为什么被折叠?
被折叠的 条评论
为什么被折叠?
 到【灌水乐园】发言


