


 本文介绍了Python uiautomator wrapper的源码学习,包括其主要类的功能和关系,如Selector、Adb、AutomatorServer、AutomatorDevice等。通过源码分析,展示了uiautomator如何实现与Android设备的自动化测试交互,同时指出其依赖于android.Uiautomator和jsonrpcserver可能带来的稳定性和性能瓶颈。
python uiautomator wrapper 源码学习
首先感谢xiaocong,让python的developer可以轻松的操控android automation。
利用jsonRPCServer实现python与 android uiautomator的沟通的确是最易懂最方便的方法。
本文主要是对python uiautomator wrapper的学习。 JsonRPCServer 在下章再讲。
安装及使用
请参考官网: https://github.com/xiaocong/uiautomator
安装
$git clone https://github.com/xiaocong/uiautomator.git
$cd uiautomator
$sudo python setup.py install
or
$sudo pip install uiautomator使用
import uiautomator as ui
d = ui.Device("<serial>")
d = ui.device
源码解析:
我的源码位置: /usr/local/lib/python2.7/dist-packages/uiautomator/init.py
Start:
import uiautomator as ui
d = ui.Device("xxxxxx")  --> d = AutomatorDevice("xxxxx")  # 创建指定serial 的device object
d = ui.device --> d = AutomatorDevice() #创建未指定device serial 的object
接下来我们就看看源码中的工作流程
最主要的8个类及他们的关系是:
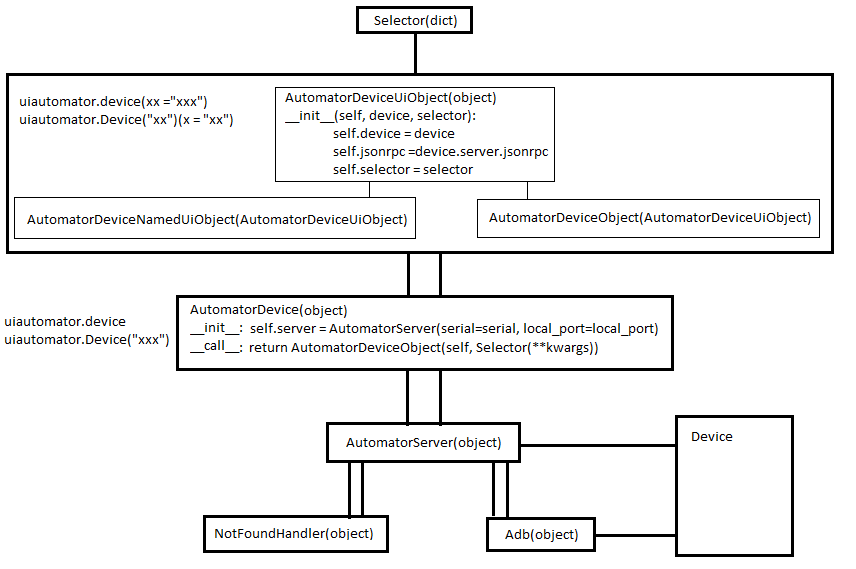
Selector(dict): 负责数据存取修改,与jsonprcserver 一起完成控件动作的交互
- 继承dict
- 初始化数据
__fields - 重写功能
__setitem__/__delitem__等 - 增加功能
clone/child/sibling等。
Adb(object): adb 工具封装类,不做过多介绍
AutomatorServer(object): 主要用于RPC server的操作, start/stop/communicate with JsonRPCClient()
- self.adb = Adb(serial)
- 定义self.device_port
- self.jsonrpc @property
AutomatorDevice(object): Device 对象类,这里是uiautomator的入口
- 提供device对象基本功能,如press、screenshot、等
__call__(self) --> return AutomatorDeviceObject(self, Selector(**kwargs))#寻访控件的时候(callable)用到,如uiautomator.device(packageName = "com.google.android.googlequicksearchbox")
AutomatorDeviceUiObject(object): UiObject 父类
- 基本控件操作
AutomatorDeviceNamedUiObject(AutomatorDeviceUiObject): 基于text、instance、description的UiObject
- 在AutomatorDeviceObject() 接到child_by_text/child_by_description/child_by_instance 等时被调用。
- return self
AutomatorDeviceObject(AutomatorDeviceUiObject): UiObject 默认类,在device对象被call的时候就会被实例化。
- 控件基本操作
流程:
d = uiautomator.device
d.click(x,y) ==> AutomatorDevice().click(x,y) ==> AutomatorDevice().jsonrpc.click(x, y) ==> JsonRPCClient(*args,**kwargs) ==> DUT 最低0.47元/天 解锁文章


 382
382

 被折叠的 条评论
为什么被折叠?
被折叠的 条评论
为什么被折叠?
 到【灌水乐园】发言


