


一、依赖
链接:https://pan.quark.cn/s/b076cc3cb617
提取码:8fac
二、数据库RPM包下载地址
https://download.oracle.com/otn/linux/oracle19c/190000/oracle-database-ee-19c-1.0-1.x86_64.rpm?AuthParam=1659321471_71f23189bb0c56255c38a7deb34dbd02
三、安装openjdk
su root
yum -y install java-1.8.0-openjdk.x86_64

...........................
...........................
Installed:
  copy-jdk-configs-3.7-3.uel20.noarch                                                java-1.8.0-openjdk-1:1.8.0.312.b07-10.up1.uel20.x86_64
  java-1.8.0-openjdk-headless-1:1.8.0.312.b07-10.up1.uel20.x86_64                    javapackages-filesystem-5.3.0-3.uel20.noarch
  lksctp-tools-1.0.18-1.uel20.x86_64                                                 lua-posix-33.3.1-12.uel20.x86_64
  tzdata-java-2021e-1.up1.uel20.noarch                                               xorg-x11-fonts-others-7.5-24.uel20.noarch

Complete!

查看一下版本
[root@localhost Desktop]# java -version
openjdk version "1.8.0_312"
OpenJDK Runtime Environment UnionTech (build 1.8.0_312-b07)
OpenJDK 64-Bit Server VM UnionTech (build 25.312-b07, mixed mode)
四、安装oracle-database-preinstall
[root@localhost 5603-DFCF]# rpm -ivh oracle-database-preinstall-19c-1.0-1.el7.x86_64.rpm

警告:oracle-database-preinstall-19c-1.0-1.el7.x86_64.rpm: 头V3 RSA/SHA256 Signature, 密钥 ID ec551f03: NOKEY
错误:依赖检测失败:
        /etc/redhat-release 被 oracle-database-preinstall-19c-1.0-1.el7.x86_64 需要
        compat-libcap1 被 oracle-database-preinstall-19c-1.0-1.el7.x86_64 需要
        compat-libstdc++-33 被 oracle-database-preinstall-19c-1.0-1.el7.x86_64 需要
        ksh 被 oracle-database-preinstall-19c-1.0-1.el7.x86_64 需要
        libaio-devel 被 oracle-database-preinstall-19c-1.0-1.el7.x86_64 需要
        sysstat 被 oracle-database-preinstall-19c-1.0-1.el7.x86_64 需要
        xorg-x11-utils 被 oracle-database-preinstall-19c-1.0-1.el7.x86_64 需要
解决依赖错误:
1)compat-libcap1错误
使用依赖.zip里面的compat-libcap1-1.10-7.amzn2.x86_64.rpm安装包
[root@localhost 5603-DFCF]# rpm -ivh compat-libcap1-1.10-7.amzn2.x86_64.rpm
警告:compat-libcap1-1.10-7.amzn2.x86_64.rpm: 头V4 RSA/SHA256 Signature, 密钥 ID c87f5b1a: NOKEY
Verifying...                          ################################# [100%]
准备中...                          ################################# [100%]
正在升级/安装...
   1:compat-libcap1-1.10-7.amzn2      ################################# [100%]
2)compat-libstdc+±33错误
使用依赖.zip里面的compat-libstdc++-33-3.2.3-72.el7.x86_64.rpm安装包
[root@localhost 5603-DFCF]# rpm -ivh compat-libstdc++-33-3.2.3-72.el7.x86_64.rpm
警告:compat-libstdc++-33-3.2.3-72.el7.x86_64.rpm: 头V3 RSA/SHA256 Signature, 密钥 ID f4a80eb5: NOKEY
Verifying...                          ################################# [100%]
准备中...                          ################################# [100%]
正在升级/安装...
   1:compat-libstdc++-33-3.2.3-72.el7 ################################# [100%]
3)剩余依赖错误
[root@localhost 5603-DFCF]# yum -y install ksh libaio-devel sysstat xorg-x11-utils
Last metadata expiration check: 0:28:02 ago on 2022年08月02日 星期二 14时39分54秒.
Dependencies resolved.
==============================================================================================================
 Package                   Architecture Version                  Repository                              Size
==============================================================================================================
Installing:
 ksh                       x86_64       1:2020.0.0-5.uel20       UnionTechOS-Server-20-everything       784 k
 libaio-devel              x86_64       0.3.112-2.uel20          UnionTechOS-Server-20-everything        10 k
 sysstat                   x86_64       12.2.1-1.uel20           UnionTechOS-Server-20-everything       400 k
 xorg-x11-utils            x86_64       7.5-32.uel20             UnionTechOS-Server-20-everything        98 k
Installing dependencies:
 libXxf86dga               x86_64       1.1.4-16.uel20           UnionTechOS-Server-20-everything        17 k
 lm_sensors                x86_64       3.6.0-4.uel20            UnionTechOS-Server-20-everything       139 k
 xorg-x11-utils-help       noarch       7.5-32.uel20             UnionTechOS-Server-20-everything        25 k
Installing weak dependencies:
 lm_sensors-help           x86_64       3.6.0-4.uel20            UnionTechOS-Server-20-everything        30 k

Transaction Summary
==============================================================================================================
Install  8 Packages

Total download size: 1.5 M
Installed size: 5.1 M
Downloading Packages:
(1/8): libaio-devel-0.3.112-2.uel20.x86_64.rpm                                 25 kB/s |  10 kB     00:00
(2/8): libXxf86dga-1.1.4-16.uel20.x86_64.rpm                                   32 kB/s |  17 kB     00:00
(3/8): lm_sensors-3.6.0-4.uel20.x86_64.rpm                                    306 kB/s | 139 kB     00:00
(4/8): ksh-2020.0.0-5.uel20.x86_64.rpm                                        651 kB/s | 784 kB     00:01
(5/8): lm_sensors-help-3.6.0-4.uel20.x86_64.rpm                                27 kB/s |  30 kB     00:01
(6/8): sysstat-12.2.1-1.uel20.x86_64.rpm                                      406 kB/s | 400 kB     00:00
(7/8): xorg-x11-utils-7.5-32.uel20.x86_64.rpm                                 144 kB/s |  98 kB     00:00
(8/8): xorg-x11-utils-help-7.5-32.uel20.noarch.rpm                             94 kB/s |  25 kB     00:00
--------------------------------------------------------------------------------------------------------------
Total                                                                         790 kB/s | 1.5 MB     00:01
Running transaction check
Transaction check succeeded.
Running transaction test
Transaction test succeeded.
Running transaction
  Preparing        :                                                                                      1/1
  Installing       : xorg-x11-utils-help-7.5-32.uel20.noarch                                              1/8
  Installing       : lm_sensors-help-3.6.0-4.uel20.x86_64                                                 2/8
  Installing       : lm_sensors-3.6.0-4.uel20.x86_64                                                      3/8
  Running scriptlet: lm_sensors-3.6.0-4.uel20.x86_64                                                      3/8
Created symlink /etc/systemd/system/multi-user.target.wants/lm_sensors.service → /usr/lib/systemd/system/lm_sensors.service.

  Installing       : libXxf86dga-1.1.4-16.uel20.x86_64                                                    4/8
  Running scriptlet: xorg-x11-utils-7.5-32.uel20.x86_64                                                   5/8
  Installing       : xorg-x11-utils-7.5-32.uel20.x86_64                                                   5/8
  Running scriptlet: xorg-x11-utils-7.5-32.uel20.x86_64                                                   5/8
  Running scriptlet: sysstat-12.2.1-1.uel20.x86_64                                                        6/8
  Installing       : sysstat-12.2.1-1.uel20.x86_64                                                        6/8
  Running scriptlet: sysstat-12.2.1-1.uel20.x86_64                                                        6/8
Created symlink /etc/systemd/system/multi-user.target.wants/sysstat.service → /usr/lib/systemd/system/sysstat.service.
Created symlink /etc/systemd/system/sysstat.service.wants/sysstat-collect.timer → /usr/lib/systemd/system/sysstat-collect.timer.
Created symlink /etc/systemd/system/sysstat.service.wants/sysstat-summary.timer → /usr/lib/systemd/system/sysstat-summary.timer.

  Installing       : libaio-devel-0.3.112-2.uel20.x86_64                                                  7/8
  Installing       : ksh-1:2020.0.0-5.uel20.x86_64                                                        8/8
  Running scriptlet: ksh-1:2020.0.0-5.uel20.x86_64                                                        8/8
  Verifying        : ksh-1:2020.0.0-5.uel20.x86_64                                                        1/8
  Verifying        : libXxf86dga-1.1.4-16.uel20.x86_64                                                    2/8
  Verifying        : libaio-devel-0.3.112-2.uel20.x86_64                                                  3/8
  Verifying        : lm_sensors-3.6.0-4.uel20.x86_64                                                      4/8
  Verifying        : lm_sensors-help-3.6.0-4.uel20.x86_64                                                 5/8
  Verifying        : sysstat-12.2.1-1.uel20.x86_64                                                        6/8
  Verifying        : xorg-x11-utils-7.5-32.uel20.x86_64                                                   7/8
  Verifying        : xorg-x11-utils-help-7.5-32.uel20.noarch                                              8/8

Installed:
  ksh-1:2020.0.0-5.uel20.x86_64                        libXxf86dga-1.1.4-16.uel20.x86_64
  libaio-devel-0.3.112-2.uel20.x86_64                  lm_sensors-3.6.0-4.uel20.x86_64
  lm_sensors-help-3.6.0-4.uel20.x86_64                 sysstat-12.2.1-1.uel20.x86_64
  xorg-x11-utils-7.5-32.uel20.x86_64                   xorg-x11-utils-help-7.5-32.uel20.noarch

Complete!
解决所有依赖错误就可以安装oracle-database-preinstall
注意:“/etc/redhat-release 被 oracle-database-preinstall-19c-1.0-1.el7.x86_64 需要”,这个错误可以通过加"–nodeps"参数解决
[root@localhost 5603-DFCF]# rpm -ivh oracle-database-preinstall-19c-1.0-1.el7.x86_64.rpm --nodeps
警告:oracle-database-preinstall-19c-1.0-1.el7.x86_64.rpm: 头V3 RSA/SHA256 Signature, 密钥 ID ec551f03: NOKEY
Verifying...                          ################################# [100%]
准备中...                          ################################# [100%]
正在升级/安装...
   1:oracle-database-preinstall-19c-1.################################# [100%]
五、安装数据库oracle-database-ee
1)注意:开始安装前再安装一个依赖
[root@localhost 5603-DFCF]# yum -y install /lib64/libnsl.so.1
Last metadata expiration check: 0:39:03 ago on 2022年08月02日 星期二 14时39分54秒.
Dependencies resolved.
==============================================================================================================
 Package         Architecture    Version                      Repository                                 Size
==============================================================================================================
Installing:
 libnsl          x86_64          2.28-84.up1.uel20            UnionTechOS-Server-20-everything           50 k

Transaction Summary
==============================================================================================================
Install  1 Package

Total download size: 50 k
Installed size: 94 k
Downloading Packages:
libnsl-2.28-84.up1.uel20.x86_64.rpm                                           273 kB/s |  50 kB     00:00
--------------------------------------------------------------------------------------------------------------
Total                                                                         270 kB/s |  50 kB     00:00
Running transaction check
Transaction check succeeded.
Running transaction test
Transaction test succeeded.
Running transaction
  Preparing        :                                                                                      1/1
  Installing       : libnsl-2.28-84.up1.uel20.x86_64                                                      1/1
  Running scriptlet: libnsl-2.28-84.up1.uel20.x86_64                                                      1/1
  Verifying        : libnsl-2.28-84.up1.uel20.x86_64                                                      1/1

Installed:
  libnsl-2.28-84.up1.uel20.x86_64

Complete!
2)接下来就可以开始安装数据库了
[root@localhost 5603-DFCF]# rpm -ivh oracle-database-ee-19c-1.0-1.x86_64.rpm
警告:oracle-database-ee-19c-1.0-1.x86_64.rpm: 头V3 RSA/SHA256 Signature, 密钥 ID ec551f03: NOKEY
Verifying...                          ################################# [100%]
准备中...                          ################################# [100%]
正在升级/安装...
   1:oracle-database-ee-19c-1.0-1     ################################# [100%]
[INFO] Executing post installation scripts...
[INFO] Oracle home installed successfully and ready to be configured.
To configure a sample Oracle Database you can execute the following service configuration script as root: /etc/init.d/oracledb_ORCLCDB-19c configure
3)初始化数据库
[root@localhost 5603-DFCF]# /etc/init.d/oracledb_ORCLCDB-19c configure
Configuring Oracle Database ORCLCDB.
准备执行数据库操作
已完成 8%
复制数据库文件
已完成 31%
正在创建并启动 Oracle 实例
已完成 32%
已完成 36%
已完成 40%
已完成 43%
已完成 46%
正在进行数据库创建
已完成 51%
已完成 54%
正在创建插接式数据库
已完成 58%
已完成 77%
执行配置后操作
已完成 100%
数据库创建完成。有关详细信息, 请查看以下位置的日志文件:
 /opt/oracle/cfgtoollogs/dbca/ORCLCDB。
数据库信息:
全局数据库名:ORCLCDB
系统标识符 (SID):ORCLCDB
有关详细信息, 请参阅日志文件 "/opt/oracle/cfgtoollogs/dbca/ORCLCDB/ORCLCDB.log"。

Database configuration completed successfully. The passwords were auto generated, you must change them by connecting to the database using 'sqlplus / as sysdba' as the oracle user.
注意接下来的操作需要切换到oralce账户
4)配置环境变量
[root@localhost 5603-DFCF]# su oracle

[oracle@localhost 5603-DFCF]$ vi ~/.bash_profile

export ORACLE_HOME=/opt/oracle/product/19c/dbhome_1
export PATH=$PATH:/opt/oracle/product/19c/dbhome_1/bin
export ORACLE_SID=ORCLCDB

保存之后
source ~/.bash_profile
5)登录数据库
[oracle@localhost 5603-DFCF]$ sqlplus / as sysdba

SQL*Plus: Release 19.0.0.0.0 - Production on Tue Aug 2 16:05:24 2022
Version 19.3.0.0.0

Copyright (c) 1982, 2019, Oracle.  All rights reserved.


???:
Oracle Database 19c Enterprise Edition Release 19.0.0.0.0 - Production
Version 19.3.0.0.0

SQL>
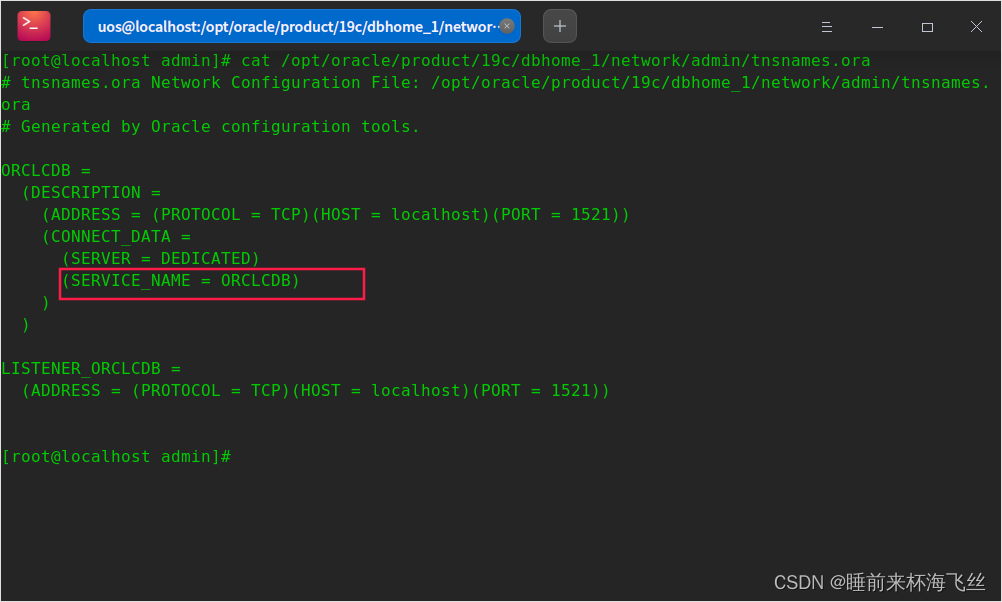
6)图形化管理工具连接注意事项
图形化管理工具的servicename,可以在/opt/oracle/product/19c/dbhome_1/network/admin/tnsnames.ora 路径下查看
至此统信服务器操作系统1050e安装oracle19c就结束了


 1万+
1万+


 被折叠的 条评论
为什么被折叠?
被折叠的 条评论
为什么被折叠?
 到【灌水乐园】发言


