


相对布局管理器指的是参考某一其他控件进行摆放,可以通过控制,将组件摆放在一个指定参考组件的上、下、左、右等位置,这些可以直接通过各个组件提供的属性完成。
下面介绍一下各个方法的基本使用
|
No.
|
属性名称
|
对应的规则常量
|
描述
|
|
1
|
android:layout_below
|
RelativeLayout.BELOW
|
摆放在指定组件的下边
|
|
2
|
android:layout_toLeftOf
|
RelativeLayout.LEFT_OF
|
摆放在指定组件的左边
|
|
3
|
android:layout_toRightOf
|
RelativeLayout.RIGHT_OF
|
摆放在指定组件的右边
|
|
4
|
android:layout_alignTop
|
RelativeLayout.ALIGN_TOP
|
以指定组件为参考进行上对齐
|
|
5
|
android:layout_alignBottom
|
RelativeLayout.ALIGN_BOTTOM
|
以指定组件为参考进行下对齐
|
|
6
|
android:layout_alignLeft
|
RelativeLayout.ALIGN_LEFT
|
以指定组件为参考进行左对齐
|
|
7
|
android:layout_alignRight
|
RelativeLayout.ALIGN_RIGHT
|
以指定组件为参考进行右对齐
|
<span style="font-size:18px;"><RelativeLayout xmlns:android="http://schemas.android.com/apk/res/android"
    xmlns:tools="http://schemas.android.com/tools"
    android:layout_width="match_parent"
    android:layout_height="match_parent"
    android:paddingBottom="@dimen/activity_vertical_margin"
    android:paddingLeft="@dimen/activity_horizontal_margin"
    android:paddingRight="@dimen/activity_horizontal_margin"
    android:paddingTop="@dimen/activity_vertical_margin"
    android:textAlignment="center"
    tools:context=".MainActivity" >

    <EditText
        android:id="@+id/editText1"
        android:layout_width="wrap_content"
        android:layout_height="wrap_content"
        android:layout_alignParentRight="true"
        android:layout_alignParentTop="true"
        android:ems="10" />

    <EditText
        android:id="@+id/editText2"
        android:layout_width="wrap_content"
        android:layout_height="wrap_content"
        android:layout_alignRight="@+id/editText1"
        android:layout_below="@+id/editText1"
        android:ems="10"
        android:inputType="textPassword" >

        <requestFocus />
    </EditText>

    <TextView
        android:id="@+id/textView1"
        android:layout_width="wrap_content"
        android:layout_height="wrap_content"
        android:layout_alignBottom="@+id/editText1"
        android:layout_alignParentLeft="true"
        android:text="账号" />

    <TextView
        android:id="@+id/textView2"
        android:layout_width="wrap_content"
        android:layout_height="wrap_content"
        android:layout_alignBottom="@+id/editText2"
        android:layout_alignParentLeft="true"
        android:text="密码"
        android:textAlignment="center" />

    <Button
        android:id="@+id/button1"
        android:layout_width="wrap_content"
        android:layout_height="wrap_content"
        android:layout_below="@+id/editText2"
        android:layout_marginLeft="23dp"
        android:layout_marginTop="36dp"
        android:layout_toRightOf="@+id/textView2"
        android:text="登    录" />

    <TextView
        android:id="@+id/textView3"
        android:layout_width="wrap_content"
        android:layout_height="wrap_content"
        android:layout_alignBottom="@+id/button1"
        android:layout_marginLeft="14dp"
        android:layout_toRightOf="@+id/button1"
        android:autoLink="web"
        android:linksClickable="true"
        android:text="忘记密码"
        android:textAppearance="?android:attr/textAppearanceSmall"
        android:textSize="10dp" />

</RelativeLayout>
</span>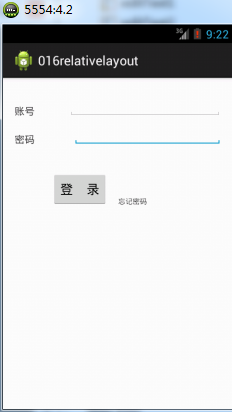
使用相对布局是目前主要的布局方式,它比其他方式都方便快捷,可以再可视化界面直接拖拽即可。
…………………………………………………………毫无美感的分割线…………………………………………………………
使用动态表布局实现和前面的是一样的,不常使用在这里不再赘述,有兴趣的读者可以自己尝试。
需要使用以下几个方法。
|
1
|
public RelativeLayout.LayoutParams (int w, int h)
|
构造
|
指定RelativeLayout布局的宽度和高度
|
|
2
|
public void addRule (int verb, int anchor)
|
普通
|
增加指定的参数规则
|
|
3
|
public int[] getRules ()
|
普通
|
取得一个组件的全部参数规则
|
下节预报:使用嵌套布局实现计算器界面


 463
463

 被折叠的 条评论
为什么被折叠?
被折叠的 条评论
为什么被折叠?
 到【灌水乐园】发言


