


http://blog.csdn.net/yangwen123/article/details/8946091
Android Phone设计介绍
在Android之rild进程启动源码分析一文中已经详细介绍了Android的电话系统架构设计,并对rild进程进行了详细的剖析。native层的rild进程负责与底层modem设备交互,比如向modem发送AT命令、从modem中接收消息,同时实时监控modem的状态;作为三层架构设计的Android电话系统:客户端的framework、服务端的rild、modem设备,rild进程还需要接收来自客户端的命令消息,将客户端的需求转发给modem设备,实现对modem的控制。
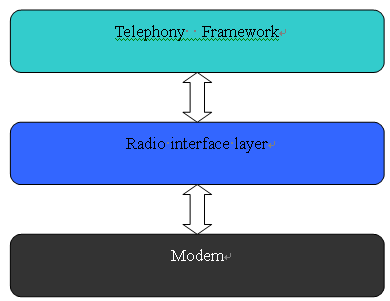
Framework的RIL与Native的Rild交互框图:

Android中关于telephony相关的java代码主要在下列目录中:
1. frameworks/base/telephony/java/android/telephony
提供Android telephony的公开接口,任何具有权限的第三方应用都可使用,如接口类TelephonyManager。
2. frameworks/base/telephony/java/com/android/internal/telephony
3. frameworks/base/services/java/com/android/server/TelephonyRegistry.java
提供一系列内部接口,目前第三方应用还不能使用。当前似乎只有packages/apps/Phone能够使用
4. packages/apps/Phone
一个特殊应用,或者理解为一个平台内部进程。其他应用通过intent方式调用这个进程的服务。
TelephonyManager主要使用两个服务来访问telephony功能:
1. ITelephony,提供与telephony进行操作,交互的接口
在packages/apps/Phone中由PhoneInterfaceManager.java实现。
2. ITelephonyRegistry, 提供登记telephony事件的接口
在frameworks/base/services/java/com/android/server/TelephonyRegistry.java实现。
在framework层提供并实现了一套完整的电话操作接口,这些接口描述了电话的各个功能模块,相关类关系图如下:
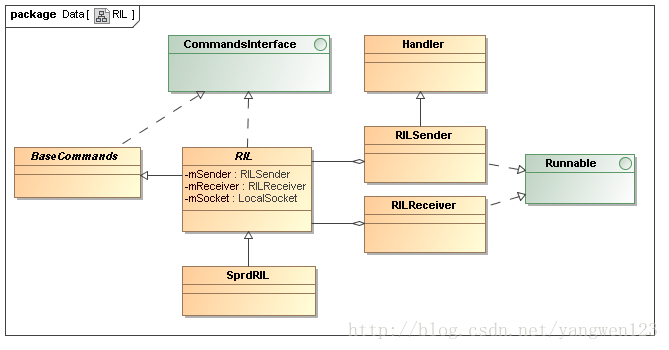
BaseCommands实现了CommandsInterface的部分接口,用于通知手机各种内部状态的变化。它里面保存了大量的Registrant(注册者)和RegistrantList,并提供了大量的registerXXX和unregisterXXX函数。当对某种状态变化感兴趣时,就可以调用registerXXX函数,在BaseCommands内部创建一个对应的registrant或将registrant添加到列表中。后者表示某种状态有多个感兴趣者,将各个registrant添加到RegistrantList中,若只能有一个感兴趣者则创建的是Registrant对象。实际上,在调用registerXXX函数时,调用者将message和handler传递给Registrant对象;当有状态变化时则通过Registrant.NotifyXXX调用Handler将消息发送到handler的消息队列上,调用者可以在一个线程中去处理这些消息,因此实现了尽可能实时通知调用者的目的。RIL类负责与rild交互,提供API用于执行AT命令,即RIL请求,供调用者调用;以及处理上报的回复,以消息的形式发送给调用者。
CommandsInterface 描述了对电话的所有操作接口,如命令,查询状态,以及电话事件监听等,BaseCommands是CommandsInterface的直接派生类,实现了电话事件的处理(发送message给对应的handler)。RIL类继承自BaseCommands,实现了CommandsInterface的部分接口,包含了2个线程sender和receiver(在RIL的构造函数中创建并启动运行),前者用于向rild发送RIL At命令请求,后者用于处理来自rild的response信息(包括对RIL请求的回复和Modem主动上报的unsolicited信息)。它们都是向本地socket读写数据来实现的。使用者在使用RIL请求API时,通过sender线程向rild发送RIL请求,具体是:在这些API函数中,得到一个RILRequest后,将要传递给AT命令的数据通过Parcel写入到socket中,rild侧解析得到传递来的数据,根据请求号调用相应的分发函数转换成AT命令传递给Modem。对于每一个命令接口方法,如acceptCall,或者状态查询,将它转换成对应的RIL_REQUEST_XXX,通过线程RILSender发送给rild。线程RILReceiver监听socket,当有数据上报时,读取该数据并处理。读取的数据有两种:
1. 电话事件,RIL_UNSOL_xxx, RIL读取相应数据后,发送message给对应的handler 。
2. 命令的异步响应。
Android电话描述相关类关系图如下:
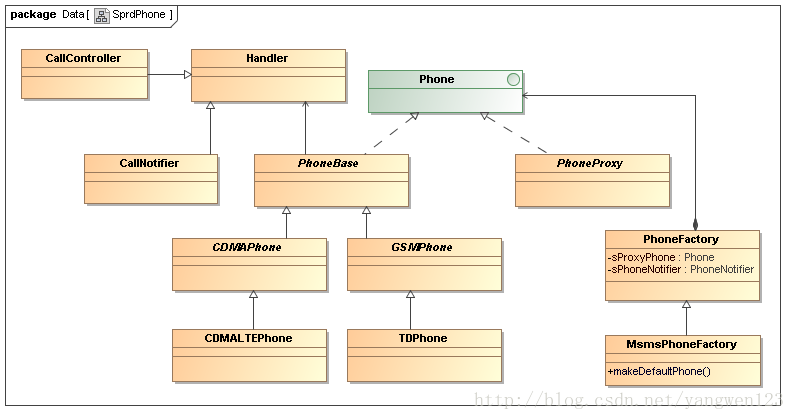
Phone描述了对电话的所有操作接口。PhoneBase直接从Phone 派生而来。而另外两个类,CDMAPhone和GSMPhone,又从PhoneBase派生而来,分别代表对CDMA 和GSM的操作。PhoneProxy也从Phone直接派生而来。当前不需要区分具体是CDMA Phone还是GSM Phone时,可使用PhoneProxy。GSMPhone和CDMAPhone实现了Phone中定义的接口。接口类Phone定义了一套API,这套API用于使用RIL发送AT命令请求,也还有一套register和unregister函数;当调用者对一些内部状态感兴趣时,可以调用对应的register函数,当状态变化时可以得到及时通知。PhoneBase实现了Phone接口中定义的部分函数,还有一部分由其子类GSMPhone和CDMAPhone实现。PhoneProxy是GSMPhone和CDMAPhone的代理,让使用者不用关注手机到底是GSM还是CDMA,它遵守Phone定义的API接口,因此继承Phone。PhoneFactory在创建Phone对象时,拥有的是PhoneProxy对象,PhoneProxy根据实际的网络类型创建对应的GSMPhone或CDMAPhone。PhoneFactory同样拥有CommandInterface的接口对象,即RIL的实例,该RIL实例将被传递给GSMPhone或CDMAPhone,即GSMPhone或CDMAPhone引用它,实现与rild的交互。GSMPhone和CDMAPhone继承自PhoneBase,它们(包括PhoneProxy)都是一个Handler。这样,它们就可以在线程的循环Looper.loop中处理来自RILJ或自身发送的各种Message。PhoneFactory负责创建各个Phone实例,其成员及成员函数为static,可以保证创建的实例在系统运行时的唯一性。
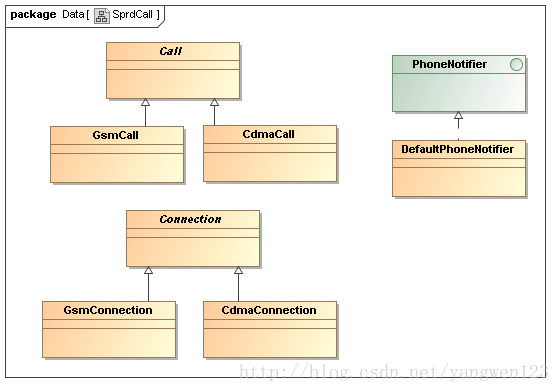
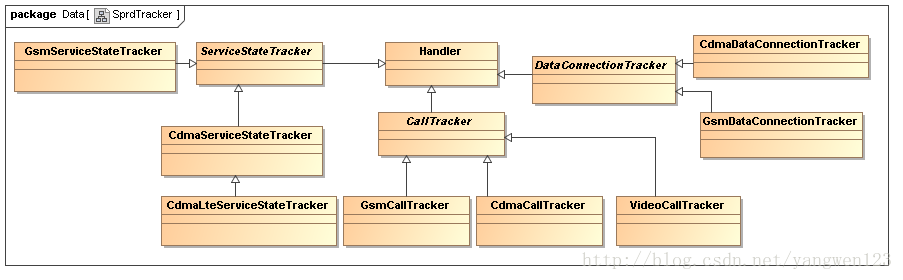
电话tracker类关系图:
Phone进程启动
Android的Phone进程并不是在点击Luncher上的图标启动的,而是在系统开机启动时,又ActivityManagerService启动的。Phone的源码位于packages\apps\Phone。在Phone的AndroidManifest.xml文件配置了如下属性:
- <application android:name="PhoneApp"
- android:persistent="true"
- android:label="@string/dialerIconLabel"
- android:icon="@drawable/ic_launcher_phone">
<application android:name="PhoneApp"
                 android:persistent="true"
                 android:label="@string/dialerIconLabel"
                 android:icon="@drawable/ic_launcher_phone">
- public void systemReady(final Runnable goingCallback){
- ......
- if (goingCallback != null) goingCallback.run();
- synchronized (this) {
- if (mFactoryTest != SystemServer.FACTORY_TEST_LOW_LEVEL) {
- try {
- //通过PackageManager查询到所有android:persistent属性为true的应用
- List apps = AppGlobals.getPackageManager().getPersistentApplications(STOCK_PM_FLAGS);
- if (apps != null) {
- int N = apps.size();
- int i;
- //遍历所有应用,并启动
- for (i=0; i<N; i++) {
- //得到每个应用的相关信息
- ApplicationInfo info= (ApplicationInfo)apps.get(i);
- //启动应用
- if (info != null &&!info.packageName.equals("android")) {
- addAppLocked(info);
- }
- }
- }
- } catch (RemoteException ex) {
- // pm is in same process, this will never happen.
- }
- }
- ........
- mMainStack.resumeTopActivityLocked(null);
- }
- }
public void systemReady(final Runnable goingCallback){
	......
	if (goingCallback != null) goingCallback.run();
	synchronized (this) {
		if (mFactoryTest != SystemServer.FACTORY_TEST_LOW_LEVEL) {
			try {
				//通过PackageManager查询到所有android:persistent属性为true的应用
				List apps = AppGlobals.getPackageManager().getPersistentApplications(STOCK_PM_FLAGS);
				if (apps != null) {
					int N = apps.size();
					int i;
					//遍历所有应用,并启动
					for (i=0; i<N; i++) {
						//得到每个应用的相关信息
						ApplicationInfo info= (ApplicationInfo)apps.get(i);
						//启动应用
						if (info != null &&!info.packageName.equals("android")) {
							addAppLocked(info);
						}
					}
				}
			} catch (RemoteException ex) {
				// pm is in same process, this will never happen.
			}
		}
		........
		mMainStack.resumeTopActivityLocked(null);
	}
}
- final ProcessRecord addAppLocked(ApplicationInfo info) {
- //根据进程名称及uid查询相应的进程
- ProcessRecord app = getProcessRecordLocked(info.processName, info.uid);
- //如果系统中不存在该进城,则创建一个新的进程
- if (app == null) {
- app = newProcessRecordLocked(null, info, null);
- mProcessNames.put(info.processName, info.uid, app);
- updateLruProcessLocked(app, true, true);
- }
- // This package really, really can not be stopped.
- try {
- AppGlobals.getPackageManager().setPackageStoppedState(info.packageName, false);
- } catch (RemoteException e) {
- } catch (IllegalArgumentException e) {
- Slog.w(TAG, "Failed trying to unstop package "+ info.packageName + ": " + e);
- }
- if ((info.flags&(ApplicationInfo.FLAG_SYSTEM|ApplicationInfo.FLAG_PERSISTENT))
- == (ApplicationInfo.FLAG_SYSTEM|ApplicationInfo.FLAG_PERSISTENT)) {
- app.persistent = true;
- app.maxAdj = ProcessList.PERSISTENT_PROC_ADJ;
- }
- if (app.thread == null && mPersistentStartingProcesses.indexOf(app) < 0) {
- mPersistentStartingProcesses.add(app);
- //启动该应用进程
- startProcessLocked(app, "added application", app.processName);
- }
- return app;
- }
final ProcessRecord addAppLocked(ApplicationInfo info) {
	//根据进程名称及uid查询相应的进程
	ProcessRecord app = getProcessRecordLocked(info.processName, info.uid);
	//如果系统中不存在该进城,则创建一个新的进程
	if (app == null) {
		app = newProcessRecordLocked(null, info, null);
		mProcessNames.put(info.processName, info.uid, app);
		updateLruProcessLocked(app, true, true);
	}
	// This package really, really can not be stopped.
	try {
		AppGlobals.getPackageManager().setPackageStoppedState(info.packageName, false);
	} catch (RemoteException e) {
	} catch (IllegalArgumentException e) {
		Slog.w(TAG, "Failed trying to unstop package "+ info.packageName + ": " + e);
	}

	if ((info.flags&(ApplicationInfo.FLAG_SYSTEM|ApplicationInfo.FLAG_PERSISTENT))
			== (ApplicationInfo.FLAG_SYSTEM|ApplicationInfo.FLAG_PERSISTENT)) {
		app.persistent = true;
		app.maxAdj = ProcessList.PERSISTENT_PROC_ADJ;
	}
	if (app.thread == null && mPersistentStartingProcesses.indexOf(app) < 0) {
		mPersistentStartingProcesses.add(app);
		//启动该应用进程
		startProcessLocked(app, "added application", app.processName);
	}
	return app;
}应用启动核心函数是startProcessLocked,该函数已经在Zygote孵化应用进程过程的源码分析中详细介绍了。由此可知对于属性android:persistent为true的应用是在ActivityManagerService服务启动完成后启动的。PhoneAPP继承自Application,启动时调用它的onCreate函数:
- public void onCreate() {
- if (VDBG) Log.v(LOG_TAG, "onCreate()...");
- ContentResolver resolver = getContentResolver();
- Settings.Secure.putInt(resolver, Settings.Secure.RADIO_OPERATION, 0);
- sVoiceCapable =getResources().getBoolean(com.android.internal.R.bool.config_voice_capable);
- if (phone == null) {
- // Get the default phone
- phone = PhoneFactory.makeDefaultPhone(this);
- // Start TelephonyDebugService After the default phone is created.
- Intent intent = new Intent(this, TelephonyDebugService.class);
- startService(intent);
- mCM = CallManager.getInstance();
- mCM.registerPhone(phone);
- // Create the NotificationMgr singleton, which is used to display
- // status bar icons and control other status bar behavior.
- notificationMgr = NotificationMgr.init(this);
- phoneMgr = PhoneInterfaceManager.init(this, phone);
- mHandler.sendEmptyMessage(EVENT_START_SIP_SERVICE);
- int phoneType = phone.getPhoneType();
- if (phoneType == Phone.PHONE_TYPE_CDMA) {
- ...
- }
- if (BluetoothAdapter.getDefaultAdapter() != null) {
- mBtHandsfree = BluetoothHandsfree.init(this, mCM);
- startService(new Intent(this, BluetoothHeadsetService.class));
- } else {
- // Device is not bluetooth capable
- mBtHandsfree = null;
- }
- ringer = Ringer.init(this);
- mReceiver = new PhoneAppBroadcastReceiver();
- mMediaButtonReceiver = new MediaButtonBroadcastReceiver();
- // before registering for phone state changes
- PowerManager pm = (PowerManager) getSystemService(Context.POWER_SERVICE);
- ...
- // create mAccelerometerListener only if we are using the proximity sensor
- if (proximitySensorModeEnabled()) {
- mAccelerometerListener = new AccelerometerListener(this, this);
- }
- mKeyguardManager = (KeyguardManager) getSystemService(Context.KEYGUARD_SERVICE);
- mPowerManagerService = IPowerManager.Stub.asInterface(ServiceManager.getService("power"));
- callController = CallController.init(this);
- inCallUiState = InCallUiState.init(this);
- callerInfoCache = CallerInfoCache.init(this);
- notifier = CallNotifier.init(this, phone, ringer, mBtHandsfree, new CallLogAsync());
- // register for ICC status
- IccCard sim = phone.getIccCard();
- if (sim != null) {
- if (VDBG) Log.v(LOG_TAG, "register for ICC status");
- sim.registerForNetworkLocked(mHandler, EVENT_SIM_NETWORK_LOCKED, null);
- }
- // register for MMI/USSD
- mCM.registerForMmiComplete(mHandler, MMI_COMPLETE, null);
- // register connection tracking to PhoneUtils
- PhoneUtils.initializeConnectionHandler(mCM);
- // Read platform settings for TTY feature
- mTtyEnabled = getResources().getBoolean(R.bool.tty_enabled);
- // Register for misc other intent broadcasts.
- IntentFilter intentFilter =new IntentFilter(Intent.ACTION_AIRPLANE_MODE_CHANGED);
- intentFilter.addAction(BluetoothHeadset.ACTION_CONNECTION_STATE_CHANGED);
- intentFilter.addAction(BluetoothHeadset.ACTION_AUDIO_STATE_CHANGED);
- intentFilter.addAction(TelephonyIntents.ACTION_ANY_DATA_CONNECTION_STATE_CHANGED);
- intentFilter.addAction(Intent.ACTION_HEADSET_PLUG);
- intentFilter.addAction(Intent.ACTION_DOCK_EVENT);
- intentFilter.addAction(Intent.ACTION_LOCALE_CHANGED);
- intentFilter.addAction(TelephonyIntents.ACTION_SIM_STATE_CHANGED);
- intentFilter.addAction(TelephonyIntents.ACTION_RADIO_TECHNOLOGY_CHANGED);
- intentFilter.addAction(TelephonyIntents.ACTION_SERVICE_STATE_CHANGED);
- intentFilter.addAction(TelephonyIntents.ACTION_EMERGENCY_CALLBACK_MODE_CHANGED);
- if (mTtyEnabled) {
- intentFilter.addAction(TtyIntent.TTY_PREFERRED_MODE_CHANGE_ACTION);
- }
- intentFilter.addAction(AudioManager.RINGER_MODE_CHANGED_ACTION);
- registerReceiver(mReceiver, intentFilter);
- ...
- AudioManager am = (AudioManager) getSystemService(Context.AUDIO_SERVICE);
- PhoneUtils.setAudioMode(mCM);
- }
- ...
- inflateView();
- Log.d(LOG_TAG,"Send Broadcast ACTION_PHONE_RESTART");
- Intent intent = new Intent(TelephonyIntents.ACTION_PHONE_RESTART);
- sendBroadcast(intent);
- }
public void onCreate() {
    if (VDBG) Log.v(LOG_TAG, "onCreate()...");

    ContentResolver resolver = getContentResolver();
    Settings.Secure.putInt(resolver, Settings.Secure.RADIO_OPERATION, 0);
    sVoiceCapable =getResources().getBoolean(com.android.internal.R.bool.config_voice_capable);
    if (phone == null) {
        // Get the default phone
        phone = PhoneFactory.makeDefaultPhone(this);

        // Start TelephonyDebugService After the default phone is created.
        Intent intent = new Intent(this, TelephonyDebugService.class);
        startService(intent);

        mCM = CallManager.getInstance();
        mCM.registerPhone(phone);

        // Create the NotificationMgr singleton, which is used to display
        // status bar icons and control other status bar behavior.
        notificationMgr = NotificationMgr.init(this);

        phoneMgr = PhoneInterfaceManager.init(this, phone);

        mHandler.sendEmptyMessage(EVENT_START_SIP_SERVICE);

        int phoneType = phone.getPhoneType();

        if (phoneType == Phone.PHONE_TYPE_CDMA) {
					...
        }

        if (BluetoothAdapter.getDefaultAdapter() != null) {
            mBtHandsfree = BluetoothHandsfree.init(this, mCM);
            startService(new Intent(this, BluetoothHeadsetService.class));
        } else {
            // Device is not bluetooth capable
            mBtHandsfree = null;
        }
        ringer = Ringer.init(this);
        mReceiver = new PhoneAppBroadcastReceiver();
        mMediaButtonReceiver = new MediaButtonBroadcastReceiver();
        // before registering for phone state changes
        PowerManager pm = (PowerManager) getSystemService(Context.POWER_SERVICE);
        ...
        // create mAccelerometerListener only if we are using the proximity sensor
        if (proximitySensorModeEnabled()) {
            mAccelerometerListener = new AccelerometerListener(this, this);
        }
        mKeyguardManager = (KeyguardManager) getSystemService(Context.KEYGUARD_SERVICE);
        mPowerManagerService = IPowerManager.Stub.asInterface(ServiceManager.getService("power"));
        callController = CallController.init(this);
        inCallUiState = InCallUiState.init(this);
        callerInfoCache = CallerInfoCache.init(this);
        notifier = CallNotifier.init(this, phone, ringer, mBtHandsfree, new CallLogAsync());
        // register for ICC status
        IccCard sim = phone.getIccCard();
        if (sim != null) {
            if (VDBG) Log.v(LOG_TAG, "register for ICC status");
            sim.registerForNetworkLocked(mHandler, EVENT_SIM_NETWORK_LOCKED, null);
        }

        // register for MMI/USSD
        mCM.registerForMmiComplete(mHandler, MMI_COMPLETE, null);

        // register connection tracking to PhoneUtils
        PhoneUtils.initializeConnectionHandler(mCM);

        // Read platform settings for TTY feature
        mTtyEnabled = getResources().getBoolean(R.bool.tty_enabled);

        // Register for misc other intent broadcasts.
        IntentFilter intentFilter =new IntentFilter(Intent.ACTION_AIRPLANE_MODE_CHANGED);
        intentFilter.addAction(BluetoothHeadset.ACTION_CONNECTION_STATE_CHANGED);
        intentFilter.addAction(BluetoothHeadset.ACTION_AUDIO_STATE_CHANGED);
        intentFilter.addAction(TelephonyIntents.ACTION_ANY_DATA_CONNECTION_STATE_CHANGED);
        intentFilter.addAction(Intent.ACTION_HEADSET_PLUG);
        intentFilter.addAction(Intent.ACTION_DOCK_EVENT);
        intentFilter.addAction(Intent.ACTION_LOCALE_CHANGED);
        intentFilter.addAction(TelephonyIntents.ACTION_SIM_STATE_CHANGED);
        intentFilter.addAction(TelephonyIntents.ACTION_RADIO_TECHNOLOGY_CHANGED);
        intentFilter.addAction(TelephonyIntents.ACTION_SERVICE_STATE_CHANGED);
        intentFilter.addAction(TelephonyIntents.ACTION_EMERGENCY_CALLBACK_MODE_CHANGED);
        if (mTtyEnabled) {
            intentFilter.addAction(TtyIntent.TTY_PREFERRED_MODE_CHANGE_ACTION);
        }
        intentFilter.addAction(AudioManager.RINGER_MODE_CHANGED_ACTION);
        registerReceiver(mReceiver, intentFilter);
        ...
        AudioManager am = (AudioManager) getSystemService(Context.AUDIO_SERVICE);

        PhoneUtils.setAudioMode(mCM);
    }
		...
    inflateView();
    Log.d(LOG_TAG,"Send Broadcast ACTION_PHONE_RESTART");
    Intent intent = new Intent(TelephonyIntents.ACTION_PHONE_RESTART);
    sendBroadcast(intent);
}NotificationMgr以静态成员函数的方式为PhoneApp用于Phone进程在状态栏中通知用户消息的功能,诸如:有未接电话、正在通话、是否静音等信息。它使用系统提供的API类NotificationManager和StatusBarManager完成通知功能。每项通知对应着通知、更新通知和取消通知的函数。当收到Message时,PhoneApp的Handler的handleMessage会使用NotificationMgr更新状态栏信息。下面的代码片段用于更新状态栏的的提示信息:
phone\src\com\android\phone\PhoneApp.java
- case EVENT_UPDATE_INCALL_NOTIFICATION:
- notificationMgr.updateInCallNotification();//通话提示
- break;
- case EVENT_DATA_ROAMING_DISCONNECTED:
- notificationMgr.showDataDisconnectedRoaming();//因漫游数据连接断开提示
- break;
- case EVENT_DATA_ROAMING_OK:
- notificationMgr.hideDataDisconnectedRoaming();//隐藏漫游断开提示
- break;
case EVENT_UPDATE_INCALL_NOTIFICATION:
  notificationMgr.updateInCallNotification();//通话提示
  break;
case EVENT_DATA_ROAMING_DISCONNECTED:
  notificationMgr.showDataDisconnectedRoaming();//因漫游数据连接断开提示
  break;
case EVENT_DATA_ROAMING_OK:
  notificationMgr.hideDataDisconnectedRoaming();//隐藏漫游断开提示
  break;
InCallScreen它是手机正在通话时的Activity。当有来电、开始拨号或正在通话时,运行的是该Activity,InCallScreen需要处理来电时跳过键盘锁直接可以接听电话、是否有耳机插入的情况、是否用蓝牙接听电话、需要监听并维护更新通话状态并显示给用户、需要支持通话过程中的某些功能(如发送DTMF、电话会议、分离一路通话)操作、OTA Call等。CallCard是InCallScreen中的一个call(可能是当前的Call或保持的Call或来电Call)。当需要接听电话或拨打电话时,上层发来intent,然后InCallScreen收到intent时它的InCallScreen.onNewIntent函数被调用,解析intent,要么调用placeCall拨打电话,要么调用internalAnswerCall接听电话。
InCallTouchUi:通话过程中的按钮功能以及来电接听时的滑动接听功能。
ManageConferenceUtils:管理多方通话的工具,包括部分UI元素。借助PhoneUtils实现其功能。
DTMFTwelveKeyDialer:通话状态时的拨号盘,用于发送DTMF。
DTMFTwelveKeyDialerView:DTMF拨号视图布局类。
InCallControlState:维护着一些状态信息,诸如是否Enable了Speaker声音免提、是否可以添加新的一路通话等等。它是MVC模式的数据部分。
InCallMenu:通话状态菜单,里面包含各个菜单项


 1497
1497

 被折叠的 条评论
为什么被折叠?
被折叠的 条评论
为什么被折叠?
 到【灌水乐园】发言


