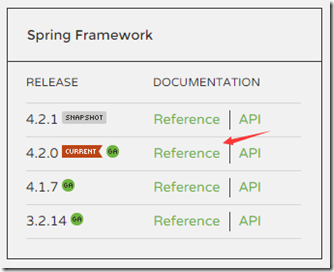
从上学期开始决心开始学习Spring,自己总是利用不好时间,到处瞎忙,结果浪费了好多时间。想着利用暑假的时间,专心看会儿书。最初我在Spring官网下载jar包的时候,忙会儿了半天愣是没找到下载的链接,瞬间觉得学Spring好难,莫名的抵触心理开始泛滥,无奈只好强抱度娘。这是我找到的链接。
附上小图:
嘿嘿,其实好简单哦,可是人家当时就是没找到嘛,也不想那么快地拥抱度娘23333……
Spring下载解压后可以看到lib目录下jar包确实有点多哦,每个jar包都有三个不同类型的,一种是含.class文件的jar包(….jar),这也是我们项目中需要的,还有两种是帮助文档(…-javadoc.jar)和源码(…-sources.jar)。以下内容纯粹是我的看书笔记哦,我是看的李刚的那本轻量级javaee。自己总是太快忘记一些事,还有一些人,所以记录下罗。
我看书写第一个Demo(setter、getter都删掉罗):
src/cn/edu/cqupt/MySpring/bean/Person.java
package cn.edu.cqupt.MySpring.bean.impl;
public class Person {
    private String name;
    private int age;
    public String toString(){
        return "Name:"+this.name+",age:"+this.age;
    }
}
src/beans.xml
<?xml version="1.0" encoding="utf-8"?>
<beans xmlns="http://www.springframework.org/schema/beans"
        xmlns:xsi="http://www.w3.org/2001/XMLSchema-instance"
        xmlns:p="http://www.springframework.org/schema/p"
        xmlns:context="http://www.springframework.org/schema/context"
        xmlns:tx="http://www.springframework.org/schema/tx"
        xmlns:util="http://www.springframework.org/schema/util"
        xsi:schemaLocation="http://www.springframework.org/schema/beans http://www.springframework.org/schema/beans/spring-beans-4.2.xsd
                http://www.springframework.org/schema/context http://www.springframework.org/schema/context/spring-context-4.2.xsd
                http://www.springframework.org/schema/tx http://www.springframework.org/schema/tx/spring-tx-4.1.xsd
                http://www.springframework.org/schema/util http://www.springframework.org/schema/util/spring-util-4.2.xsd"
                >
<bean id="person" class="cn.edu.cqupt.MySpring.bean.impl.Person">
    <property name="name" value="xiaofeig"/>
    <property name="age" value="20"/>
</bean>
</beans>
src/cn/edu/cqupt/MyString/test/TestMain.java
package cn.edu.cqupt.MySpring.test;

import org.springframework.context.ApplicationContext;
import org.springframework.context.support.ClassPathXmlApplicationContext;
import cn.edu.cqupt.MySpring.bean.impl.Person;
public class TestMain {
    public static void main(String[] args) {
        ApplicationContext context=new ClassPathXmlApplicationContext("beans.xml");
        Person person=context.getBean("person",Person.class);
        System.out.println(person);
    }
打印结果:Name:xiaofeig,age:20
写完了,还是什么都不懂。
Spring的核心机制:依赖注入(Dependency Injection)
我们在xml文件中配置了一个编号为person的实例之后,Spring容器就负责帮助我们来创建这个实例,这个实例包含两个属性,分别为name和age,通过property标签来设置它的值value。配置完成之后,Spring容器就通过反射机制调用Person类的无参构造方法创建一个实例,然后再调用属性name,age的setter方法,为这两个属性设值。这应该就是最简单的依赖注入啦。我们只需要在容器ApplicationContext中通过实例编号person去取就可以啦。书上还有一些关于依赖关系的一些介绍,加入A组件调用了B组件的方法,我们可称A组件依赖于B组件。
依赖注入还有个特别高大上的名字,控制反转(Inversion of Control,IoC),有木有,是不是很难懂。
Spring推荐面向接口编程,更好地让规范和实现分离,写代码会更愉快……好有道理的样子,好吧,我会试试的!!!
下面的示例是注入一个复杂属性,就是将一个配置好的bean作为另一个bean的属性:
src/cn/edu/cqupt/MySpring/bean/Axe.java
package cn.edu.cqupt.MySpring.bean;
/**斧子,六级没过,原谅我不认识这个单词*/
public interface Axe {
    public String chop();
}
src/cn/edu/cqupt/MySpring/bean/impl/StoneAxe.java
package cn.edu.cqupt.MySpring.bean.impl;
import cn.edu.cqupt.MySpring.bean.Axe;
public class StoneAxe implements Axe {
    @Override
    public String chop() {
        return "石斧...";
    }
}
src/cn/edu/cqupt/MySpring/bean/impl/Person.java(setter、getter都删掉罗)
package cn.edu.cqupt.MySpring.bean.impl;
import cn.edu.cqupt.MySpring.bean.Axe;
public class Person {
    private String name;
    private int age;
    private Axe axe;public String toString(){
        return "Name:"+this.name+",age:"+this.age;
    }
}
src/beans.xml(部分代码)
<?xml version="1.0" encoding="utf-8"?>
 <bean id="person" class="cn.edu.cqupt.MySpring.bean.impl.Person">
    <property name="name" value="xiaofeig"/>
    <property name="age" value="20"/>
    <property name="axe" ref="stoneAxe"/>
</bean>
<bean id="stoneAxe" class="cn.edu.cqupt.MySpring.bean.impl.StoneAxe"/>
src/cn/edu/cqupt/MyString/test/TestMain.java
package cn.edu.cqupt.MySpring.test;
import org.springframework.context.ApplicationContext;
import org.springframework.context.support.ClassPathXmlApplicationContext;
import cn.edu.cqupt.MySpring.bean.Axe;
import cn.edu.cqupt.MySpring.bean.impl.Person;
public class TestMain {
    public static void main(String[] args) {
        ApplicationContext context=new ClassPathXmlApplicationContext("beans.xml");
        Person person=context.getBean("person",Person.class);
        Axe axe=person.getAxe();
        System.out.println(axe.chop());
    }
}
打印结果:石斧...看这句 < property name ="axe" ref ="stoneAxe" />,axe表示Person的属性,stoneAxe是我们配置的是一个实例的编号,通过ref这个标签属性,我们就可以轻松地将stoneAxe实例注入到Person的属性中,看起来是不是也很easy。
我看书到537页的时候,觉得最重要的一点就是依赖注入通过配置的方式将Bean实例之间代码层次的耦合分离了出来,我们可以清晰地透过xml文件观察到Bean实例之间的依赖关系。
书上原话总结了Spring IoC容器的3个基本要点:
- 面向接口编程可以将各组件之间的耦合提升到接口层次,从而有利项目后期的扩展
- 应用程度的各组件不再有程序主动产生,而是有Spring容器来负责产生、并初始化
- Spring采用配置文件、或Annotation(注解,书后面会有提到,不过我总是用不来,新事物的自然抵触)来管理Bean的实现类、依赖关系,Spring容器通过配置文件利用反射来创建实例(所谓的依赖注入)
可以看出,上面写的Demo都是Spring容器利用setter方法来为实例注入属性值的,其实,我们也可以让容器利用有参构造方法来直接创建一个实例,这就是书上提到的构造注入。
src/cn/edu/cqupt/MySpring/bean/impl/Person.java(setter、getter都删掉罗)
package cn.edu.cqupt.MySpring.bean.impl;
import cn.edu.cqupt.MySpring.bean.Axe;
public class Person {
    private String name;
    private int age;
    private Axe axe;
    public Person(){}
    public Person(String name,int age,Axe axe){
        this.name=name;
        this.age=age;
        this.axe=axe;
    }
    public String toString(){
        return "Name:"+this.name+",age:"+this.age;
    }
}
src/beans.xml
<?xml version="1.0" encoding="utf-8"?>
<bean id="person" class="cn.edu.cqupt.MySpring.bean.impl.Person">
    <constructor-arg value="xiaofeig"/>
    <constructor-arg value="20"/>
    <constructor-arg ref="stoneAxe"/>
</bean>
<bean id="stoneAxe" class="cn.edu.cqupt.MySpring.bean.impl.StoneAxe"/>
src/cn/edu/cqupt/MySpring/test/TestMain.java
package cn.edu.cqupt.MySpring.test;
import org.springframework.context.ApplicationContext;
import org.springframework.context.support.ClassPathXmlApplicationContext;
import cn.edu.cqupt.MySpring.bean.impl.Person;
public class TestMain {
    public static void main(String[] args) {
        ApplicationContext context=new ClassPathXmlApplicationContext("beans.xml");
        Person person=context.getBean("person",Person.class);
        System.out.println(person);
        System.out.println(person.getAxe().chop());
    }
}
打印结果: Name:xiaofeig,age:20 石斧...
标签<constructor-arg/>就是用来构造注入的哦,标签的顺序就是构造参数的顺序,上面的实例比较简单,Person类只有一个有参构造方法,第二个属性在注入的时候直接将”20”转换成了整型,现在来假想一种情况,如果Person类还有一个构造方法,如:
public Person(String name,String age,Axe axe){
        this.name=name;
        this.axe=axe;
    }
这样会产生什么结果呢?我们再次调用测试方法
打印结果:
Name:xiaofeig,age:0
石斧...
是不是秒懂啊,Spring容器会优先考虑上面的那个构造方法,如果我们想让Spring容器先调用含int age的构造方法,可以设置标签property的属性type值为’int’。
<constructor-arg value="20" type="int"/>
可人我故意把有参构造方法注释掉了,意外在控制台发现了这样一句话:
hint: specify index/type/name arguments for simple parameters to avoid type ambiguities
没办法,英语水平棒棒哒,自信地打开了有道词典,意思应该是说为避免歧义,简单参数需要指定index/type/name这些属性。现在我们来好好看看<constructor-arg/>到底有哪些属性,index/name/value/type/ref,是不是一看就懂了,index应该是指定参数序列(从0开始),name指定参数名罗,type指定类型。有了这些属性,是不是就不会产生歧义啦。
好了,简单地了解了这两种构造方法,设值注入和构造注入,个人还是比较喜欢设值注入啦。


 808
808

 被折叠的 条评论
为什么被折叠?


