


多线程相关知识
1.CPU调度算法原理(先来先服务、最短作业法、优先级调度算法)??
2.站在字节码角度+cpu上下文切换角度分析线程安全问题?
3.手写Callable与FutureTask模式?两种方式??
4.并发编程实战案例之手写并发队列日志框架
多线程的基本概念
什么是cpu
CPU的中文名称是中央处理器,是进行逻辑运算用的,主要由运算器、控制器、寄存器三部分组成,从字面意思看就是运算就是起着运算的作用,控制器就是负责发出cpu每条指令所需要的信息,寄存器就是保存运算或者指令的一些临时文件,这样可以保证更高的速度。
也就是我们的线程运行在cpu之上。
CPU
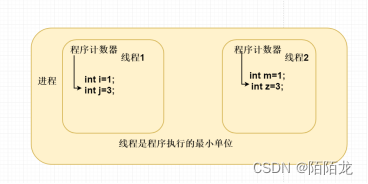
什么是线程/进程
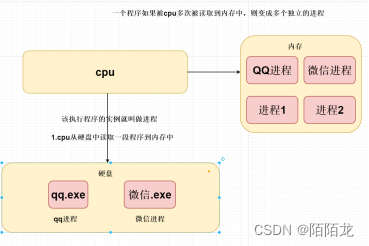
进程是资源分配最小单位,线程是程序执行的最小单位。 计算机在执行程序时,会为程序创建相应的进程,进行资源分配时,是以进程为单位进行相应的分配。每个进程都有相应的线程,在执行程序时,实际上是执行相应的一系列线程。
总结:进程是资源分配最小单位,线程是程序执行的最小单位****
什么是进程:
1. cpu从硬盘中读取一段程序到内存中,该执行程序的实例就叫做进程****
2. 一个程序如果被cpu多次被读取到内存中,则变成多个独立的进程****
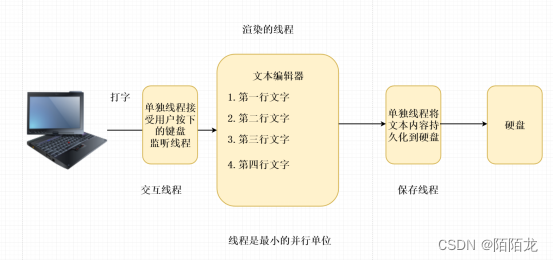
什么是线程:
线程是程序执行的最小单位*****,在一个进程中可以有多个不同的线程*
同时执行。
为什么在进程中还需要线程呢?
同一个应用程序中(进程),更好并行处理
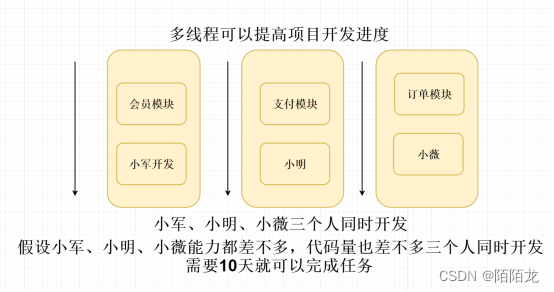
为什么需要使用到多线程
采用多线程的形式执行代码,目的就是为了提高程序的效率。
目的就是为了提高程序开发的效率
比如:现在一个项目只有一个程序员开发,需要开发功能模块会员模块、支付模块、订单模块。
并行/串行区别
串行也就是单线程执行 代码执行效率非常低,代码从上向下执行;
并行就是多个线程并行一起执行,效率比较高。
使用多线程一定提高效率吗?
多线程 执行 需要同时执行
不一定,需要了解cpu调度的算法
就是先把前一个任务的 CPU 上下文(也就是 CPU 寄存器和程序计数器)保存起来,然后加载新任务的上下文到这些寄存器和程序计数器,最后再跳转到程序计数器所指的新位置,运行新任务
如果生产环境中开启几百个或者上千个线程,而我们的服务器核数8核
16核 32核,这么多线程都会在我们这些cpu上做上下文切换
上下文切换:
从该线程执行切换到另外的线程 该线程—运行切换为就绪状态。
线程池:和服务器cpu核数 8核 16核
同步与异步的区别
同步概念:就是代码从上向下执行。
异步的概念:单独分支执行 相互之间没有任何影响。
CPU调度时间片
单核的cpu上每次只能够执行一次线程,如果在单核的cpu上开启了多线程,则会发生对每个线程轮流执行
Cpu每次单个计算的时间成为一个cpu时间片,实际只有几十毫秒人为感觉好像是
在多线程
对于线程来说,存在等待cpu调度的时候 该线程的状态是为就绪状态,如果被cpu调度则该线程的状态为运行状态
当cpu转让执行其他的线程时,则该线程有变为就绪状态
如果在单核的cpu之上开启了多线程,底层执行并不是真正意义上的多线程。
利用多核多线程性能
Cpu密集型/IO密集型
Cpu密集型:长时间占用cpu;例如: 视频剪辑
IO密集型 :cpu计算时间短 访问外接设备时间长
Input/output
CPU调度算法原理
1.先来先服务 缺点如果最先来执行的线程 是CPU密集型 这样话可能会一直
无法继续执行其他的线程。
2.最短作业法 谁的计算时间短,谁先来执行。
3.优先级调度算法 根据重要性将进程分成4个优先级
优先级4 进程D负责画面----
优先级3 进程B和进程C接受用户的指令 重要
优先级2 后台处理器 次要
优先级1
程序计数器
程序计数器是用于存放下一条指令所在单元的地址的地方
Cpu上下文切换
多线程的应用场景
多线程的快速入门
客户端(移动App端/)开发;
异步发送短信/发送邮件
将执行比较耗时的代码改用多线程异步执行; 可以提高接口的响应速度
异步写入日志 日志框架底层
多线程下载
多线程的创建方式
1)继承Thread类创建线程
2)实现Runnable接口创建线程
3)使用匿名内部类的形式创建线程
4)使用lambda表达式创建线程
5)使用Callable和Future创建线程
6)使用线程池例如用Executor框架
7)spring @Async异步注解 结合线程池.
继承Thread类创建线程
public class ThreadDemo01 extends Thread {
    @Override
    public void run() {
        System.out.println(Thread.currentThread().getName() + "<run>");
    }

    public static void main(String[] args) {
        // 创建一个线程
        ThreadDemo01 threadDemo01 = new ThreadDemo01();
        // 启动线程是start方法而不是run方法
        threadDemo01.start();
    }
}
实现Runnable接口创建线程
public class ThreadDemo02 implements Runnable {
    public void run() {
        System.out.println(Thread.currentThread().getName() + ",我是子线程");
    }

    public static void main(String[] args) {
        new Thread(new ThreadDemo02()).start();
    }
}
使用匿名内部类的形式创建线程
//         1.使用匿名内部类创建线程
new Thread(new Runnable() {
	public void run() {
	   	System.out.println(Thread.currentThread().getName() + ",>我是子线程<");
	}
}).start();
使用jdk8的新特性lambda 创建线程
// 2.lambda表达式创建线程
new Thread(()->{
    System.out.println(Thread.currentThread().getName() + ",>我是子线程<");
}).start();
使用Callable和Future创建线程
Callable和Future 线程可以获取到返回结果 底层基于LockSupport
线程 异步执行 比较耗时间-
从Java 5开始,Java提供了Callable接口,该接口是Runnable接口的增强版,Callable接口提供了一个call()方法,可以看作是线程的执行体,但call()方法比run()方法更强大。
call()方法可以有返回值。
call()方法可以声明抛出异常。
public class ThreadCallable implements Callable<Integer> {
    public static void main(String[] args) throws ExecutionException, InterruptedException {
        ThreadCallable threadCallable = new ThreadCallable();
        FutureTask<Integer> integerFutureTask = new FutureTask<>(threadCallable);
        new Thread(integerFutureTask).start();
        Integer result = integerFutureTask.get();
        System.out.println(result);
    }

    @Override
    public Integer call() throws Exception {
        // 默认代码执行非常耗时!!
        System.out.println(Thread.currentThread().getName() + ",执行计算操作");
        Thread.sleep(3000);
        return 1;
    }
}
使用线程池例如用Executors框架
复用机制
ExecutorService executorService = Executors.newCachedThreadPool();
executorService.execute(new Runnable() {
    @Override
    public void run() {
        System.out.println(Thread.currentThread().getName() + ">我是子线程<");
    }
});
spring @Async异步注解
@Async 底层基于aop+自定义注解实现
@Component
@Slf4j
public class OrderManage {
    @Async
    public void asyncLog() {
        try {
            Thread.sleep(3000);
            log.info("<2>");
        } catch (Exception e) {
        }
    }
}
/**
 * http://127.0.0.1:8080/addOrder
 *
 * @return
 */
@RequestMapping("/addOrder")
public String addOrder() {
    log.info("<1>");
    orderManage.asyncLog();
    log.info("<3>");
    return "3";
}
手写 @Async异步注解
1.aop 拦截只要在我们的方法上有使用到@MayiktAsync 就单独的开启一个异步线程
执行我们的目标方法。
Aop
http请求
环绕通知开始
目标方法
环绕通知结束
@Aspect
@Component
public class ExtMayiktThreadAop {
    @Around(value = "@annotation(com.mayikt.service.annotation.MayiktAsync)")
    public void around(ProceedingJoinPoint joinPoint) {
        try {
            // 正常需要结合到线程池
            new Thread(() -> {
                try {
                    joinPoint.proceed();
                } catch (Throwable throwable) {
                    throwable.printStackTrace();
                }
            }, "mayikt线程").start();

        } catch (Throwable throwable) {
        }
    }
}

@Target(ElementType.METHOD)
@Retention(RetentionPolicy.RUNTIME)
public @interface MayiktAsync {
}
@Component
@Slf4j
public class OrderManage {
    @MayiktAsync
    public void asyncLog() {
        try {
            Thread.sleep(3000);
            log.info("<2>");
        } catch (Exception e) {
        }
    }
}
手写一个异步日志框架
常用日志框架: Log4j,Log4j 2,Logback
日志框架:ALL < TRACE < DEBUG < INFO < WARN < ERROR < FATAL < OFF
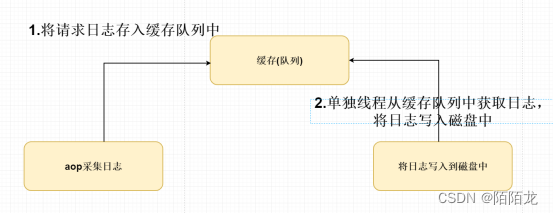
aop采集日志
@Aspect
@Component
@Slf4j
public class AopLog {
private static final String START_TIME = "request-start";
private SimpleDateFormat sdf4 = new SimpleDateFormat("yyyy年MM月dd日HH时mm分ss秒");
/**
* 切入点
*/
@Pointcut("execution(public * com.mayikt.service.*Service.*(..))")
public void log() {
}
/**
* 前置操作
*
* @param point 切入点
*/
@Before("log()")
public void beforeLog(JoinPoint point) {
ServletRequestAttributes attributes = (ServletRequestAttributes) RequestContextHolder.getRequestAttributes();
HttpServletRequest request = Objects.requireNonNull(attributes).getRequest();
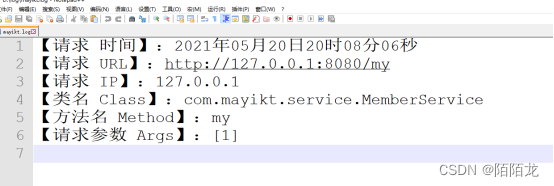
LogManage.addLog("【请求 时间】:" + sdf4.format(new Date()));
LogManage.addLog("【请求 URL】:" + request.getRequestURL());
LogManage.addLog("【请求 IP】:" + request.getRemoteAddr());
LogManage.addLog("【类名 Class】:" + point.getSignature().getDeclaringTypeName());
LogManage.addLog("【方法名 Method】:" + point.getSignature().getName());
LogManage.addLog("【请求参数 Args】:" +
JSON.toJSONString(point.getArgs())
);
// log.info("【请求 时间】:{}", System.currentTimeMillis());
// log.info("【请求 URL】:{}", request.getRequestURL());
// log.info("【请求 IP】:{}", request.getRemoteAddr());
// log.info("【类名 Class】:{},【方法名 Method】:{}", point.getSignature().getDeclaringTypeName(), point.getSignature().getName());
// log.info("【请求参数 Args】:{},", point.getArgs());
}
}
@Component
public class LogManage {
private static BlockingDeque<String> blockingDeque = new LinkedBlockingDeque<>();
private static final String filePath = "d:/log/mayikt.log";
public LogManage() {
new LogThread().start();
}
public static void addLog(String msg) {
blockingDeque.add(msg);
}
class LogThread extends Thread {
@Override
public void run() {
while (true) {
String log = blockingDeque.poll();
if (!StringUtils.isEmpty(log)) {
// 将该log写入到磁盘中
FileUtils.writeText(filePath, log, true);
}
}
}
}
}
public class FileUtils {
/*判断文件是否存在*/
public static boolean isExists(String filePath) {
File file = new File(filePath);
return file.exists();
}
/*判断是否是文件夹*/
public static boolean isDir(String path) {
File file = new File(path);
if (file.exists()) {
return file.isDirectory();
} else {
return false;
}
}
/**
* 文件或者目录重命名
*
* @param oldFilePath 旧文件路径
* @param newName 新的文件名,可以是单个文件名和绝对路径
* @return
*/
public static boolean renameTo(String oldFilePath, String newName) {
try {
File oldFile = new File(oldFilePath);
//若文件存在
if (oldFile.exists()) {
//判断是全路径还是文件名
if (newName.indexOf("/") < 0 && newName.indexOf("\\") < 0) {
//单文件名,判断是windows还是Linux系统
String absolutePath = oldFile.getAbsolutePath();
if (newName.indexOf("/") > 0) {
//Linux系统
newName = absolutePath.substring(0, absolutePath.lastIndexOf("/") + 1) + newName;
} else {
newName = absolutePath.substring(0, absolutePath.lastIndexOf("\\") + 1) + newName;
}
}
File file = new File(newName);
//判断重命名后的文件是否存在
if (file.exists()) {
System.out.println("该文件已存在,不能重命名");
} else {
//不存在,重命名
return oldFile.renameTo(file);
}
} else {
System.out.println("原该文件不存在,不能重命名");
}
} catch (Exception e) {
e.printStackTrace();
}
return false;
}
/*文件拷贝操作*/
public static void copy(String sourceFile, String targetFile) {
File source = new File(sourceFile);
File target = new File(targetFile);
target.getParentFile().mkdirs();
FileInputStream fis = null;
FileOutputStream fos = null;
FileChannel in = null;
FileChannel out = null;
try {
fis = new FileInputStream(source);
fos = new FileOutputStream(target);
in = fis.getChannel();//得到对应的文件通道
out = fos.getChannel();//得到对应的文件通道
in.transferTo(0, in.size(), out);//连接两个通道,并且从in通道读取,然后写入out通道
} catch (IOException e) {
e.printStackTrace();
} finally {
try {
if (out != null) {
out.close();
}
if (in != null) {
in.close();
}
if (fos != null) {
fos.close();
}
if (fis != null) {
fis.close();
}
} catch (IOException e) {
e.printStackTrace();
}
}
}
/*读取Text文件操作*/
public static String readText(String filePath) {
String lines = "";
try {
FileReader fileReader = new FileReader(filePath);
BufferedReader bufferedReader = new BufferedReader(fileReader);
String line = null;
while ((line = bufferedReader.readLine()) != null) {
lines += line + "\n";
}
} catch (Exception e) {
e.printStackTrace();
}
return lines;
}
/*写入Text文件操作*/
public static void writeText(String filePath, String content, boolean isAppend) {
FileOutputStream outputStream = null;
OutputStreamWriter outputStreamWriter = null;
BufferedWriter bufferedWriter = null;
try {
outputStream = new FileOutputStream(filePath, isAppend);
outputStreamWriter = new OutputStreamWriter(outputStream);
bufferedWriter = new BufferedWriter(outputStreamWriter);
bufferedWriter.write(content);
bufferedWriter.newLine();
} catch (IOException e) {
e.printStackTrace();
} finally {
try {
if (bufferedWriter != null) {
bufferedWriter.close();
}
if (outputStreamWriter != null) {
outputStreamWriter.close();
}
if (outputStream != null) {
outputStream.close();
}
} catch (Exception e) {
e.printStackTrace();
}
}
}
}
多线程线程安全问题
什么是线程安全问题
多线程同时对同一个全局变量做写的操作,可能会受到其他
线程的干扰,就会发生线程安全性问题。
全局变量----java内存结构
什么是写操作------修改
当多个线程共享同一个全局变量,做写的操作时,可能会受到其他的线程干扰,发生线程
安全问题。
public class ThreadCount implements Runnable {
    private static Integer count = 100;

    @Override
    public void run() {
        while (count > 1) {
            cal();
        }
    }

    private  void cal() {
        try {
            Thread.sleep(20);
        } catch (Exception e) {

        }
        count--;
        System.out.println(Thread.currentThread().getName() + "," + count);
    }


    public static void main(String[] args) {
        ThreadCount threadCount = new ThreadCount();
        Thread thread1 = new Thread(threadCount);
        Thread thread2 = new Thread(threadCount);
        thread1.start();
        thread2.start();
    }
}
同时执行概念
1-3 多线程如何解决线程安全问题/ 多线程如何实现同步呢
如何解决线程安全的问题
核心思想:上锁 分布式锁
在同一个jvm中,多个线程需要竞争锁的资源,最终只能够有一个线程
能够获取到锁,多个线程同时抢同一把锁,谁(线程)能够获取到锁,
谁就可以执行到该代码,如果没有获取锁成功 中间需要经历锁的升级过程
如果一致没有获取到锁则会一直阻塞等待。
如果线程A获取锁成功 但是线程A一直不释放锁
线程B一直获取不到锁,则会一直阻塞等待。
代码从那一块需要上锁?-----可能会发生线程安全性问题的代码需要上锁。
Juc并发编程 锁 重入锁 悲观锁 乐观锁 公平锁 非公平锁
线程0 线程1 同时获取 this锁,假设线程0 获取到this ,意味着线程1没有获取到锁
则会阻塞等待。等我们线程0 执行完count-- 释放锁之后 就会唤醒 线程1从新进入
到获取锁的资源。
获取锁与释放锁 全部都是有底层虚拟机实现好了。
对一块代码加锁缺点:
可能会影响到程序的执行效率。
如果是同一把锁 在多线程的情况下 最终只能够给一个线程使用。
如果有线程持有了该锁 意味着其他的线程 不能够在继续获取锁
核心思想:当多个线程共享同一个全局变量时,将可能会发生线程安全的代码
上锁,保证只有拿到锁的线程才可以执行,没有拿到锁的线程不可以执行,需要阻塞等待。
1.使用synchronized锁,JDK1.6开始 锁的升级过程 juc 18-25
2.使用Lock锁 ,需要自己实现锁的升级过程。底层是基于aqs实现
3.使用Threadlocal,需要注意内存泄漏的问题。
4.原子类 CAS 非阻塞式
synchronized锁的基本用法
在多线程的情况下 需要是同一个对象锁
Synchronized(对象锁)
{
需要保证线程安全的代码
}
1.修饰代码块,指定加锁对象,对给定对象加锁,进入同步代码快前要获得 给定对象 的锁。
2.修饰实例方法,作用于当前实例加锁,进入同步代码前要获得 当前实例 的锁
3.修饰静态方法,作用于当前类对象(当前类.class)加锁,进入同步代码前要获得 当前类对象 的锁
修饰代码块
修饰代码块,指定加锁对象,对给定对象加锁,进入同步代码库前要获得 给定对象 的锁。
public class ThreadCount implements Runnable {
    private static Integer count = 100;
    private String lock = "lock";

    @Override
    public void run() {
        while (count > 1) {
            cal();
        }
    }

    private void cal() {
        synchronized (this) {
            try {
                Thread.sleep(10);
            } catch (Exception e) {

            }
            count--;
            System.out.println(Thread.currentThread().getName() + "," + count);
        }

    }


    public static void main(String[] args) {
        ThreadCount threadCount = new ThreadCount();
        Thread thread1 = new Thread(threadCount);
        Thread thread2 = new Thread(threadCount);
        thread1.start();
        thread2.start();
    }
}
修饰实例方法
修饰实例方法,作用于当前实例加锁,进入同步代码前要获得 当前实例的锁
在实例方法上默认加上synchronized 默认使用this锁。
public class ThreadCount implements Runnable {
    private static Integer count = 100;
    private String lock = "lock";

    @Override
    public void run() {
        while (count > 1) {
            cal();
        }
    }

    private synchronized void cal() {
        try {
            Thread.sleep(10);
        } catch (Exception e) {

        }
        count--;
        System.out.println(Thread.currentThread().getName() + "," + count);
    }
    public static void main(String[] args) {
        ThreadCount threadCount = new ThreadCount();
        Thread thread1 = new Thread(threadCount);
        Thread thread2 = new Thread(threadCount);
        thread1.start();
        thread2.start();
    }
}
修饰静态方法
修饰静态方法,作用于当前类对象加锁,进入同步代码前要获得 当前类对象的锁
默认使用当前类的类名.class 锁
public class ThreadCount implements Runnable {
    private static Integer count = 100;
    private static String lock = "lock";

    @Override
    public void run() {
        while (count > 1) {
            cal();
        }
    }

    private static void cal() {
        synchronized (ThreadCount.class) {
            try {
                Thread.sleep(10);
            } catch (Exception e) {

            }
            count--;
            System.out.println(Thread.currentThread().getName() + "," + count);
        }

    }


    public static void main(String[] args) {
        ThreadCount threadCount1 = new ThreadCount();
        ThreadCount threadCount2 = new ThreadCount();
        Thread thread1 = new Thread(threadCount1);
        Thread thread2 = new Thread(threadCount2);
        thread1.start();
        thread2.start();
    }
}
synchronized死锁问题
我们如果在使用synchronized 需要注意 synchronized锁嵌套的问题 避免死锁的问题发生。
案例:
public class DeadlockThread implements Runnable {
    private int count = 1;
    private String lock = "lock";

    @Override
    public void run() {
        while (true) {
            count++;
            if (count % 2 == 0) {
                // 线程1需要获取 lock 在获取 a方法this锁
                // 线程2需要获取this 锁在 获取B方法lock锁
                synchronized (lock) {
                    a();
                }
            } else {
                synchronized (this) {
                    b();
                }
            }
        }
    }

    public synchronized void a() {
        System.out.println(Thread.currentThread().getName() + ",a方法...");
    }

    public void b() {
        synchronized (lock) {
            System.out.println(Thread.currentThread().getName() + ",b方法...");
        }
    }

    public static void main(String[] args) {
        DeadlockThread deadlockThread = new DeadlockThread();
        Thread thread1 = new Thread(deadlockThread);
        Thread thread2 = new Thread(deadlockThread);
        thread1.start();
        thread2.start();
    }
}
synchronized 死锁诊断工具
D:\path\jdk\jdk8\bin\jconsole.exe
线程1 先获取到自定义对象的lock锁,进入到a方法需要获取this锁
线程2 先获取this锁, ? ? ? ? ?进入到b方法需要自定义对象的lock锁
线程1 线程2 是在同时执行
线程1 线程2
先获取到自定义对象的lock锁 先获取this锁
需要线程2已经持有的this锁 线程1已经持有自定义对象的lock锁
springmvc 接口中使用
需要注意:
Spring MVC Controller默认是单例的 需要注意线程安全问题
单例的原因有二:
1、为了性能。
2、不需要多例。
@Scope(value = “prototype”) 设置为多例子。
@RestController
@Slf4j
//@Scope(value = "prototype")
public class CountService {

    private int count = 0;

    @RequestMapping("/count")
    public synchronized String count() {
        try {
            log.info(">count<" + count++);
            try {
                Thread.sleep(3000);
            } catch (Exception e) {

            }
        } catch (Exception e) {

        }
        return "count";
    }
}
临界区
当多个线程读共享资源 读的过程中,没有任何问题,
在多个线程对共享资源读写操作时发生指令交错,就会发生线程安全问题
在多线程中如果存在对共享资源读写操作,该代码称作为临界区。
public class Thread08 extends Thread {
    int count = 0;

    @Override
    public void run() {
        // 该代码就是为临界区
        count++ ;
    }
}
竞争条件
多个线程在临界区内执行,由于代码的执行序列不同(指令)而导致结果无法预测,称之为发生了竞态条件
解决办法:
synchronized,Lock、原子类
字节码角度分析线程安全问题
线程安全问题:
1.字节码
2.上下文切换
3.Jmm java内存模型
Java源代码 →编译成class文件
线程安全代码
public class Thread02 extends Thread {
    private static int sum = 0;

    @Override
    public void run() {
        sum();
    }

    public void sum() {
        for (int i = 0; i < 10000; i++) {
            sum++;
        }
    }

    public static void main(String[] args) throws InterruptedException {
        Thread02 t1 = new Thread02();
        Thread02 t2 = new Thread02();
        t1.start();
        t2.start();
        t1.join();
        t2.join();
        System.out.println(sum);
    }
}
字节码文件分析
javap -p -v Thread01.class
sum++
Getstatic ### 获取静态变量值sum
iconst_1 ## 准备一个常量1
Iadd ### 自增
Putstatic ### 将修改后的值存入静态变量sum
Cpu上下文角度分析线程安全问题.
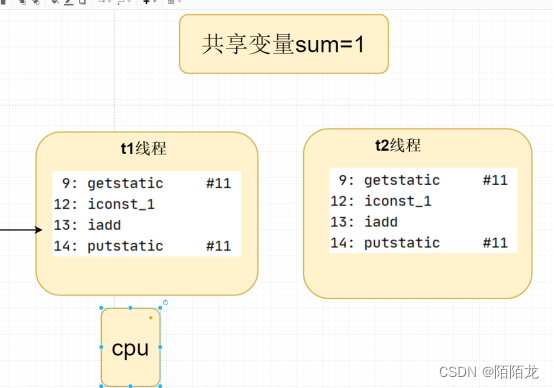
分析:
共享变量值 sum=0
假设现在cpu执行到t1线程,t1线程执行到13行 就切换到另外t2线程执行,
t2线程将静态变量sum=0改成=sum=1 有切换回来执行t1线程 t1线程 使用之前获取
Sum=0 +1 赋值给共享变量sum ,则最终结果:sum=1.
但是现在sum++ 执行 最终结果是算了一次。
多线程线程之间通讯
等待/通知机制
等待/通知的相关方法是任意Java对象都具备的,因为这些方法被定义在所有对象的超类java.lang.Object上,方法如下:
1.notify() :通知一个在对象上等待的线程,使其从main()方法返回,而返回的前提是该线程获取到了对象的锁
2.notifyAll():通知所有等待在该对象的线程
3.wait():调用该方法的线程进入WAITING状态,只有等待其他线程的通知或者被中断,才会返回。需要注意调用wait()方法后,会释放对象的锁 。
Exception in thread “Thread-0” java.lang.IllegalMonitorStateException
at java.lang.Object.wait(Native Method)
at java.lang.Object.wait(Object.java:502)
at com.mayikt.thread.days02.Thread03.run(Thread03.java:16)
注意:wait,notify和notifyAll要与synchronized一起使用
wait/notify/notifyAll在Object类中
因为我们在使用synchronized锁 对象锁可以是任意对象,所以wait/notify/notifyAll需要放在Object类中。
wait/notify/简单的用法
public class Thread03 extends Thread {
    @Override
    public void run() {
        try {
            synchronized (this) {
                System.out.println(Thread.currentThread().getName() + ">>当前线程阻塞,同时释放锁!<<");
                this.wait();
            }
            System.out.println(">>run()<<");
        } catch (InterruptedException e) {

        }
    }

    public static void main(String[] args) {
        Thread03 thread = new Thread03();
        thread.start();
        try {
            Thread.sleep(3000);
        } catch (Exception e) {

        }
        synchronized (thread) {
            // 唤醒正在阻塞的线程
            thread.notify();
        }

    }
}
多线程通讯实现生产者与消费者
public class Thread04 {
    class Res {
        /**
         * 姓名
         */
        private String userName;
        /**
         * 性别
         */
        private char sex;
        /**
         * 标记
         */
        private boolean flag = false;
    }

    class InputThread extends Thread {
        private Res res;

        public InputThread(Res res) {
            this.res = res;
        }

        @Override
        public void run() {
            int count = 0;
            while (true) {
                synchronized (res) {
                    //flag = false  写入输入 flag = true 则不能写入数据 只能读取数据
                    try {
                        // 如果flag = true 则不能写入数据 只能读取数据 同时释放锁!
                        if (res.flag) {
                            res.wait();
                        }
                    } catch (Exception e) {

                    }
                    if (count == 0) {
                        this.res.userName = "余胜军";
                        this.res.sex = '男';
                    } else {
                        this.res.userName = "小薇";
                        this.res.sex = '女';
                    }
                    res.flag = true;
                    res.notify();
                }

                count = (count + 1) % 2;
            }
        }
    }

    class OutThread extends Thread {
        private Res res;

        public OutThread(Res res) {
            this.res = res;
        }


        @Override
        public void run() {
            while (true) {
                synchronized (res) {
                    try {
                        if (!res.flag) {
                            res.wait();
                        }
                    } catch (Exception e) {

                    }
                    System.out.println(res.userName + "," + res.sex);
                    res.flag = false;
                    res.notify();
                }
            }
        }
    }


    public static void main(String[] args) {
        new Thread04().print();
    }

    public void print() {
        Res res = new Res();
        InputThread inputThread = new InputThread(res);
        OutThread outThread = new OutThread(res);
        inputThread.start();
        outThread.start();
    }
}
/**
- flag 默认值==false
- flag false 输入线程 输入值 输出线程 先拿到锁 释放锁
- flag true 输出线程 输出值
*/
public boolean flag = false;
Join/Wait与sleep之间的区别
sleep(long)方法在睡眠时不释放对象锁
join(long)方法先执行另外的一个线程,在等待的过程中释放对象锁 底层是基于wait封装的,
Wait(long)方法在等待的过程中释放对象锁
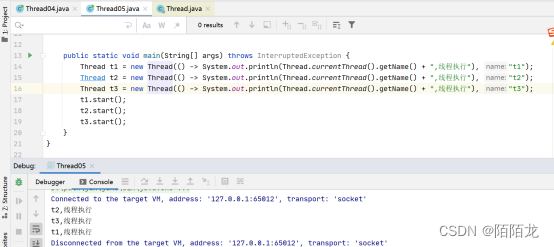
三个线程 T1,T2,T3,怎么确保它们按顺序执行?
Thread t1 = new Thread(() -> System.out.println(Thread.currentThread().getName() + “,线程执行”), “t1”);
Thread t2 = new Thread(() -> System.out.println(Thread.currentThread().getName() + “,线程执行”), “t2”);
Thread t3 = new Thread(() -> System.out.println(Thread.currentThread().getName() + “,线程执行”), “t3”);
t1.start();
t2.start();
t3.start();
public class Thread05 {


    public    static void main(String[] args) throws InterruptedException {
        Thread t1 = new Thread(() -> {
            try {
                Thread.sleep(3000);
            } catch (Exception e) {

            }
            System.out.println(Thread.currentThread().getName() + ",线程执行");
        }, "t1");
        Thread t2 = new Thread(() -> {
            try {
                t1.join();
            } catch (InterruptedException e) {

            }
            System.out.println(Thread.currentThread().getName() + ",线程执行");
        }, "t2");
        Thread t3 = new Thread(() -> {
            try {
                t2.join();
            } catch (InterruptedException e) {

            }
            System.out.println(Thread.currentThread().getName() + ",线程执行");
        }, "t3");
        t1.start();
        t2.start();
        t3.start();
    }
}
Join的底层原理如何实现
public class Thread06 {
    private Object object = new Object();

    public static void main(String[] args) throws InterruptedException {
        Thread06 thread06 = new Thread06();
        Thread thread = thread06.print();
        thread.start();
        try {
            Thread.sleep(3000);
            thread.interrupt();
        } catch (Exception e) {

        }

    }

    public Thread print() {
        Thread thread = new Thread(() -> {
            synchronized (object) {
                System.out.println("1");
                try {
                    object.wait(0);
                } catch (InterruptedException e) {
                    e.printStackTrace();
                }
                System.out.println("2");
            }
        });
        return thread;
    }


}
Join底层原理是基于wait封装的,唤醒的代码在jvm Hotspot 源码中 当
jvm在关闭线程之前会检测线阻塞在t1线程对象上的线程,然后执行notfyAll(),这样t2就被唤醒了。
多线程知识高级部分
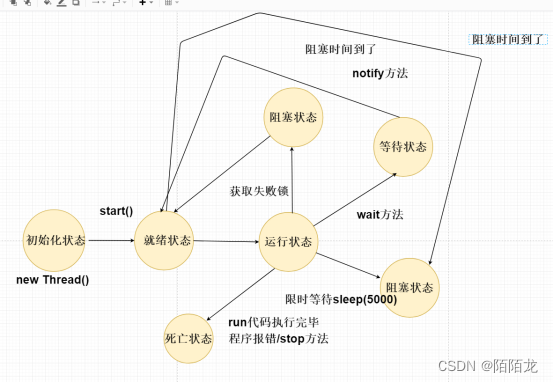
多线程七种执行的状态
初始化状态
就绪状态
运行状态
死亡状态
阻塞状态
超时等待
等待状态
start():调用start()方法会使得该线程开始执行,正确启动线程的方式。
wait():调用wait()方法,进入等待状态,释放资源,让出CPU。需要在同步快中调用。
sleep():调用sleep()方法,进入超时等待,不释放资源,让出CPU
stop():调用sleep()方法,线程停止,线程不安全,不释放锁导致死锁,过时。
join():调用sleep()方法,线程是同步,它可以使得线程之间的并行执行变为串行执行。
yield():暂停当前正在执行的线程对象,并执行其他线程,让出CPU资源可能立刻获得资源执行。
yield()的目的是让相同优先级的线程之间能适当的轮转执行
notify():在锁池随机唤醒一个线程。需要在同步快中调用。
nnotifyAll():唤醒锁池里所有的线程。需要在同步快中调用。
Sleep 主动释放cpu执行权 休眠一段时间
运行状态→限时等待状态
限时等待状态→就绪状态→运行状态
Synchronized 没有获取到锁 当前线程变为阻塞状态
如果有线程释放了锁,唤醒正在阻塞没有获取到锁的线程
从新进入到获取锁的状态
wait() 运行—等待状态
notify() 等待状态–阻塞状态(没有获取到锁的线程 队列)
—就绪状态→运行状态
守护线程与用户线程
java中线程分为两种类型:用户线程和守护线程。通过Thread.setDaemon(false)设置为用户线程;通过Thread.setDaemon(true)设置为守护线程。如果不设置次属性,默认为用户线程。
1.守护线程是依赖于用户线程,用户线程退出了,守护线程也就会退出,典型的守护线程如垃圾回收线程。
2.用户线程是独立存在的,不会因为其他用户线程退出而退出。
public class Thread01 {
    public static void main(String[] args) {
        Thread thread = new Thread(() -> {
            while (true) {
                try {
                    Thread.sleep(1000);
                    System.out.println(Thread.currentThread().getName() + ",我是子线程");
                } catch (Exception e) {

                }
            }
        });
        /**
         * 1.setDaemon 设置为true 守护线程是依赖于用户线程,用户线程退出了,守护线程也就会退出,典型的守护线程如垃圾回收线程。
         * 2.setDaemon 设置为false 用户线程是独立存在的,不会因为其他用户线程退出而退出。
         */
        thread.setDaemon(true);
        thread.start();
        System.out.println("我是主线程,代码执行结束");
    }
}
多线程yield
主动释放cpu执行权
1.多线程yield 会让线程从运行状态进入到就绪状态,让后调度执行其他线程。
2.具体的实现依赖于底层操作系统的任务调度器
public Thread02(String name) {
    super(name);
}

@Override
public void run() {
    for (int i = 0; i < 50; i++) {
        if (i == 30) {
            System.out.println(Thread.currentThread().getName() + ",释放cpu执行权");
            this.yield();
        }
        System.out.println(Thread.currentThread().getName() + "," + i);
    }


}

public static void main(String[] args) {
    new Thread02("mayikt01").start();
    new Thread02("mayikt02").start();
}
多线程优先级
1.在java语言中,每个线程都有一个优先级,当线程调控器有机会选择新的线程时,线程的优先级越高越有可能先被选择执行,线程的优先级可以设置1-10,数字越大代表优先级越高
注意:Oracle为Linux提供的java虚拟机中,线程的优先级将被忽略,即所有线程具有相同的优先级。
所以,不要过度依赖优先级。
2.线程的优先级用数字来表示,默认范围是1到10,即Thread.MIN_PRIORITY到Thread.MAX_PRIORTY.一个线程的默认优先级是5,即Thread.NORM_PRIORTY
3.如果cpu非常繁忙时,优先级越高的线程获得更多的时间片,但是cpu空闲时,设置优先级几乎没有任何作用。
public class Thread03 {
    public static void main(String[] args) {
        Thread t1 = new Thread(() -> {
            int count = 0;
            for (; ; ) {
                System.out.println(Thread.currentThread().getName() + "," + count++);
            }
        }, "t1线程:");
        Thread t2 = new Thread(() -> {
            int count = 0;
            for (; ; ) {
                System.out.println(Thread.currentThread().getName() + "," + count++);
            }
        }, "t2线程:");
        t1.setPriority(Thread.MIN_PRIORITY);
        t1.setPriority(Thread.MAX_PRIORITY);
        t1.start();
        t2.start();
    }
}
sleep防止CPU占用100%
sleep(long millis) 线程睡眠 millis 毫秒
sleep(long millis, int nanos) 线程睡眠 millis 毫秒 + nanos 纳秒
使用sleep方法避免cpu空转 防止cpu占用100%
public static void main(String[] args) {
    new Thread(() -> {
        while (true) {
            try {
                Thread.sleep(30);
            } catch (InterruptedException e) {
                e.printStackTrace();
            }
        }
    }).start();
}
如何安全的停止一个线程
调用stop方法
Stop:中止线程,并且清除监控器锁的信息,但是可能导致 线程安全问题,JDK不建议用。 Destroy: JDK未实现该方法。
Interrupt(线程中止)
Interrupt 打断正在运行或者正在阻塞的线程。
1.如果目标线程在调用Object class的wait()、wait(long)或wait(long, int)方法、join()、join(long, int)或sleep(long, int)方法时被阻塞,那么Interrupt会生效,该线程的中断状态将被清除,抛出InterruptedException异常。
2.如果目标线程是被I/O或者NIO中的Channel所阻塞,同样,I/O操作会被中断或者返回特殊异常值。达到终止线程的目的。
如果以上条件都不满足,则会设置此线程的中断状态。
打断正在阻塞的线程
public static void main(String[] args) {
    Thread t1 = new Thread(() -> {
        try {
            Thread.sleep(5000);
        } catch (Exception e) {
              e.printStackTrace();
        }
    }, "t1");
    t1.start();
    try {
        Thread.sleep(1000);
    } catch (Exception e) {

    }
    System.out.println("打断子线程");
    //调用interrupt 打断正在阻塞的线程
    t1.interrupt();
    System.out.println("获取打断标记:" + t1.isInterrupted());
}
打断正在运行的线程
public class Thread06 extends Thread {
    @Override
    public void run() {
        while (true) {
            // 如果终止了线程,则停止当前线程
            if (this.isInterrupted()) {
                break;
            }
        }
    }

    public static void main(String[] args) {
        Thread06 thread06 = new Thread06();
        thread06.start();
        try {
            Thread.sleep(1000);
        } catch (Exception e) {
        }
        thread06.interrupt();

    }
}
正确的线程中止-标志位
在上方代码逻辑中,增加一个判断,用来控制线程执行的中止。
public class Thread07 extends Thread {
    private volatile boolean isFlag = true;

    @Override
    public void run() {
        while (isFlag) {

        }
    }

    public static void main(String[] args) {
        Thread07 thread07 = new Thread07();
        thread07.start();
//        thread07.isFlag = false;

    }
}
Lock锁的基本使用
在jdk1.5后新增的ReentrantLock类同样可达到此效果,且在使用上比synchronized更加灵活
相关API:
使用ReentrantLock实现同步
lock()方法:上锁
unlock()方法:释放锁
使用Condition实现等待/通知 类似于 wait()和notify()及notifyAll()
Lock锁底层基于AQS实现,需要自己封装实现自旋锁。
Synchronized —属于JDK 关键字 底层属于 C++虚拟机底层实现
Lock锁底层基于AQS实现-- 变为重量级
Synchronized 底层原理—锁的升级过程
Lock 过程中 注意 获取锁 释放锁
ReentrantLock用法
import java.util.concurrent.TimeUnit;
import java.util.concurrent.locks.Lock;
import java.util.concurrent.locks.ReentrantLock;

/**
 * @author 余胜军
 * @ClassName Thread09
 * @qq 644064779
 * @addres www.mayikt.com
 * 微信:yushengjun644
 */
public class Thread09 implements Runnable {
    private int count = 100;
    private Lock lock = new ReentrantLock();

    @Override
    public void run() {
        while (true) {
            try {
                Thread.sleep(30);
            } catch (Exception e) {

            }
            try {
                // 获取锁
                lock.lock();
                if (count > 1) {
                    count--;
                    System.out.println(Thread.currentThread().getName() + "," + count);

                }
            } catch (Exception e) {
                e.printStackTrace();
            } finally {
                // 释放锁
                lock.unlock();
            }
        }
    }

    public static void main(String[] args) {
        Thread09 thread09 = new Thread09();
        Thread t1 = new Thread(thread09);
        Thread t2 = new Thread(thread09);
        t1.start();
        t2.start();
    }
}
Condition用法
public class Thread10 {
    private ReentrantLock lock = new ReentrantLock();
    private Condition condition = lock.newCondition();

    public static void main(String[] args) {
        Thread10 thread10 = new Thread10();
        try {
            thread10.print();
            Thread.sleep(3000);
            thread10.signal();
        } catch (Exception e) {

        }
    }

    public void print() {
        new Thread(() -> {
            try {
                // 释放锁 同时当前线程阻塞
                lock.lock();
                System.out.println(Thread.currentThread().getName() + ",1");
                condition.await();
                System.out.println(Thread.currentThread().getName() + ",2");
            } catch (Exception e) {
                e.printStackTrace();
            } finally {
                lock.unlock();
            }
        }).start();
    }

    public void signal() {
        try {
            lock.lock();
            condition.signal();
        } catch (Exception e) {
            e.printStackTrace();
        } finally {
            lock.unlock();
        }
    }
}
多线程综合小案例
手写Callable与FutureTask模式
可以基于Callable+FutureTask可以实现异步线程执行 带返回结果。
LockSupport实现方式
定义Callable+FutureTask
public interface MayiktCallable<V> {
    V call();
}
public class MayiktFutureTask<V> implements Runnable {
    private MayiktCallable<V> mayiktCallable;
    private Thread cuThread;
    private V result;

    public MayiktFutureTask(MayiktCallable mayiktCallable) {
        this.mayiktCallable = mayiktCallable;
    }

    @Override
    public void run() {
        // 获取到mayiktCallable 执行返回结果
        result = mayiktCallable.call();
        // 如果 call方法执行完毕 则唤醒当前阻塞的线程
        if (cuThread != null)
            LockSupport.unpark(cuThread);
    }

    /**
     * 调用get方法 当前线程就会阻塞。
     */
    public V get() {
        cuThread = Thread.currentThread();
        // 阻塞当前线程
        LockSupport.park();
        return result;
    }
}
MayiktCallable mayiktCallable = new MayiktCallableImpl();
MayiktFutureTask<Integer> futureTask = new MayiktFutureTask<Integer>(mayiktCallable);
new Thread(futureTask).start();
Integer result = futureTask.get();
System.out.println(Thread.currentThread().getName() + result);
wait()与notify
public class MayiktFutureTask<V> implements Runnable {
    private MayiktCallable<V> mayiktCallable;
    private Thread cuThread;
    private V result;
    private Object lock = new Object();

    public MayiktFutureTask(MayiktCallable mayiktCallable) {
        this.mayiktCallable = mayiktCallable;
    }

    @Override
    public void run() {
        // 获取到mayiktCallable 执行返回结果
        result = mayiktCallable.call();
        // 如果 call方法执行完毕 则唤醒当前阻塞的线程
        if (cuThread != null)
            synchronized (lock) {
                lock.notify();
            }
    }

    /**
     * 调用get方法 当前线程就会阻塞。
     */
    public V get() {
        cuThread = Thread.currentThread();
        synchronized (lock) {
            try {
                // 当前线程释放锁 变为阻塞状态
                lock.wait();
            } catch (Exception e) {
            }
        }
        return result;
    }
}


 被折叠的 条评论
为什么被折叠?
被折叠的 条评论
为什么被折叠?
 到【灌水乐园】发言


