


spring开发步骤:
spring jar包介绍:
在3.0以下的版本,源码有spring中相关的所有包(包括spring核心包和依赖包)
在3.0以上版本,源码中只有spring的核心包 没有依赖包 依赖包需要自己下载
1)源码,jar包:spring-framwork-3.2.5.RELEASE
commons-logging-1.1.3.jar 日志
spring-beans-3.2.5.RELEASE.jar bean节点
spring-context-3.2.5.RELEASE.jar spring上下文节点
spring-core-3.2.5.RELEASE.jar spring核心功能
spring-expression-3.2.5.RELEASE.jar spring表达式相关表
以上是必须引入的5个jar包,在项目中可以用户管理!
2)核心配置文件:applicationContext.xml
spring配置文件:applicationContext.xml/bean.xml
约束参考:
spring-framework-3.2.5.RELEASE\docs\spring-framework-reference\htmlsingle\index.html
| <beans xmlns="http://www.springframework.org/schema/beans" xmlns:xsi="http://www.w3.org/2001/XMLSchema-instance" xmlns:p="http://www.springframework.org/schema/p" xmlns:context="http://www.springframework.org/schema/context" xsi:schemaLocation=" http://www.springframework.org/schema/beans http://www.springframework.org/schema/beans/spring-beans.xsd http://www.springframework.org/schema/context http://www.springframework.org/schema/context/spring-context.xsd">
</beans> |
User类
<span style="font-family:Courier New;">package cn.itcast.hello;

public class User {
	public User() {
		System.out.println("user对象创建了!");
	}
	private int id;
	private String name;
	public int getId() {
		return id;
	}
	public void setId(int id) {
		this.id = id;
	}
	public String getName() {
		return name;
	}
	public void setName(String name) {
		this.name = name;
	}


}</span><strong>
</strong><<span style="font-family:Courier New;">beans xmlns="http://www.springframework.org/schema/beans"
xmlns:xsi="http://www.w3.org/2001/XMLSchema-instance"
xmlns:p="http://www.springframework.org/schema/p"
xsi:schemaLocation="http://www.springframework.org/schema/beans
http://www.springframework.org/schema/beans/spring-beans.xsd">
<!--
默认情况下spring创建对象是单例的 singleton
prototype:多例的
-->
<bean id="user" class="cn.itcast.hello.User" ></bean>
<bean id="user" lazy-init="true" class="cn.itcast.hello.User" scope="singleton" init-method="init_user" destroy-method="destory_user"></bean>
</beans></span>下面是两种创建IOC容器的方法,推荐第二种.
<span style="font-family:Courier New;">package cn.itcast.hello;

import org.junit.Test;
import org.springframework.beans.factory.BeanFactory;
import org.springframework.beans.factory.xml.XmlBeanFactory;
import org.springframework.context.ApplicationContext;
import org.springframework.context.support.ClassPathXmlApplicationContext;
import org.springframework.core.io.ClassPathResource;
import org.springframework.core.io.Resource;

public class App {
	@Test
	public void test(){
		//1.解析bean.xml文件、
		Resource resource=new ClassPathResource("bean.xml");
		//2.创建对象容器,bean的工厂 IOC容器=工厂类+配置文件
		BeanFactory factory=new XmlBeanFactory(resource);
		User user= (User) factory.getBean("user");
		System.out.println(user.getName());
	}
	@Test
	public void test2(){
		//这样可以直接得到IOC容器
		ApplicationContext ac=new ClassPathXmlApplicationContext("bean.xml");
		User user=(User) ac.getBean("user");
		System.out.println(user.getId());

	}

}</span>细节问题:
我们把bean.xml配置文件中的配置user对象更改为:
<bean id="user" lazy-init="true" class="cn.itcast.hello.User" scope="singleton" init-method="init_user" destroy-method="destory_user"></bean>
同时在User类中添加一个无惨的构造函数和一个初始化的方法以及一个对象销毁的方法
<span style="font-family:Courier New;">public User() {
		System.out.println("user对象创建了!");
	}
public void init_user(){
		System.out.println("user对象初始化了!");
	}
	public void destory_user(){
		System.out.println("user对象销毁了!");
}</span><span style="font-family:Courier New;">package cn.itcast.hello;
import org.junit.Test;
import org.springframework.context.ApplicationContext;
import org.springframework.context.support.ClassPathXmlApplicationContext;
public class App2 {
@Test
public void test(){
ClassPathXmlApplicationContext ac=new ClassPathXmlApplicationContext("bean.xml");
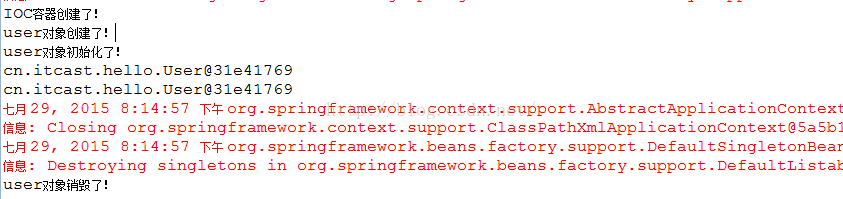
System.out.println("IOC容器创建了!");
User user1=(User) ac.getBean("user");
User user2=(User) ac.getBean("user");
System.out.println(user1);
System.out.println(user2);
//对象的销毁方法要显示的调用 接口 中没有销毁的方法需要使用实现类调用destroy()方法
ac.destroy();
}
}
</span>
测试多例bean.xml中scope="prototype"

总结:
* 1) 对象创建:单例/多例
* scope="singleton", 默认值,即默认是单例 【service/dao/工具类】
* scope="prototype", 多例; 【Action对象】
*
* 2) 什么时候创建?
* scope="prototype" 在用到对象的时候,才创建对象。
* scope="singleton" 在启动(容器初始化之前),就已经创建了bean,且整个应用只有一个。
* 3)是否延迟创建
* lazy-init="false" 默认为false, 不延迟创建,即在启动时候就创建对象
* lazy-init="true" 延迟初始化,在用到对象的时候才创建对象
* (只对单例有效)
* 4) 创建对象之后,初始化/销毁
* init-method="init_user" 【对应对象的init_user方法,在对象创建爱之后执行】
* destroy - method="destroy_user" 【在调用容器对象的 destriy 方法时候执行, ( 容器 用实现类 ) 】


 2541
2541


 被折叠的 条评论
为什么被折叠?
被折叠的 条评论
为什么被折叠?
 到【灌水乐园】发言


