


之前写过gateway整合websocket,使用stomp Gateway整合websocket stomp_u014203449的博客-CSDN博客_gateway整合websocket。
如果使用springboot websocket,也是可以的,使用简单方便。
顺便看看gateway和boot 关于websocket的核心类
gateway
以下是代码,gateway配置。
注意路由规则中,websocekt转发的协议要写成 ws: 。lb是指从注册中心根据服务名获取服务
      routes:
        - id: web
          order: 5
          uri: lb://web   #lb代表从注册中心获取服务,将path的请求路由到uri
          predicates:
            - Path=/web/**
          filters:
            - StripPrefix=1    #除去第一个/前缀,比如请求/wisdomclass-demo/demo,会去除前缀/wisdomclass-demo,请求到路由服务的 /demo接口
            - name: Hystrix    #Hystrix Filter的名称,一个在网关层面的熔断过滤器,如果后端服务不可用,可作服务降级,返回友好提示
              args:   #Hystrix配置参数
                name: fallbackcmd #HystrixCommond 的名字
                fallbackUri: forward:/fallback  #自定义的接口
        - id: web
          uri: lb:ws://web     #wesocket协议
          order: 2
          predicates:
            - Path=/web/websocket/apaas/**
          filters:
            - StripPrefix=1
但我测试以下这个handler不加也可以,在boot中有对ws的处理
@Component
public class WebsocketHandler implements GlobalFilter, Ordered {

    private final Logger logger = LoggerFactory.getLogger(WebsocketHandler.class);

    private final static String DEFAULT_FILTER_PATH = "/websocket/**";

    /**
     *
     * @param exchange ServerWebExchange是一个HTTP请求-响应交互的契约。提供对HTTP请求和响应的访问,
     *                 并公开额外的 服务器 端处理相关属性和特性,如请求属性
     * @param chain
     * @return
     */
    @Override
    public Mono<Void> filter(ServerWebExchange exchange, GatewayFilterChain chain) {
        String upgrade = exchange.getRequest().getHeaders().getUpgrade();
        URI requestUrl = exchange.getRequiredAttribute(GATEWAY_REQUEST_URL_ATTR);
        String scheme = requestUrl.getScheme();
        AntPathMatcher pathMatcher = new AntPathMatcher();
        if (!"ws".equals(scheme) && !"wss".equals(scheme)) {
            return chain.filter(exchange);
        } else if (pathMatcher.match(DEFAULT_FILTER_PATH,requestUrl.getPath())) {
            logger.info("now request websocekt ={}",requestUrl.getPath());
            String wsScheme = convertWsToHttp(scheme);
            URI wsRequestUrl = UriComponentsBuilder.fromUri(requestUrl).scheme(wsScheme).build().toUri();
            exchange.getAttributes().put(GATEWAY_REQUEST_URL_ATTR, wsRequestUrl);
        }
        return chain.filter(exchange);
    }

    @Override
    public int getOrder() {
        return Ordered.LOWEST_PRECEDENCE - 2;
    }

    static String convertWsToHttp(String scheme) {
        scheme = scheme.toLowerCase();
        return "ws".equals(scheme) ? "http" : "wss".equals(scheme) ? "https" : scheme;
    }
}
boot项目
其他boot websocket配置简单
        <dependency>
            <groupId>org.springframework.boot</groupId>
            <artifactId>spring-boot-starter-websocket</artifactId>
        </dependency>
import org.springframework.context.annotation.Bean;
import org.springframework.context.annotation.Configuration;
import org.springframework.web.socket.server.standard.ServerEndpointExporter;
@Configuration
public class WebSocketConfig {
/**
* ServerEndpointExporter 作用
*
* 这个Bean会自动注册使用@ServerEndpoint注解声明的websocket endpoint
*
* @return
*/
@Bean
public ServerEndpointExporter serverEndpointExporter() {
return new ServerEndpointExporter();
}
}websocket接口
import org.springframework.stereotype.Component;
import javax.websocket.*;
import javax.websocket.server.PathParam;
import javax.websocket.server.ServerEndpoint;
import java.io.IOException;
import java.util.concurrent.ConcurrentHashMap;
import java.util.concurrent.atomic.AtomicInteger;

/**
 * @author :PangTiemin
 * @date :Created in 2020/12/14 20:46
 * @description:
 * @modified By:
 */
@ServerEndpoint("/websocket/apaas/{sid}")
@Component
public class WebSocketServer {
    //静态变量,用来记录当前在线连接数。应该把它设计成线程安全的。
    private static AtomicInteger onlineNum = new AtomicInteger();

    //concurrent包的线程安全Set,用来存放每个客户端对应的WebSocketServer对象。
    private static ConcurrentHashMap<String, Session> sessionPools = new ConcurrentHashMap<>();

    //发送消息
    public void sendMessage(Session session, String message) throws IOException {
        if(session != null){
            synchronized (session) {
//                System.out.println("发送数据:" + message);
                session.getBasicRemote().sendText(message);
            }
        }
    }
    //给指定用户发送信息
    public void sendInfo(String userName, String message){
        Session session = sessionPools.get(userName);
        try {
            sendMessage(session, message);
        }catch (Exception e){
            e.printStackTrace();
        }
    }

    //建立连接成功调用
    @OnOpen
    public void onOpen(Session session, @PathParam(value = "sid") String userName){
        sessionPools.put(userName, session);
        addOnlineCount();
        System.out.println(userName + "加入webSocket2!当前人数为" + onlineNum);
        try {
            sendMessage(session, "欢迎" + userName + "加入连接!");
        } catch (IOException e) {
            e.printStackTrace();
        }
    }

    //关闭连接时调用
    @OnClose
    public void onClose(@PathParam(value = "sid") String userName){
        sessionPools.remove(userName);
        subOnlineCount();
        System.out.println(userName + "断开webSocket连接!当前人数为" + onlineNum);
    }

    //收到客户端信息
    @OnMessage
    public void onMessage(String message) throws IOException{
        message = "webSocket2  客户端:" + message + ",已收到";
        System.out.println(message);
        for (Session session: sessionPools.values()) {
            try {
                sendMessage(session, message);
            } catch(Exception e){
                e.printStackTrace();
                continue;
            }
        }
    }

    //错误时调用
    @OnError
    public void onError(Session session, Throwable throwable){
        System.out.println("发生错误");
        throwable.printStackTrace();
    }

    public static void addOnlineCount(){
        onlineNum.incrementAndGet();
    }

    public static void subOnlineCount() {
        onlineNum.decrementAndGet();
    }

}
页面
<!DOCTYPE HTML>
<html>
<head>
    <title>My WebSocket</title>
</head>

<body>
<input id="text" type="text" />
<button onclick="send()">Send</button>
<button onclick="closeWebSocket()">Close</button>
<div id="message"></div>
</body>

<script type="text/javascript">
    var websocket = null;

    //判断当前浏览器是否支持WebSocket, 主要此处要更换为自己的地址
    if ('WebSocket' in window) {
        websocket = new WebSocket("ws://localhost:9000/web/websocket/apaas/hi?Authorization="+"eyJhbGciOiJIUzI1NiIsInR5cCI6IkpXVCJ9.eyJhdWQiOlsid2ViIl0sInBob25lTnVtYmVyIjoiMTU2ODYwOTczNjYiLCJ1c2VyX25hbWUiOiIxNTY4NjA5NzM2NiIsInNjb3BlIjpbImFsbCJdLCJzeXN0ZW1UeXBlIjoiMSIsImV4cCI6MTYwNjk4NTc2OCwidXNlcklkIjoiOSIsImp0aSI6Ijk3NTNlNTk2LTNmNTUtNDE3ZS1iZmNmLTVkZmY5ZGFmZWU3MiIsImNsaWVudF9pZCI6ImNsaWVudCJ9.5QpMmSVYqvALrHpk3zT_zJWxbJKtkIJs3eUa2WWUuWI");
    } else {
        alert('Not support websocket')
    }

    //连接发生错误的回调方法
    websocket.onerror = function() {
        setMessageInnerHTML("error");
    };

    //连接成功建立的回调方法
    websocket.onopen = function(event) {
        setMessageInnerHTML("open");
    }

    //接收到消息的回调方法
    websocket.onmessage = function(event) {
        setMessageInnerHTML(event.data);
    }

    //连接关闭的回调方法
    websocket.onclose = function(event) {
        setMessageInnerHTML("close");
    }

    //监听窗口关闭事件,当窗口关闭时,主动去关闭websocket连接,防止连接还没断开就关闭窗口,server端会抛异常。
    // window.onbeforeunload = function() {
    //     websocket.close();
    // }

    //将消息显示在网页上
    function setMessageInnerHTML(innerHTML) {
        document.getElementById('message').innerHTML += innerHTML + '<br/>';
    }

    //关闭连接
    function closeWebSocket() {
        websocket.close();
    }

    //发送消息
    function send() {
        var message = document.getElementById('text').value;
        websocket.send(message);
    }
</script>
</html>
携带认证信息
关键问题不好传递请求头,将token传递,网上有在protocol子协议的地方写入token,这种方式实际上是传递了一个Sec-websocket-protocol的请求头,服务端需要修改获取token的逻辑,而且这个请求头要求相应也有同样名称的响应头。我没采用这个方式,直接将token写在了url的queryparam上,再修改服务端获取token的逻辑。(注意websocket不支持cookie传递)
websocket = new WebSocket(url,[protocol])
gateway处理websocket
WebsocketRoutingFilter是一个GlobalFilter,对Sec-websocket-protocol的处理,然后交给 webSocketService继续处理

HandshakeWebSocketService进行一些校验,然后握手

boot处理websocket
AbstractProtocol是个核心类,他处理所有协议请求过程,debug websocekt 可以发现,他循环找不同的processor处理,状态state值随之变化。
初始state是closed,先用Http11Processor处理 state为upgrading升级中,在这步会调用ws open方法(需要我们写的ws open业务方法);再UpgradeProcessorInternal处理为 upgraded升级成功。
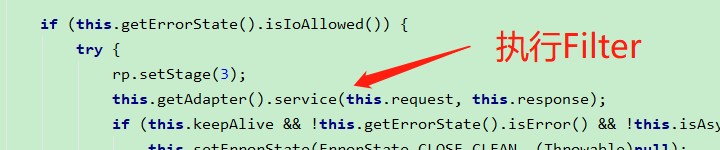
先截图 Http11Processor类service方法的一段。 this.getAdapter().service(this.request, this.response) 会执行 Filter链
如果执行正常,会返回 UPGRADING的状态,验证了 websocket握手时通过http,然后再升级。

AbstractProtocol,upgrading后,再UpgradeProcessorInternal处理为 upgraded升级成功。


 1万+
1万+


 被折叠的 条评论
为什么被折叠?
被折叠的 条评论
为什么被折叠?
 到【灌水乐园】发言


