


Java NIO Selector(选择器)
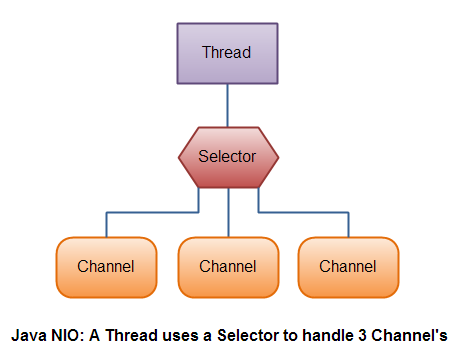
选择器是用来检测一个或多个NIO通道,并能够知晓通道是否为诸如读写事件做好准备的组件。这样,单个线程可以管理多个通道,从而管理多个网络连接。
1.为什么使用选择器
使用单个线程处理多个channel的优势是,需要更少的线程来处理这些channels。实际上,可以仅仅使用单个线程来处理所有的channels。对于操作系统来说,线程之间上下文切换开销很大,并且每个线程会占用一些系统资源(如内存)。因此,线程使用的越少越好。
但是要记住,在现代操作系统中,CPU在处理多任务上已经变得越来越好了,因此,多线程的开销随着时间的推移慢慢变小了。实际上,如果一个CPU有多个核,如果你不使用多任务,那么会造成CPU资源的浪费。
2.创建选择器
通过调用Selector.open()方法:
Selector selector = Selector.open();3.向选择器注册通道
为了将Channel和Selector配合使用,必须将channel注册到selector上。调用SelectableChannel.register()方法实现。
channel.configureBlocking(false);
SelectionKey key = channel.register(selector, SelectionKey.OP_READ);与Selector一起使用时,Channel必须处于非阻塞模式下。这意味着不能将FileChannel与Selector一起使用,因为FileChannel不能切换到非阻塞模式。而Socket通道可以很好地运行。
注意register()方法的第二个参数,是一个interest集合,意思是在通过Selector监听Channel时对什么事件感兴趣。可以监听四种不同类型的事件:
Connect
Accept
Read
Write
通道触发了一个事件意思是该事件已经就绪。因此,某个通道成功连接到另一个服务器称为“连接就绪”。一个server socket channel准备好接收新进入的连接称为“接收就绪”。一个有数据可读的通道可以说是“读就绪”。等待写数据的通道可以说是“写就绪”。
这是四种事件用SelectionKey的四个常量表示:
SelectionKey.OP_CONNECT
SelectionKey.OP_ACCEPT
SelectionKey.OP_READ
SelectionKey.OP_WRITE
如果你对不止一种事件感兴趣,那么可以用“位或”操作符将常量连接起来。
int interestSet = SelectionKey.OP_READ | SelectionKey.OP_WRITE;3.选择器关键字
上一节中,当向Selector注册Channel时,register()方法会返回一个SelectionKey对象。这个对象包含了一些你感兴趣的属性:
The interest set
The ready set
The Channel
The Selector
An attached object(附加对象,optional)
4.Interest 集合
就像向Selector注册通道一节中所描述的,interest集合是你所选择的感兴趣的事件集合。可以通过SelectionKey读写interest集合。
int interestSet = selectionKey.interestOps();

boolean isInterestedInAccept  = interestSet & SelectionKey.OP_ACCEPT;
boolean isInterestedInConnect = interestSet & SelectionKey.OP_CONNECT;
boolean isInterestedInRead    = interestSet & SelectionKey.OP_READ;
boolean isInterestedInWrite   = interestSet & SelectionKey.OP_WRITE;
可以通过“位与”操作interest 集合和给定的SelectionKey常量,可以确定某个确定的事件是否在interest 集合中。
4.Ready集合
ready集合是通道已经准备就绪的操作的集合。在一次选择(Selection)之后,你会首先访问这个ready set。Selection将在下一小节进行解释。
int readySet = selectionKey.readyOps();可以用像检测interest集合那样的方法,来检测channel中什么事件或操作已经就绪。但是,也可以使用以下四个方法,它们都会返回一个布尔类型:
selectionKey.isAcceptable();
selectionKey.isConnectable();
selectionKey.isReadable();
selectionKey.isWritable();
5.Channel+Selector
从SelectionKey访问Channel和Selector很简单。
Channel  channel  = selectionKey.channel();

Selector selector = selectionKey.selector();
6.附加的对象
可以将一个对象或者更多信息附着到SelectionKey上,这样就能方便的识别某个给定的通道。例如,可以附加与通道一起使用的Buffer,或是包含聚集数据的某个对象。
selectionKey.attach(theObject);

Object attachedObj = selectionKey.attachment();
还可以在用register()方法向Selector注册Channel的时候附加对象。
SelectionKey key = channel.register(selector, SelectionKey.OP_READ, theObject);7.通过选择器选择通道
一旦向Selector注册了一或多个通道,就可以调用几个重载的select()方法。这些方法返回你所感兴趣的事件(如连接、接受、读或写)已经准备就绪的那些通道。换句话说,如果你对“读就绪”的通道感兴趣,select()方法会返回读事件已经就绪的那些通道。
int select()
int select(long timeout)
int selectNow()
select,一直阻塞到至少有一个注册的通道就绪。
select(long timeout),和select一样,但是最长阻塞timeout毫秒。
selectNow,不管什么通道就绪都立刻返回。(此方法执行非阻塞的选择操作。如果自从前一次选择操作后,没有通道变成可选择的,则此方法直接返回零)
select方法返回的int值是告诉我们有多少通道已经就绪。就是,自上次调用select()方法后有多少通道变成就绪状态。如果调用select()方法,因为有一个通道变成就绪状态,返回了1,若再次调用select()方法,如果另一个通道就绪了,它会再次返回1。如果对第一个就绪的channel没有做任何操作,现在就有两个就绪的通道,但在每次select()方法调用之间,只有一个通道就绪了。
8.SelectedKeys
一旦你调用了select方法,并且返回值表明有一个或更多个通道就绪了,然后可以通过调用selector的selectedKeys()方法,访问“已选择键集(selected key set)”中的就绪通道。
Set<SelectionKey> selectedKeys = selector.selectedKeys(); 当像Selector注册Channel时,Channel.register()方法会返回一个SelectionKey 对象。这个对象代表了注册到该Selector的通道。可以通过SelectionKey的selectedKeySet()方法访问这些对象。
可以遍历这个已选择的键集合来访问就绪的通道。
Set<SelectionKey> selectedKeys = selector.selectedKeys();

Iterator<SelectionKey> keyIterator = selectedKeys.iterator();

while(keyIterator.hasNext()) {

    SelectionKey key = keyIterator.next();

    if(key.isAcceptable()) {
        // a connection was accepted by a ServerSocketChannel.

    } else if (key.isConnectable()) {
        // a connection was established with a remote server.

    } else if (key.isReadable()) {
        // a channel is ready for reading

    } else if (key.isWritable()) {
        // a channel is ready for writing
    }

    keyIterator.remove();
}
这个循环遍历已选择键集中的每个键,并检测各个键所对应的通道的就绪事件。
注意每次迭代末尾的keyIterator.remove()调用。Selector不会自己从已选择键集中移除SelectionKey实例。必须在处理完通道时自己移除。下次该通道变成就绪时,Selector会再次将其放入已选择键集中。
SelectionKey.channel()方法返回的通道需要转型成你要处理的类型,如ServerSocketChannel或SocketChannel等。
9.wakeUP()
某个线程调用select()方法后阻塞了,即使没有通道已经就绪,也有办法让其从select()方法返回。只要让其它线程在第一个线程调用select()方法的那个对象上调用Selector.wakeup()方法即可。阻塞在select()方法上的线程会立马返回。
如果有其它线程调用了wakeup()方法,但当前没有线程阻塞在select()方法上,下个调用select()方法的线程会立即“醒来(wake up)”。
10.Close
用完Selector后调用其close()方法会关闭该Selector,且使注册到该Selector上的所有SelectionKey实例无效。通道本身并不会关闭。
10.完整示例
这里有一个完整的示例,打开一个Selector,注册一个通道注册到这个Selector上(通道的初始化过程略去),然后持续监控这个Selector的四种事件(接受,连接,读,写)是否就绪。
Selector selector = Selector.open();

channel.configureBlocking(false);

SelectionKey key = channel.register(selector, SelectionKey.OP_READ);


while(true) {

  int readyChannels = selector.select();

  if(readyChannels == 0) continue;


  Set<SelectionKey> selectedKeys = selector.selectedKeys();

  Iterator<SelectionKey> keyIterator = selectedKeys.iterator();

  while(keyIterator.hasNext()) {

    SelectionKey key = keyIterator.next();

    if(key.isAcceptable()) {
        // a connection was accepted by a ServerSocketChannel.

    } else if (key.isConnectable()) {
        // a connection was established with a remote server.

    } else if (key.isReadable()) {
        // a channel is ready for reading

    } else if (key.isWritable()) {
        // a channel is ready for writing
    }

    keyIterator.remove();
  }
}
文件通道
Java NIO中的FileChannel是一个连接到文件的通道。可以通过文件通道读写文件。
FileChannel无法设置为非阻塞模式,它总是运行在阻塞模式下。
1.打开FileChannel
在使用FileChannel之前,必须先打开它。但是,我们无法直接打开一个FileChannel,需要通过使用一个InputStream、OutputStream或RandomAccessFile来获取一个FileChannel实例。
    RandomAccessFile aFile = new RandomAccessFile("data/nio-data.txt", "rw");
    FileChannel inChannel = aFile.getChannel();
2.从FileChannel读取数据
调用多个read()方法之一从FileChannel中读取数据。
ByteBuffer buf = ByteBuffer.allocate(48);
int bytesRead = inChannel.read(buf);
首先,分配一个Buffer。从FileChannel中读取的数据将被读到Buffer中。
然后,调用FileChannel.read()方法。该方法将数据从FileChannel读取到Buffer中。read()方法返回的int值表示了有多少字节被读到了Buffer中。如果返回-1,表示到了文件末尾。
3.向FileChannel写数据
使用FileChannel.write()方法向FileChannel写数据,该方法的参数是一个Buffer。
String newData = "New String to write to file..." + System.currentTimeMillis();

ByteBuffer buf = ByteBuffer.allocate(48);
buf.clear();
buf.put(newData.getBytes());

buf.flip();

while(buf.hasRemaining()) {
    channel.write(buf);
}
注意FileChannel.write()是在while循环中调用的。因为无法保证write()方法一次能向FileChannel写入多少字节,因此需要重复调用write()方法,直到Buffer中已经没有尚未写入通道的字节。
3.关闭FileChannel
用完FileChannel后必须将其关闭。
channel.close(); 4.FileChannel的position方法
有时可能需要在FileChannel的某个特定位置进行数据的读/写操作。可以通过调用position()方法获取FileChannel的当前位置。
也可以通过调用position(long pos)方法设置FileChannel的当前位置。
这里有两个例子:
    long pos = channel.position();
    channel.position(pos +123);
5.FileChannel的size方法
FileChannel实例的size()方法将返回该实例所关联文件的大小。
long fileSize = channel.size(); 6.FileChannel的truncate方法
可以使用FileChannel.truncate()方法截取一个文件。截取文件时,文件将中指定长度后面的部分将被删除。
channel.truncate(1024); 7.FileChannel的force方法
FileChannel.force()方法将通道里尚未写入磁盘的数据强制写到磁盘上。出于性能方面的考虑,操作系统会将数据缓存在内存中,所以无法保证写入到FileChannel里的数据一定会即时写到磁盘上。要保证这一点,需要调用force()方法。
force()方法有一个boolean类型的参数,指明是否同时将文件元数据(权限信息等)写到磁盘上。
下面的例子同时将文件数据和元数据强制写到磁盘上:
channel.force(true); Socket 通道
Java NIO中的SocketChannel是一个连接到TCP网络套接字的通道。可以通过以下2种方式创建SocketChannel:
打开一个SocketChannel并连接到互联网上的某台服务器。
一个新连接到达ServerSocketChannel时,会创建一个SocketChannel。
1.打开 SocketChannel
下面是SocketChannel的打开方式:
SocketChannel socketChannel = SocketChannel.open();
socketChannel.connect(new InetSocketAddress("http://jenkov.com", 80));
2.关闭 SocketChannel
当用完SocketChannel之后调用SocketChannel.close()关闭SocketChannel。
socketChannel.close(); 3.从 SocketChannel 读取数据
要从SocketChannel中读取数据,调用一个read()的方法之一。以下是例子:
ByteBuffer buf = ByteBuffer.allocate(48);
int bytesRead = socketChannel.read(buf);
首先,分配一个Buffer。从SocketChannel读取到的数据将会放到这个Buffer中。
然后,调用SocketChannel.read()。该方法将数据从SocketChannel 读到Buffer中。read()方法返回的int值表示读了多少字节进Buffer里。如果返回的是-1,表示已经读到了流的末尾(连接关闭了)。
4.写入 SocketChannel
写数据到SocketChannel用的是SocketChannel.write()方法,该方法以一个Buffer作为参数。示例如下:
String newData = "New String to write to file..." + System.currentTimeMillis();

ByteBuffer buf = ByteBuffer.allocate(48);
buf.clear();
buf.put(newData.getBytes());

buf.flip();

while(buf.hasRemaining()) {
        channel.write(buf);
    }
注意SocketChannel.write()方法的调用是在一个while循环中的。Write()方法无法保证能写多少字节到SocketChannel。所以,我们重复调用write()直到Buffer没有要写的字节为止。
5.非阻塞模式
可以设置 SocketChannel 为非阻塞模式(non-blocking mode)。设置之后,就可以在异步模式下调用connect(), read() 和write()了。
6.connect
如果SocketChannel在非阻塞模式下,此时调用connect(),该方法可能在连接建立之前就返回了。为了确定连接是否建立,可以调用finishConnect()的方法。
    socketChannel.configureBlocking(false);
    socketChannel.connect(new InetSocketAddress("http://jenkov.com", 80));

    while(! socketChannel.finishConnect() ){
        //wait, or do something else...
    }
7.write
非阻塞模式下,write()方法在尚未写出任何内容时可能就返回了。所以需要在循环中调用write()。
8.read
非阻塞模式下,read()方法在尚未读取到任何数据时可能就返回了。所以需要关注它的int返回值,它会告诉你读取了多少字节。
9.非阻塞模式与选择器
非阻塞模式与选择器搭配会工作的更好,通过将一或多个SocketChannel注册到Selector,可以询问选择器哪个通道已经准备好了读取,写入等。
ServerSocket通道
Java NIO中的 ServerSocketChannel 是一个可以监听新进来的TCP连接的通道,就像标准IO中的ServerSocket一样。ServerSocketChannel类在 java.nio.channels包中。
    ServerSocketChannel serverSocketChannel = ServerSocketChannel.open();

    serverSocketChannel.socket().bind(new InetSocketAddress(9999));

    while(true){
        SocketChannel socketChannel =
                serverSocketChannel.accept();

        //do something with socketChannel...
    }
1.打开ServerSocketChannel
通过调用 ServerSocketChannel.open() 方法来打开ServerSocketChannel。
ServerSocketChannel serverSocketChannel = ServerSocketChannel.open(); 2.关闭ServerSocketChannel
通过调用ServerSocketChannel.close() 方法来关闭ServerSocketChannel。
serverSocketChannel.close(); 通过 ServerSocketChannel.accept() 方法监听新进来的连接。当 accept()方法返回的时候,它返回一个包含新进来的连接的 SocketChannel。因此,accept()方法会一直阻塞到有新连接到达。
通常不会仅仅只监听一个连接,在while循环中调用 accept()方法。
3.非阻塞模式
ServerSocketChannel可以设置成非阻塞模式。在非阻塞模式下,accept() 方法会立刻返回,如果还没有新进来的连接,返回的将是null。 因此,需要检查返回的SocketChannel是否是null。
ServerSocketChannel serverSocketChannel = ServerSocketChannel.open();

serverSocketChannel.socket().bind(new InetSocketAddress(9999));
serverSocketChannel.configureBlocking(false);

    while(true){
        SocketChannel socketChannel =
                serverSocketChannel.accept();

        if(socketChannel != null){
            //do something with socketChannel...
        }
    }
Datagram通道
1.打开 DatagramChannel
下面是 DatagramChannel 的打开方式:
DatagramChannel channel = DatagramChannel.open();
channel.socket().bind(new InetSocketAddress(9999));
这个例子打开的 DatagramChannel可以在UDP端口9999上接收数据包。
2.接收数据
通过receive()方法从DatagramChannel接收数据。
ByteBuffer buf = ByteBuffer.allocate(48);
buf.clear();
channel.receive(buf);
3.发送数据
通过send()方法从DatagramChannel发送数据。
String newData = "New String to write to file..." + System.currentTimeMillis();

ByteBuffer buf = ByteBuffer.allocate(48);
buf.clear();
buf.put(newData.getBytes());
buf.flip();

int bytesSent = channel.send(buf, new InetSocketAddress("jenkov.com", 80));
这个例子发送一串字符到”jenkov.com”服务器的UDP端口80。 因为服务端并没有监控这个端口,所以什么也不会发生。也不会通知你发出的数据包是否已收到,因为UDP在数据传送方面没有任何保证。
4.连接到特定的地址
可以将DatagramChannel“连接”到网络中的特定地址的。由于UDP是无连接的,连接到特定地址并不会像TCP通道那样创建一个真正的连接。而是锁住DatagramChannel ,让其只能从特定地址收发数据。
channel.connect(new InetSocketAddress("jenkov.com", 80)); 当连接后,也可以使用read()和write()方法,就像在用传统的通道一样。只是在数据传送方面没有任何保证。
int bytesRead = channel.read(buf);
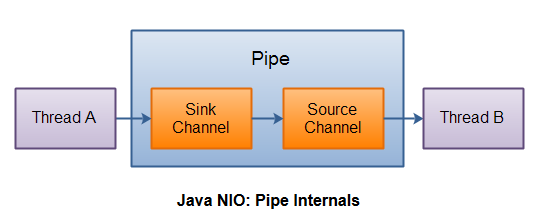
int bytesWritten = channel.write(but); 管道(Pipe)
Java NIO 管道是2个线程之间的单向数据连接。Pipe有一个source通道和一个sink通道。数据会被写到sink通道,从source通道读取。
1.创建管道
通过Pipe.open()方法打开管道。
Pipe pipe = Pipe.open(); 2.向管道写数据
要向管道写数据,需要访问sink通道。
Pipe.SinkChannel sinkChannel = pipe.sink(); 通过调用SinkChannel的write()方法,将数据写入SinkChannel。
    String newData = "New String to write to file..." + System.currentTimeMillis();
    ByteBuffer buf = ByteBuffer.allocate(48);
    buf.clear();
    buf.put(newData.getBytes());

    buf.flip();

    while(buf.hasRemaining()) {
        <b>sinkChannel.write(buf);</b>
    }
3.从管道读取数据
从读取管道的数据,需要访问source通道。
Pipe.SourceChannel sourceChannel = pipe.source(); 调用source通道的read()方法来读取数据。
ByteBuffer buf = ByteBuffer.allocate(48);

int bytesRead = inChannel.read(buf);
read()方法返回的int值会告诉我们多少字节被读进了缓冲区。


 833
833

 被折叠的 条评论
为什么被折叠?
被折叠的 条评论
为什么被折叠?
 到【灌水乐园】发言


