


elastic官方网站
Elastic有一条完整的产品线:Elasticsearch、Kibana、Logstash等,前面说的三个就是大家常说的ELK技术栈。
1.安装java环境
java环境的安装
ElasticSearch 7.3安装
cd /tools
wget https://artifacts.elastic.co/downloads/elasticsearch/elasticsearch-6.1.3.zip
unzip elasticsearch-6.1.3.zip
mv ./elasticsearch-6.1.3 /usr/local/elasticsearch
2.1安装ElasticSearch 7.3.1安装
es下载页
cd /tools
wget https://artifacts.elastic.co/downloads/elasticsearch/elasticsearch-7.3.2-linux-x86_64.tar.gz
tar -zxvf elasticsearch-7.3.2-linux-x86_64.tar.gz
mv ./elasticsearch-7.3.2 /usr/local/elasticsearch
目录结构介绍:
bin:可执行文件,运行es的命令
config:配置文件目录
 config/elasticsearch.yml:ES启动基础配置
 config/jvm.options:ES启动时JVM配置
 config/log4j2.properties:ES日志输出配置文件
lib:依赖的jar
logs:日志文件夹
modules:es模块
plugins:可以自己开发的插件
data:我们自己创建的,存放es存储文件

设置es权限(elk是elatic的简称) cd /usr/local
# 添加elk分组 groupadd elk
# 在elk分组下添加elk用户 useradd -g elk elk
# 赋权给/usr/local/elasticsearch chown elk:elk -R /usr/local/elasticsearch 安装成功
启动
#切换为elk用户
su elk
#启动 后面加 -d 为后台启动
/usr/local/elasticsearch/bin/elasticsearch
一定要注意,elasticSearch不能用root账户启动,elasticSearch不能用root账户启动,elasticSearch不能用root账户启动,重要的说三遍,我这里用的是我新建的elasticsearch账户开机启动
报错1:
bash-4.2$ ./elasticsearch -d
future versions of Elasticsearch will require Java 11; your Java version from [/usr/local/jdk/jdk1.8.0_201/jre] does not meet this requirement
Exception in thread “main” java.lang.RuntimeException: starting java failed with [1]
output:
There is insufficient memory for the Java Runtime Environment to continue.
Native memory allocation (mmap) failed to map 986513408 bytes for committing reserved memory.
An error report file with more information is saved as:
logs/hs_err_pid1395.log
error:
Java HotSpot(TM) 64-Bit Server VM warning: INFO: os::commit_memory(0x00000000c5330000, 986513408, 0) failed; error='Cannot allocate memory' (errno=12)
    at org.elasticsearch.tools.launchers.JvmErgonomics.flagsFinal(JvmErgonomics.java:111)
    at org.elasticsearch.tools.launchers.JvmErgonomics.finalJvmOptions(JvmErgonomics.java:79)
    at org.elasticsearch.tools.launchers.JvmErgonomics.choose(JvmErgonomics.java:57)
    at org.elasticsearch.tools.launchers.JvmOptionsParser.main(JvmOptionsParser.java:89)
解决方案:调小启动内存
vi /usr/local/elasticsearch/config/jvm.options
修改22行

#-Xms2g
#-Xmx2g
-Xms256m
-Xmx256m
1、切换到root用户修改配置sysctl.conf

vi /etc/sysctl.conf
添加下面配置:

vm.max_map_count=655360
并执行命令:

sysctl -p
然后,重新启动elasticsearch,即可启动成功。
上面设置的分配的内存的最大值为256MB和最小值64mb,您可以根据自己的机器情况设置内存大小。
重新启动即可/usr/local/elasticsearch/bin/elasticsearch
[root@master local]# curl http://127.0.0.1:9200
{
  "name" : "master",
  "cluster_name" : "elasticsearch",
  "cluster_uuid" : "j-_k3fJLTtq49qNso0bAcw",
  "version" : {
    "number" : "7.3.2",
    "build_flavor" : "default",
    "build_type" : "tar",
    "build_hash" : "1c1faf1",
    "build_date" : "2019-09-06T14:40:30.409026Z",
    "build_snapshot" : false,
    "lucene_version" : "8.1.0",
    "minimum_wire_compatibility_version" : "6.8.0",
    "minimum_index_compatibility_version" : "6.0.0-beta1"
  },
  "tagline" : "You Know, for Search"
}
启动成功!
后台启动:
/usr/local/elasticsearch/bin/elasticsearch -d
2.2 设置开机启动: 我是本地,直接把iptables 关掉了
vim /etc/rc.d/rc.local
service iptables stop
su elk -c “/usr/local/elasticsearch/bin/elasticsearch -d”
2.3 配置
vim /usr/local/elasticsearch/config/elasticsearch.yml
修改如下:
cluster.name: application-1
node.name: node-1
network.host: 192.168.0.210
其中cluster.name 是集群名称,这个不要使用默认的,要修改,去掉注释,如果有多个机器,加入同一个集群,那么这个值必须一样
noide.name 是集群里面每个节点的值,也就是当前机器的节点的值,这个值,每个节点要不一样。
network host 改成当前的内网ip
下面的部分是elasticsearch 2 部分的插件,在es6中已经不可用,
es6的可视化GUI,请查看:http://www.fecshop.com/topic/668
记录一下问题(设置network host :0.0.0.0,用于外网访问)一直都报这个错误:
[2019-09-19T11:59:58,586][DEBUG][o.e.a.ActionModule       ] [node-1] Using REST wrapper from plugin org.elasticsearch.xpack.security.Security
[2019-09-19T11:59:59,408][INFO ][o.e.d.DiscoveryModule    ] [node-1] using discovery type [zen] and seed hosts providers [settings]
[2019-09-19T12:00:01,501][INFO ][o.e.n.Node               ] [node-1] initialized
[2019-09-19T12:00:01,501][INFO ][o.e.n.Node               ] [node-1] starting ...
[2019-09-19T12:00:01,852][INFO ][o.e.t.TransportService   ] [node-1] publish_address {172.31.64.25:9300}, bound_addresses {0.0.0.0:9300}
[2019-09-19T12:00:01,864][INFO ][o.e.b.BootstrapChecks    ] [node-1] bound or publishing to a non-loopback address, enforcing bootstrap checks
ERROR: [1] bootstrap checks failed
[1]: the default discovery settings are unsuitable for production use; at least one of [discovery.seed_hosts, discovery.seed_providers, cluster.initial_master_nodes] must be configured
[2019-09-19T12:00:01,984][INFO ][o.e.n.Node               ] [node-1] stopping ...
[2019-09-19T12:00:02,269][INFO ][o.e.n.Node               ] [node-1] stopped
[2019-09-19T12:00:02,269][INFO ][o.e.n.Node               ] [node-1] closing ...
[2019-09-19T12:00:02,287][INFO ][o.e.n.Node               ] [node-1] closed
解决方案: 修改/usr/local/elasticsearch/config/elasticsearch.yml配置文件
修改72行
#cluster.initial_master_nodes: [“node-1”, “node-2”]
cluster.initial_master_nodes: [“node-1”]
2.4 查看:
http://自己ip:9200/
报错2
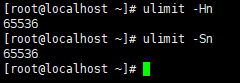
ERROR: [3] bootstrap checks failed [1]: max file descriptors [4096] for elasticsearch process is too low, increase to at least [65535]
每个进程最大同时打开文件数太小,可通过下面2个命令查看当前数量
ulimit -Hn
ulimit -Sn
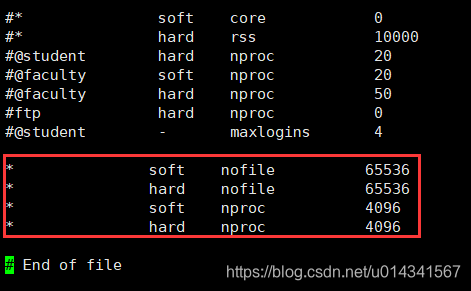
修改/etc/security/limits.conf文件,增加配置,用户退出后重新登录生效
*               soft    nofile          65536
*               hard    nofile          65536
max number of threads [3818] for user [es] is too low, increase to at least [4096]
问题同上,最大线程个数太低。修改配置文件/etc/security/limits.conf(和问题1是一个文件),增加配置
*               soft    nproc           4096
*               hard    nproc           4096
修改过后需要重启服务器 后执行 ulimit -a 是否修改成功
错误3
java.lang.UnsupportedOperationException: seccomp unavailable: requires kernel 3.5+ with CONFIG_SECCOMP and CON
FIG_SECCOMP_FILTER compiled in
原因: 因为Centos6不支持SecComp,而ES默认bootstrap.system_call_filter为true进行检测,所以导致检测失败,失败后直接导致ES不能启动解决:修改elasticsearch.yml 添加一下内容 :
bootstrap.memory_lock: false
bootstrap.system_call_filter: false
2.5 集群设置
如果想要建立一个elasticSearch集群,可以按照下面的步骤,非常的简单,首先,想说明的是:对于elasticSearch,他隐藏了分布式的复杂性,分片和复制集,都是他自动完成,你只需要配置好ip就可以了,下面是配置的步骤:
我有两台机器 192.169.0.210 192.168.0.199
我的两台机器都按照上面的步骤配置完成,下面配置集群
首先是192.168.0.210
vim /usr/local/elasticsearch/config/elasticsearch.yml
找到行 , 修改如下:
discovery.zen.ping.unicast.hosts: [“192.168.0.199”]
上面的ip就是其他的节点的ip,如果我有5台机器,那么,这里需要把其他四台机器的ip写上。
同理,对于其他的节点,需要把其他的节点协商,用逗号隔开
elasticSearch会找到对应的节点,自动分片和做复制集。
2.6 安装ik插件(中文分词使用)
报错原因
我使用的Elasticsearch是6.2.2版本,按照学校文档创建字段时,使用了
{“type”:“string”,“index”:“not_analyzed”}。
原因分析
检查拼写无误之后,我决定去查Elasticsearch新版本特性,因为之前也踩过head插件的安装方法的坑,就是因为版本问题。
果不其然,Elasticsearch从5.X就引入了text和keyword,其中keyword适用于不分词字段,搜索时只能完全匹配,这时string还保留着。
到了6.X就彻底移除string了。
另外,”index”的值只能是boolean变量了。
解决方法
{“type”:“text”,“index”:false}


 1197
1197


 被折叠的 条评论
为什么被折叠?
被折叠的 条评论
为什么被折叠?
 到【灌水乐园】发言


