更多SpringBoot3内容请关注我的专栏:《SpringBoot3》
期待您的点赞👍收藏⭐评论✍
重学SpringBoot3-集成Redis(七)之分布式限流
在分布式系统中,流量控制是一项关键的任务,特别是当我们需要应对瞬时的大流量请求时。分布式限流是一种有效的方式,可以防止系统被突发的请求击垮。在这篇文章中,将介绍如何通过 Redis 和 Spring Boot 3 实现分布式限流。
1. 什么是分布式限流?
限流的目的是控制一定时间窗口内的请求数量,确保系统稳定运行。分布式限流的核心在于它可以在多台服务器或多个节点上,对所有的请求进行全局控制。通过限流,我们可以:
- 防止系统过载
- 保护关键资源
- 提高系统的稳定性和可用性
Redis 作为一个内存存储系统,具有高性能、分布式、可扩展的特点,非常适合用于实现分布式限流。
2. 常见的限流算法
在介绍具体实现之前,我们先了解一些常用的限流算法:
- 固定窗口算法:在一个固定的时间窗口内,限制请求次数。
- 滑动窗口算法:相比固定窗口算法,滑动窗口更平滑,可以在时间窗口内动态更新请求。
- 令牌桶算法:根据流量产生令牌,请求只能在获取到令牌后才可以通过。
- 漏桶算法:以固定速率处理请求,超出速率的请求被丢弃。
首先将以 固定窗口 为例,展示如何通过 Redis 实现限流。
3. Redis 分布式限流实现
3.1. 添加依赖
首先,确保项目中已经引入了 Redis 依赖,详细参考重学SpringBoot3-集成Redis(一)基本使用。在 pom.xml 文件中添加以下依赖:
        <dependency>
            <groupId>org.springframework.boot</groupId>
            <artifactId>spring-boot-starter-data-redis</artifactId>
        </dependency>
3.2. 配置 Redis 连接
在 application.yml 中配置 Redis 的基本连接信息:
spring:
  data:
    redis:
      host: localhost
      port: 6379            # Redis 端口
      password:             # 如果有密码可以在这里配置
      lettuce:
        pool:
          max-active: 100    # 最大并发连接数
          max-idle: 50       # 最大空闲连接数
          min-idle: 10       # 最小空闲连接数
3.3. 编写限流逻辑
我们可以使用 Redis 的 INCR 命令结合 EXPIRE 来实现限流功能。每当有请求时,先检查当前时间窗口内的请求次数,如果超过限制则拒绝请求。
package com.coderjia.boot310redis.config;

import org.springframework.beans.factory.annotation.Autowired;
import org.springframework.data.redis.core.StringRedisTemplate;
import org.springframework.stereotype.Component;

import java.time.Duration;

/**
 * @author CoderJia
 * @create 2024/10/7 上午 11:14
 * @Description
 **/
@Component
public class RateLimiter {

    @Autowired
    private StringRedisTemplate redisTemplate;

    // 限制 10 秒内最多允许 5 次请求,可放到配置文件中
    private static final int LIMIT = 5;
    private static final int TIME_WINDOW = 10; // 单位:秒

    public boolean isAllowed(String userId) {
        String key = "rate:limit:" + userId;
        Long currentCount = redisTemplate.opsForValue().increment(key);

        if (currentCount == 1) {
            // 设置 key 的过期时间为 10 秒
            redisTemplate.expire(key, Duration.ofSeconds(TIME_WINDOW));
        }

        // 超过限制
        return currentCount <= LIMIT;
    }
}
在这个类中:
- 我们使用
INCR命令来对某个键进行自增操作。 - 当第一次自增时,我们使用
expire设置键的过期时间,即时间窗口的长度(如 10 秒)。 - 如果某个用户在这个时间窗口内的请求次数超过了限制值,则返回
false,表示请求被拒绝。
3.4. 编写控制器测试限流
为了测试限流功能,我们创建一个简单的控制器,当用户访问时,检查其是否被限流。
import org.springframework.beans.factory.annotation.Autowired;
import org.springframework.web.bind.annotation.GetMapping;
import org.springframework.web.bind.annotation.RequestParam;
import org.springframework.web.bind.annotation.RestController;

@RestController
public class RateLimitController {

    @Autowired
    private RateLimiter rateLimiter;

    @GetMapping("/api/request")
    public String handleRequest(@RequestParam String userId) {
        boolean allowed = rateLimiter.isAllowed(userId);

        if (allowed) {
            return "Request allowed for user: " + userId;
        } else {
            return "Request limit exceeded for user: " + userId;
        }
    }
}
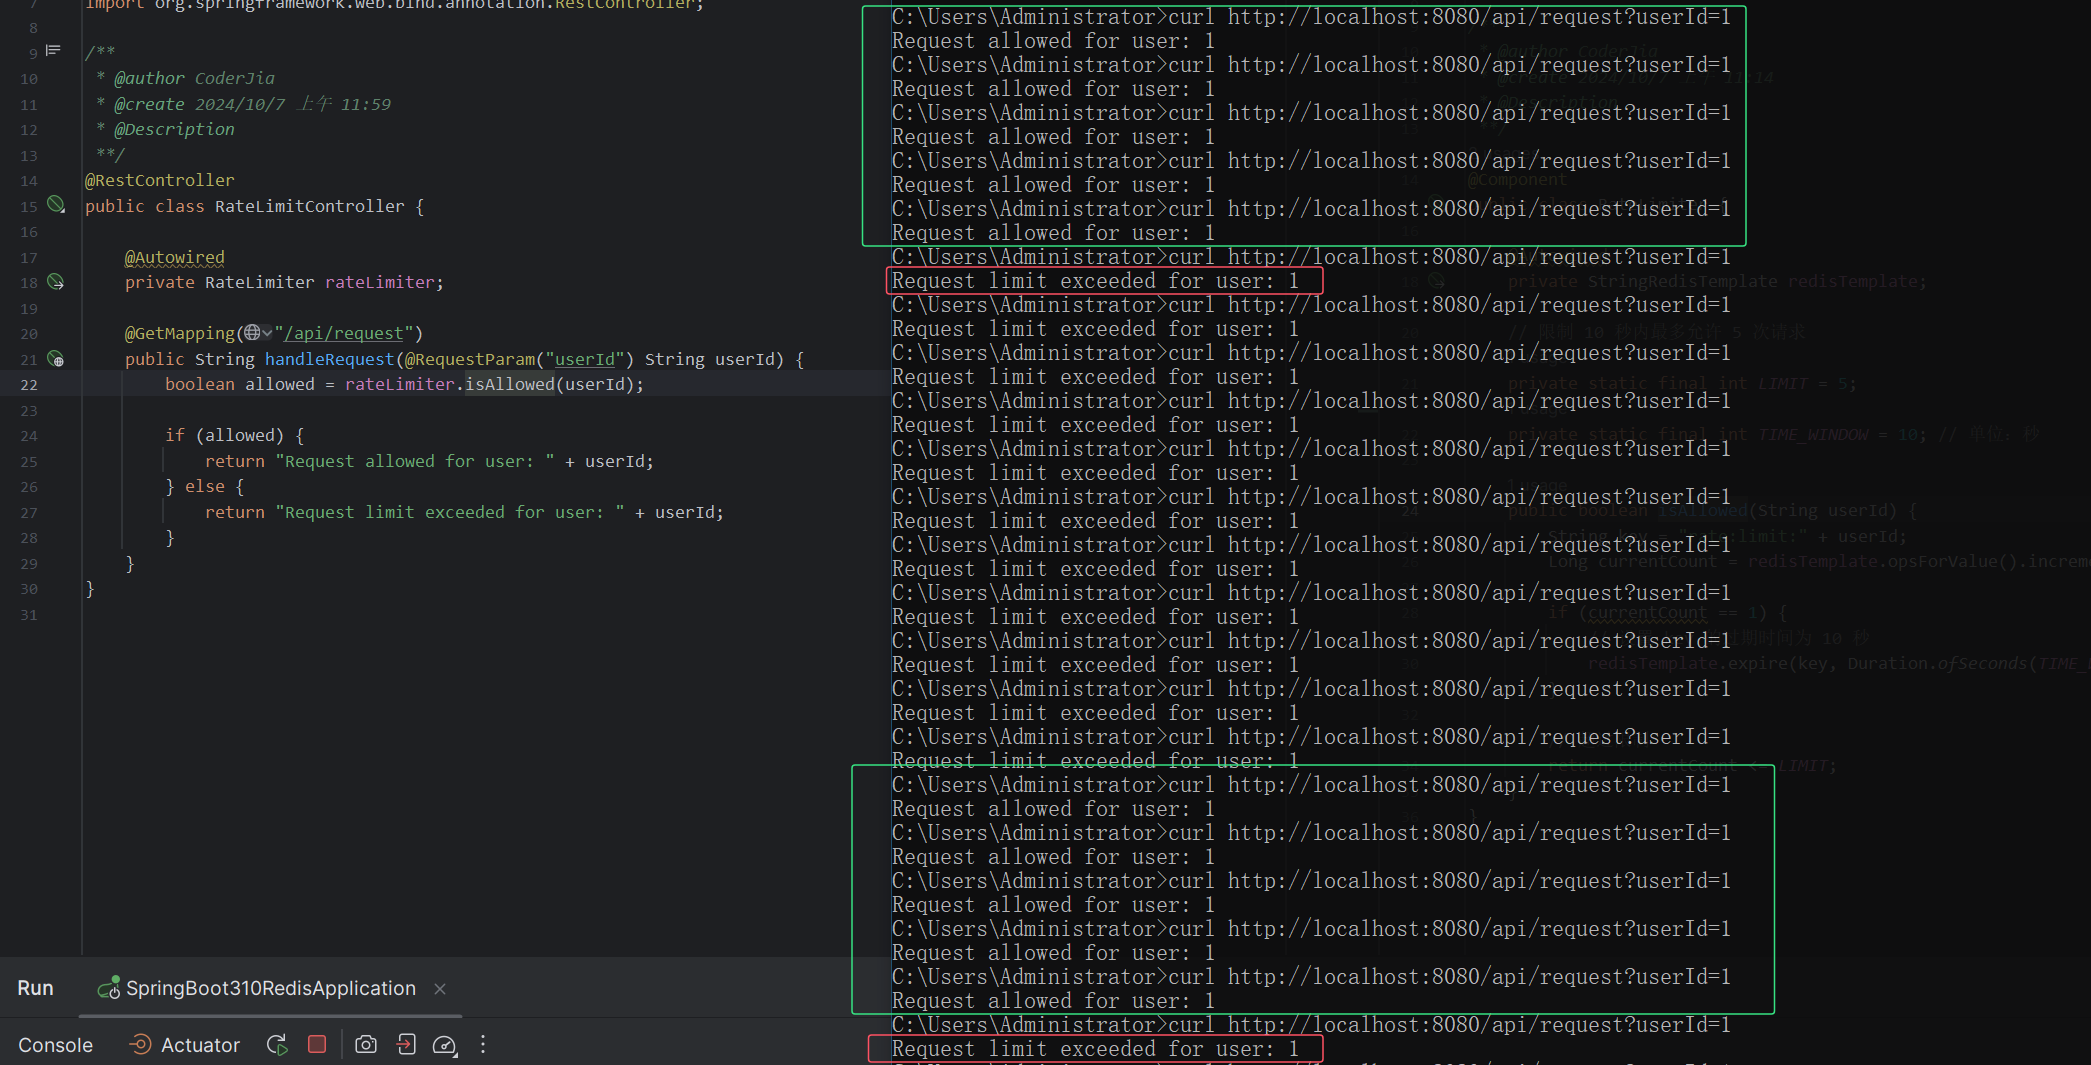
现在,当用户连续访问 http://localhost:8080/api/request?userId=1 时,系统会根据设定的规则,决定是否允许请求。如下图,连续5次请求之后,之后再请求将会被限制访问,直到10s之后,进入到下一个固定窗口,可以再访问5次,之后触发限流。

4. 限流算法的改进
在实际场景中,我们可以根据业务需求选择不同的限流算法。例如:
- 滑动窗口限流:通过记录每个请求的时间戳来实现更精确的限流控制。
- 令牌桶限流:可以动态调整请求速率,允许一定程度的突发流量。
如果需要更多的定制化功能,可以借助 Redisson 等工具,它提供了开箱即用的分布式限流功能,能够更加优雅地处理复杂的限流场景。
Redisson 是基于 Redis 的 Java 客户端,它提供了多种高级功能,包括分布式锁、信号量、限流等。利用 Redisson 实现滑动窗口限流,我们可以避免直接通过 Redis 的 INCR 和 EXPIRE 命令来手动操作,而是使用其提供的高层 API 实现更加精确的流量控制。
4.1. 什么是滑动窗口限流?
滑动窗口限流是一种动态的限流策略,它将时间划分为多个小窗口,并在多个窗口中统计请求次数,从而实现平滑的流量控制。相比于固定窗口限流,滑动窗口限流不会因为时间窗口的边界问题导致突发流量通过,而是根据请求的时间动态调整。
4.2. 使用 Redisson 实现滑动窗口限流
4.2.1. 引入依赖
详细配置可参考重学SpringBoot3-集成Redis(四)之Redisson ,需要在 pom.xml 文件中引入 Redisson 的依赖:
        <dependency>
            <groupId>org.redisson</groupId>
            <artifactId>redisson-spring-boot-starter</artifactId>
            <version>3.23.4</version>
        </dependency>
4.2.2. 配置 Redisson
配置 Redisson 的基本信息,在 application.yml 文件中进行 Redis 的连接配置:
spring:
  redis:
    redisson:
      config: |
        singleServerConfig:
          address: redis://1.94.26.81:6379   # Redis 连接地址,前缀为 redis://
          password: redis123456              # 如果 Redis 需要密码认证,则填写密码
          timeout: 3000                      # 命令执行超时时间(毫秒)
4.2.3. 滑动窗口限流的实现
Redisson 提供了 RateLimiter(限流器)来控制请求频率。RateLimiter 支持滑动窗口限流算法,我们可以通过它来控制一定时间内的请求次数。
package com.coderjia.boot310redis.config;

import jakarta.annotation.PostConstruct;
import org.redisson.api.RRateLimiter;
import org.redisson.api.RateIntervalUnit;
import org.redisson.api.RateType;
import org.redisson.api.RedissonClient;
import org.springframework.beans.factory.annotation.Autowired;
import org.springframework.stereotype.Component;

/**
 * @author CoderJia
 * @create 2024/10/7 下午 12:10
 * @Description
 **/
@Component
public class SlidingWindowRateLimiter {

    @Autowired
    private RedissonClient redissonClient;

    private RRateLimiter rateLimiter;

    @PostConstruct
    public void init() {
        // 创建一个滑动窗口限流器
        rateLimiter = redissonClient.getRateLimiter("rrateLimiter");

        // 每 1 秒最多允许 5 次请求
        boolean b = rateLimiter.trySetRate(RateType.OVERALL, 5, 1, RateIntervalUnit.SECONDS);
        // 查看是否设置成功
        if (b){
            System.out.println("限流器设置成功");
        }else {
            System.out.println("限流器设置失败");
        }
    }

    public boolean tryAcquire() {
        // 尝试获取一个令牌
        return rateLimiter.tryAcquire(1);
    }
}
在这个代码中:
rateLimiter.trySetRate()设置限流规则,每人每 1 秒最多允许 5 次请求。RateType.PER_CLIENT设置限制同一用户,如果限制全部用户请求,可改为RateType.OVERALL。rateLimiter.tryAcquire(1)尝试获取一个令牌,如果成功获取,则返回true,表示请求通过;如果失败,则返回false,表示请求被限流。
4.2.4. 控制器测试限流
我们可以通过一个简单的控制器来测试滑动窗口限流:
import org.springframework.beans.factory.annotation.Autowired;
import org.springframework.web.bind.annotation.GetMapping;
import org.springframework.web.bind.annotation.RestController;

@RestController
public class RateLimitController {

    @Autowired
    private SlidingWindowRateLimiter rateLimiter;

    @GetMapping("/api/request")
    public String handleRequest() {
        boolean allowed = rateLimiter.tryAcquire();

        if (allowed) {
            return "Request allowed";
        } else {
            return "Request limit exceeded";
        }
    }
}
当我们访问 http://localhost:8080/api/request 时,系统会检查是否符合限流条件,从而决定是否允许请求。
这里需要借助 apifox 进行压测:

4.2.5. 单用户限制
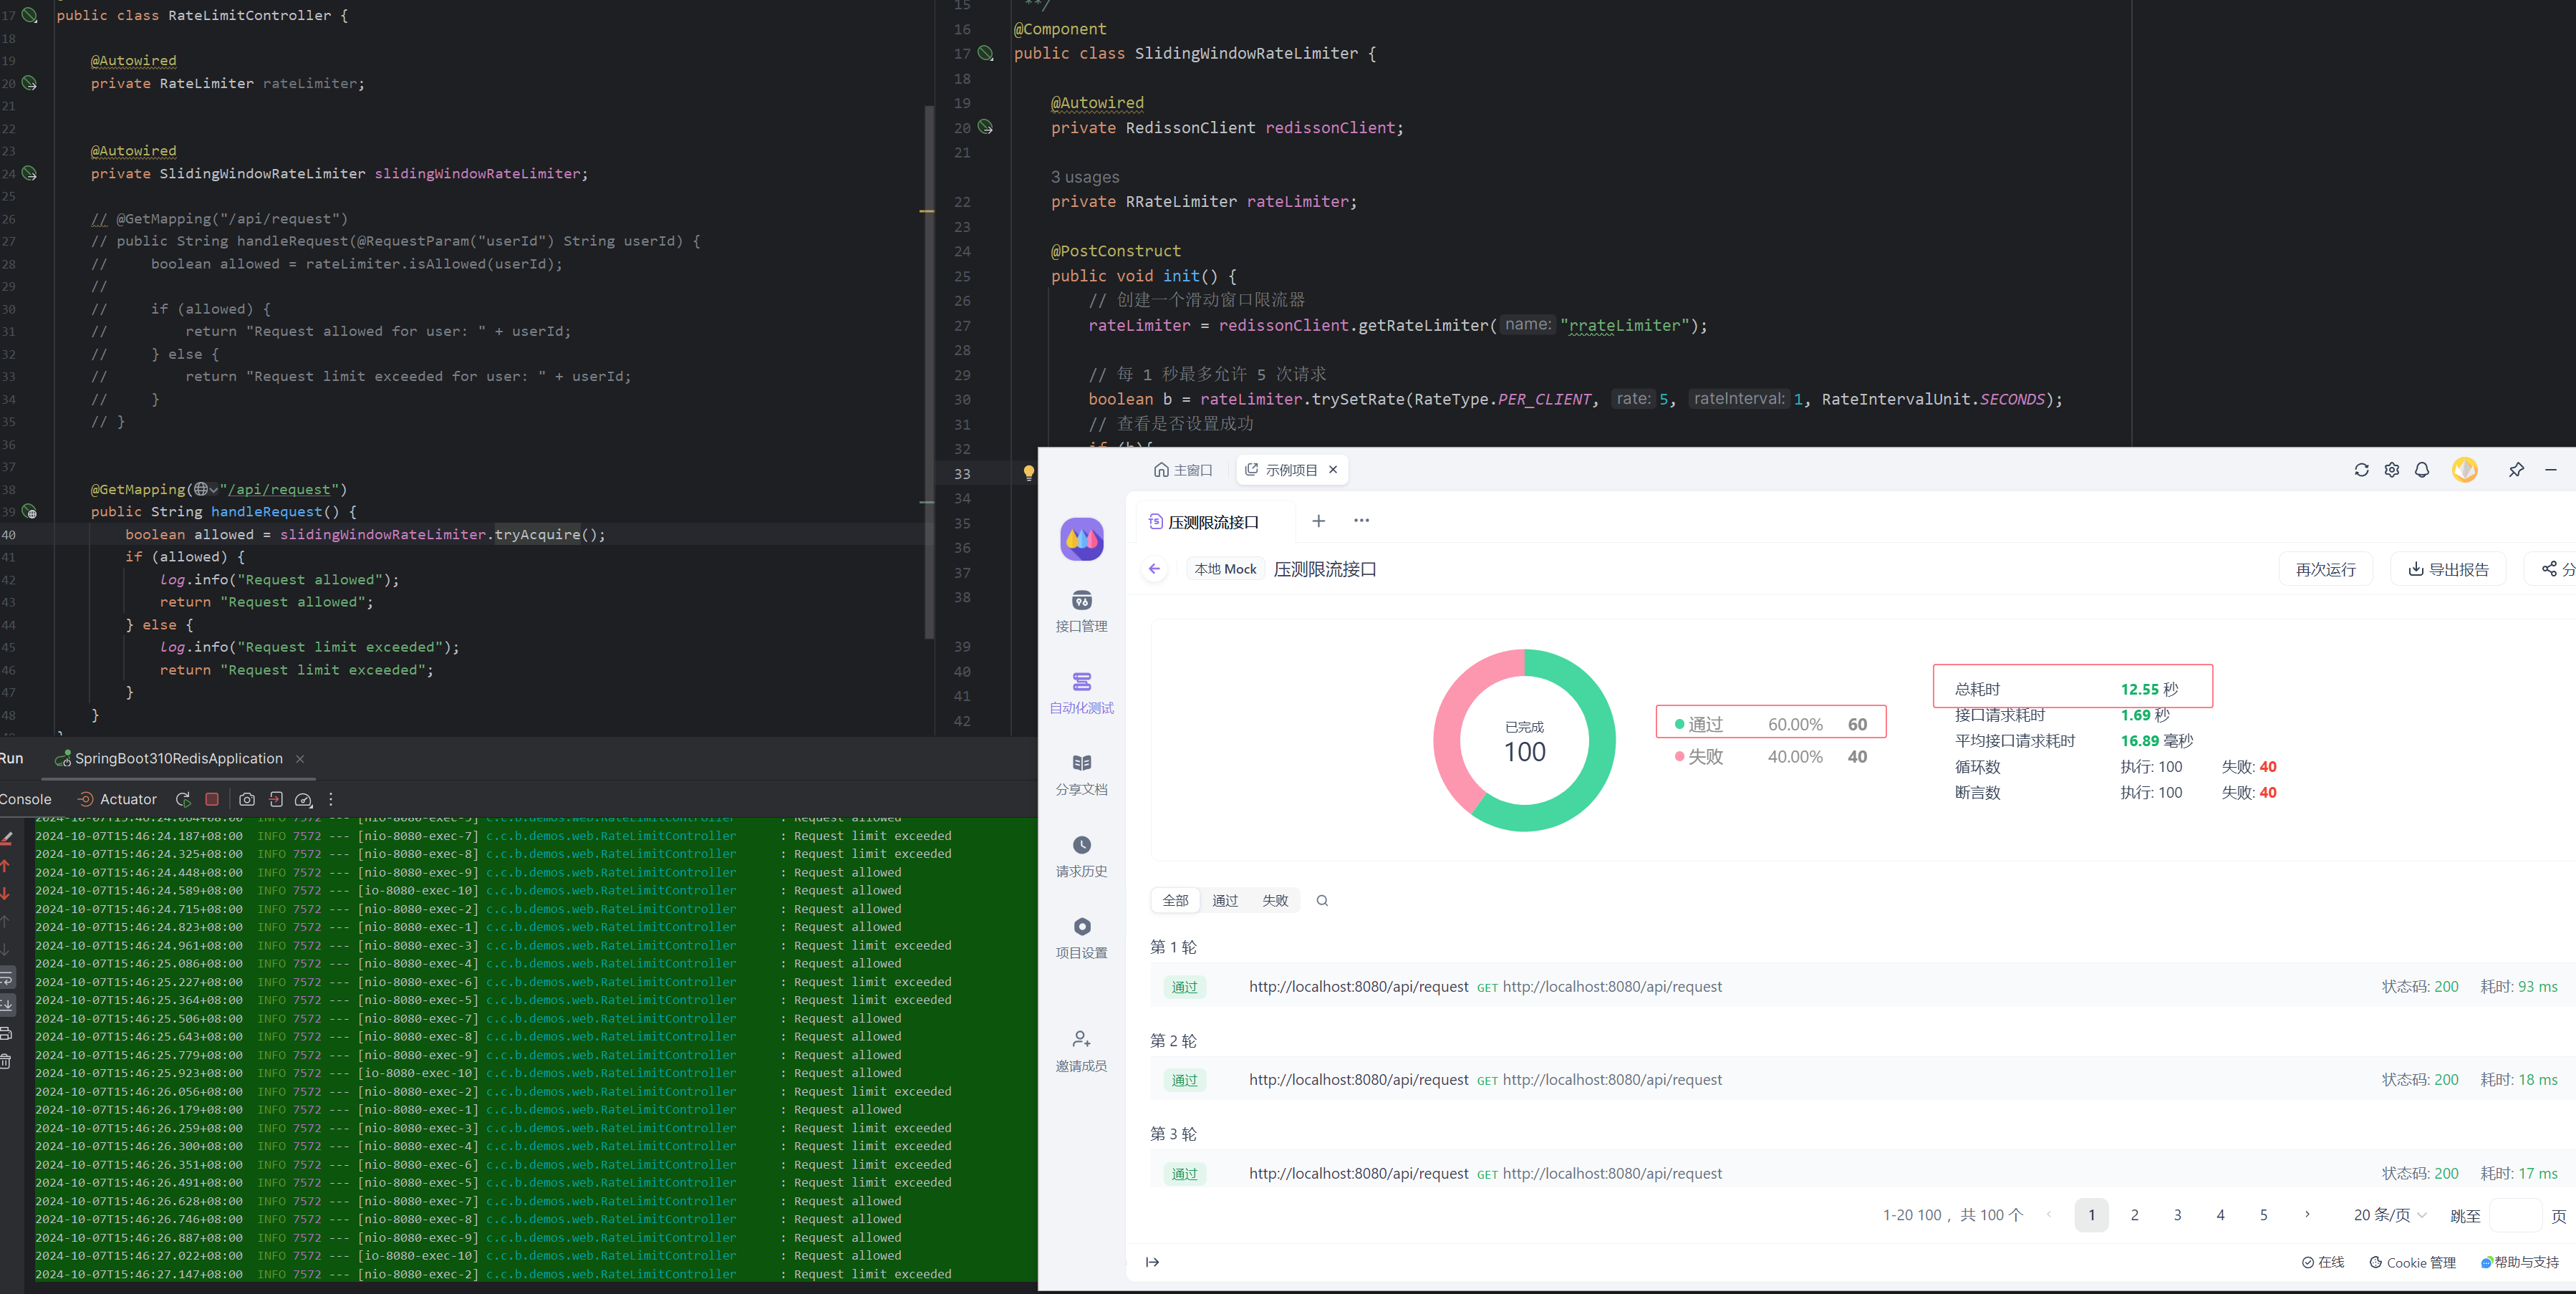
首先是单用户限制每秒钟访问5次,单用户连续请求100次,报告显示12s时间成功请求了60次,达到了我们的效果。

4.2.6. 全部请求限制
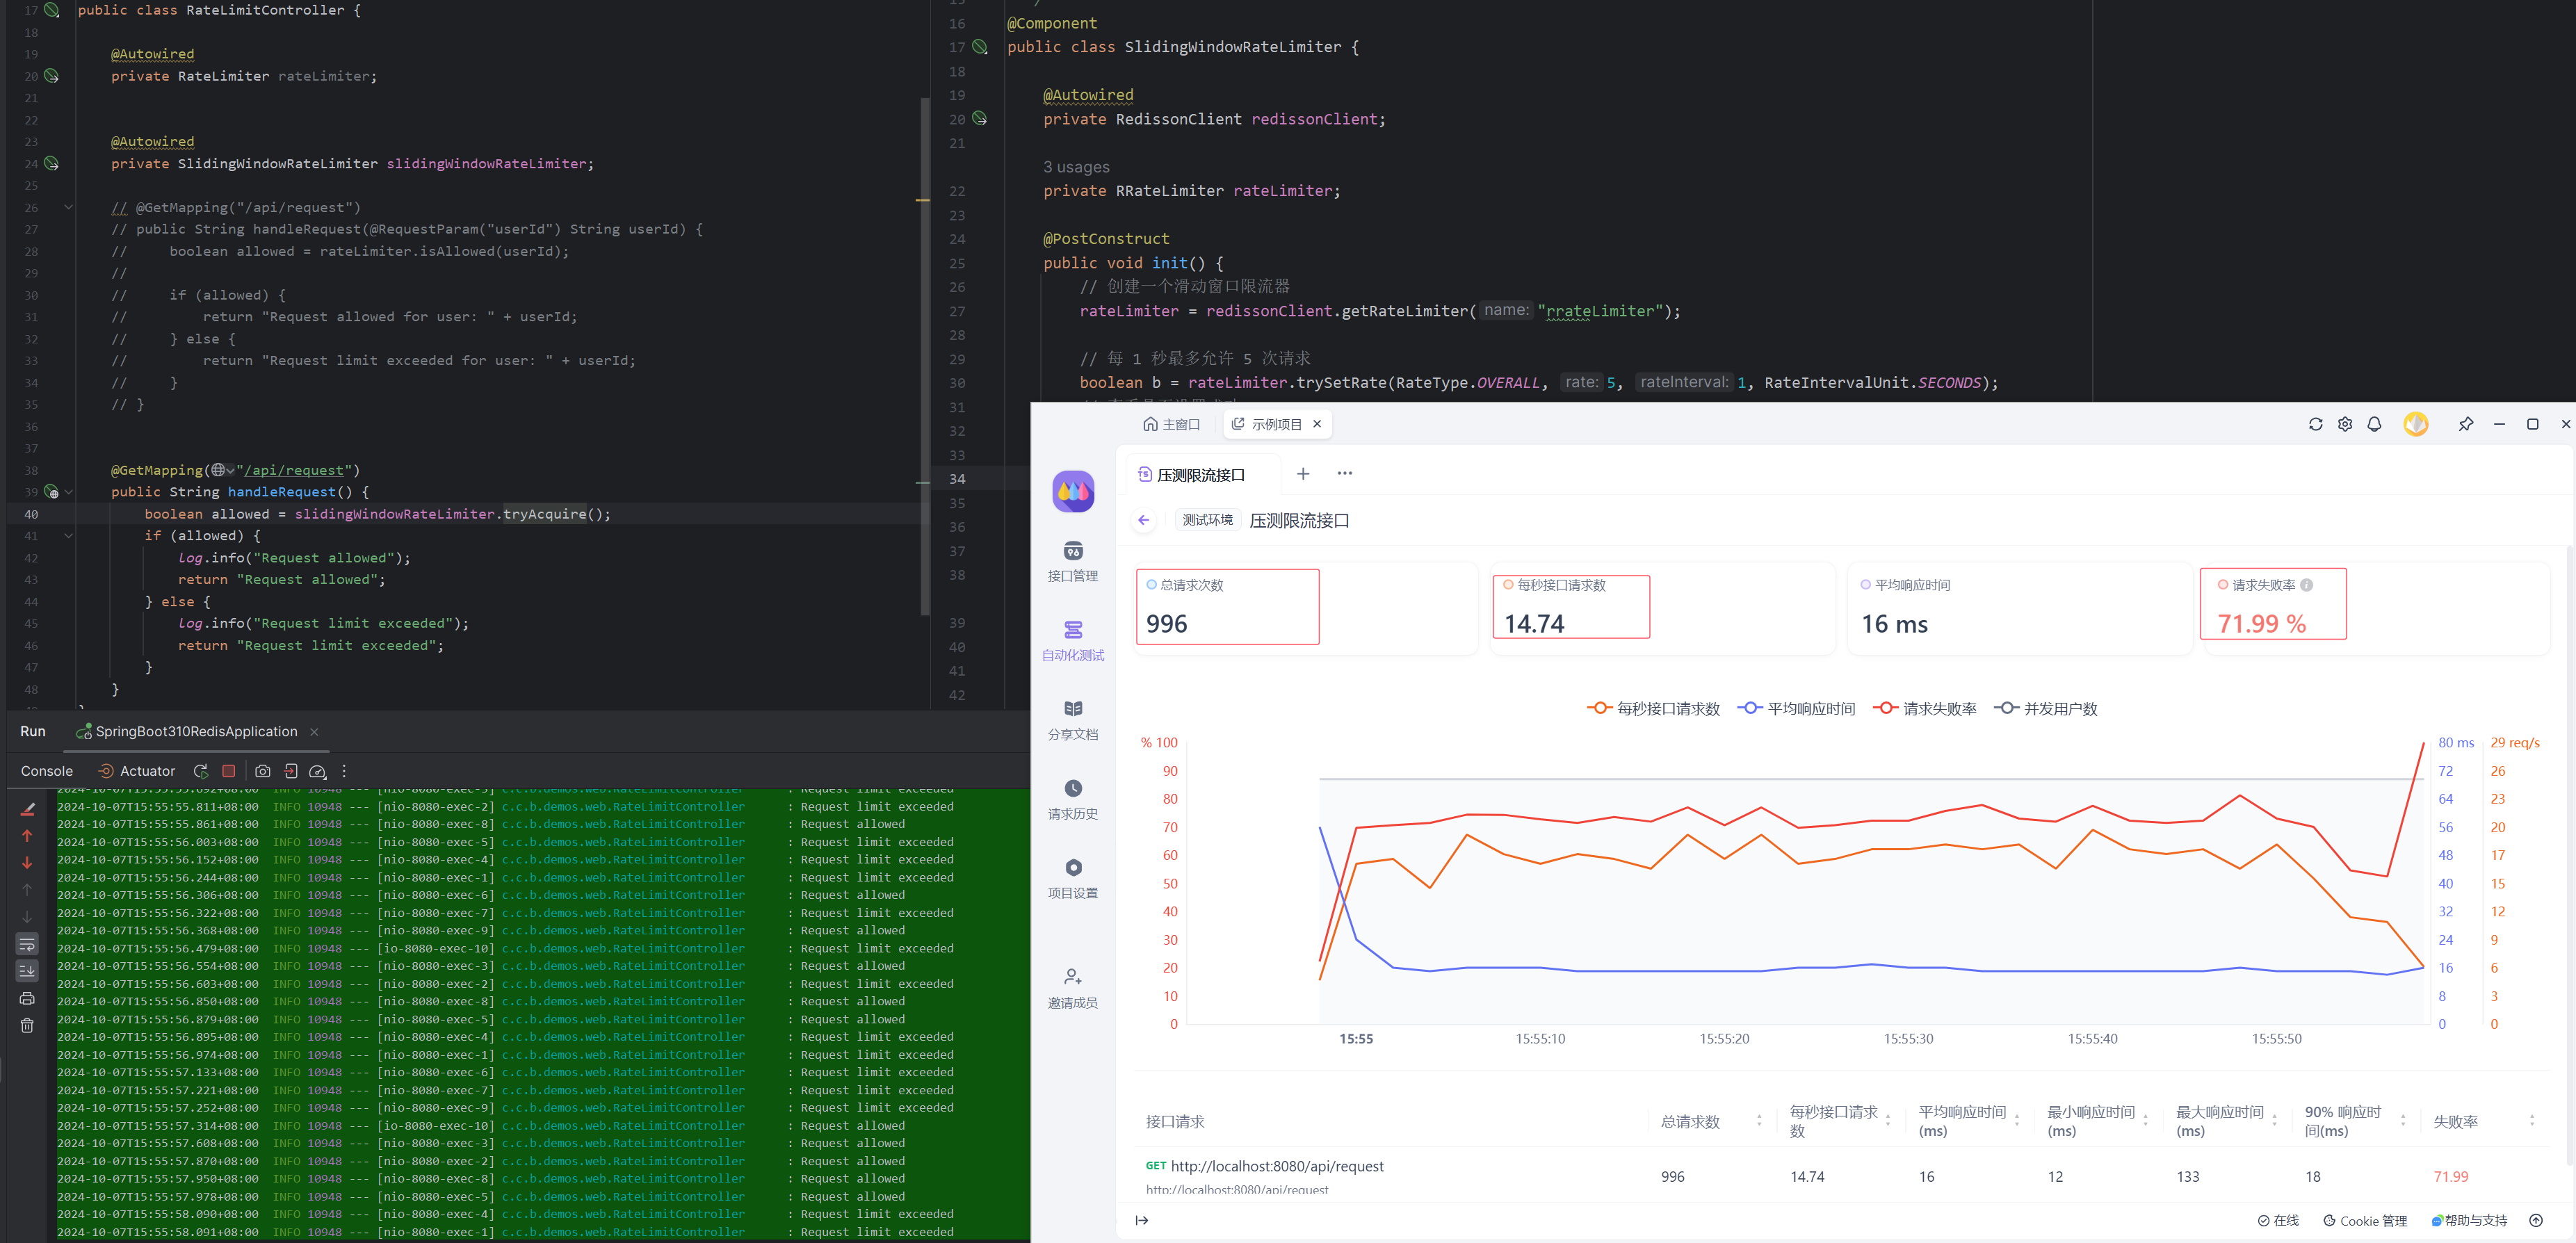
下面模拟20用户连续请求1分钟,下面报告显示1分钟内,请求了996次,由于设置的1秒内运行请求5次,所有成功率60*5/996约等于30%,考虑接口耗时,和报告的失败率近似。

4.3. 优势
- 高精度限流:滑动窗口可以更精确地统计请求数,相较于固定窗口限流,它可以避免窗口边界导致的瞬时突发请求超出限制的情况。
- 自动管理:Redisson 自带的 RateLimiter 限流器无需手动维护 Redis 键值过期时间,它会自动处理这些细节,大大简化了限流的实现。
5. 总结
通过 Redis 实现的分布式限流,具有实现简单、性能高、易于扩展的优势。它能够帮助我们应对瞬时的大流量请求,保护系统免于过载。同时,结合不同的限流算法,我们可以根据具体的业务需求,设计灵活、精准的限流策略。
如果你在项目中遇到类似的限流需求,Redis 是一个很好的选择。希望这篇文章能够帮助你了解如何使用 Spring Boot 3 和 Redis 实现分布式限流。如果你有任何疑问或建议,欢迎留言讨论!


 565
565

 被折叠的 条评论
为什么被折叠?


