


主要参考官网文档:Deploy a Sharded Cluster — MongoDB Manual
1. docker镜像
可以使用官方提供的镜像,也可以自己做。
我自己做了一个,只要将从官网下载的二进制文件打入镜像,再下载一个依赖libcurl4即可。
FROM ubuntu:22.04
add bin/ /usr/bin
add sources.list /etc/apt
run apt update && apt install -y libcurl4
VOLUME /data/db
ENTRYPOINT ["/usr/bin/mongod"]
2. 集群架构
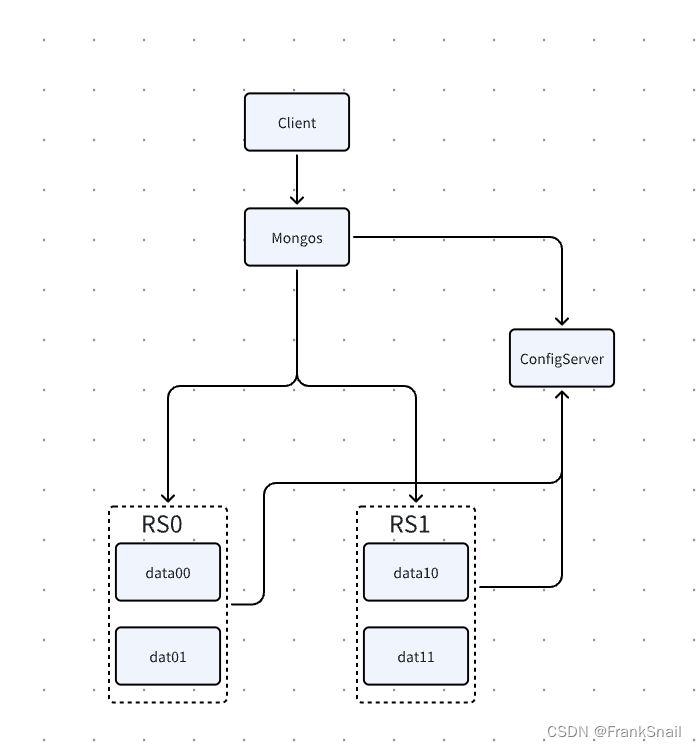
如上图所示,为简化部署,mongos和config节点都使用单节点,部署了两个用作分片的replica-set,分别命名为RS0和RS1。各使用两个节点做高可用。
3. 部署容器
3.1 docker-compose文件
涉及到6个docker容器,所以决定使用docker-compose来编排部署,
由于构建rs时需要录入每个节点的地址,这里给每个容器都事先分配好了地址,这样配置的时候直接使用即可。
version: "3.8"
services:
  configserver:
    image: mongodb/mongodb-community-server:latest
    volumes:
    - type: volume
      source: configserver
      target: /data/configdb
      read_only: false
    command: ["mongod", "--configsvr", "--replSet", "configRS", "--dbpath", "/data/configdb", "--bind_ip_all"]
    networks:
      shard_cluster:
        ipv4_address: 192.168.31.201
  rs00:
    image: mongodb/mongodb-community-server:latest
    volumes:
    - type: volume
      source: data00
      target: /data/db
    networks:
      shard_cluster:
        ipv4_address: 192.168.31.211
    command: ["mongod", "--shardsvr", "--replSet", "RS0", "--dbpath", "/data/db", "--bind_ip_all"]
  rs01:
    image: mongodb/mongodb-community-server:latest
    volumes:
    - type: volume
      source: data01
      target: /data/db
    networks:
      shard_cluster:
        ipv4_address: 192.168.31.212
    command: ["mongod", "--shardsvr", "--replSet", "RS0", "--dbpath", "/data/db", "--bind_ip_all"]
  rs10:
    image: mongodb/mongodb-community-server:latest
    volumes:
    - type: volume
      source: data10
      target: /data/db
    networks:
      shard_cluster:
        ipv4_address: 192.168.31.213
    command: ["mongod", "--shardsvr", "--replSet", "RS1", "--dbpath", "/data/db", "--bind_ip_all"]
  rs11:
    image: mongodb/mongodb-community-server:latest
    volumes:
    - type: volume
      source: data11
      target: /data/db
    networks:
      shard_cluster:
        ipv4_address: 192.168.31.214
    command: ["mongod", "--shardsvr", "--replSet", "RS1", "--dbpath", "/data/db", "--bind_ip_all"]
  mongos:
    image: mongodb/mongodb-community-server:latest
    command: ["mongos", "--configdb", "configRS/192.168.31.201:27019", "--bind_ip_all"]
    ports:
      - target: 27017
        published: 27017
        protocol: tcp
    networks:
      shard_cluster:
        ipv4_address: 192.168.31.221
networks:
  shard_cluster:
    ipam:
      config:
        - subnet: 192.168.31.0/24
volumes:
  configserver:
  data00:
  data01:
  data10:
  data11:
3.2 部署容器
执行命令即可部署
docker-compose up -d3.3 配置集群
配置configserver
$docker exec -it mongo_cluster_configserver_1 mongosh --port 27019
test> rs.initiate({_id: "configRS", configsvr: true, members:[{_id: 0, host: "192.168.31.201:27019"}]})
配置数据节点
$ docker-compose exec rs00   mongosh --port 27018
test> rs.initiate({_id: "RS0", members: [{_id:0, "host": "192.168.31.211:27018"},{_id:1, host: "192.168.31.212:27018"}]})

$ docker-compose exec rs10   mongosh --port 27018
test> rs.initiate({_id: "RS1", members: [{_id:0, "host": "192.168.31.213:27018"},{_id:1, host: "192.168.31.214:27018"}]})
配置mongos
$ docker-compose exec mongos   mongosh --port 27017
[direct: mongos] test> sh.addShard( "RS0/192.168.31.211:27018,192.168.31.212:27018")
{
  shardAdded: 'RS0',
  ok: 1,
  '$clusterTime': {
    clusterTime: Timestamp({ t: 1696212363, i: 5 }),
    signature: {
      hash: Binary.createFromBase64("AAAAAAAAAAAAAAAAAAAAAAAAAAA=", 0),
      keyId: Long("0")
    }
  },
  operationTime: Timestamp({ t: 1696212363, i: 5 })
}
[direct: mongos] test> sh.addShard( "RS1/192.168.31.213:27018,192.168.31.214:27018")
{
  shardAdded: 'RS1',
  ok: 1,
  '$clusterTime': {
    clusterTime: Timestamp({ t: 1696212377, i: 13 }),
    signature: {
      hash: Binary.createFromBase64("AAAAAAAAAAAAAAAAAAAAAAAAAAA=", 0),
      keyId: Long("0")
    }
  },
  operationTime: Timestamp({ t: 1696212377, i: 3 })
}
验证功能
1. 在集合上开启分片
sh.shardCollection("test.testc", { _id : "hashed" } )2. 在集合插入数据
for(i=0; i<1000;i++) {db.testc.insertOne({"name": "User_" + i});}3. 到单个rs上查看
$ docker-compose exec rs00   mongosh --port 27018
RS0 [direct: primary] test> db.testc.countDocuments()
531
可以看到单个rs上存放了约一半的数据,分片生效


 1万+
1万+


 被折叠的 条评论
为什么被折叠?
被折叠的 条评论
为什么被折叠?
 到【灌水乐园】发言


