


1. 絮絮叨叨
-
畏难情绪和猎奇心理作祟,总是对那些奇奇怪怪的小功能感兴趣,对开源组件核心功能的源码阅读却拖拖拉拉
-
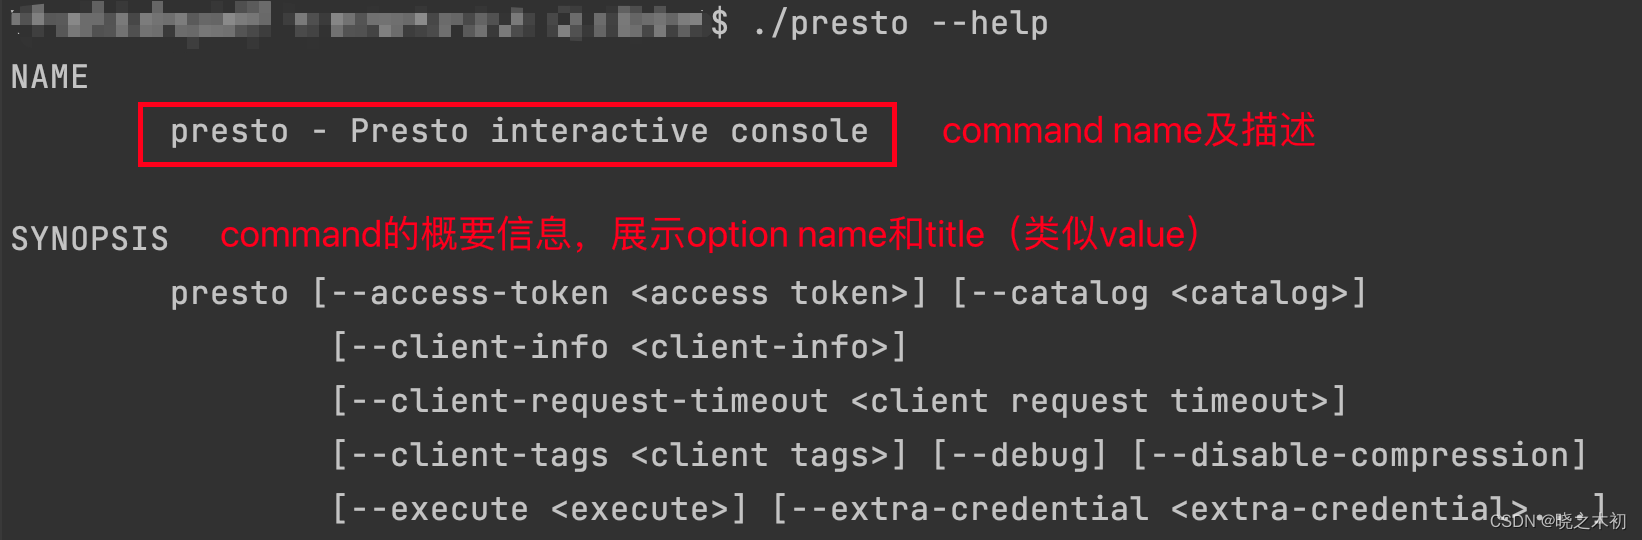
例如,presto-cli实际是一个command,这个command执行起来后才能支持SQL输入、查询执行、查询结果展示等,才形成了CLI(
Command Line Interface,命令行界面)# 指定了option的command ./presto --server localhost:8080 --user sunrise --catalog hive # command的运行逻辑由run()方法控制,运行起来后,允许用户与Presto服务进行查询交互 > select * from tpch.orders limit 10; -
笔者的愚见: 如果一个command执行起来后,用户可以与之交互,则这个command就变成了CLI
-
令笔者感兴趣的是:presto-cli对应的名为
presto的command是如何实现的呢? -
尤其是
--help选项的实现,肯定不是自定义代码的,按照开源组件的调性,应该会借助现成的第三方库去实现
-
至于presto-cli是如何将用户输入的SQL传递给Presto集群,又如何执行进度、执行结果等,笔者并不感兴趣 😂 😂
2. Java库Airline
-
在阅读presto-cli模块的源码时,发现presto-cli的入口类为Presto,其main()方法中启动了一个Console类
public final class Presto { private Presto() {} public static void main(String[] args) { Console console = singleCommand(Console.class).parse(args); if (console.helpOption.showHelpIfRequested() || console.versionOption.showVersionIfRequested()) { return; } System.exit(console.run() ? 0 : 1); } } -
Console类的定义如下,对应上面截图中的presto命令(一个single command)
@Command(name = "presto", description = "Presto interactive console") public class Console { ... // 省略static final字段,只展示与option有关的字段 @Inject public HelpOption helpOption; @Inject public VersionOption versionOption = new VersionOption(); @Inject public ClientOptions clientOptions = new ClientOptions(); ... // 其他代码省略 } -
仔细阅读相关代码后发现,presto命令的实现依赖了airlift的airline,还使用的是不再维护的0.8版本的airline
-
deprecated的Airline,对Airline的介绍如下:
Airline is a Java annotation-based framework for parsing Git like command line structures.
Airline是基于注解的Java框架,用于解析像git一样的命令 -
Airline的maven依赖如下:
<dependency> <groupId>io.airlift</groupId> <artifactId>airline</artifactId> <version>0.9</version> </dependency> -
Airline 2的介绍则更加直白,就是一个构建CLI的Java库
Airline is an annotation-driven Java library for building Command Line Interfaces (CLIs), it supports simple commands all the way through to complex Git style CLIs with groups and user defined command aliases.
Airline是注解驱动的、用于构建CLI的Java库。从简单的command,到复杂的git风格(有group和用户自定义command别名)的CLI,Airline都支持 -
Airline 2的maven依赖如下:
<dependency>
  <groupId>com.github.rvesse</groupId>
  <artifactId>airline</artifactId>
  <version>2.9.0</version>
</dependency>
3. Airline实战
-
目标: 使用Airline实现一个简单的即席查询(ad-hoc query)的伪CLI,只打印启动CLI时的用户选项(client options)
-
整个项目需要使用到如下maven依赖
<dependencies>
    <dependency>
        <groupId>io.airlift</groupId>
        <artifactId>airline</artifactId>
        <version>0.9</version>
    </dependency>
    <dependency>
        <groupId>com.google.guava</groupId>
        <artifactId>guava</artifactId>
        <version>31.1-jre</version>
    </dependency>
</dependencies>
3.1 定义options
- 模拟presto-cli,即席查询的cli至少支持
--help、--version这两个必备的option,还有--serevr、--user、--session等与访问即席查询服务有关的client options --help选项,可以直接使用Airline提供的HelpOption类--version选项和后续的client options都需要自定义,需要使用Airline的@Option注解
3.1.1 自定义VersionOption
-
模拟presto-cli,VersionOption的代码实现如下:
public class VersionOption
{
	// 可选的option,即command中可以不使用;默认值为false,即默认不展示cli的version信息
    @Option(name = "--version", description = "Display version information and exit")
    public Boolean version = false;

	// 返回version,以决定是否运行cli;一般展示version和帮助信息,不需要开启cli
    public boolean showVersionIfRequested()
    {
        if (version) {
        	// AdhocQuery就是cli的入口类,获取入口类的implementation version,可能为null
            String clientVersion = AdhocQuery.class.getPackage().getImplementationVersion();
            System.out.println("Ad-hoc Query CLI " + firstNonNull(clientVersion, "(version unknown)"));
        }
        return version;
    }
}
3.1.2 自定义ClientOptions
- 自定义ClientOptions,里面包含多个client option,这些client option与访问即席查询服务有关
- 通过尝试使用
@Option中的不同元素,体验各个元素的作用public class ClientOptions { // 带默认值的optional option @Option(name = "--server", title = "server", description = "ad-hoc query server location (default: localhost:8080)") public String server = "localhost:8080"; // 带默认值的optional option @Option(name = "--user", title = "user", description = "Username") public String user = System.getProperty("user.name"); // optional option,默认值null(string的默认值) @Option(name = "--password", title = "password", description = "Password") public String password; // optional option,要么不使用该选项,要么使用时指定两个session属性 @Option(name = "--session", title = "session", description = "Session property (property can be at most two; format: --session key1=value1 key2=value2; " + "use 'SHOW SESSION' to see available properties)", arity = 2) public final List<Property> sessionProperties = new ArrayList<>(); // required option,使用command时必须使用debug选项;由于debug选项为boolean类型,也就是debug选项的值必须为true @Option(name = "--debug", title = "debug", description = "Enable debug information", required = true) public boolean debug; // --help显示帮助信息时,将隐藏该选项 @Option(name = "--advanced", title = "advanced-properties", hidden = true, description = "Advanced property (property can be used multiple times; format: --advanced key1=value1 --advanced key2=value2 ...)") public List<Property> advancedProperties = new ArrayList<>(); @Override public String toString() { return toStringHelper(this) .add("server", server) .add("user", user) .add("password", password) .add("sessionProperties", sessionProperties) .add("debug", debug) .add("advancedProperties", advancedProperties) .toString(); } } - 其中,property就是
k1=v1类型的键值对public class Property { private static final Splitter NAME_VALUE_SPLITTER = Splitter.on('=').limit(2); private static final CharMatcher PRINTABLE_ASCII = CharMatcher.inRange((char) 0x21, (char) 0x7E); // spaces are not allowed private final String name; private final String value; public Property(String property) { List<String> nameValue = NAME_VALUE_SPLITTER.splitToList(property); checkArgument(nameValue.size() == 2, "Invalid property: %s", property); name = nameValue.get(0); value = nameValue.get(1); verifyProperty(name, value); System.out.printf("create property from property string (%s)\n", property); } private static void verifyProperty(String name, String value) { checkArgument(!name.isEmpty(), "Session property name is empty"); checkArgument(name.indexOf('=') < 0, "Session property name must not contain '=': %s", name); checkArgument(PRINTABLE_ASCII.matchesAllOf(name), "Session property name contains spaces or is not US_ASCII: %s", name); checkArgument(PRINTABLE_ASCII.matchesAllOf(value), "Session property value contains spaces or is not US_ASCII: %s", value); } public String getName() { return name; } public String getValue() { return value; } @Override public String toString() { return name + '=' + value; } @Override public int hashCode() { return Objects.hash(name, value); } @Override public boolean equals(Object obj) { if (this == obj) { return true; } if (obj == null || getClass() != obj.getClass()) { return false; } Property other = (Property) obj; return Objects.equals(this.name, other.name) && Objects.equals(this.value, other.value); } }
3.2 定义command
-
使用Airline提供的
@Command注解定义command:- 将想要支持的option以依赖注入的方式(
@Inject),传递给command - 定义
run()方法,里面包含命令的执行逻辑;为了简单起见,这里不支持用户交互,所以是一个伪CLI 😂
@Command(name = "adhoc-query", description = "Ad-hoc query interactive console") public class Console { @Inject // javax.inject.Inject; public HelpOption helpOption; // 不知为何,VersionOption无法自动实现依赖注入,需要手动创建,且无法去除@Inject注解 @Inject public VersionOption versionOption = new VersionOption(); @Inject public ClientOptions clientOptions; /** * 简单打印client options的值 */ public void run() { System.out.println(clientOptions); } } - 将想要支持的option以依赖注入的方式(
3.4 启动CLI
3.4.1 创建入口类,以启动CLI
- 创建入口类
AdhocQuery:public class AdhocQuery { // 工具类,不支持对象的创建 private AdhocQuery() {} public static void main(String[] args) { // 使用SingleCommand.singleCommand()创建一个parser,可以解析Console的命令行参数,如option、argument等 // 使用parse()方法解析来自args的命令行参数,得到对应的、已初始化的命令行 Console console = singleCommand(Console.class).parse(args); // 如果使用--help选项,则打印command帮助信息后退出 // 如果使用--version选项,则打印command帮助信息后退出 if (console.helpOption.showHelpIfRequested() || console.versionOption.showVersionIfRequested()) { return; } // 执行command,这里选择打印command的client options信息 console.run(); } }
3.42 理解@Option各元素的作用
- 使用IDEA的run configuration,添加运行参数

required=true带来的影响
- 执行失败,提示缺少
--debug选项

- 这是因为在定义
--debug选项时,设置了required=true,导致在使用adhoc-query命令时,必须加上该选项
对照帮助信息,理解@Option的多个元素
- 加上
--debug,成功打印出帮助信息
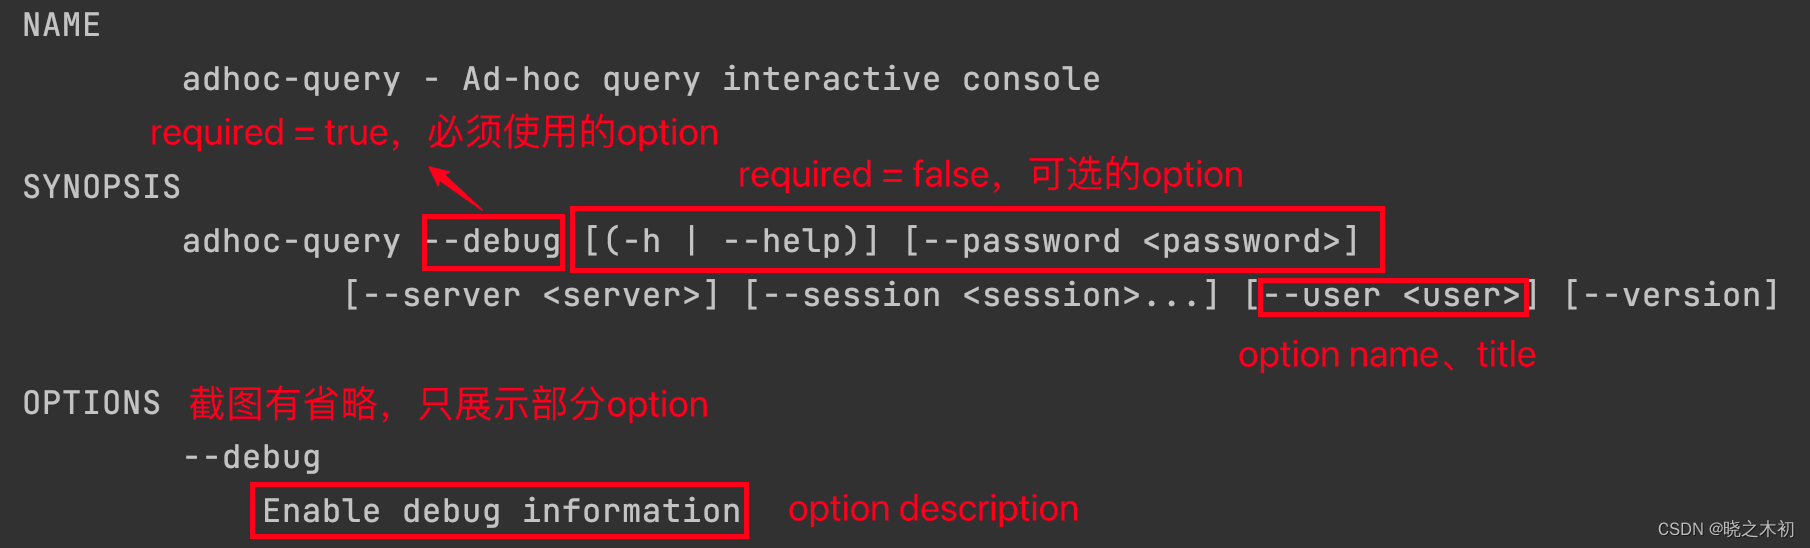
hidden = true带来的影响
- 细心的你,将会发现没有展示
--advanced选项 - 这是因为在定义
--advanced选项时,设置了hidden = true,导致该选项的帮助信息被隐藏
option的值
-
将args修改为
--debug,发现打印的client options信息如下:- 对于可选的option,如果不在定义时设置默认值,则将使用对应类型的默认值,如password则使用了string的默认值
null - 对于boolean类型的选项,在命令行中使用该选项则表示true;这里将
--debug定义为required的、boolean的option,导致在命令行中必须使用它
ClientOptions{server=localhost:8080, user=11120066, password=null, sessionProperties=[], debug=true, advancedProperties=[]} - 对于可选的option,如果不在定义时设置默认值,则将使用对应类型的默认值,如password则使用了string的默认值
arity = 2带来的影响
-
尝试使用
--session,添加访问即席查询的session property,args如下--debug --session k1=v1 -
执行出错,提示
--session选项要求的values并未提供

-
这是因为在定义
--session选项时,设置了arity = 2,导致使用该选项时,必须且只能设置两个session property
4. 打包成可执行的jar
4.1 错误的打包方法
-
按照之前使用maven创建一个可以通过
java -jar执行的jar包的经验,使用下面的plugin配置就可以实现该CLI的打包<plugin> <groupId>org.apache.maven.plugins</groupId> <artifactId>maven-shade-plugin</artifactId> <version>3.1.1</version> <executions> <execution> <phase>package</phase> <goals> <goal>shade</goal> </goals> <configuration> <transformers> <transformer implementation="org.apache.maven.plugins.shade.resource.ManifestResourceTransformer"> <mainClass>com.sunrise.AdhocQuery</mainClass> </transformer> </transformers> </configuration> </execution> </executions> </plugin> -
生成的jar包改名、添加可执行权限,就可以像
./presto --server localhost:8080 --user sunrise --catalog hive一样去使用了 -
尝试打印帮助信息,却提示
bash: ./adhoc-query: cannot execute binary file

-
如果使用
java -jar并给出程序运行参数,也是能成功打印出帮助信息的java -jar adhoc-query --debug --help -
但是,笔者还是想跟presto-cli一样,提供一个能
./adhoc-query --debug --help这样执行的jar -
用Presto官网介绍presto-cli的话说,就是一个
self-executingjarThe CLI is a self-executing JAR file, which means it acts like a normal UNIX executable.
4.2 正确的打包方式
-
查看presto-cli的打包方式,发现与当前使用的打包方式有差异
<plugin> <groupId>org.apache.maven.plugins</groupId> <artifactId>maven-shade-plugin</artifactId> <version>3.1.1</version> <executions> <execution> <phase>package</phase> <goals> <goal>shade</goal> </goals> <configuration> <!-- 默认值为false,这里改成了true --> <shadedArtifactAttached>true</shadedArtifactAttached> <!-- 默认值为shaded,这里改成了executable --> <shadedClassifierName>executable</shadedClassifierName> <transformers> <transformer implementation="org.apache.maven.plugins.shade.resource.ManifestResourceTransformer"> <manifestEntries> <Main-Class>com.sunrise.AdhocQuery</Main-Class> </manifestEntries> </transformer> </transformers> </configuration> </execution> </executions> </plugin> <!-- 新增的配置,make the jar chmod +x style executable --> <plugin> <groupId>org.skife.maven</groupId> <artifactId>really-executable-jar-maven-plugin</artifactId> <version>1.0.5</version> <configuration> <flags>-Xmx1G</flags> <!-- 与<shadedClassifierName>相呼应 --> <classifier>executable</classifier> </configuration> <executions> <execution> <phase>package</phase> <goals> <goal>really-executable-jar</goal> </goals> </execution> </executions> </plugin> -
重新打包后,在target目录下发现有两个jar,一个是带executable后缀的、具有可执行权限的jar,这跟presto-cli原始的jar名一致

-
重命名
airline-study-1.0-SNAPSHOT-executable.jar,再次执行./adhoc-query --debug --help,成功打印出帮助信息

4.3 絮絮叨叨
- 关于为何这样配置就能生成一个真正的可行执行jar,笔者暂不做深入探究
- really-executable-jars-maven-plugin的资料很少,只能查看github的README或者一个blog:Making Really Executable Jars


 601
601


 被折叠的 条评论
为什么被折叠?
被折叠的 条评论
为什么被折叠?
 到【灌水乐园】发言


