


概述
在引入 SpringCloud 的项目中会多次创建 Spring 容器,本篇从源码角度深入分析具体哪些点会创建 Spring 容器,以及这些容器之间的区别与联系。
本文介绍的Spring相关容器是基于Finchley.RELEASE项目。
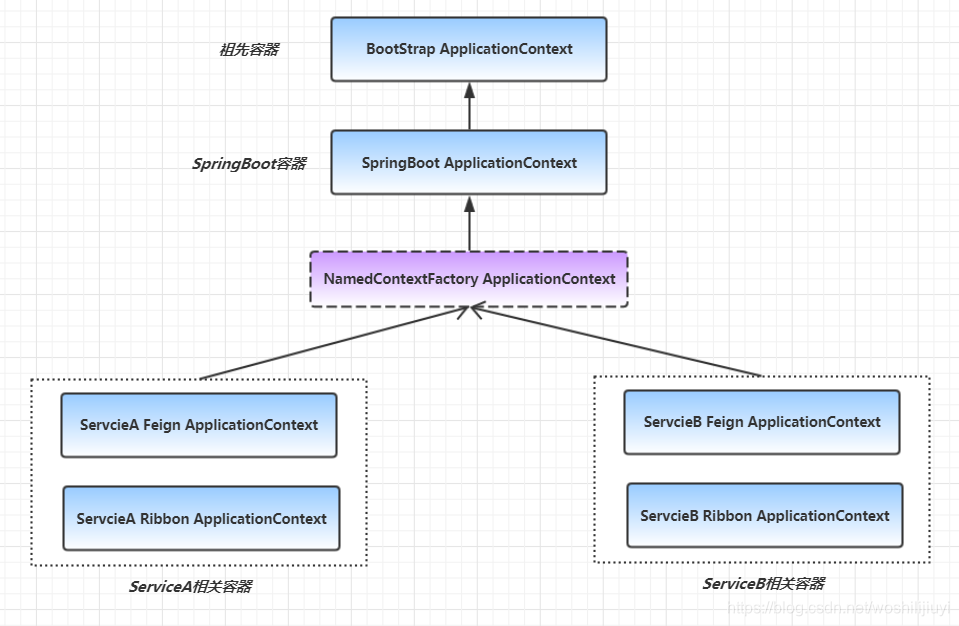
容器大致分为三层:
- BootStrap Spring 容器:由SpringCloud 监听器创建,用来初始化 SpringCloud 上下文
- SpringBoot Spring 容器:由SpringBoot创建,也是项目中常用的Spring容器。
- 微服务 Spring相关容器:Feign和Ribbon配置类对应的上下文,由配置容器抽象工厂 NamedContextFactory 创建,用于容器隔离。
分别来看。
BootStrap Spring容器
先来看一下BootStrap Spring容器是何时创建的。
在之前的博客《SpringBoot2 | SpringBoot启动流程源码分析(一)》中,提到了 SpringBoot 在启动时,会触发相关一系列监听器,监听器各司其职,做一些初始化预处理操作。SpringCloud 实现了自己的监听器:BootstrapApplicationListener,来初始化SpringCloud上下文环境。
来看一下该监听器被触发后的处理逻辑:
@Override
	public void onApplicationEvent(ApplicationEnvironmentPreparedEvent event) {
		ConfigurableEnvironment environment = event.getEnvironment();
		//如果未开启SpringCloud,直接返回
		if (!environment.getProperty("spring.cloud.bootstrap.enabled", Boolean.class,
				true)) {
			return;
		}
		// don't listen to events in a bootstrap context
		//判断该监听器是否已经执行过,如果执行过,直接返回
		if (environment.getPropertySources().contains(BOOTSTRAP_PROPERTY_SOURCE_NAME)) {
			return;
		}
		//这里返回了一个 Spring 容器
		ConfigurableApplicationContext context = bootstrapServiceContext(environment,
				event.getSpringApplication());
		apply(context, event.getSpringApplication(), environment);
	}
bootstrapServiceContext方法创建了一个 Spring 容器:ConfigurableApplicationContext,来看一下:
private ConfigurableApplicationContext bootstrapServiceContext( ConfigurableEnvironment environment, final SpringApplication application) { StandardEnvironment bootstrapEnvironment = new StandardEnvironment(); MutablePropertySources bootstrapProperties = bootstrapEnvironment .getPropertySources(); for (PropertySource<?> source : bootstrapProperties) { bootstrapProperties.remove(source.getName()); } //设置读取 bootstrap 文件 String configName = environment .resolvePlaceholders("${spring.cloud.bootstrap.name:bootstrap}"); //设置 bootstrap 文件路径 String configLocation = environment .resolvePlaceholders("${spring.cloud.bootstrap.location:}"); Map<String, Object> bootstrapMap = new HashMap<>(); bootstrapMap.put("spring.config.name", configName); if (StringUtils.hasText(configLocation)) { bootstrapMap.put("spring.config.location", configLocation); } //设置是否已经初始化BootStrap环境 bootstrapProperties.addFirst( new MapPropertySource(BOOTSTRAP_PROPERTY_SOURCE_NAME, bootstrapMap)); for (PropertySource<?> source : environment.getPropertySources()) { bootstrapProperties.addLast(source); } //...... //加载BootstrapConfiguration 配置类 List<String> names = SpringFactoriesLoader .loadFactoryNames(BootstrapConfiguration.class, classLoader); for (String name : StringUtils.commaDelimitedListToStringArray( environment.getProperty("spring.cloud.bootstrap.sources", ""))) { names.add(name); } //创建 Spring 容器 SpringApplicationBuilder builder = new SpringApplicationBuilder() .profiles(environment.getActiveProfiles()).bannerMode(Mode.OFF) .environment(bootstrapEnvironment) .properties("spring.application.name:" + configName) .registerShutdownHook(false) .logStartupInfo(false) .web(false); List<Class<?>> sources = new ArrayList<>();builder.sources(sources.toArray(new Class[sources.size()])); AnnotationAwareOrderComparator.sort(sources); final ConfigurableApplicationContext context = builder.run(); //创建祖先容器 addAncestorInitializer(application, context); bootstrapProperties.remove(BOOTSTRAP_PROPERTY_SOURCE_NAME); mergeDefaultProperties(environment.getPropertySources(), bootstrapProperties); return context; }
首先,SpringBoot项目是通过SpringApplicationBuilder启动,在上述逻辑中又构建了一个SpringApplicationBuilder对象,再次执行run方法,所以启动流程会执行两遍,只是读取的配置文件和配置类不同。之前有人问我,SpringCloud项目ApplicationContextInitializer实现类中的逻辑执行了两遍,原因就在于启动流程会执行两遍。
同样的,当第二次创建SpringApplicationBuilder并启动时,会不会再次出发监听器,然后接着创建SpringApplicationBuilder呢?
肯定不会。否则就是死循环了。上面已经提到了,SpringCloud通过标识符BOOTSTRAP_PROPERTY_SOURCE_NAME来判断。监听器执行之后,会设置该变量对应值,下次启动前如果有值,表明已经执行。
上面有一行关键的代码:addAncestorInitializer(application, context);
ancestor 祖先的意思,来看一下:
private void addAncestorInitializer(SpringApplication application, ConfigurableApplicationContext context) { boolean installed = false; //遍历所有的initializer,判断是否已经存在 祖先initializer for (ApplicationContextInitializer<?> initializer : application .getInitializers()) { if (initializer instanceof AncestorInitializer) { installed = true; // 如果存在,则设置 bootStrapApplication ((AncestorInitializer) initializer).setParent(context); } } //如果不存在,则创建。 if (!installed) { application.addInitializers(new AncestorInitializer(context)); } }主要是创建 AncestorInitializer 对象,并传入 SpringCloud 创建的 BootStrap Application。也就是祖先容器。
当SpringCloud BootStrap环境初始化完毕后,再次回到SpringBoot初始化流程,SpringBoot会触发所有的initializers,当执行祖先initializer:AncestorInitializer时,将BootStrapApplication容器设为父容器:private static class AncestorInitializer implements ApplicationContextInitializer<ConfigurableApplicationContext>, Ordered {private ConfigurableApplicationContext parent; public AncestorInitializer(ConfigurableApplicationContext parent) { this.parent = parent; } @Override public void initialize(ConfigurableApplicationContext context) { //如果已经存在父容器,则直接取出 while (context.getParent() != null && context.getParent() != context) { context = (ConfigurableApplicationContext) context.getParent(); } reorderSources(context.getEnvironment()); //设置父容器 new ParentContextApplicationContextInitializer(this.parent) .initialize(context); }
}
上述方法将设置父容器的逻辑委托给ParentContextApplicationContextInitializer类处理,来看下initialize方法:
public class ParentContextApplicationContextInitializer implements ApplicationContextInitializer<ConfigurableApplicationContext>, Ordered {private int order = Ordered.HIGHEST_PRECEDENCE; private final ApplicationContext parent; @Override public void initialize(ConfigurableApplicationContext applicationContext) { if (applicationContext != this.parent) { //设置父容器 applicationContext.setParent(this.parent); //创建监听器,主要用来发布项目中存在父子容器事件 applicationContext.addApplicationListener(EventPublisher.INSTANCE); } }
}
BootStrap Application 容器的作用:
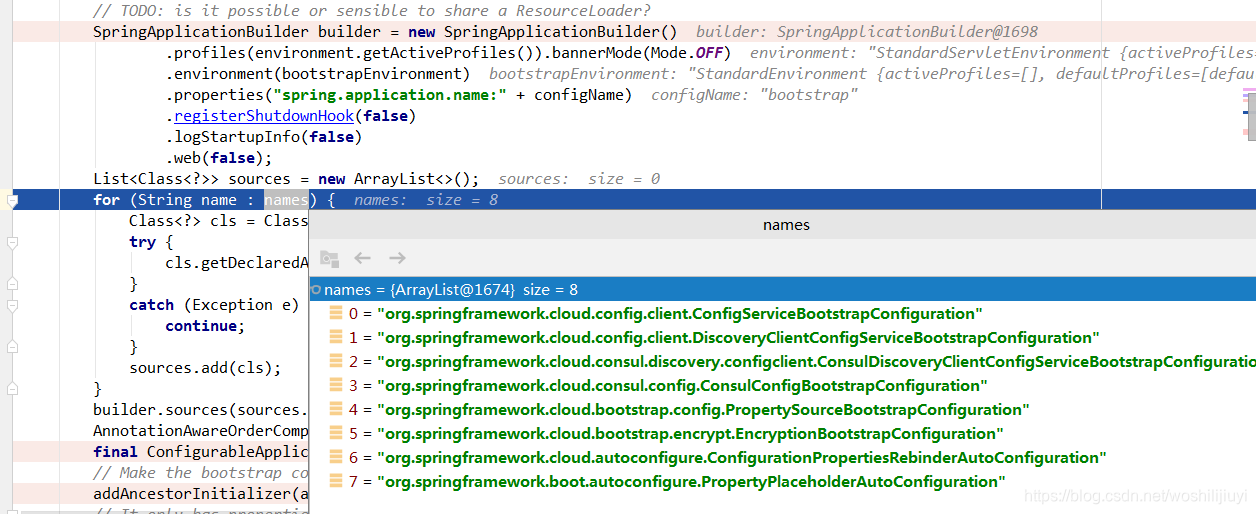
提前加载SpringCloud 相关的配置类,比如BootStrap Application会提前加载配置中心相关配置类,优先加读取bootstrap配置文件等逻辑。
默认加载的配置如下:
SpringBoot Spring容器
SpringBoot创建的 Spring容器是最核心的容器,也是使用最多的Spring容器。
创建的对象会有3种类型,Servlet,Reactive,和默认。
在SpringBoot2.x版本中的判断如下:
public class SpringApplication { //...... protected ConfigurableApplicationContext createApplicationContext() { Class<?> contextClass = this.applicationContextClass; if (contextClass == null) { try { switch (this.webApplicationType) { case SERVLET: contextClass = Class.forName(DEFAULT_WEB_CONTEXT_CLASS); break; case REACTIVE: contextClass = Class.forName(DEFAULT_REACTIVE_WEB_CONTEXT_CLASS); break; default: contextClass = Class.forName(DEFAULT_CONTEXT_CLASS); } } catch (ClassNotFoundException ex) { throw new IllegalStateException( "Unable create a default ApplicationContext, " + "please specify an ApplicationContextClass", ex); } } return (ConfigurableApplicationContext) BeanUtils.instantiateClass(contextClass); } //...... }具体细节不多介绍了,创建流程可参考之前 SpringBoot启动流程源码分析文章。
微服务配置容器
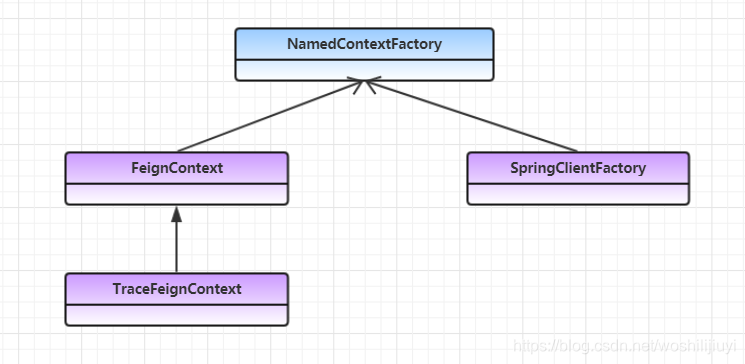
上面 uml 图中提到了一个关键类:
NamedContextFactory,从命名可以看出,这是一个工厂类:抽象容器工厂。同 hystrix 线程隔离原理一样,该工厂根据不同的服务名称,创建不同的容器。该容器有2个实现类,FeignContext和SpringClientFactory,分别用来加载对应的配置。
来看一下相关的核心代码:public abstract class NamedContextFactory<C extends NamedContextFactory.Specification> implements DisposableBean, ApplicationContextAware {//Feign 和Ribbon 配置抽象接口 public interface Specification { String getName(); Class<?>[] getConfiguration(); } //Application集合 private Map<String, AnnotationConfigApplicationContext> contexts = new ConcurrentHashMap<>(); protected AnnotationConfigApplicationContext getContext(String name) { //根据服务名称获取对应配置工厂,如果没有,则创建 if (!this.contexts.containsKey(name)) { synchronized (this.contexts) { if (!this.contexts.containsKey(name)) { //创建并进行缓存 this.contexts.put(name, createContext(name)); } } } return this.contexts.get(name); } protected AnnotationConfigApplicationContext createContext(String name) { //创建一个 Spring 容器 AnnotationConfigApplicationContext context = new AnnotationConfigApplicationContext(); if (this.configurations.containsKey(name)) { for (Class<?> configuration : this.configurations.get(name) .getConfiguration()) { //注入配置类 context.register(configuration); } } //注入默认的Feign或Ribbon配置类 for (Map.Entry<String, C> entry : this.configurations.entrySet()) { if (entry.getKey().startsWith("default.")) { for (Class<?> configuration : entry.getValue().getConfiguration()) { context.register(configuration); } } } context.register(PropertyPlaceholderAutoConfiguration.class, this.defaultConfigType); context.getEnvironment().getPropertySources().addFirst(new MapPropertySource( this.propertySourceName, Collections.<String, Object> singletonMap(this.propertyName, name))); if (this.parent != null) { // Uses Environment from parent as well as beans //设置父类为 SpringBoot 创建的Spring 容器 context.setParent(this.parent); } //启动容器 context.refresh(); return context; }
}
具体执行细节这里不做展开了,之前的文章《SpringCloud | SpringCloud Feign的前世今生【源码深入分析】》有详细介绍。
所以,具体Feign 和 Ribbon配置类会创建多少实例,和项目本身依赖发服务有关。如果依赖10个服务,那就是20个微服务配置容器+SpringBoot容器+BootStrap容器。哪里看到呢?
如果项目引入了SpringBoot 监控模块Spring Boot Actuator,那在idea中可以看到已经创建的容器:
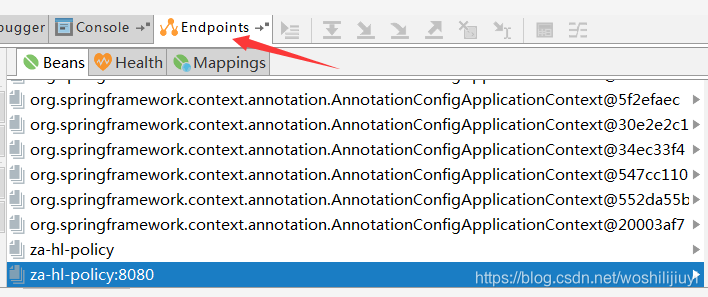
注意:由于Ribbon 默认会采用懒加载,也就是只有第一次请求的时候才会加载。所以idea这里不会显示 Ribbon 相关配置类容器,只显示项目启动流程中创建完成的 Spring 容器。
这也是微服务经常第一次超时的根本原理,创建并启动一个Spring容器需要一定的时间。
总结
本篇主要介绍了 SpringCloud 项目中创建的 Spring 容器:
首先 SpringBoot 项目启动,触发监听器,如果引入了SpringCloud 中的BootstrapApplicationListener,则开始初始化 SpringCloud 相关的上下文:Bootstrap ApplicationContext,将其设置为祖先容器,然后继续创建其子容器:SpringBoot Application。
如果引入了 FeignClient,则会实例化一个容器工厂,以服务名称为key,Feign 和 Ribbon配置类容器为value,配置隔离,父容器则都为 SpringBoot Application。


 187
187


 被折叠的 条评论
为什么被折叠?
被折叠的 条评论
为什么被折叠?
 到【灌水乐园】发言


