


web前端之用JavaScript实现图片剪切效果(一)
效果图:
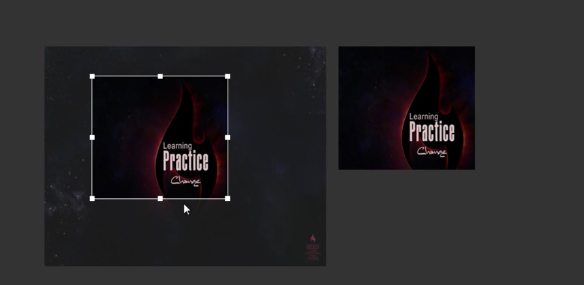
说明:
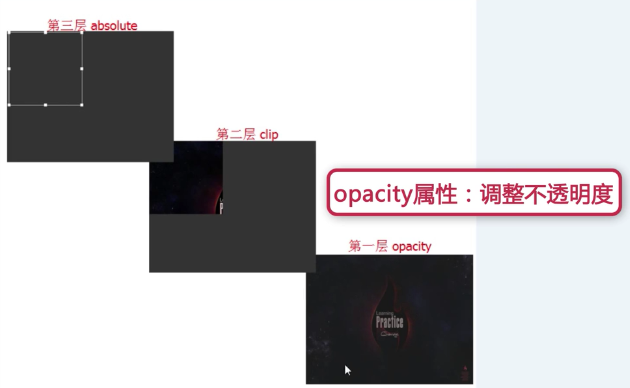
用CSS实现效果布局
CSS实现图片不透明及裁剪效果
opacity: 0-1,用来设置透明度
clip:rect(top,right,bottomm,left)用来选择选定的区域大小和位置
img2用来覆盖img1
<!DOCTYPE html PUBLIC "-//W3C//DTD XHTML 1.1//EN" "http://www.w3.org/TR/xhtml11/DTD/xhtml11.dtd">
<html xmlns="http://www.w3.org/1999/xhtml" xml:lang="en">
<head>
<meta http-equiv="Content-Type" content="text/html;charset=UTF-8">
<title>Document</title>
<style type="text/css">
body{
    background: #333;
}
#box{
    position: absolute;
    top: 100px;
    left: 200px;
    width: 400px;
    height: 300px;
}
#img1{
    width: 400px;
    height: 300px;
    opacity: 0.6;
    position: absolute;
    top: 0;
    left: 0;
}
#img2{
    width: 400px;
    height: 300px;
    opacity: 1;
    position: absolute;
    top: 0;
    left: 0;
    clip: rect(0px,200px,200px,0px);
}
</style>
</head>
<body>
<div id="box">
    <img src="1.jpg" id="img1">
    <img src="1.jpg" id="img2">
</div>
</body>
</html>
CSS实现图片控制触点效果
<!DOCTYPE html PUBLIC "-//W3C//DTD XHTML 1.1//EN" "http://www.w3.org/TR/xhtml11/DTD/xhtml11.dtd">
<html xmlns="http://www.w3.org/1999/xhtml" xml:lang="en">
<head>
<meta http-equiv="Content-Type" content="text/html;charset=UTF-8">
<title>Document</title>
<style type="text/css">
body{
    background: #333;
}
#box{
    position: absolute;
    top: 100px;
    left: 200px;
    width: 400px;
    height: 300px;
}
#img1{
    width: 400px;
    height: 300px;
    opacity: 0.6;
    position: absolute;
    top: 0;
    left: 0;
}
#img2{
    width: 400px;
    height: 300px;
    opacity: 1;
    position: absolute;
    top: 0;
    left: 0;
    clip: rect(0px,200px,200px,0px);
}
#main{
    position: absolute;
    border: 1px solid #fff;
    width: 200px;
    height: 200px;
}
.minDiv{
    position: absolute;
    width: 8px;
    height: 8px;
    background: #fff;
}
.left-up{
    top: -4px;
    left: -4px;
    cursor: nw-resize;
}
.up{
    left: 50%;
    margin-left: -4px;
    margin-top: -4px;
    cursor: n-resize;
}
.right-up{
    right: -4px;
    top: -4px;
    cursor: ne-resize;
}
.right{
    right: -4px;
    top: 50%;
    margin-top: -4px;
    cursor: e-resize;
}
.right-down{
    right: -4px;
    bottom: -4px;
    cursor: se-resize;
}
.down{
    bottom: -4px;
    right: 50%;
    margin-left: -4px;
    cursor: s-resize;
}
.left-down{
    left: -4px;
    bottom: -4px;
    cursor: sw-resize;
}
.left{
    left: -4px;
    top: 50%;
    margin-top: -4px;
    cursor: w-resize;
}
</style>
</head>
<body>
<div id="box">
    <img src="1.jpg" id="img1">
    <img src="1.jpg" id="img2">
    <div id="main">
        <div class="minDiv left-up"></div>
        <div class="minDiv up"></div>
        <div class="minDiv right-up"></div>
        <div class="minDiv right"></div>
        <div class="minDiv right-down"></div>
        <div class="minDiv down"></div>
        <div class="minDiv left-down"></div>
        <div class="minDiv left"></div>
    </div>
</div>
</body>
</html>
实现的效果图:
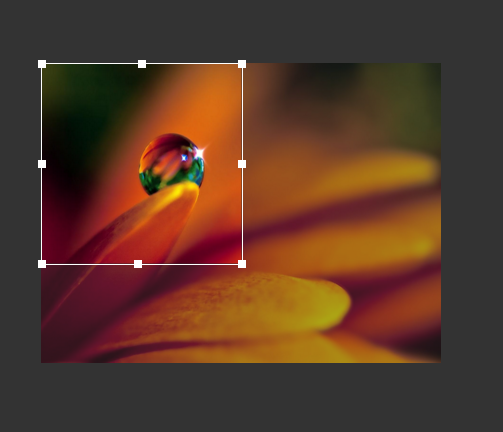
用JavaScript实现剪切功能
JavaScript获取选择框偏移量
获取元素相对于屏幕左边的距离,利用offsetLeft实现
获取元素的父元素,利用offsetParent实现
获取鼠标在屏幕中的横坐标:event.clientX
function getPosition(node){
    var left=node.offsetLeft;
    var top=node.offsetTop;
    var parent=node.offsetParent;//获取父元素
    while(parent !=null){
        left +=parent.offsetLeft;
        top += parent.offsetTop;
        parent=parent.offsetParent;
    }
    return {"left":left,"top":top};
}


 417
417

 被折叠的 条评论
为什么被折叠?
被折叠的 条评论
为什么被折叠?
 到【灌水乐园】发言


