


NOTE:本文基于官方yocto project start 2.2手册翻译,水平有限翻译肯定存在问题,希望发现的大侠不要吝啬。
有时间会逐步翻译我在学习过程中阅读的官方文档。
欢迎
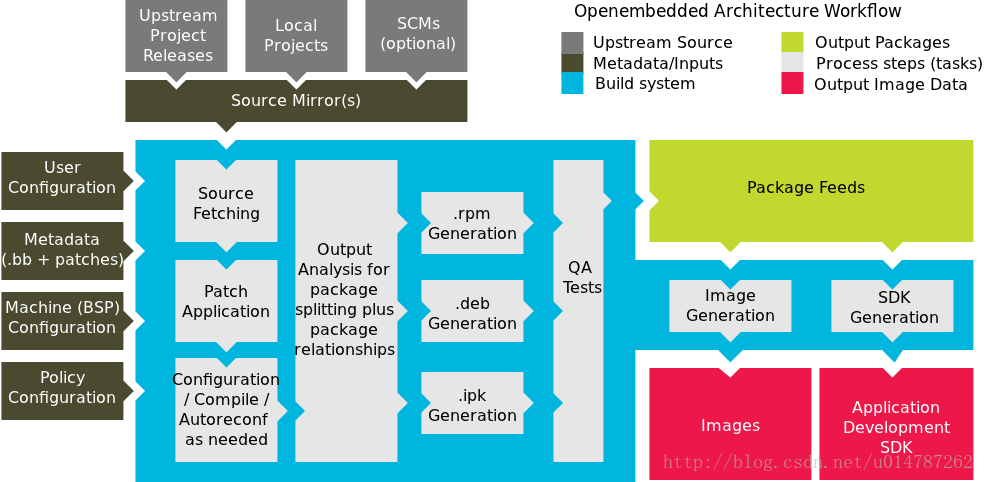
欢迎来到Yocto项目!Yocto项目是一个开源协作项目,其重点是嵌入式Linux系统的开发人员。其中,Yocto项目的构建主机基于OpenEmbedded(OE)项目,使用BitBake工具构建完整的Linux 镜像。BitBake和OE组件组合在一起以形成参考构建主机,历史上称为Poky。
如果你没有运行Linux的系统,并且你想给Yocto项目一个运行,你可以考虑使用Yocto项目生成工具。构建设备允许你使用非Linux开发系统使用Yocto项目构建和引导自定义嵌入式Linux镜像。有关详细信息,请参阅Yocto Project Build Appliance。
快速入门是为了让你可以快速设置一个构建主机并且使用Yocto项目,然后构建一些Linux镜像。而不是提供Yocto项目及其全部功能的详细信息,只是提供使用受支持的Linux构建主机来尝试Yocto项目所需的最少信息。阅读和使用快速入门会使你对Yocto项目以及如何使用其某些核心组件有一个基本的了解。你还将通过一下步骤生成两个image:一个适合于仿真,一个在实际硬件上启动。这些示例突出显示了如何轻松地使用Yocto项目为多种类型的硬件创建image。
有关Yocto项目的更多详细信息,你可以参考以下资源:
Website: The Yocto Project Website provides the latest builds, breaking news, full development documentation, and access to a rich Yocto Project Development Community into which you can tap.
https://www.yoctoproject.org/
FAQs: Lists commonly asked Yocto Project questions and answers. You can find two FAQs: Yocto Project FAQ on a wiki, and the “FAQ” chapter in the Yocto Project Reference Manual.
https://wiki.yoctoproject.org/wiki/FAQ
Developer Screencast: The Getting Started with the Yocto Project - New Developer Screencast Tutorial provides a 30-minute video created for users unfamiliar with the Yocto Project but familiar with Linux build hosts. While this screencast is somewhat dated, the introductory and fundamental concepts are useful for the beginner.
http://vimeo.com/36450321
Yocto项目开发环境介绍
Yocto项目通过OpenEmbedded构建系统提供了针对ARM,MIPS,PowerPC和x86架构的开源开发环境,适用于各种平台,包括x86-64和模拟平台。你可以使用Yocto项目的组件进行开发,构建,调试,模拟和测试完整的软件堆栈在Linux,X Window系统,GTK +框架和Qt框架平台下。
Yocto项目特点:
1.提供最新的Linux内核以及适用于嵌入式环境的一套系统命令和库。
2.提供可用的系统组件,例如X11,GTK +,Qt,Clutter和SDL(以及其他),以便你可以在具有显示硬件的设备上创建丰富的用户例子。对于没有显示器或希望使用备用UI框架的设备,无需安装这些组件。
3.创建的核心不仅具有专一和稳定的特点且兼容与OpenEmbedded工程,你可以轻松且可靠地进行项目的构建和开发。
4.通过Quick EMUlator(QEMU)技术,因此完全支持各种硬件和设备仿真。
5.提供分层的机制,因此允许你非常容易的扩展系统以及进行自定义,并且不失调理。
你可以使用Yocto项目为多种设备生成镜像。如前所述,Yocto项目支持创建参考镜像,且可以使用QEMU启动和仿真。标准示例机器旨在使用QEMU所有系统进行仿真,例如32位和64位的x86,ARM,MIPS和PowerPC架构的操作系统。除了仿真之外,你还可以依据分层的原理将其应用到任何可以运行Linux和工具链的目标平台。
另一个Yocto项目特性是Sato reference User Interface,其基于GTK +,目地在于那些因屏幕大小受限制且作为OpenEmbedded Core层一部分的设备也能让开发者进行软件堆栈的测试。
如何从建立到使用Yocto Project
以下展示基于linux建立Yocto Project主机以及使用主机建立镜像文件所需的步骤:
1.Build Host 至少拥有50G空闲磁盘空间且运行linux发行版的主机 (i.e. recent releases of Fedora, openSUSE, CentOS, Debian, or Ubuntu).
2.Build Host Packages在构建主机上安装适当的软件包。
3.The Yocto Project 一个已经发布的yocto project
支持的Linux发行版本:
Ubuntu
Fedora
openSUSE
CentOS
Debian
有关支持Yocto项目的分发版本更详细的列表,请参阅Yocto项目参考手册中的“”Supported Linux Distributions”部分。OpenEmbedded构建系统应该能运行在能支持以下版本的Git,tar和PythonGit 1.8.3.1 or greater工具的任何版本。
tar 1.24 or greater
Python 3.4.0 or greater.
如果构建主机不满足上述三个要求中的任何一个,你应该做好软件支持,以便你可以使用Yocto项目。有关信息,请参阅Yocto项目参考手册中的“”Required Git, tar, and Python Versions”章节。
构建主机软件包
所需的构建主机包取决于构建机器和你使用的Yocto项目。 例如,如果要构建一个可以以图形模式(最小的基本构建要求)在QEMU上运行的镜像,那么构建主机包的要求和用于无头系统上的镜像或构建Yocto项目文档集是不同的。
总的来说,如果你想覆盖所有情况,所需的软件包数量很大。
注意:
一般而言,你需要在root权限下安装所需的软件包。 因此,下一节中的命令是否正常工作决于你的Linux发行版是否安装了sudo。
以下列表显示了建立能在QEMU上以图形模式运行的镜像(必需有图形支持)所需的软件包。 有关其他方案的所需软件包列表,请参阅the Yocto Project Reference Manual的”Required Packages for the Host Development System”部分。
Ubuntu and Debian
sudo apt-get install gawk wget git-core diffstat unzip texinfo gcc-multilib \
build-essential chrpath socat libsdl1.2-dev xterm
Fedora
sudo dnf install gawk make wget tar bzip2 gzip python3 unzip perl patch \
diffutils diffstat git cpp gcc gcc-c++ glibc-devel texinfo chrpath \
ccache perl-Data-Dumper perl-Text-ParseWords perl-Thread-Queue perl-bignum socat \
findutils which SDL-devel xterm
OpenSUSE
sudo zypper install python gcc gcc-c++ git chrpath make wget python-xml \
diffstat makeinfo python-curses patch socat libSDL-devel xterm
CentOS
sudo yum install gawk make wget tar bzip2 gzip python unzip perl patch \
diffutils diffstat git cpp gcc gcc-c++ glibc-devel texinfo chrpath socat \
perl-Data-Dumper perl-Text-ParseWords perl-Thread-Queue SDL-devel xterm
注意:
CentOS 6.x的用户需要检查Git, tar and Python工具的版本是否可用。详见the Yocto Project Reference Manual 的“Required Git, tar, and Python Versions”章节。
Yocto Project发布
使用Yocto项目之前需要满足的最后要求是获得一个已经发布的Yocto项目。建议在主机上构建(以Git语言克隆)一个Poky Git存储库的本地副本,然后检查最新版本,从而获得最新的Yocto项目版本。 这样做能轻松更新到较新的Yocto项目版本,以及方便的贡献你的Yocto项目。
下面是一个来自Ubuntu构建主机的示例,它克隆了Poky的存储库,然后检查最新的Yocto项目版本(即2.2):
$ git clone git://git.yoctoproject.org/poky
     Cloning into 'poky'...
     remote: Counting objects: 226790, done.
     remote: Compressing objects: 100% (57465/57465), done.
     remote: Total 226790 (delta 165212), reused 225887 (delta 164327)
     Receiving objects: 100% (226790/226790), 100.98 MiB | 263 KiB/s, done.
     Resolving deltas: 100% (165212/165212), done.
     $ git checkout morty
你一样可以通过Yocto Project websit来下载发布版本。
有关建立Yocto项目的更多信息,请参阅the Yocto Project Development Manual中的“Yocto Project Release”章节。
建立镜像
现在,你满足了所有的系统要求,如此是时候测试Yocto项目了。 你可以使用命令行界面或Toaster(图形用户界面)来测试Yocto Project。 如果要使用GUI测试Yocto项目,请参阅“Toaster User Manual”,了解有关如何安装和设置Toaster的信息。
1.建立qemux86参考镜像并在QEMU仿真器中运行。
2.可以轻松更改配置,因此你可以快速创建第二个镜像,将其加载到可启动媒体或者目标板上。本示例使用MinnowBoard MAX-compatible board。
注意:
以下两个部分的步骤不提供细节,而是提供必要的工作命令和示例,旨在让你入门。更多详细信息,请参阅Yocto Project manual set中对应手册手册。
为仿真器建立镜像
有关网络代理:
By default, the build process searches for source code using a pre-determined order through a set of locations. If you are working behind a firewall and your build host is not set up for proxies, you could encounter problems with the build process when fetching source code (e.g. fetcher failures or Git failures).
If you do not know your proxy settings, consult your local network infrastructure resources and get that information. A good starting point could also be to check your web browser settings. Finally, you can find more information on using the Yocto Project behind a firewall in the Yocto Project Reference Manual FAQ and on the “Working Behind a Network Proxy” wiki page.
1. 确保构建主机已正确设置:在此部分中构建镜像成功与否取决于构建主机是否正确配置。 确保你已经完成了“Setting Up to Use the Yocto Project”一节中描述的要求。
2.检查你的分支:确定你在顶层目录下(例如:poky)之后检查与Yocto Project发行版关联的分支。
  cd ~/poky
  git checkout -b morty origin/morty
Git的check out命令首先在本地的同名分支(i.e. morty)中进行检查。本地分支跟踪同名的上游分支。 基于已发布的分支创建自己的分支,确保你正在使用该发行版的最新文件。
3.初始化构建环境:运行oe-init-build-env环境脚本用以定义OE构建系统的环境变量。
$ source oe-init-build-env除此之外,脚本会产生构建目录,并位于源目录中。脚本运行后,你的当前工作目录将被设置为构建目录。 稍后,构建完成后,构建目录中包含构建期间创建的所有文件。
注意:
有关运行驻留内存的BitBake信息,请参阅oe-init-build-env-memres建立脚本。
4.检查本地配置文件:当你完成构建环境后, local.conf在Build Directory的子目录conf下生成。在使用 bitbake开始构建前,你最好看看这个配置文件以确保里面的配置都是你想要的:
a.建立过程节省磁盘空间,添加以下字段到你的配置文件,位于poky/build/conf/local.conf,
添加该字段后将在配方建立完成后删除work目录下用于生成该配方的目录。
INHERIT += "rm_work"b.默认生成qumux86的目标机,意味着产生的image只能在Intel® 32-bit 架构上使用,此外,在本示例中,如果想生成其他架构的image只需更改MACHINE变量即可。
c. 在构建之前的另一个注意事项是创建镜像时使用的包管理器。默认的local.conf文件选择RPM软件包管理器。 你可以使用PACKAGE_CLASSES变量控制此配置。
包管理器的选择与在运行时在目标镜像中是否使用包管理是分开的
有关其他包管理器选择信息,请参阅the Yocto Project Reference Manual中的“package.bbclass”部分。
5.开始建立:继续执行下面的命令为目标板构建系统镜像,在此示例中为core-image-sato:
NOTE:
据处理器和内核的数量,RAM的数量,Internet连接的速度和其他因素,第一次构建过程可能需要几个小时。随后的构建运行将变快,因为第一次构建构建过程产生缓存。
bitbake core-image-sato
对于bitbake的用法参见Yocto Project Reference Manual的”BitBake”章节,或者查看the BitBake User Manual的”BitBake Command”章节。
关于目标的更多信息,查看Yocto Project Reference Manual的”Images”章节。
6.使用QEMU对image进行仿真:一旦专用的image创建后就可以使用QEMU加载运行:
$ runqemu qemux86
7.退出QEMU:通过单击关机图标或者打开一个终端输入poweroff,后输入回车。
构建具有实体硬件的镜像:
以下步骤显示了如何轻松地设置构建主机以及建立镜像。一下步骤为MinnowBoard MAX构建image,其被Yocto Project和meta-intel intel-corei7-64 and intel-core2-32的板级支持包(BSP)所支持。
注意:
MinnowBoard MAX附带64位固件。 如果要在32位模式下使用该板,必须下载32位固件。
1.创建一个meta-intel Repository的拷贝:建立MinnowBoard MAX需要the meta-intel层。在源目录下使用 git clone命令,意在将repository 克隆到本地,下面是一个例子源目录为poky:
     $ cd $HOME/poky
     $ git clone git://git.yoctoproject.org/meta-intel
     Cloning into 'meta-intel'...
     remote: Counting objects: 11988, done.
     remote: Compressing objects: 100% (3884/3884), done.
     Receiving objects: 100% (11988/11988), 2.93 MiB | 2.51 MiB/s, done.
     remote: Total 11988 (delta 6881), reused 11752 (delta 6645)
     Resolving deltas: 100% (6881/6881), done.
     Checking connectivity... done.
默认情况下,git clone存储库时,“主”分支被检查。 在构建使用meta-intel层的镜像前,必须确保两个存储库(meta-intel和poky)都使用相同的版本。 因此,你需要在克隆met-intel之后检查“morty”版本:
     $ cd $HOME/poky/meta-intel
     $ git checkout morty
     Branch morty set up to track remote branch morty from origin.
     Switched to a new branch 'morty'
2.构建配置:构建的配置,需要修改bblayers.conf 和 local.conf 两个文件,都位于build/conf目录下。
这里有一个快速制作配置文件的方法。
a.使用bitbake-layers add-layer 命令添加meta-intel层,将会包含intel-core* BSP到构建中。
b.通过设置MACHINE变量选择BSP
     $ cd $HOME/poky/build
     $ bitbake-layers add-layer "$HOME/poky/meta-intel"
     $ echo 'MACHINE = "intel-corei7-64"' >> conf/local.conf
注意:
a.生成64位image:
$ echo 'MACHINE = "intel-corei7-64"' >> conf/local.confb.生成32位image:
$ echo 'MACHINE = "intel-core2-32"' >> conf/local.conf3.为MinnowBoard MAX板构建一个image: 你构建的image类型取决于你的目标。 例如,之前的版本创建了一个core-image-sato镜像并支持Sato。可以为MinnowBoard MAX构建各种image类型。如core-image-base,,其仅支持控制台的image。也可以是core-image-full-cmdline,这是另一个仅控制台的image,但其安装了Linux系统全部的功能。 对于可以使用Yocto项目构建的镜像类型,请参阅Yocto Project Reference Manual中的“image”一章。
由于配置更改对于第二次构建的设置很少,OpenEmbedded构建系统可以尽可能多地重复使用先前构建中的文件。 重新使用文件意味着第二次构建将比初始构建快得多。 对于此示例,构建core-image-base的image:
$ bitbake core-image-base一旦建立完成,仅支持控制台的image将被放在build文件夹下:
tmp/deploy/images/intel-corei7-64/core-image-base-intel-corei7-64.wic
4.烧写镜像:可以使用dd工具将image写入可以启动的媒体文件(例如USB闪存盘,sata驱动器,sd卡等)
$ sudo dd if=tmp/deploy/images/intel-corei7-64/core-image-base-intel-corei7-64.wic of=TARGET_DEVICE在使用dd命令之前,TARGET_DEVICE参数为媒体设备在linux下的截点(例如:/dev/sdc, which is most likely a USB stick, or /dev/mmcblk0, which is most likely an SD card)
5.启动硬件:启动设备之前,先将媒体设备插入到MinnowBoard MAX后再启动硬件。板子将自动匹配媒体设备并启动到boorloader以及随后的操作系统。
如果板子没有自动启动没你应该从EFI中手动启动它,启动命令如下:
Shell> connect -r
     Shell> map -r
     Shell> fs0:
     Shell> bootx64
注意:
32位image使用以下命令:
Shell> bootia32下一步可以做:
如果你完成了上一节中的所有步骤,那么恭喜你! 现在怎么办?
根据你对于yocto project最感兴趣的点,你可以考虑一下任何一种进行学习:
Visit the Yocto Project Web Site: The official Yocto Project web site contains information on the entire project. Visiting this site is a good way to familiarize yourself with the overall project.
Look Through the Yocto Project Development Manual: The Yocto Project Development Manual is a great place to get a feel for how to use the Yocto Project. The manual contains conceptual and procedural information that covers common development models and introduces the Yocto Project open source development environment. The manual also contains several targeted sections that cover specific common tasks such as understanding and creating layers, customizing images, writing new recipes, working with libraries, and configuring and patching the kernel.
Look Through the Yocto Project Software Development Kit (SDK) Developer’s Guide: The Yocto Project Software Development Kit (SDK) Developer’s Guide describes how to use both the standard SDK and the extensible SDK, which are used primarily for application development. This manual also provides an example workflow that uses the popular Eclipse™ development environment. See the “Workflow using Eclipse™” section.
Learn About Board Support Packages (BSPs): If you want to learn about BSPs, see the Yocto Project Board Support Packages (BSP) Developer’s Guide.
Learn About Toaster: Toaster is a web interface to the Yocto Project’s OpenEmbedded build system. If you are interested in using this type of interface to create images, see the Toaster User Manual.
Have Available the Yocto Project Reference Manual The Yocto Project Reference Manual, unlike the rest of the Yocto Project manual set, is comprised of material suited for reference rather than procedures. You can get build details, a closer look at how the pieces of the Yocto Project development environment work together, information on various technical details, guidance on migrating to a newer Yocto Project release, reference material on the directory structure, classes, and tasks. The Yocto Project Reference Manual also contains a fairly comprehensive glossary of variables used within the Yocto Project.


 3万+
3万+

 被折叠的 条评论
为什么被折叠?
被折叠的 条评论
为什么被折叠?
 到【灌水乐园】发言


