


关于windowManager可能很多人不是很熟悉,其实所有的window都是windowManager来管理的。当然包括的Activity的phoneWindow
这里主要讲的是android 的悬浮窗口。先来看一下案例:
<?xml version="1.0" encoding="utf-8"?>
<LinearLayout xmlns:android="http://schemas.android.com/apk/res/android"
    android:orientation="vertical" android:layout_width="match_parent"
    android:layout_height="match_parent">
 <Button
     android:id="@+id/window_button_add"
     android:text="添加"
     android:layout_width="wrap_content"
     android:layout_height="wrap_content"
     android:onClick="onAddButtonClick"/>
 <Button
     android:id="@+id/window_button_remove"
     android:text="删除"
     android:layout_width="wrap_content"
     android:layout_height="wrap_content"
     android:onClick="onRemoveButtonClick"/>
</LinearLayout>/**
* @author Gordon
* @since 2016/8/5
* do()
*/
public class WindowManagerActivity extends Activity implements View.OnTouchListener {
private Button mCreateWindowButton;
private Button mFloatingButton;
private LayoutParams mLayoutParams;
private WindowManager mWindowManager;
private boolean isShow;
@Override
protected void onCreate(Bundle savedInstanceState) {
super.onCreate(savedInstanceState);
setContentView(R.layout.window_manage_activity);
initView();
}
private void initView() {
mCreateWindowButton = (Button) findViewById(R.id.window_button_add);
mWindowManager = (WindowManager) getSystemService(Context.WINDOW_SERVICE);
}
public void onAddButtonClick(View v) {
if (v == mCreateWindowButton && !isShow) {
if(mFloatingButton == null)
mFloatingButton = new Button(this);
mFloatingButton.setText("move me");
mLayoutParams = new LayoutParams(
LayoutParams.WRAP_CONTENT, LayoutParams.WRAP_CONTENT, 0, 0,
PixelFormat.TRANSPARENT);
mLayoutParams.flags = LayoutParams.FLAG_NOT_TOUCH_MODAL
| LayoutParams.FLAG_NOT_FOCUSABLE
| LayoutParams.FLAG_SHOW_WHEN_LOCKED;
mLayoutParams.type = LayoutParams.TYPE_SYSTEM_ERROR;
mLayoutParams.gravity = Gravity.LEFT | Gravity.TOP;
mLayoutParams.x = 100;
mLayoutParams.y = 300;
mFloatingButton.setOnTouchListener(this);
mWindowManager.addView(mFloatingButton, mLayoutParams);
isShow = true;
}
}
public void onRemoveButtonClick(View v) {
if (mFloatingButton != null) {
try {
mWindowManager.removeViewImmediate(mFloatingButton);
isShow = false;
} catch (Exception e) {
}
;
}
}
private int x, y, moveX, moveY;
@Override
public boolean onTouch(View v, MotionEvent event) {
switch (event.getAction()) {
case MotionEvent.ACTION_DOWN:
//相对于屏幕的位置
x = (int) event.getRawX();
y = (int) event.getRawY();
break;
case MotionEvent.ACTION_MOVE:
moveX = (int) (event.getRawX() - x);
moveY = (int) (event.getRawY() - y);
if (Math.abs(moveX) < 5 || Math.abs(moveY) < 5) { //如果手指一动的距离很小就break
break;
}
mLayoutParams.x += moveX;
mLayoutParams.y += moveY;
mWindowManager.updateViewLayout(mFloatingButton, mLayoutParams);
x = (int) event.getRawX();
y = (int) event.getRawY();
break;
case MotionEvent.ACTION_UP:
break;
default:
break;
}
return false;
}
@Override
protected void onDestroy() {
try {
mWindowManager.removeView(mFloatingButton);
} catch (IllegalArgumentException e) {
e.printStackTrace();
}
super.onDestroy();
}
}
看看运行的图,如下:
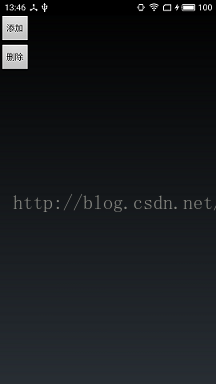
简单的介绍一下,这里点击添加按钮生成一个悬浮窗,然后可以随意的移动悬浮窗,删除按钮删除悬浮窗。
那么悬浮窗是怎么出现的呢?让我们看下源码,
看下WidowManegerActivity的22行,这个windowManager是怎么来的,点进去:
    @Override
    public Object getSystemService(@ServiceName @NonNull String name) {
        if (getBaseContext() == null) {
            throw new IllegalStateException(
                    "System services not available to Activities before onCreate()");
        }

        if (WINDOW_SERVICE.equals(name)) {
            return mWindowManager;
        } else if (SEARCH_SERVICE.equals(name)) {
            ensureSearchManager();
            return mSearchManager;
        }
        return super.getSystemService(name);
}直接返回没mWindowManager。看下activity的attach方法
 final void attach(Context context, ActivityThread aThread,
            Instrumentation instr, IBinder token, int ident,
            Application application, Intent intent, ActivityInfo info,
            CharSequence title, Activity parent, String id,
            NonConfigurationInstances lastNonConfigurationInstances,
            Configuration config, String referrer, IVoiceInteractor voiceInteractor) {
      .........................................
      ..........................................
     ............................................
        mWindow.setWindowManager(
                (WindowManager)context.getSystemService(Context.WINDOW_SERVICE),
                mToken, mComponent.flattenToString(),
                (info.flags & ActivityInfo.FLAG_HARDWARE_ACCELERATED) != 0);
        if (mParent != null) {
            mWindow.setContainer(mParent.getWindow());
        }
        mWindowManager = mWindow.getWindowManager();
        mCurrentConfig = config;
} /**
* Set the window manager for use by this Window to, for example,
* display panels. This is <em>not</em> used for displaying the
* Window itself -- that must be done by the client.
*
* @param wm The window manager for adding new windows.
*/
public void setWindowManager(WindowManager wm, IBinder appToken, String appName,
boolean hardwareAccelerated) {
mAppToken = appToken;
mAppName = appName;
mHardwareAccelerated = hardwareAccelerated
|| SystemProperties.getBoolean(PROPERTY_HARDWARE_UI, false);
if (wm == null) {
wm = (WindowManager)mContext.getSystemService(Context.WINDOW_SERVICE);
}
mWindowManager = ((WindowManagerImpl)wm).createLocalWindowManager(this);
}看下WindowManagerActivity的25-41行:
关键的41行中,有个addview方法,而这个mWindowManager又是WindowManagerImpl,看下它的addView方法:
    @Override
    public void addView(@NonNull View view, @NonNull ViewGroup.LayoutParams params) {
        applyDefaultToken(params);
        mGlobal.addView(view, params, mDisplay, mParentWindow);
} public void addView(View view, ViewGroup.LayoutParams params,
Display display, Window parentWindow) {
if (view == null) {
throw new IllegalArgumentException("view must not be null");
}
if (display == null) {
throw new IllegalArgumentException("display must not be null");
}
if (!(params instanceof WindowManager.LayoutParams)) {
throw new IllegalArgumentException("Params must be WindowManager.LayoutParams");
}
final WindowManager.LayoutParams wparams = (WindowManager.LayoutParams) params;
if (parentWindow != null) {
parentWindow.adjustLayoutParamsForSubWindow(wparams);
} else {
// If there's no parent, then hardware acceleration for this view is
// set from the application's hardware acceleration setting.
final Context context = view.getContext();
if (context != null
&& (context.getApplicationInfo().flags
& ApplicationInfo.FLAG_HARDWARE_ACCELERATED) != 0) {
wparams.flags |= WindowManager.LayoutParams.FLAG_HARDWARE_ACCELERATED;
}
}
ViewRootImpl root;
View panelParentView = null;
synchronized (mLock) {
// Start watching for system property changes.
if (mSystemPropertyUpdater == null) {
mSystemPropertyUpdater = new Runnable() {
@Override public void run() {
synchronized (mLock) {
for (int i = mRoots.size() - 1; i >= 0; --i) {
mRoots.get(i).loadSystemProperties();
}
}
}
};
SystemProperties.addChangeCallback(mSystemPropertyUpdater);
}
int index = findViewLocked(view, false);
if (index >= 0) {
if (mDyingViews.contains(view)) {
// Don't wait for MSG_DIE to make it's way through root's queue.
mRoots.get(index).doDie();
} else {
throw new IllegalStateException("View " + view
+ " has already been added to the window manager.");
}
// The previous removeView() had not completed executing. Now it has.
}
// If this is a panel window, then find the window it is being
// attached to for future reference.
if (wparams.type >= WindowManager.LayoutParams.FIRST_SUB_WINDOW &&
wparams.type <= WindowManager.LayoutParams.LAST_SUB_WINDOW) {
final int count = mViews.size();
for (int i = 0; i < count; i++) {
if (mRoots.get(i).mWindow.asBinder() == wparams.token) {
panelParentView = mViews.get(i);
}
}
}
root = new ViewRootImpl(view.getContext(), display);
view.setLayoutParams(wparams);
mViews.add(view);
mRoots.add(root);
mParams.add(wparams);
}
// do this last because it fires off messages to start doing things
try {
root.setView(view, wparams, panelParentView);
} catch (RuntimeException e) {
// BadTokenException or InvalidDisplayException, clean up.
synchronized (mLock) {
final int index = findViewLocked(view, false);
if (index >= 0) {
removeViewLocked(index, true);
}
}
throw e;
}
}30-67的加锁的代码主要就是准备添加的view,防止重复添加。
mViews存储的是所有Window所对应的View,mRoots存储的是所有Window所对应的ViewRootImpl,
mParams存储的是所有Window所对应的布局参数,
而mDyingViews存储了那些正在被删除的View对象,或者说是那些已经调用removeView方法但是还没有删除的Window对象。
在addView方法中通过如下方式将Window的一系列对象添加到列表中。
80行的root.setView()才是真正的添加View。而ViewRootImpl又是什么呢?
/**
 * The top of a view hierarchy, implementing the needed protocol between View
 * and the WindowManager.  This is for the most part an internal implementation
 * detail of {@link WindowManagerGlobal}.
 *
 * {@hide}
 */
@SuppressWarnings({"EmptyCatchBlock", "PointlessBooleanExpression"})
public final class ViewRootImpl implements ViewParent,
        View.AttachInfo.Callbacks, HardwareRenderer.HardwareDrawCallbacks {
    ..........................
}用于更新界面,看下此类的setView方法:
 /**
     * We have one child
     */
    public void setView(View view, WindowManager.LayoutParams attrs, View panelParentView) {
        synchronized (this) {
            if (mView == null) {
               ..................
                .......................
                  .........................
                requestLayout();
                if ((mWindowAttributes.inputFeatures
                        & WindowManager.LayoutParams.INPUT_FEATURE_NO_INPUT_CHANNEL) == 0) {
                    mInputChannel = new InputChannel();
                }
                try {
                    mOrigWindowType = mWindowAttributes.type;
                    mAttachInfo.mRecomputeGlobalAttributes = true;
                    collectViewAttributes();
                    res = mWindowSession.addToDisplay(mWindow, mSeq, mWindowAttributes,
                            getHostVisibility(), mDisplay.getDisplayId(),
                            mAttachInfo.mContentInsets, mAttachInfo.mStableInsets,
                            mAttachInfo.mOutsets, mInputChannel);
                } catch (RemoteException e) {
                    mAdded = false;
                    mView = null;
                    mAttachInfo.mRootView = null;
                    mInputChannel = null;
                    mFallbackEventHandler.setView(null);
                    unscheduleTraversals();
                    setAccessibilityFocus(null, null);
                    throw new RuntimeException("Adding window failed", e);
                } finally {
                    if (restore) {
                        attrs.restore();
                    }
                }
           ..............................
             ................................
                 ...................................
    }
windowSession.addDisplay是调用服务端添加到window中,看下源码:
    @Override
    public int addToDisplay(IWindow window, int seq, WindowManager.LayoutParams attrs,
            int viewVisibility, int displayId, Rect outContentInsets, Rect outStableInsets,
            Rect outOutsets, InputChannel outInputChannel) {
        return mService.addWindow(this, window, seq, attrs, viewVisibility, displayId,
                outContentInsets, outStableInsets, outOutsets, outInputChannel);
}更新和删除都是这个流程,总结一下看下流程图:

WindowManagerImpl implements 接口WindowManager,为WindowManager implements接口VIewManager,
在WindowManagerImpl类中调用WindowManagerGlobal单独来处理添加,更新和删除的动作,
而在相应的方法中,核心的调用VIewRootImpl的相应方法,ViewRootImpl类本身去处理View的绘制和更新工作,
类中调用Android service端完成窗口的添加,更新和删除工作 。
关于删除的removeView()和removeViewImmediate()其实顾名思义就是阻塞和非阻塞的删除方法,具体可以看看源码。
着了就不多说了。
下一章 继续研究Activity的启动过程


 2465
2465

 被折叠的 条评论
为什么被折叠?
被折叠的 条评论
为什么被折叠?
 到【灌水乐园】发言


