


前言
软件许可(License)证书可以在软件产品交付的时候,对其使用时间以及使用范围进行授权。当用户申请(购买)改变使用时间和使用范围的时候,授权方可以为用户生成一个新的license替换原来的license即可,从而避免了修改源码、改动部署等繁琐操作。
公钥、私钥和证书介绍
在互联网通信中,为了保证信息传输的安全,通常使用对称秘钥、非对称秘钥以及密码散列函数的方式对通信信息进行加密以及通信身份进行验证。对称秘钥即通信双方使用相同的秘钥对通信内容进行加密,这种方式应该是比较老旧的通信加密方式,通信安全程度较低。现在使用的较多的应该是非对称加密,每个人有自己的私钥,然后拥有授权的公钥。每人可以利用自己的私钥对要发送的信息进行加密,然后接受者通过发送者的公钥对信息进行解密。可以类比信箱,拥有公钥的人,可以向 信箱投送信件,拥有私钥的人可以打开信箱,读取信件。
在这种通信方式中,可能存在C偷偷将B持有的A公钥换成自己的公钥,而B不知道自己拥有的A的公钥已经被替换,那么C就可以冒充A给B发送信息,而B相信此信息来自A。为了解决这个问题,需要对B持有的A的公钥进行认证,从而确定此公钥确实是A的公钥,而不是被别人篡改过的。而认证机构必须是第三方可信赖的机构,就是CA,由此发送过程就变成如下:
-
A发给B数据的时候,除了要发送签名和数据实体,还要发送CA颁发的证书。
-
B接收到A发送过来的数据后,首先用CA的公钥区解密证书,如果能解,表明这个证书里的信息可信赖,从而得到证书里A的公钥,然后B再用到后的公钥去做下一步动作。
核心工具包
使用的核心工具包是:truelicense-core,TrueLicense是一个开源的证书管理引擎,可以用于license的生成和有效性的验证。在Truelicense中,license将和公钥一起发送给被授权者,在程序中,使用公钥对license进行解密,并校验其许可信息。
<!-- https://mvnrepository.com/artifact/de.schlichtherle.truelicense/truelicense-core -->
<dependency>
    <groupId>de.schlichtherle.truelicense</groupId>
    <artifactId>truelicense-core</artifactId>
    <version>1.33</version>
</dependency>
使用Java自带的Keytool生成公私钥库
Keytool 是一个Java 数据证书的管理工具 ,Keytool 将密钥(key)和证书(certificates)存在一个称为keystore的文件中 在keystore里,包含两种数据:
-
密钥条目(Key entity)——密钥(secret key)又或者是私钥和配对公钥(采用非对称加密)
-
可信任的证书实体(trusted certificate entries)——只包含公钥
生成license命令
## 1. 生成私匙库 # validity:私钥的有效期多少天 # alias:私钥别称 # keystore: 指定私钥库文件的名称(生成在当前目录) # storepass:指定私钥库的密码(获取keystore信息所需的密码) # keypass:指定别名条目的密码(私钥的密码) keytool -genkey -keysize 1024 -keyalg DSA -validity 1 -alias "privateKey" -keystore "privateKeys.store" -storepass "952781lx" -keypass "952731lx" -dname "CN=lx, OU=lx, O=lx, L=SC, ST=CD, C=CN" ## 2. 把私匙库内的公匙导出到一个文件当中 # alias:私钥别称 # keystore:指定私钥库的名称(在当前目录查找) # storepass: 指定私钥库的密码 # file:证书名称 keytool -exportcert -alias "privateKey" -keystore "privateKeys.store" -storepass "952781lx" -file "certfile.cer" ## 3. 再把这个证书文件导入到公匙库 # alias:公钥别称 # file:证书名称 # keystore:公钥文件名称 # storepass:指定私钥库的密码 keytool -import -alias "publicCert" -file "certfile.cer" -keystore "publicCerts.store" -storepass "952781lx"
在任意目录下执行完上述三个命令之后。我们会在当前目录下面得到三个文件:privateKeys.keystore、publicCerts.keystore、certfile.cer。
-
privateKeys.keystore:私钥,这个我们自己留着,不能泄露给别人。
-
publicCerts.keystore:公钥,这个给客人用的。在我们程序里面就是用他来解析license文件里面的信息的。
-
certfile.cer:这个文件没啥用,可以删掉。
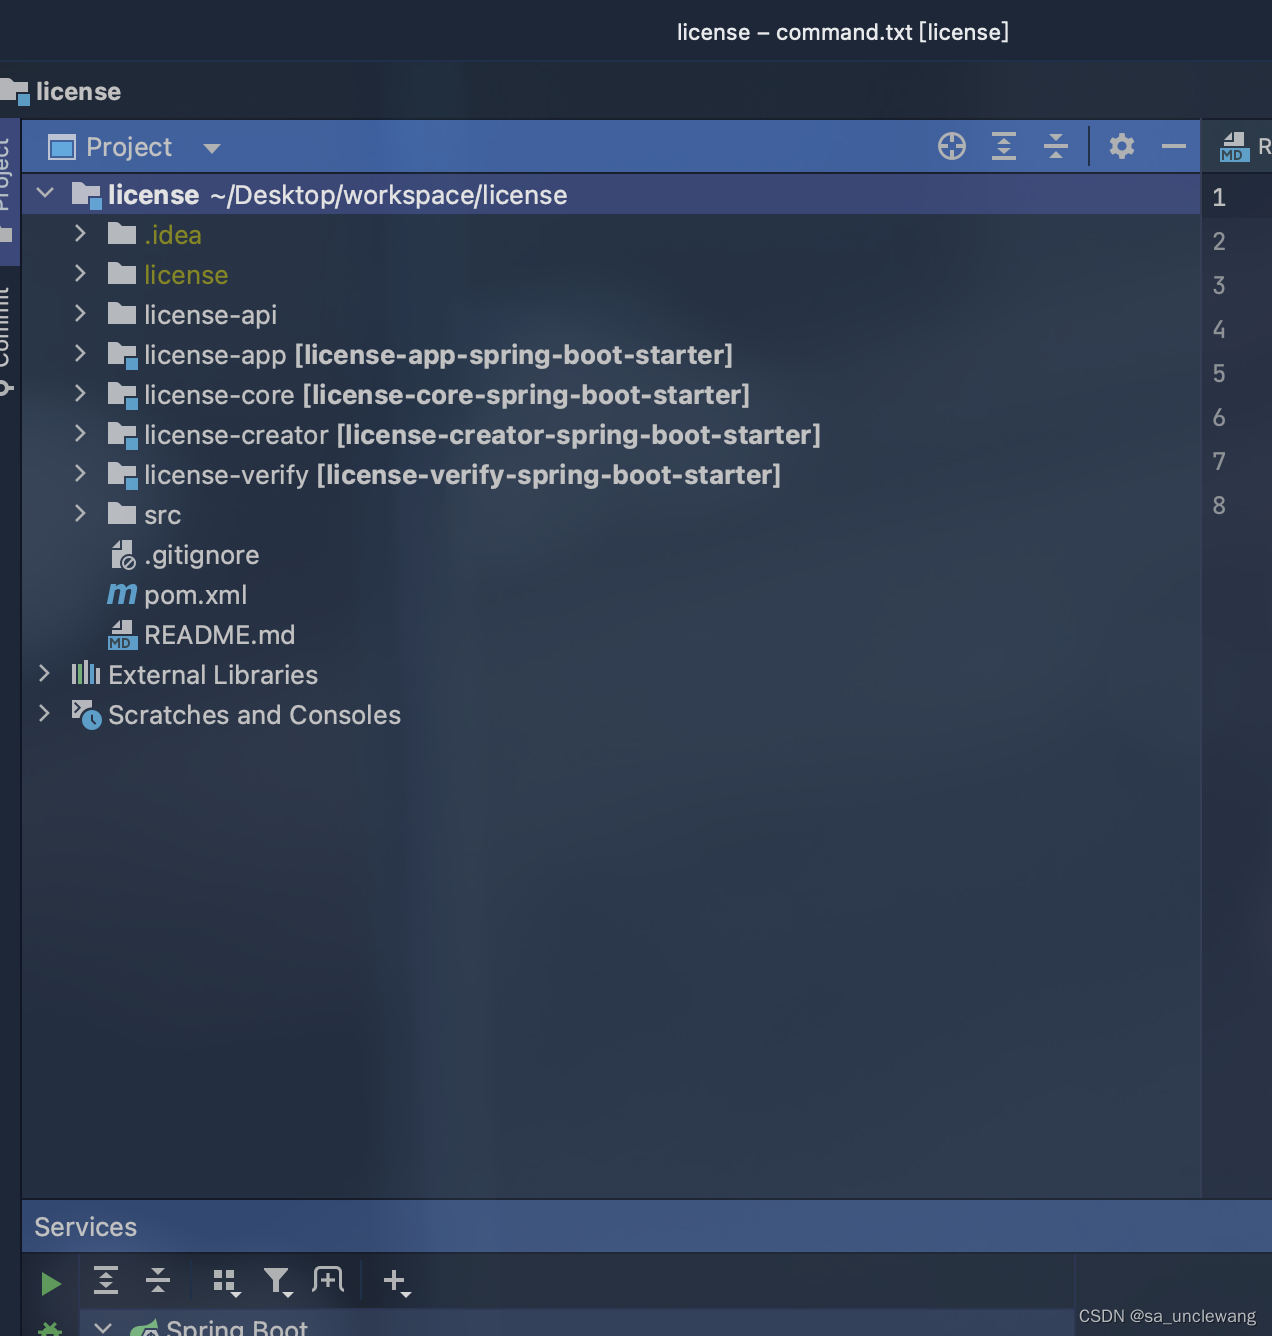
项目结构
-
License-api:接口地址api。
-
License-app:模拟的应用app。
-
License-core:核心实现工具包。
-
License-creator:创建证书。
-
License-verify:校验证书。
整体项目运作流程
首先我们把生成的私钥(privateKeys.store)放到license-creator项目的resources文件夹下面,然后就可以启动项目license-app下的license-creator-app-test,项目启动以后我们去调用:/license/getServerInfos,此接口是为两获取服务器硬件信息,接口返回的信息如下:
{
• "status": 200,
• "message": "成功",
• "data": {
• "ipAddress": [
• "10.0.0.192"
• ],
• "macAddress": [
• "BC-D0-74-72-73-21"
• ],
• "cpuSerial": "",
• "mainBoardSerial": "",
• "registerAmount": **null**,
• "boardCheck": **false**,
• "registerCheck": **false**,
• "macCheck": **false**,
• "cpuCheck": **false**,
• "ipCheck": **false**
• },
• "timeStamp": "2023-08-17 10:30:43"
}
获取到的ip地址、mac地址、cpu序列号、主办号等等信息就是为了我们后续生成证书的时候提供一些入参,当然如果不需要开启这些校验那可以跳过。
然后我们获取到以上信息以后,就可以去尝试生成证书了,生成证书的接口:/license/generate,调用此接口需要一些基本的参数,具体如下:
{`
• `"subject": "ipv6",`
• `"privateAlias": "privateKey",`
• `"keyPass": "952781lx",`
• `"storePass": "952781lx",`
• `"privateKeysStorePath": "/privateKeys.store",`
• `"issuedTime": "2023-08-09 14:30:00",`
• `"expiryTime": "2023-08-10 14:30:00",`
• `"description": "系统软件许可证书",`
• `"licenseCheck": {`
• `"ipAddress": [`
• `"10.0.0.192"`
• `],`
• `"macAddress": [`
• `"BC-D0-74-72-73-21"`
• `],`
• `"cpuSerial": "",`
• `"mainBoardSerial": "",`
• `"macCheck": **false**,`
• `"boardCheck": **false**,`
• `"cpuCheck": **false**,`
• `"ipCheck": **false**`
• `}`
`}
接口调用成功后返回结果如下:
{
• "status": 200,
• "message": "成功",
• "data": {
• "subject": "ipv6",
• "privateAlias": "privateKey",
• "keyPass": "952781lx",
• "privateKeysStorePath": "/privateKeys.store",
• "storePass": "952781lx",
• "licensePath": "/Users/unclewang/Desktop/workspace/license/license/20230817103817/license.lic",
• "issuedTime": "2023-08-09 14:30:00",
• "expiryTime": "2023-08-18 14:30:00",
• "consumerType": "user",
• "consumerAmount": 1,
• "description": "系统软件许可证书",
• "licenseCheck": {
• "ipAddress": [
• "10.0.0.192"
• ],
• "macAddress": [
• "BC-D0-74-72-73-21"
• ],
• "cpuSerial": "",
• "mainBoardSerial": "",
• "registerAmount": **null**,
• "boardCheck": **false**,
• "registerCheck": **false**,
• "macCheck": **false**,
• "cpuCheck": **false**,
• "ipCheck": **false**
• },
• "licUrl": "http://localhost:8080/license/download?path=/Users/unclewang/Desktop/workspace/license/license/20230817103817/license.lic"
• },
• "timeStamp": "2023-08-17 10:38:17"
}
我们所需要的证书就会生成在当前项目路径:/license/20230817103817/license.lic,或者说还可以给我们提供一个证书下载地址:
"licUrl": "http://localhost:8080/license/download?path=/Users/unclewang/Desktop/workspace/license/license/20230817103817/license.lic"。到此我们的证书就正式生成,接下来我们就需要验证证书是否合法有效。
上面我们已经正式生成了证书,然后我们需要把证书移动到我们的项目license-verify-app-test的resources文件夹下面,接下来我们就可以启动license-app下的license-verify-app-test项目来校验证书,如果我们的证书不合法,那么在启动的时候项目会给出如下提示:
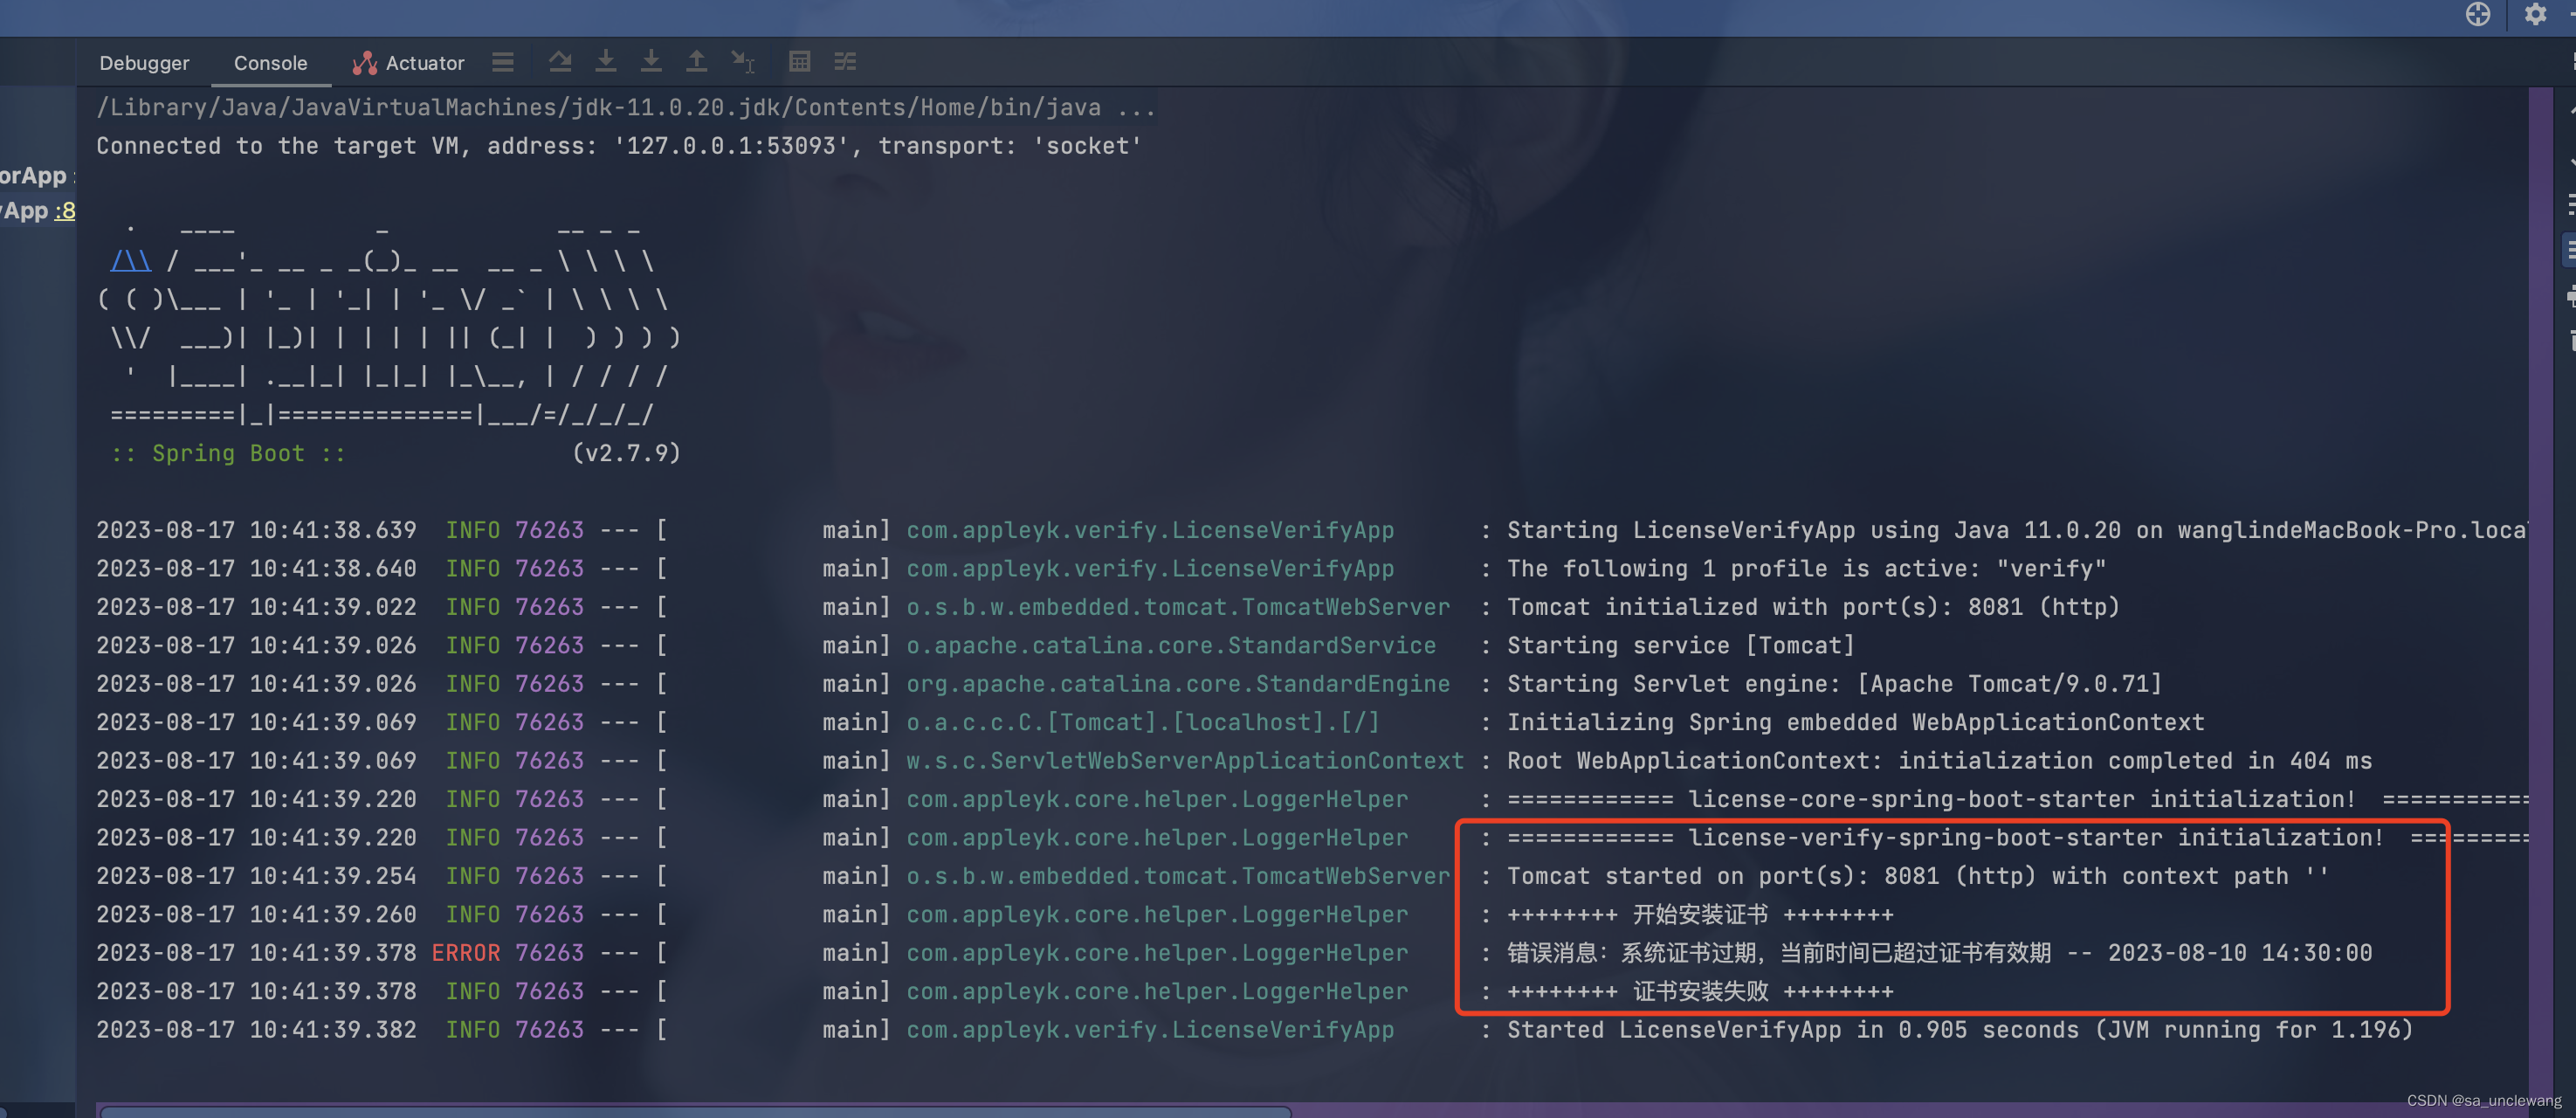
那么我们正常去调用接口的时候,会给我们如下提示:

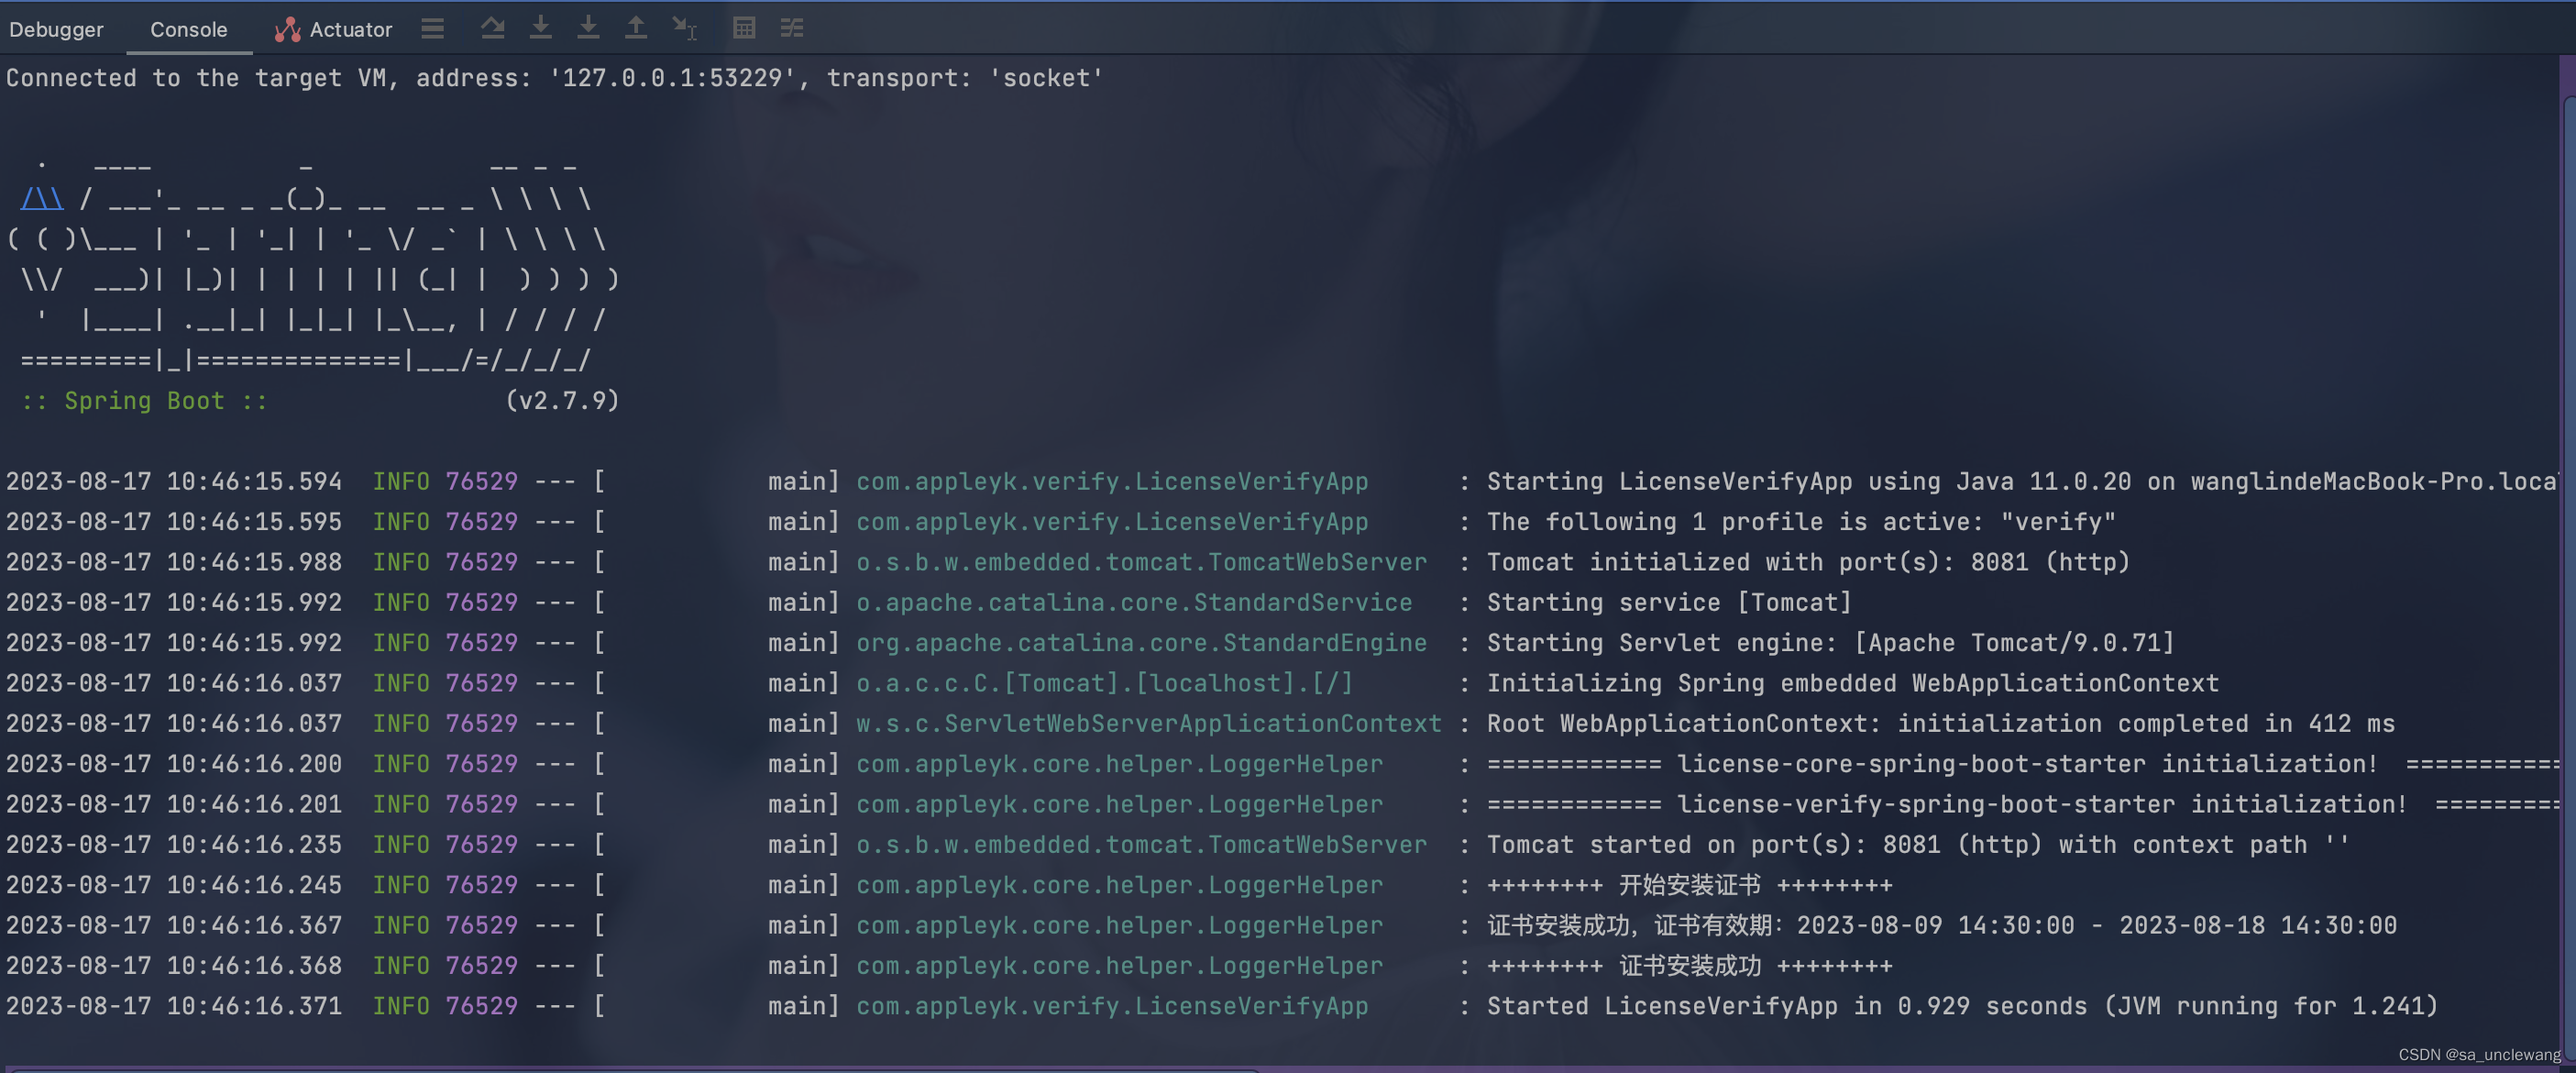
当我们的证书合法有效的时候,我们启动项目会给出一个正确的提示,如下:
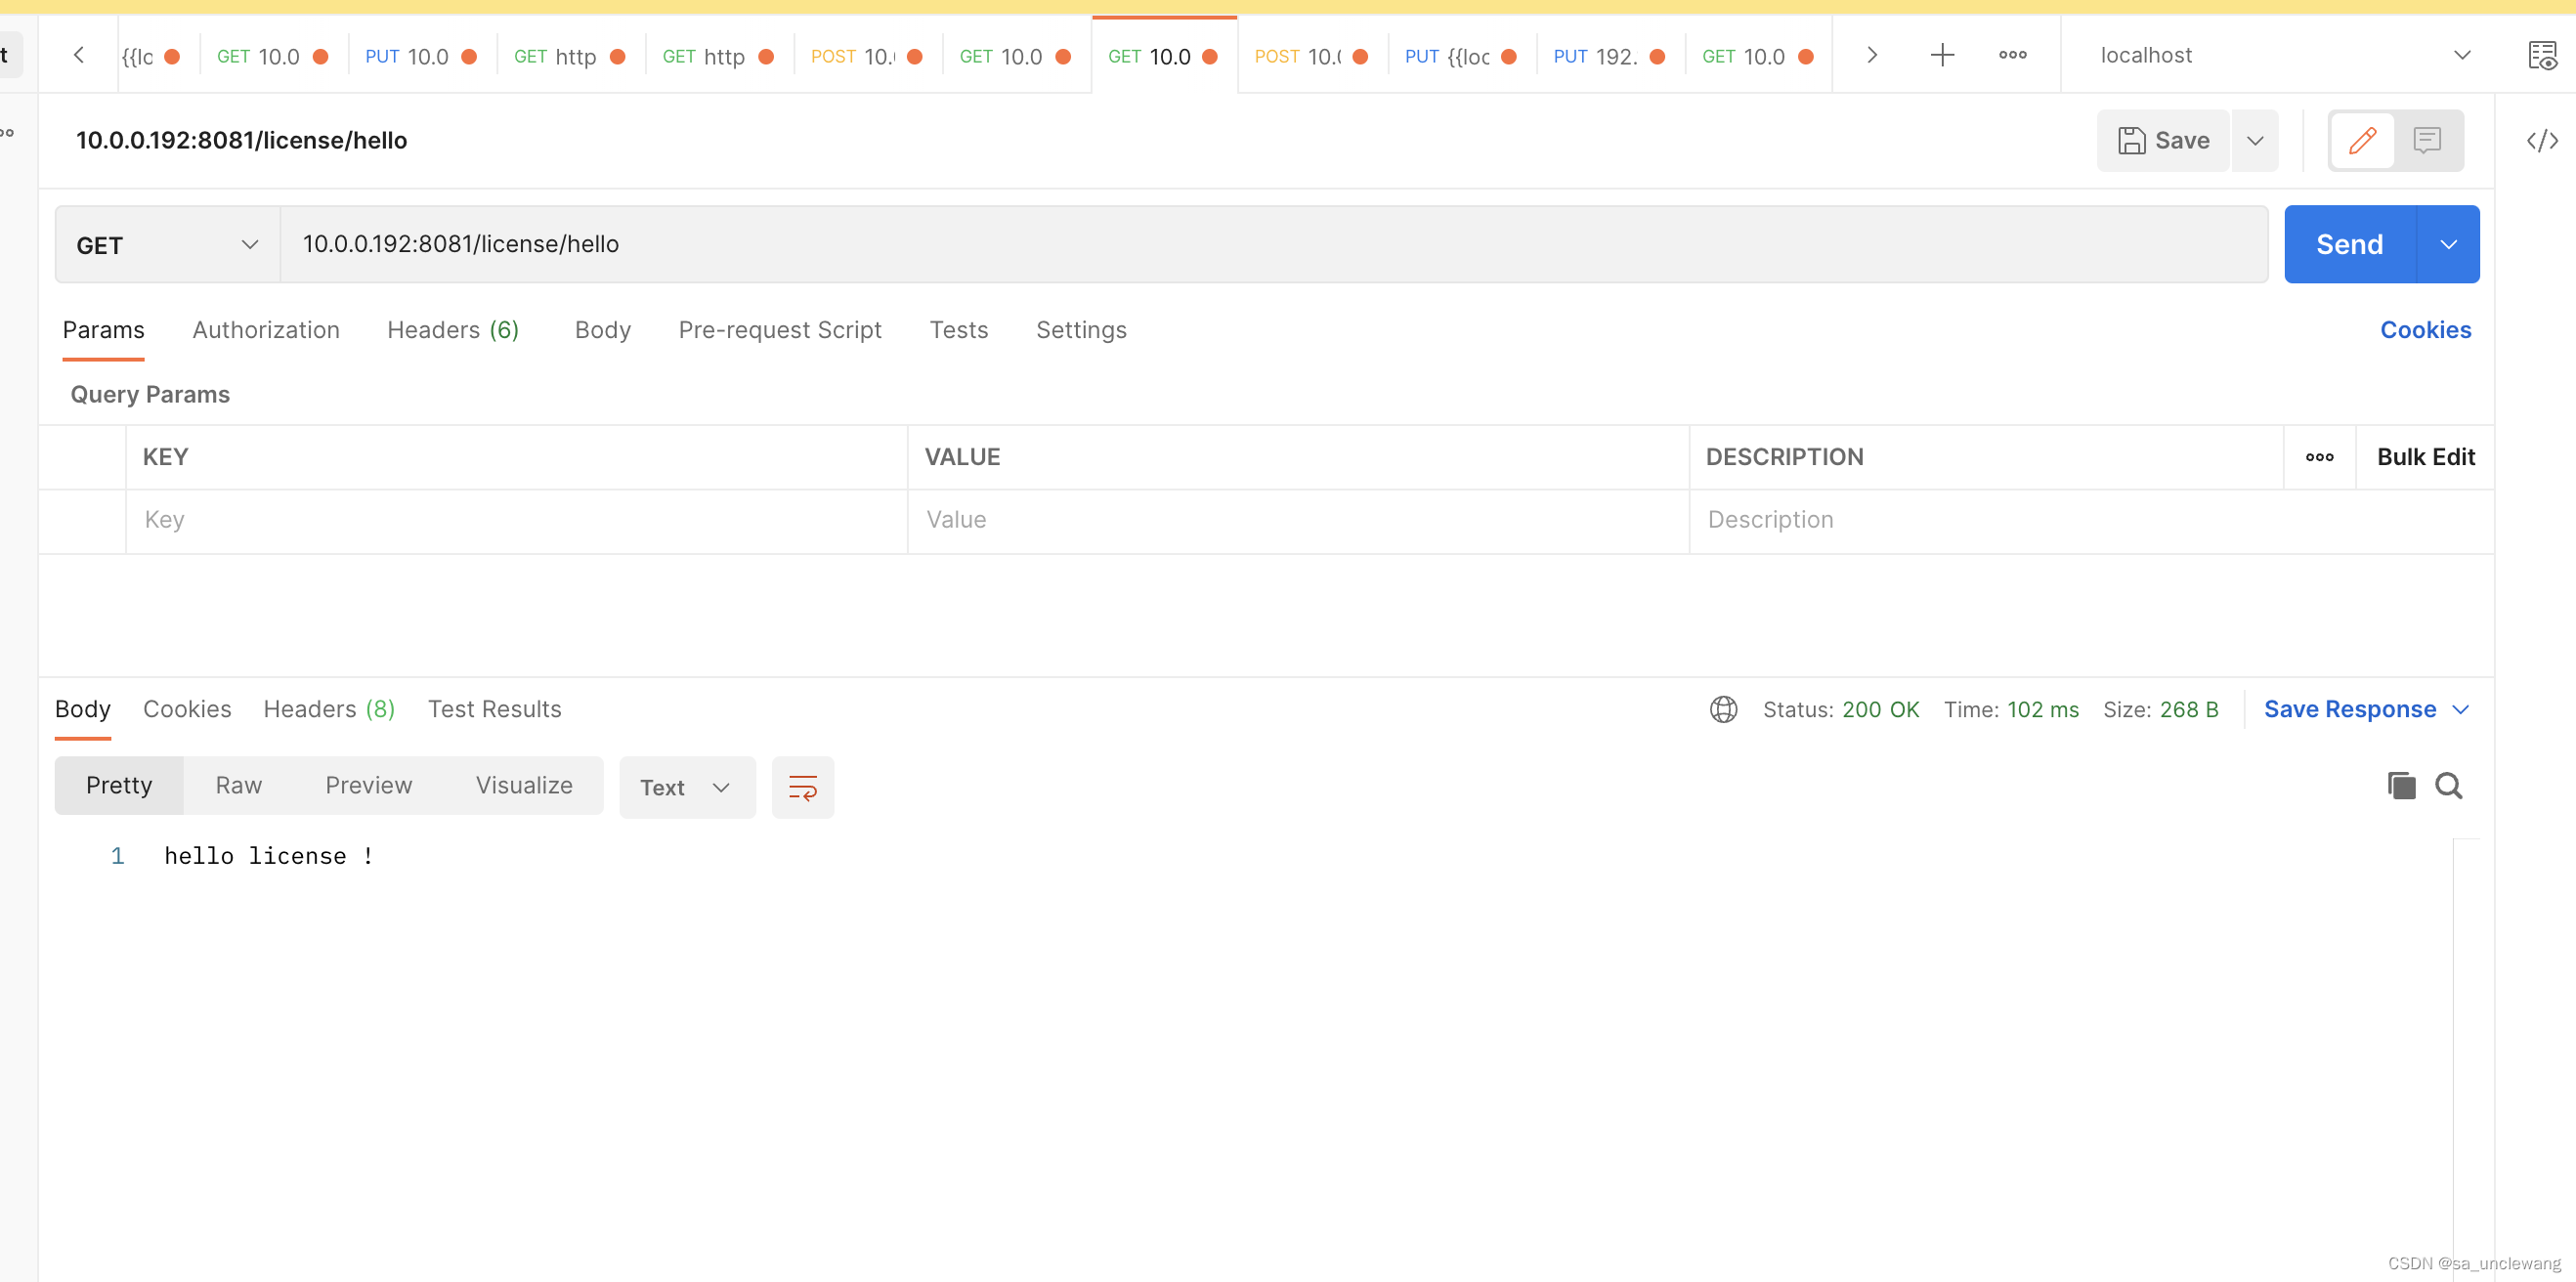
然后我们再去调用我们的接口,才会给我们正常返回结果,如下:
以上就是我们整个项目整体运作流程,下面有一些需要关心和注意到的地方,稍微整理描述一下。
-
LicenseManager:构建License的管理器,提供证书的创建、安装、校验功能。
-
LicenseVerifyInterceptor:license验证拦截器,主要是拦截携带自定义注解VLicense的接口。
-
@VLicense:自定义注解,需要证书拦截添加此注解。
-
LicenseVerifyInstallListener:项目启动时安装证书以及定时监测License是否发生变化。
网上对这块的资料也比较少,希望对各位有所帮助,如果需要源码或者技术支撑,请私聊。


 3225
3225

 被折叠的 条评论
为什么被折叠?
被折叠的 条评论
为什么被折叠?
 到【灌水乐园】发言


