


Spring Web MVC与Spring Bean注解
@Controller/@RestController
@Controller是@Component注解的一个延伸,Spring 会自动扫描并配置被该注解标注的类。此注解用于标注Spring MVC的控制器。
@Controller
@RequestMapping("/api/v1")
public class UserApiController{

	@Autowired
	private UserService userService;

	@GetMapping("/users/{id}")
	@ResponseBody
	public User getUserById(@PathVariable long id) throws UserNotFoundException{
		return userService.findOne(id);
	}
}
@RestController是在Spring 4.0开始引入的,这是一个特定的控制器注解。此注解相当于@Controller和@ResponseBody的快捷方式。
当使用此注解时,不需要再在方法上使用@ResponseBody注解。
将控制器方法的返回值转换为JSON格式,并以HTTP响应的方式返回给客户端。如果需要返回XML格式的响应,可以使用其他注解,如@Produces和@Consumes
@RestController
@RequestMapping("/api/v1")
public class UserApiController{

	@Autowired
	private UserService userService;

	@GetMapping("/users/{id}")
	public User getUserById(@PathVariable long id) throws UserNotFoundException{
		return userService.findOne(id);
	}
}
@RequestMapping
对请求处理类中的请求处理方法进行标注,主要用途是将Web请求与请求处理类中的方法进行映射。
Spring MVC和Spring WebFlux都通过RquestMappingHandlerMapping和RequestMappingHndlerAdapter两个类来提供对@RequestMapping注解的支持
- value:映射的请求URL或者其别名
- method:兼容HTTP的方法名
- params:根据HTTP参数的存在、缺省或值对请求进行过滤
- header:根据HTTP Header的存在、缺省或值对请求进行过滤
- consume:设定在HTTP请求正文中允许使用的媒体类型
- product:在HTTP响应体中允许使用的媒体类型
【提示:在使用@RequestMapping之前,请求处理类还需要使用@Controller或@RestController进行标记】
@Controller
public class DemoController{

	@RequestMapping(value="/demo/home",method=RequestMethod.GET)
	public String home(){
		return "/home";
	}
}
@RequestMapping还可以对类进行标记,这样类中的处理方法在映射请求路径时,会自动将类上@RequestMapping设置的value拼接到方法中映射路径之前,如下:
@Controller
@RequestMapping(value="/demo")
public class DemoController{

	@RequestMapping(value="/home",method=RequestMethod.GET)
	public String home(){
		return "/home";
	}
}
@RequestBody
在处理请求方法的参数列表中使用,它可以将请求主体中的参数绑定到一个对象中,请求主体参数是通过HttpMessageConverter传递的,根据请求主体中的参数名与对象的属性名进行匹配并绑定值。此外,还可以通过@Valid注解对请求主体中的参数进行校验。
@RequestController
@RequestMapping("/api/v1")
public class UserController{

	@Autowired
	private UserService userService;

	@PostMapping("/users")
	public User createUser(@Valid @RequestBody User user){
		return userService.save(user);
	}
}
@ResponseBody
会自动将控制器中方法的返回值写入到HTTP响应中.
@ResponseBody注解只能用在被@Controller注解标记的类中。如果在被@RestController标记的类中,则方法不需要使用@ResponseBody注解进行标注。@RestController相当于是@Controller和@ResponseBody的组合注解
@ResponseBody
@GetMapping("/users/{id}")
public User findByUserId(@PathVariable long id) throws UserNotFoundException{
	User user = userService.findOne(id);
	return user;
}
@PathVariable
将方法中的参数绑定到请求URI中的模板变量上。可以通过@RequestMapping注解来指定URI的模板变量,然后使用@PathVariable注解将方法中的参数绑定到模板变量上。
@PathVariable注解允许我们使用value或name属性来给参数取一个别名
模板变量名需要使用{ }进行包裹,如果方法的参数名与URI模板变量名一致,则在@PathVariable中就可以省略别名的定义。
@GetMapping("/uers/{id}/roles/{roleId}")
public Role getUserRole(@PathVariable(name="id") long id,@PathVariable(value="roleId")long roleId)throws ResourceNotFoundException{

	return userRoleService.findByUserIdAndRoledId(id,roleId);
}
@RequestParam
用于将方法的参数与Web请求的传递的参数进行绑定。
使用@RequestParam可以轻松的访问HTTP请求参数的值
该注解的其他属性配置与@PathVariable的配置相同,特别的,如果传递的参数为空,还可以通过defaultValue设置一个默认值。
@GetMapping
public Role getUserRole(@RequestParam(name="id") long id,@ReuqestParam(name="roleId")long roleId)throws ResourceNotFoundException{
	return userRoleService.findByUserIdAndRoleId(id,roleId);
}

//如果参数为空设置默认值
@GetMapping
public Role getUserRole(@RequestParam(name="id",defalut="0") long id,@RequestParam(name="roleId",default="0")long roleId){
	if(id==0||roleId==0){
		return new Role();
	}
	return userRoleService.findByUserIdAndRoleId(id,roleId);
}
@ModelAttribute
通过此注解,可以通过模型索引名称来访问已经存在于控制器中的model。
与@PathVariable和@RequestParam注解一样,如果参数名与模型具有相同的名字,则不必指定索引名称
@PostMapping("/users")
public void createUser(@ModelAttribute("user") User user){
	userService.save(user);
}
如果使用@ModelAttribute对方法进行标注,Spring会将方法的返回值绑定到具体的Model上。
@ModelAttribute("ramostear")
User getUser(){
	User user = new User();
	user.setId(1);
	user.setFirstName("ramostear");
	user.setEmail("ramostear@163.com");
	return user;
}
【在Spring调用具体的处理方法之前,被@ModelAttribute注解标注的所有方法都将被执行。】
@GetMapping/@PostMapping/@PutMapping/@DeleteMapping@PatchMapping
用于处理HTTP GET/POST/PUT/DELETE/PATCH请求,并将请求映射到具体的处理方法中。具体来说,@GetMapping是一个组合注解,它相当于是@RequestMapping(method=RequestMethod.GET/POST/PUT/DELETE/PATCH)的快捷方式
@RequestController
@RequestMapping("/api/v1")
public class UserController{

	@Autowired
	private UserService userService;

	@GetMapping("/users")
	public List<User> findAllUser(){
		List<User> users = userService.findAll();
		return users;
	}

	@GetMapping("/users/{id}")
	public User findOneById(@PathVariable(name="id") long id) throws UserNotFoundException{

		return userService.findOne();
	}

	@PostMapping("/users")
	public User createUser(@Valid @RequestBody User user){
		return userService.save(user);
	}

	@PutMapping("/users/{id}")
	public ResponseEntity<User> updateUser(@PathValriable(name="id") long id,@Value @ResponseBody User detail)throws UserNotFoundException{

		User user = userRepository.findById(id).orElseThrow(() -> UserNotFoundException("User not found with this id "+id));

		user.setLastName(detail.getLastName());
		user.setEmail(detail.getEmail());
		user.setAddress(detail.getAddress());
		final User origin = userRepository.save(user);
		return ResponseEntity.ok(origin);
	}

	@DeleteMapping("/users/{id}")
	public Map<String,Boolean> deleteById(@PathVariable(name="id") long id) throws UserNotFoundException{

		User user = userRepository.findById(id).orElseThrow(() -> UserNotFoundException("User not found with this id "+id));

		userRepository.delete(user);
		Map<String,Boolean> response = new HashMap<>();
		response.put("deleted",Boolean.TRUE);
		return response;
	}

	@PatchMapping("/users/patch")
	public ResponseEntity<Object> patch(){
		return new ResponseEntity<>("Path method response message",HttpStatus.OK);
	}
}
@ControllerAdvice
@ControllerAdvice是@Component注解的一个延伸注解,Spring会自动扫描并检测被@ControllerAdvice所标注的类。
@ControllerAdvice需要和@ExceptionHandler、@InitBinder以及@ModelAttribute注解搭配使用,主要是用来处理控制器所抛出的异常信息。
我们需要定义一个被@ControllerAdvice所标注的类,在该类中,定义一个用于处理具体异常的方法,并使用@ExceptionHandler注解进行标记。
在有必要的时候,可以使用@InitBinder在类中进行全局的配置,还可以使用@ModelAttribute配置与视图相关的参数。
使用@ControllerAdvice注解,就可以快速的创建统一的,自定义的异常处理类。
@ControllerAdvice(basePackages={"com.ramostear.controller.user"})
public class UserControllerAdvice{

	@InitBinder
	public void binder(WebDataBinder binder){
		SimpleDateFormat format = new SimpleDateFormat("yyyy-MM-dd");
		format.setLenient(false);
		binder.registerCustomEditor(Date.class,"user",new CustomDateFormat(format,true));
	}

	//配置于视图相关的参数
	@ModelAttribute
	public void modelAttribute(Model model){
		model.addAttribute("msg","User not found exception.");
	}

	@ExceptionHandler(UserNotFoundException.class)
	public ModelAndView userNotFoundExceptionHandler(UserNotFoundException e){
		ModelAndView modelAndView = new ModelAndView();
		modelAndView.addObject("exception",ex);
		modelAndView.setViewName("error");
		return modelAndView;
	}
}
@ExceptionHander注解用于标注处理特定类型异常类所抛出异常的方法。
当控制器中的方法抛出异常时,Spring会自动捕获异常,并将捕获的异常信息传递给被@ExceptionHandler标注的方法。
@ExceptionHandler(UserNotFoundException.class)
public ResponseEntity<Object> userNotFoundExceptionHandler(UserNotFoundException ex,WebRequest request){

	UserErrorDetail detail = new UserErrorDetail(new Date(),ex.getMessage,request.getDescription(false));
	return new ResponseEntity<>(detail,HttpStates.NOT_FOUND);
}
@InitBinder注解用于标注初始化WebDataBinider 的方法,该方法用于对Http请求传递的表单数据进行处理,如时间格式化、字符串处理等。
@InitBinder
public void initBinder(WebDataBinder dataBinder){
	StringTrimmerEditor editor = new StringTrimmerEditor(true);
	dataBinder.registerCustomEditor(String.class,editor);
}
@ResponseStatus
标注请求处理方法。使用此注解,可以指定响应所需要的HTTP STATUS。特别地,我们可以使用HttpStauts类对该注解的value属性进行赋值。
@ResponseStatus(HttpStatus.BAD_REQEST)
@ExceptionHandler(UserNotFoundException.class)
public ResponseEntity<Object> userNotFoundExceptionHandler(UserNotFoundException ex,WebRequest request){

	UserErrorDetail detail = new UserErrorDetail(new Date(),ex.getMessage(),request.getDescription(false));
	return new ResponseEntity<>(detail,HttpStatus.NOT_FOUND);
}
@CrossOrigin
解决跨域问题,跨域资源共享(CORS)问题。跨域资源共享是浏览器安全策略的一部分,它限制了浏览器在不同域名之间发送和接收HTTP请求。
/**
	使用@CrossOrigin注解指定允许来自http://localhost:8080域名的GET和POST请求访问该控制器中的方法。
	这意味着,在http://localhost:8080域名下的网页可以通过XMLHttpRequest对象发送GET和POST请求,访问该控制器中的方法
*/
@RequestController
@RequestMapping("/api")
@CrossOrigin(origins="http://localhost:8080",methods={RequestMethod.GET,RequestMethod.POST})
public class ApiController{

	@GetMapping("/users")
	public List<User> getUsers(){
		//查询用户信息
		List<User> users = userService.getUsers();
		return users;
	}
}
@Async
在Spring框架中,如果一个方法需要执行一些比较耗时的操作,如果这个方法是在主线程中执行,就会导致主线程被阻塞,用户界面无法响应用户的操作。使用@Async注解可以将这个方法的执行异步化,让主线程继续执行其他任务,提高应用程序的响应性能。
@Service
public class UserService{

	//查询用户信息的操作在异步线程中执行,不会阻塞主线程。
	@Async
	public CompletableFuture<UserDetails> getUserDetailsAsync(Long id){
		// 查询用户信息
        UserDetails userDetails = userRepository.getUserDetails(id);
        return CompletableFuture.completedFuture(userDetails);//返回一个CompletableFuture对象,表示异步执行的结果
	}
}
@Cacheable
在Spring框架中,如果一个方法的返回结果是固定的,而且这个方法的执行比较耗时,我们可以使用@Cacheable注解将这个方法的返回结果缓存起来,下次执行这个方法时直接从缓存中获取结果,避免重复执行
@Service
public class UserServie{

	//这个方法的返回结果可以被缓存起来,会被缓存到名为"userCache"的缓存中
	@Cacheable("userCache")
	public User getUser(Long id){
		// 查询用户信息
        User user = userRepository.getUser(id);
        return user;
	}
}
@CacheEvict
在Spring框架中,如果一个方法的执行会导致缓存数据的失效,我们可以使用@CacheEvict注解将这个方法的缓存数据清空,这样下次执行这个方法时就会重新查询数据并缓存起来。
@Service
public class UserService{

	@Cacheable("userCache")
	public User getUser(Long id){
		// 查询用户信息
        User user = userRepository.getUser(id);
        return user;
	}

	//当调用clearCache方法时,@CacheEvict注解会清空名为"userCache"的缓存,下次执行getUser方法时,就需要重新查询数据并缓存起来
	@CacheEvict("userCache")
	public void clearCache(){
		//清空缓存
	}
}
@CachePut
在Spring框架中,如果一个方法的执行会导致缓存数据的更新或添加,我们可以使用@CachePut注解将这个方法的返回结果更新或添加到缓存中
@Service
public class UserService {

    @Cacheable("userCache")
    public User getUser(Long id) {
        // 查询用户信息
        User user = userRepository.getUser(id);
        return user;
    }

    /**
		调用updateUser方法时,@CachePut注解会更新或添加名为"userCache"的缓存,下次执行getUser方法时,就可以从缓存中获取更新后的用户信息
	*/
    @CachePut("userCache")
    public User updateUser(Long id, User user) {
        // 更新用户信息
        User updatedUser = userRepository.updateUser(id, user);
        return updatedUser;
    }
}
@Transactional
在Spring框架中,如果一个方法需要对数据库进行操作,我们可以使用@Transactional注解来确保这个操作在一个事务中进行,从而保证操作的原子性、一致性、隔离性和持久性
/**
	在类级别上使用@Transactional注解标注,表示这个类中的所有方法都需要使用事务进行操作
*/
@Service
@Transactional
public class UserService {

    @Autowired
    private UserRepository userRepository;//userRepository的操作都在一个事务中进行

    public void createUser(User user) {
        userRepository.save(user);
    }

    public void updateUser(Long id, User user) {
        User existingUser = userRepository.findById(id);

        if (existingUser != null) {
            existingUser.setName(user.getName());
            existingUser.setEmail(user.getEmail());
            userRepository.save(existingUser);
        }
    }
}
@EnableAspectJAutoProxy
用于启用自动代理功能,以便使用AOP(面向切面编程)进行编程
/**
	在类级别上使用@EnableAspectJAutoProxy注解标注,表示这个配置类需要启用自动代理功能。
*/
@Configuration
@EnableAspectJAutoProxy
public class AppConfig{

	@Bean
	public MyAspect myAspect(){
		return new MyAspect();
	}

	@Bean
	public UserService userService(){
		return new UserService();
	}
}
@Aspect/@Pointcut
@Aspect用于标识一个类为切面类,从而可以在该类中定义切面逻辑以实现AOP(面向切面编程)
在切面类中,我们可以定义切面逻辑,包括切入点、通知类型和切面顺序等
@Pointcut定义一个切入点,从而可以在该切入点上定义通知类型以实现AOP
@Aspect
@Component
public class MyAspect{

	@Before("execution(* com.michael.UserService.*(..))")
	public void beforeAdvice(){
		System.out.println("Before advice is executed.");
	}

	@After("execution(* com.example.UserService.*(..))")
    public void afterAdvice() {
        System.out.println("After advice is executed.");
    }
}
@Aspect
@Component
public class MyAspect{

	@Pointcut("execution(* com.michael.UserService.*(..))")
	public void userServicePointcut(){}

	@Before("userServicePointcut()")
    public void beforeAdvice() {
        System.out.println("Before advice is executed.");
    }

    @After("userServicePointcut()")
    public void afterAdvice() {
        System.out.println("After advice is executed.");
    }
}
@Order
如果有多个切面类需要对同一个方法进行切面处理,那么这些切面类的执行顺序可能会影响到最终的结果。为了控制这些切面类的执行顺序,我们可以使用@Order注解来定义它们的执行顺序,参数为一个整数,数值越小表示优先级越高,数值相同时按照类名的自然顺序进行排序
@Aspect
@Component
@Order(1)
public class MyAspect1{

	@Before("execution(* com.example.UserService.*(..))")
    public void beforeAdvice() {
        System.out.println("Before advice from MyAspect1 is executed.");
    }
}

@Aspect
@Component
@Order(2)
public class MyAspect2 {

    @Before("execution(* com.example.UserService.*(..))")
    public void beforeAdvice() {
        System.out.println("Before advice from MyAspect2 is executed.");
    }
}
@Slf4j
是Lombok框架中的一个注解,用于在Java类中自动生成日志记录器
通常情况下,我们需要手动引入日志框架(如Log4j、SLF4J等)并编写相应的日志记录代码。这些代码可能会比较繁琐,而且容易出现错误。为了简化这个过程,Lombok框架提供了一个@Slf4j注解,可以在Java类中自动生成日志记录器。
@Slf4j
public class MyService{

	/**
		使用log变量来记录日志,而不需要再引入其他的日志框架
	*/
	public void doSomething(){
		log.debug("This is a debug message.");
        log.info("This is an info message.");
        log.error("This is an error message.");
	}
}
==========================================================
SpringBean相关的注解
@ComponentScan
@ComponentScan注解用于配置Spring需要扫描的被组件注解注释的类所在的包。可以通过配置其basePackages属性或者value属性来配置需要扫描的包路径。
value属性是basePackages的别名。
@Configuration
@ComponentScan(basePackages="com.michael.service")
public class ServiceConfig{

}
@Component与@Value
@Component用于标注一个普通的组件类,它没有明确的业务范围,只是通知Spring被此注解的类需要被纳入到Spring Bean容器中并进行管理。
@Value用于获取配置文件中的属性值,将配置文件中的属性值注入到Bean对象中。方便地处理不同环境下的配置文件,如开发环境和生产环境的配置文件
@Component
public class EncryptUserPasswordComponent{

	@Value("${my.property}")
	private String myProperty;

	public String encrypt(String password,String salt){

	}
}
@Profile
用于指定配置环境,如开发环境、测试环境或生产环境
@Configuration
public class AppConfig{

	@Bean
	@Profile("dev")
	public UserService userServiceDev(){
		return new UserServiceDevImpl();
	}

	@Bean
	@PProfile("prod")
	public UserService usserServiceProd(){
		return new UserServiceProdImpl();
	}
}
@PropertySource
用于指定配置文件位置,用于指定一组属性文件的位置,从而可以在Spring应用程序中使用这些属性
@Configuration
@PropertySource("classpath:application.properties")
public class AppConfig{

	@Autowired
	private Environment environment;

	/**
		使用Environment对象从属性文件中读取属性值,并将这些属性值传递给UserService实例的构造方法
	*/
	@Bean
	public UserService userService(){
		return new UserServiceImpl(environment.getProperty("userService.name"));
	}
}
@Service
@Service注解是@Component的一个延伸(特例),它用于标注业务逻辑类。与@Component注解一样,被此注解标注的类,会自动被Spring所管理。
@Repository
@Repository注解也是@Component注解的延伸,与@Component注解一样,被此注解标注的类会被Spring自动管理起来,@Repository注解用于标注DAO层的数据持久化类。
@Import
能够将额外的配置类导入到当前的配置类中。本质上,此注释有助于合并来自不同模块的配置,从而有助于模块化编程
- 集中配置:如果您有在多个模块之间共享的配置,例如数据库或消息传递配置,您可以将它们放在单独的类中,@Configuration并在需要时将其导入到其他配置类中
- 条件导入:Spring 的@Conditional注释可以与条件导入配置类一起使用@Import。这对于仅在特定条件下应用配置的场景非常有用,例如在不同的环境(开发、生产等)中。
@Configuration
public class DatabaseConfig{

	@Bean
	public DataSource dataSource(){
		return new DataSource();
	}
}
@Configuration
@Import(DatabaseConfig.class)
public class AppConfig{

	@Autowired
	private DataSource dataSource;

	//使用dataSource的bean
}

@Configuration
@Import(DatabaseConfig.class)
@ConditionalOnProperty(name="database.enabled",havingValue="true") //条件导入
public class ConditionalAppConfig{
	//仅当database.enabled=true时才加载此配置
}
- 模块化功能:如果您的应用程序具有需要各自特定配置的不同功能,您可以为每个功能创建一个配置类并将它们导入到中央配置中。这增强了可维护性和关注点分离
- 第三方库集成:如果您使用的第三方库提供了自己的 Spring 配置,则可以使用注释将其导入到您自己的应用程序的配置中@Import
- 对相关 Bean 进行分组:有时,如果在同一配置类中定义,逻辑上相关的 Bean 会得到更好的维护。但是,它们可以在应用程序的各个部分中使用。在这种情况下,@Import注释可以帮助您在需要的地方导入这些 bean,从而使您的应用程序保持 DRY(不要重复)
【避免循环依赖:确保您不会在配置类之间创建循环依赖,因为这会导致初始化错误
使用描述性类名称:创建配置类时,使用能够清楚表明配置用途的名称。这使得更容易理解特定配置类的作用,特别是在将其导入其他类时
文档导入:始终记录为什么需要导入,特别是在导入类和导入类之间的关系不明显的情况下。这可以通过注释或 JavaDoc 来完成
】
@ImportResource
将XML配置导入到基于注解的配置类中。当您在混合配置环境中工作或必须使用系统中不易重构的旧部分时,此注释可以成为您的救星
- 遗留代码集成:如果您的项目已经存在了一段时间并且依赖于基于 XML 的配置,您可以将@ImportResource这些现有配置合并到更新的基于注释的配置中,而无需进行彻底修改
- 第三方库配置:带有自己的基于 XML 的配置的库可以使用注释轻松地合并到您的应用程序中@ImportResource
- 配置分段:在大型项目中,配置可能会变得过于广泛而无法有效管理。通过使用@ImportResource,您可以将配置分段为不同的 XML 文件,按功能或模块组织,然后根据需要导入它们。
- 混合配置场景:有时您可能需要同时使用 XML 和基于 Java 的配置。通过注释@ImportResource,您可以无缝集成这些不同的配置类型
@Confituration
@ImportResource("classpath:com-spring-config.xml")//该some-spring-config.xml文件可以定义 bean,就像在基于XML的Spring 应用程序中一样:
public class AppConfig{
	//其他配置和bean
}
<beans xmlns="http://www.springframework.org/schema/beans"
       xmlns:xsi="http://www.w3.org/2001/XMLSchema-instance"
       xsi:schemaLocation="http://www.springframework.org/schema/beans
       http://www.springframework.org/schema/beans/spring-beans.xsd">

    <bean id="someBean" class="com.example.SomeClass">
        <!-- bean configurations here -->
    </bean>
</beans>
在启动类,将dubbo配置文件导入配置类中
@SpringBootApplication(exclude = {DataSourceAutoConfiguration.class})
@ImportResource("classpath*:META-INF/spring/*.xml")
public class ShiroRestApplication {

    public static void main(String[] args) {
        SpringApplication.run(ShiroRestApplication.class, args);
    }
}
<?xml version="1.0" encoding="UTF-8"?>
<beans xmlns="http://www.springframework.org/schema/beans"
       xmlns:xsi="http://www.w3.org/2001/XMLSchema-instance" xmlns:dubbo="http://code.alibabatech.com/schema/dubbo"
       xsi:schemaLocation="http://www.springframework.org/schema/beans http://www.springframework.org/schema/beans/spring-beans.xsd http://code.alibabatech.com/schema/dubbo http://code.alibabatech.com/schema/dubbo/dubbo.xsd">

    <dubbo:application name="${dubbo.application.name}" owner="abel" organization="abel" logger="slf4j"/>

    <dubbo:registry protocol="zookeeper" address="${dubbo.registry.address}" file="false" client="curator"
                    group="${dubbo.registry.group}" version="${dubbo.registry.version}"/>

    <dubbo:annotation package="${dubbo.annotation.package}"/>

    <dubbo:protocol name="dubbo" port="${dubbo.protocol.port}" accesslog="${dubbo.log.file}"/>

    <dubbo:consumer check="false" loadbalance="roundrobin" retries="0" timeout="10000"/>


    <dubbo:reference id="roleService" interface="cn.abel.user.service.UserService" protocol="dubbo"
                     timeout="300000" check="false"/>
两者区别:
@Import:该注解用于导入其他带有.注解的基于Java的配置类@Configuration
@ImportResource:此注解允许将基于 XML 的配置文件导入到基于 Java 的配置类中(比如dubbo的配置文件)
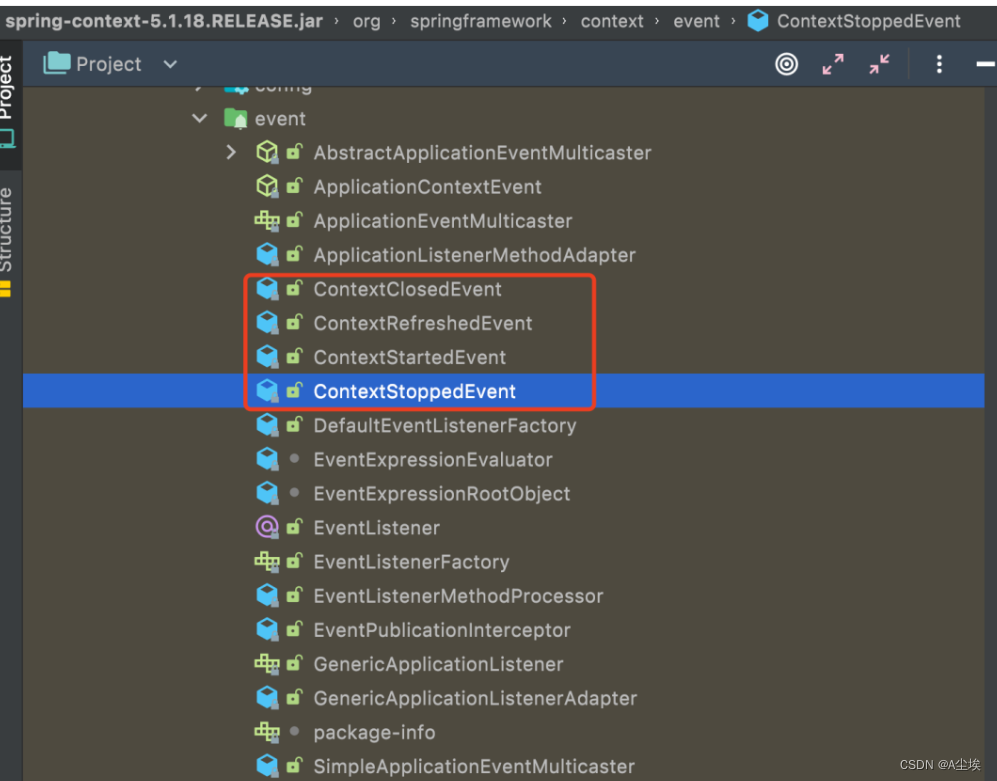
@EventListener
监听并且触发相应的方法(另种方案:ApplicationListener接口和@EventListener)。
以下几个角色:
- 事件event,封装和传递监听器中要处理的参数,比如对象或字符串,并作为监听器监听的目标
- 监听器listener,具体根据事件发生的业务处理模块,可以接收处理事件中封装的对象或字符串
- 时间发布者publisher,事件发生的触发者
一、采用接口方式
Spring框架提供的ApplicationListener接口如下:
泛型的类型必须是ApplicationEvent及其子类,只要实现了这个接口,那么当容器有相应的事件触发时
就能触发onApplicationEvent方法

Spring框架提供ApplicationEvent类的子类
使用方法:
实现一个ApplicationListener接口,并且加入容器中
@Component
public class DefinitionApplicationListener implements ApplicationListener<ApplicationEvent>{
@Override
public void onApplicationEvent(ApplicationEvent event){
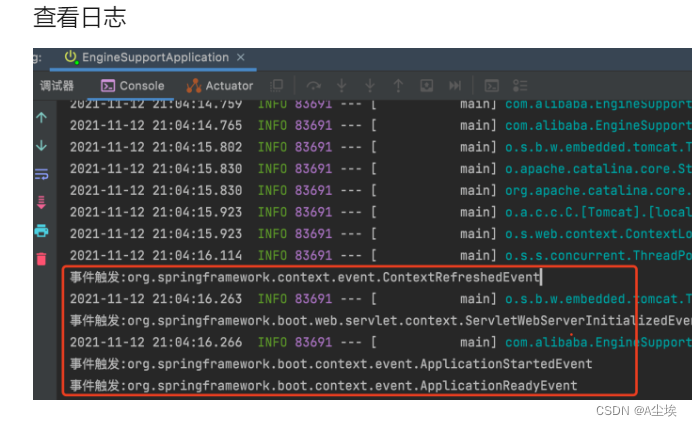
System.out.println("事件触发:" + event.getClass().getName());
}
}
启动项目
@SpringBootApplication
public class EngineSupportApplication{

	public static void main(String[] args){
		SpringApplication.run(EngineSupportApplication.class);
	}
}
自定义事件
public class DefinitionEvent extends ApplicationEvent{

	public boolean enable;
	public DefinitionEvent(Object source,boolean enable){
		super(source);
		this.enable = enable;
	}
}
定义监听器
@Component
public class DefinitionApplicationListener implements ApplicationListener<ApplicationEvent>{

	@Override
	public void onApplicationEvent(ApplicationEvent event){
		System.out.println("事件触发:" + event.getClass().getName());
	}

	//自定义事件以及监听
	@Autowired
	private ApplicationEventPublisher eventPublisher;

	/**
		事件发布方法
	*/
	public void pushListener(String msg){
		eventPublisher.publishEvent(new DefinitionEvent(this,false));
	}
}
二、采用注解方式
通过注解@EventListener注解实现对任意的方法都能监听事件
在任意方法上标注@EventListener注解,指定classes,即需要处理的事件类型
一般就是ApplicationEvent及其子类,可以设置多项
@Component
public class DefinitionAnnottionEventListener{
@EventListener(classes={DefinitionEvent.class})
public void listen(DefinitionEvent envent){
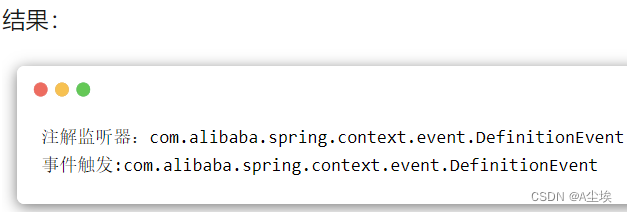
System.out.println("注解监听器:" + event.getClass().getName());
}
}
此时,就可以有一个发布,两个监听器监听到发布的消息了,一个是注解方式,一个是非注解方式
其实上面方法里还有一个@TransactionalEventListener注解,其实原理是一模一样的,只是这个监听者可以选择在事务完成后才会被执行,事务执行失败就不会被执行。
这两个注解的逻辑是一模一样的,并且@TransactionalEventListener本身就被标记有@EventListener
===================================================
Spring Dependency Inject与Bean Scopes注解
@DependsOn
@DependsOn注解可以配置Spring IoC容器在初始化一个Bean之前,先初始化其他的Bean对象。
public class FirstBean{

	@Autowired
	private SecondBean secondBean;

	@Autowired
	private ThirdBean thirdBean;

	public FirstBean(){

	}
}

public class SecondBean{

	public SecondBean(){

	}
}

public class ThirdBean{

	public ThirdBean(){

	}
}
@Configuration
public class CustomBeanConfig{

	@Bean("firstBean")
	@DependsOn(value={"secondBean","thirdBean"})//
	public FirstBean firstBean(){
		return new FirstBean();
	}

	@Bean("secondBean")
	public SecondBean secondBean(){
		return new SecondBean();
	}

	@Bean("thirdBean")
	public ThireBean thirdBean(){
		return new ThirdBean();
	}
}
@Bean
主要的作用是告知Spring,被此注解所标注的类将需要纳入到Bean管理工厂中
@Component
public class DataBaseInitializer{

	public void init(){
		System.out.println("This is init method.");
	}

	public void destroy(){
		System.out.println("This is destroy method.");
	}
}
@Configuration
public class SpringBootApplicationConfig{

	@Bean(initMethod="init",destroyMethod="destroy")
	public DataBaseInitializer databaseInitializer(){
		return new DataBaseInitializer();
	}
}
@Scops
用来定义@Component标注的类的作用范围以及@Bean所标记的类的作用范围。
限定的作用范围有:singleton、prototype、request、session、globalSession或者其他的自定义范围。
当一个Spring Bean被声明为prototype(原型模式)时,在每次需要使用到该类的时候,Spring IoC容器都会初始化一个新的改类的实例。在定义一个Bean时,可以设置Bean的scope属性为prototype:scope=“prototype”,也可以使用@Scope注解设置,如下:
@Scope(value=ConfigurableBeanFactory.SCOPE_PROPTOtYPE)
两种不同的方式来使用@Scope注解
public interface UserService{

}

@Component
@Scope(value=ConfigurableBeanFactory.SCOPE_PROTOTYPE) //标注该类每次使用都会创建一个新对象
public class UserServiceImpl implements UserService{

}

@Configuration
@ComponentScan(basePackages = "com.michael.service") //扫描service包下的
public class ServiceConfig{

}

//------------------------------------------

public class StudentService implements UserService{

}

@Configuration
public class StudentServiceConfig{

	@Bean
	@Scope(value=ConfigurableBeanFactory.SCOPE_PROTOTYPE)
	public UserService userService(){
		return new StudentServiceImpl();
	}
}
容器配置注解
@Autowired
@Autowired注解用于标记Spring将要解析和注入的依赖项。此注解可以作用在构造函数、字段和setter方法上。
@RestController
public class UserController{

	private UserService userService;

	@Autowired //作用域构造函数之上
	UserController(UserService userService){
		this.userService = userService;
	}

	@Autowired //作用域setter方法上
	public void setUserService(UserService userService){
		this.userService = userService;
	}

	@Autowired //作用域字段上
	private UserService userService;
}
@Primary
当系统中需要配置多个具有相同类型的bean时,@Primary可以定义这些Bean的优先级。
public interface MessageService{
}
@Component
public class EmailMessageServiceImpl implements MessageService{
@Override
public String sendMessage(){
return "this is send email method message";
}
}
@Component
public class WechatMessageImpl implements MessageService{
@Override
public String sendMessage(){
return "this is send wechat method message";
}
}
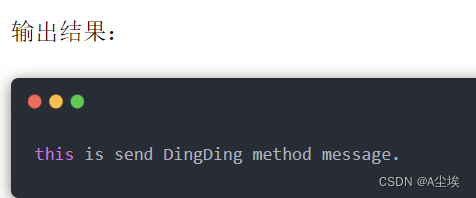
@Primary
@Component
public class DingDingMessageImple implements MessageService{
@Override
public String sendMessage(){
return "this is send DingDing method message";
}
}
//以上同一个MessageService接口类型下的三个不同实现类
@RestController
public class MessageController{
@Autowired
private MessageService messageService;
@GetMapping("/info")
public String info(){
return messageService.sendMessage();
}
}
@PostConstruct与@PreDestroy
这两个注解不属于Spring,它们是源于JSR-250中的两个注解,位于common-annotations.jar中
@PostConstruct注解用于标注在Bean被Spring初始化之前需要执行的方法
@PreDestroy注解用于标注Bean被销毁前需要执行的方法。
@Component
public class DemoComponent{

	private List<String> list = new ArrayList<>();

	@PostConstruct
	public void init(){
		list.add("jordan");
		list.add("kobe");
	}

	@PreDestroy
	public void destroy(){
		list.clear();
	}
}
@Qualifier
当系统中存在同一类型的多个Bean时,@Autowired在进行依赖注入的时候就不知道该选择哪一个实现类进行注入。此时,我们可以使用@Qualifier注解来微调,帮助@Autowired选择正确的依赖项。
public interface MessageService{
	public String sendMessage(String message);
}

@Service("emailService")
public class EmailServiceImpl implements MessageService{

	@Override
	public String sendMessage(String message){
		return "send email,content:"+message;
	}
}

@Service("smsService")
public class SMSServiceImpl implements MessageService{

	@Override
	public String sendMessage(String message){
		return "send SMS,content"+message;
	}
}
public interface MessageProcessor{
	public String processMessage(String message);
}

public class MessageProcessorImpl implements MessageProcessor{

	private MessageService messageService;

	@Autowired
	@Aualifier("emailService")//指定处理MessageService接口下的具体实现类
	public void setMessageService(MessageService messageService){
		this.messageServcie = messageService;
	}

	@Override
	public String processMessage(String message){
		return messageService.sendMessage(message);
	}
}
SpringBoot注解
@SpringBootApplication
该注解是一个快捷的配置注解,在被它标注的类中,可以定义一个或多个Bean,并自动触发自动配置Bean和自动扫描组件。
属性:exclude = {DataSourceAutoConfiguration.class} 排除指定bean
此注解相当于@Configuration、@EnableAutoConfiguration和@ComponentScan的组合
- @Configuration:指示这个类是一个配置类,它定义了一个或多个@Bean方法,用于创建和配置Spring应用程序上下文中的Bean
- @EnableAutoConfiguration:启用Spring Boot的自动配置机制,它会自动添加所需的依赖项和配置,以使应用程序能够运行
- @ComponentScan:指示Spring Boot扫描当前包及其子包中的所有@Component、@Service、@Repository和@Controller注解的类,并将它们注册为Spring Bean
@SpringBootApplication
public class Application{
    public static void main(String [] args){
        SpringApplication.run(Application.class,args);
    }
}
@EnableAutoConfiguration
该注解用于通知Spring,根据当前类路径下引入的依赖包,自动配置与这些依赖包相关的配置项
@ConditionalOnClass与@ConditionalOnMissingClass
这两个注解属于类条件注解,它们根据是否存在某个类作为判断依据来决定是否要执行某些配置。
@Configuration
@ConditionalOnClass(DataSource.class)
public class MySQLAutoConfiguration{

}
@ConditionalOnBean与@ConditionalOnMissingBean
这两个注解属于对象条件注解,根据是否存在某个对象作为依据来决定是否要执行某些配置方法。
@Bean
@ConditionalOnBean(name="dataSource")
LocalContainerEntityManagerFactoryBean entityManagerFactory(){
    //...
}

@Bean
@ConditionalOnMissingBean
public MyBean myBean(){
        //...
}
@ConditionalOnWebApplication与@ConditionalOnNotWebApplication
这两个注解用于判断当前的应用程序是否是Web应用程序。如果当前应用是Web应用程序,则使用Spring WebApplicationContext,并定义其会话的生命周期。
@ConditionalOnWebApplication
HealthCheckController healthCheckController(){
        //...
}
@ConditionalOnProperty
会根据Spring配置文件中的配置项是否满足配置要求,从而决定是否要执行被其标注的方法
@Bean
@ConditionalOpProperty(name="alipay",havingValue="od")
Alipay alipay(){

	return new Alipay();
}
@ConditionalOnResource
此注解用于检测当某个配置文件存在时,则触发被其标注的方法
@ConditionalOnResource(resources = "classpath:website.properties")
Properties addWebsiteProperties(){

}
@ConditionalExpression
此注解可以让我们控制更细粒度的基于表达式的配置条件限制。当表达式满足某个条件或者表达式为真的时候,将会执行被此注解标注的方法。
@Bean
@ConditionalException("${localstore} && ${local == 'true'}")
LocalFileStore store(){
  //...
}
@Conditional
可以控制更为复杂的配置条件。在Spring内置的条件控制注解不满足应用需求的时候,可以使用此注解定义自定义的控制条件,以达到自定义的要求。
@Conditioanl(CustomConditioanl.class)
CustomProperties addCustomProperties(){
    //...
}
@Endpoint
SpringBoot Actoator中的监视和管理应用程序,通过/health端点报告应用程序的健康状态,在诊断问题或调整性能时,内存使用情况、垃圾收集、活动线程等。
<dependency>
    <groupId>org.springframework.boot</groupId>
    <artifactId>spring-boot-starter-actuator</artifactId>
</dependency>
注释一个类时@Endpoint会获得某些功能:
- ID:为端点分配一个ID,使其可以通过自定义URL进行访问
- 启用/禁用:可以通过属性有选择地启用或禁用端点
- 安全性:用用安全规则来限制对端点的访问
- 操作:定义端点将公开哪些操作(读、写、删除)
@Endpoint(id="helloWorld") //标志该类为一个执行器端点,通过 URL 进行访问/actuator/helloWorld
public class HelloWorldEndpoint{

	@ReadOperation //可以使用 HTTP GET 请求来调用该方法
	public String sayHello(){
		return "Hello,World!";
	}
}
安全影响:
通过应用程序的属性文件指定访问每个端点所需的角色,甚至完全禁用某些端点
# helloWorld端点已启用并仅限于具有“ADMIN”角色的用户
management.endpoint.helloWorld.enabled = true
management.endpoint.helloWorld.roles = ADMIN
以下三个注释:允许您在自定义端点上公开方法,分别用于读取、写入和删除数据或操作方面
本质上,它们映射到 HTTP GET、POST/PUT 和 DELETE 方法,尽管它们不限于 HTTP 并且可以通过 JMX 等其他协议公开
@ReadOperation
@Endpoint(id="diskSpace")
public class DiskSpaceEndpoint{

	@ReadOperation
	public long getFreeDiskSpace(){ //考虑一个公开系统上可用磁盘空间的自定义端点
		File file = new File("/");
		return file.getFreeSpace();
	}
}
@WriteOperation
相当于执行器端点的 HTTP POST 或 PUT。您可以使用它来更新配置、启用或禁用功能或启动特定操作
@Endpoint(id="featureToggle")
public class FeatureToggleEndpoint{

	private AtomicBoolean featureEnabled = new AtomicBoolean(true);

	@WriteOperation
	public String toggleFeature(){
		featureEnable.set(!featureEnabled.get());
		return "Feature is now " + (featureEnabled.get() ? "enabled" : "disabled");
	}
}
@DeleteOperation
公开了类似 HTTP DELETE 的操作。这通常用于清理资源或将应用程序的某些方面重置为其默认状态。
/**
	清除内存缓存的端点
*/
@Endpoint(id="cache")
public class CacheEndpoint{

	private Map<String,Object> cache = new ConcurrentHashMap<>();

	@DeleteOperation
	public String clearCache(){
		cache.clear();
		return "Cache cleared";
	}
}
在@ReadOperation方法中使用查询参数,或在@WriteOperation和@DeleteOperation方法中使用请求正文和路径变量,从而使您能够更好地控制和灵活地控制自定义端点的功能
创建自定义执行器端点
①、使用@Endpoint创建一个Spring组件
@Endpoint(id="activeUser")
public class ActiveUserspoint{
	//实现将在此处
}
②、添加操作方法
添加方法来公开不同的操作,@ReadOperation公开活跃用户的数量
public class ActiveUsersEndpoint{

	@ReadOperation
	public int getActiveUsers(){
		//通常,此数据可能来自数据库或其他外部源
		return 5;
	}
}
③、保护端点(可选)
自定义端点暴露了敏感数据或功能,那么保护它就至关重要。您可以使用文件中的属性application.properties或直接在代码中进行配置。
management.endpoint.activeUsers.enabled = true
management.endpoint.activeUsers.roles = ADMIN
④、测试端点
新端点应该可以通过类似 的 URL 访问http://localhost:8080/actuator/activeUsers
您可能希望端点更具交互性。您可以根据您的要求添加更多带有@WriteOperation和注释的操作方法。@DeleteOperation
public class ActiveUserEndpoint{

	@WriteOperation
	public String addUser(){
		//将新用户添加到活动用户列表
		return "用户添加成功";
	}

	@DeleteOperation
	public String removeUser(){
		//从活跃用户列表中删除用户
		return "用户删除成功";
	}
}


 1677
1677


 被折叠的 条评论
为什么被折叠?
被折叠的 条评论
为什么被折叠?
 到【灌水乐园】发言


