


在Android笔记(七)搭建Android JetPack Compose组件中Scaffold脚手架 一文中通过定义一个导航的函数来实现不同界面的切换。如果没有传递任何参数,这样的导航处理也是可以接受的,处理方式也非常简单。但是,如果考虑到不同Compose界面的切换且传递参数,或者有更复杂地处理情况,就可以考虑使用导航组件Navigation来实现。
一、导航组件的配置
新建一个项目模块,在模块对应的build.gradle.kt中中增加依赖:
implementation(“androidx.navigation:navigation-compose:2.7.4”)
注意:采用2.7.4版本,必须设置android的目标SDK和编译SDK为34版本
在本笔记中通过一个展示机器人相关信息来说明导航组件的实现。为此,分别定义实体类和不同的界面。
二、定义机器人实体类
@Parcelize
data class Robot(val name:String,val description:String,val icon:Int):Parcelable
三、定义要显示的主要界面
1.定义机器人列表界面
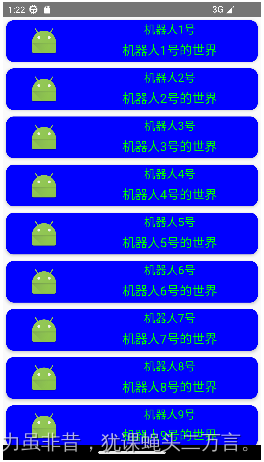
图1 显示机器人列表
(1)定义单独一行机器人卡片
注意:
因为使用了ConstraintLayout布局,需要在项目模块的build.gradle.kt中增加依赖:
implementation(“androidx.constraintlayout:constraintlayout-compose:1.0.1”)
具体的代码如下:
//定义单独的机器人单独一行的卡片
@Composable
fun RobotCard(robot:Robot){
      Card(modifier = Modifier
          .fillMaxWidth()
          .wrapContentHeight()
          .padding(5.dp),
       colors = CardDefaults.elevatedCardColors(contentColor = Color.Green, containerColor = Color.Blue),
       elevation = CardDefaults.elevatedCardElevation(defaultElevation = 3.dp)){

       ConstraintLayout(modifier= Modifier.fillMaxWidth()) {
           val (imageRef,nameRef,descRef) = remember{createRefs()}
           val vguideLine = createGuidelineFromStart(0.3f)
           val hguideLine = createGuidelineFromTop(0.4f)

           Image(modifier= Modifier
               .constrainAs(imageRef) {
                   top.linkTo(parent.top)
                   bottom.linkTo(parent.bottom)
                   start.linkTo(parent.start)
                   end.linkTo(vguideLine)
               }
               .clickable {

               },painter = painterResource(id = robot.icon), contentDescription = robot.name )

           Text(modifier = Modifier.constrainAs(nameRef){
                  top.linkTo(parent.top)
                  bottom.linkTo(hguideLine)
                  start.linkTo(vguideLine)
                  end.linkTo(parent.end)
              },
               text = robot.name,fontSize = 18.sp)

           Text(modifier = Modifier.constrainAs(descRef){
                  top.linkTo(hguideLine)
                  bottom.linkTo(parent.bottom)
                  start.linkTo(vguideLine)
                  end.linkTo(parent.end)
               },
               text = robot.description,fontSize = 20.sp)
       }
  }
}
(2)定义组合多个机器人卡片生成机器人列表界面
@Preview
@Composable
fun RobotListScreen(){
    val robots = mutableListOf<Robot>()
    for(i in 1..10)
        robots.add(Robot("机器人${i}号","机器人${i}号的世界",android.R.mipmap.sym_def_app_icon))

    LazyColumn{
        items(robots){robot:Robot->
            RobotCard(robot)
        }
    }
}
2.定义机器人单独显示界面
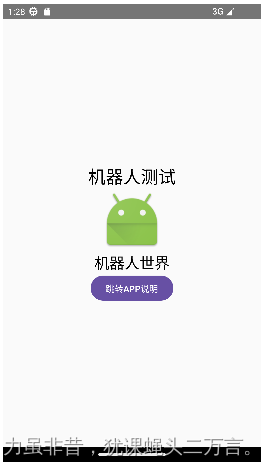
图2
@Composable
fun RobotDetailScreen(){
    val robot = Robot("机器人测试","机器人世界",android.R.mipmap.sym_def_app_icon)

    Box(contentAlignment = Alignment.Center,
        modifier= Modifier.fillMaxSize()){

        Column(horizontalAlignment = Alignment.CenterHorizontally){
            Text(robot.name,fontSize = 28.sp)

            Image(modifier = Modifier.size(100.dp,100.dp),
                  painter = painterResource(id = robot.icon),
                  contentDescription = robot.name)

            Text(robot.description,fontSize=24.sp,maxLines = 5)

            Button(onClick = {

            }){
                Text("跳转APP说明")
            }
        }
    }
}
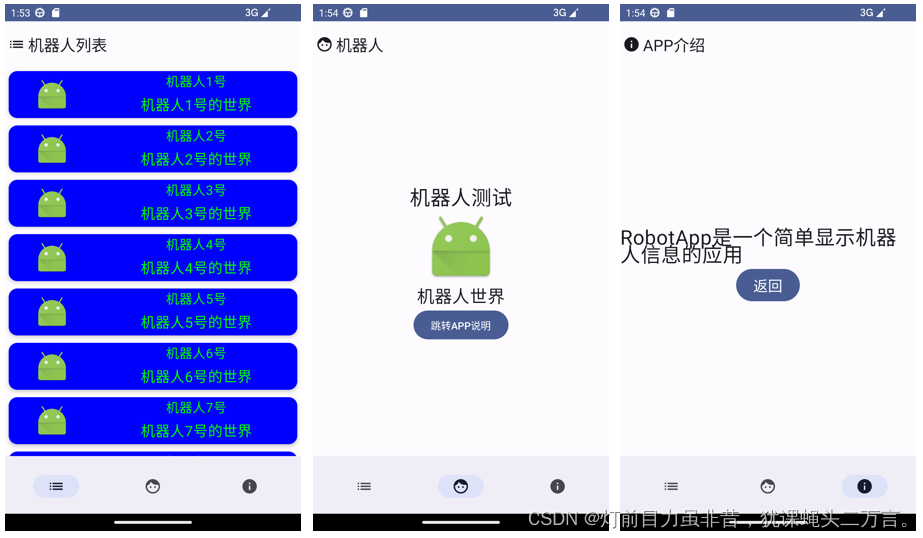
3.定义应用介绍界面

图3
@Composable
fun RobotAppScreen(){
    Box(contentAlignment = Alignment.Center,modifier = Modifier.fillMaxSize()){
        Column(modifier = Modifier.fillMaxWidth(),
            horizontalAlignment = Alignment.CenterHorizontally){
            Text("RobotApp是一个简单显示机器人信息的应用",fontSize = 28.sp, maxLines = 5)
            Button(
                modifier = Modifier.wrapContentSize(),
                onClick = {

            }){
                Text("返回",fontSize = 20.sp)
            }
        }
    }
}
四.定义界面的密封类
定义关于界面的密封类,在密封类对上述的三个界面基本特征如导航路径route、导航使用的标题title以及导航使用的图表icon进行分别定义,代码如下所示:
sealed class Screen(val route:String,val title:String,val icon: ImageVector){
    object RobotListPage:Screen(route="robotlist",title="机器人列表",icon= Icons.Filled.List)
    object RobotPage:Screen(route = "robot",title="机器人",icon = Icons.Filled.Face)
    object AppPage:Screen(route="aboutApp",title = "APP介绍",icon = Icons.Filled.Info)
}
在此前提的基础上,定义一个列表,将三个核心显示的界面定义在列表中,如下所示:
val screens = listOf(Screen.RobotListPage,Screen.RobotPage,Screen.AppPage)
五、定义导航图
在导航图中需要确定导航图中宿主和要切换的界面。要让定义好的导航图发挥作用
(1)需要在活动中指定导航宿主NavHost,通过指定NavHost表示导航宿主,用于定义用户界面的屏幕目标的预留位置;
(2) 需要利用NavController导航控件实现导航。
val navController = rememberNavController()
值得注意的是:NavController可以调用navigate()函数来实现导航,常见有三种形式:
//在导航到route的目的地之前,要将路径home之前所有的内容退出后退堆栈
navController.navigate(“route”){
popUpTo(“home”)
}
//在导航到route的目的地之前,要将包括路径home之前所有的内容退出后退堆栈
navController.navigate(“route”){
popUpTo(“home”) {inclusive = true}
}
//当没有导航到route时,才导航到route路径后退堆栈只有一个route导航路径
navController.navigate(“route”){
launchSingleTop = true
}
在下列定义了一个简单的导航图,代码如下:
@Composable
fun NavigationGraphScreen(navController:NavHostController,startDestination:String){
    NavHost(navController = navController,startDestination=Screen.RobotListPage.route){
        composable(Screen.RobotListPage.route){
            RobotListScreen()
        }

        composable(Screen.RobotPage.route){
            RobotDetailScreen()
        }

        composable(Screen.AppPage.route){
            RobotAppScreen()
        }
    }
}
六、在脚手架结构的底部导航栏中使用导航图
@OptIn(ExperimentalMaterial3Api::class)
@Composable
fun MainScreen(){
    val currentScreen: MutableState<Screen> = remember{mutableStateOf(Screen.RobotListPage)}
    val navController = rememberNavController()
    Scaffold(
        topBar={
            TopAppBar(
                title = {
                       Text(text = currentScreen.value.title )
                },
                navigationIcon = {
                    Icon(imageVector = currentScreen.value.icon,contentDescription = null)
                }
            )
        },
        bottomBar = {
            BottomAppBar {
                screens.forEach {screen:Screen->
                    NavigationBarItem(
                        selected = screen.route == currentScreen.value.route ,
                        onClick = {
                                  currentScreen.value = screen
                                  navController.navigate(screen.route){
                                      popUpTo(Screen.RobotListPage.route)
                                      launchSingleTop
                                  }
                                  },
                        icon = {
                            Icon(imageVector = screen.icon,contentDescription = screen.title)
                        })
                }
            }
       },
       content={it:PaddingValues->
           Box(modifier = Modifier.padding(it)){
                NavigationGraphScreen(
                    navController = navController,
                    startDestination =Screen.RobotListPage.route )
           }
       })
}
注意:
(1)导航navController.navigate(screen.route)中设置popUpTo(Screen.RobotListPage.route),表示导航到screen.route的界面会将Screen.RobotListPage.route之前(不包含)的所有其他界面退出返回堆栈BackStack。可以观察到,通过底部导航栏,如上图依次从左到右访问三个界面,在最后一个界面APP介绍界面时,选择手机模拟器的Back键,会直接返回第一个界面RobotListPage.route路径指向的界面。
(2)在脚手架Scaffold的content属性设置核心显示内容为导航图NavigationGraphScreen
七、实现导航传递参数
在上述的运行效果中,可以发现如下不足:
从机器人列表Screen.RobotListPage.route跳转到单个机器人界面Screen.RobotPage.route路径时,只能固定的显示机器人测试信息,显然不合实际情况;
解决之道:就是在不同导航中设置参数传递。
(1)发送方:
navController.navigate(“route/${参数}”)
(2)数据接受方:
在导航图中指定接受参数名和参数类型composable(route = "route/{参数名}", arguments = listOf(arguments = listOf(navArgument(“参数名"){ type =NavType.StringType}) ){ val data = it.arguments?.getString(“参数名”)?:"默认值" }
在传递数据如果是基本数据类型比较容易,但是对于自定义的数据类,则可以采用转换的方式实现数据传递:
(1)数据发送方,把自定义类型的对象通过Gson库转换成字符串;
(2)数据接受方,将接受的数据字符串通过Gson库再转换成自定义类型的对象
为了使用Gson库,需要在模块的build.gradle.kt中增加依赖,如下所示:
implementation(“com.google.code.gson:gson:2.10.1”)
1.数据发送方
将机器人列表界面RobotListScreen作为数据的发送方,每次点击列表的图标,则传递数据到下一个界面RobotDetailScreen;由于点击实际的图标定义在RobotCard组合项中,因此,为RobotCard定义的图片内容增加一个点击处理的功能;因为要实现导航,因此RobotListScreen和RobotCard都需要传递NavController参数,下面是修改的代码:
@Composable
fun RobotCard(navController:NavController,robot:Robot){
      Card(modifier = Modifier
          .fillMaxWidth()
          .wrapContentHeight()
          .padding(5.dp),
       colors = CardDefaults.elevatedCardColors(contentColor = Color.Green, containerColor = Color.Blue),
       elevation = CardDefaults.elevatedCardElevation(defaultElevation = 3.dp)){

       ConstraintLayout(modifier= Modifier.fillMaxWidth()) {
           val (imageRef,nameRef,descRef) = remember{createRefs()}
           val vguideLine = createGuidelineFromStart(0.3f)
           val hguideLine = createGuidelineFromTop(0.4f)

           Image(modifier= Modifier
               .constrainAs(imageRef) {
                   top.linkTo(parent.top)
                   bottom.linkTo(parent.bottom)
                   start.linkTo(parent.start)
                   end.linkTo(vguideLine)
               }
               .clickable {
                    val robotStr = Gson().toJson(robot)
                    navController.navigate(Screen.RobotPage.route+"/${robotStr}")
               },painter = painterResource(id = robot.icon), contentDescription = robot.name )

           Text(modifier = Modifier.constrainAs(nameRef){
                  top.linkTo(parent.top)
                  bottom.linkTo(hguideLine)
                  start.linkTo(vguideLine)
                  end.linkTo(parent.end)
              },
               text = robot.name,fontSize = 18.sp)

           Text(modifier = Modifier.constrainAs(descRef){
                  top.linkTo(hguideLine)
                  bottom.linkTo(parent.bottom)
                  start.linkTo(vguideLine)
                  end.linkTo(parent.end)
               },
               text = robot.description,fontSize = 20.sp)
       }
  }
}
@Composable
fun RobotListScreen(navController: NavController){
    val robots = mutableListOf<Robot>()
    for(i in 1..10)
        robots.add(Robot("机器人${i}号","机器人${i}号的世界",android.R.mipmap.sym_def_app_icon))

    LazyColumn{
        items(robots){robot:Robot->
            RobotCard(navController,robot)
        }
    }
}
2.数据接受方
在这个应用中RobotDetailScreen是数据的接受方,因此需要修改导航图,在导航图中增加接受数据的处理,代码如下:
@Composable
fun NavigationGraphScreen(navController:NavHostController,startDestination:String){
    NavHost(navController = navController,startDestination=Screen.RobotListPage.route){
        composable(Screen.RobotListPage.route){
            RobotListScreen(navController = navController)
        }

        composable(Screen.RobotPage.route+"/{robot}", arguments = listOf(navArgument("robot"){
            type = NavType.StringType
        })){
            val robotStr = it.arguments?.getString("robot")
            val robot = Gson().fromJson(robotStr,Robot::class.java)
            RobotDetailScreen(robot)
        }

        composable(Screen.AppPage.route){
            RobotAppScreen()
        }
    }
}
相应的RobotDetailScreen也需要修改,增加一个Robot参数,可以对具体的Robot对象进行显示,代码修改如下:
@Composable
fun RobotDetailScreen(robot:Robot){
    Box(contentAlignment = Alignment.Center,
        modifier= Modifier.fillMaxSize()){

        Column(horizontalAlignment = Alignment.CenterHorizontally){
            Text(robot.name,fontSize = 28.sp)

            Image(modifier = Modifier.size(100.dp,100.dp),
                  painter = painterResource(id = robot.icon),
                  contentDescription = robot.name)

            Text(robot.description,fontSize=24.sp,maxLines = 5)

            Button(onClick = {

            }){
                Text("跳转APP说明")
            }
        }
    }
}
3.调整底部栏导航处理
因为增加了数据发送和接受的处理,相应的针对脚手架的底部栏导航的处理也需要调整,需要增加发送和接受数据的处理:
@OptIn(ExperimentalMaterial3Api::class)
@Composable
fun MainScreen(){
    val currentScreen: MutableState<Screen> = remember{mutableStateOf(Screen.RobotListPage)}
    val currentRobot:MutableState<Robot> = remember{mutableStateOf(Robot("机器人${1}号","机器人${1}号的世界",android.R.mipmap.sym_def_app_icon))}
    val navController = rememberNavController()
    Scaffold(
        topBar={
            TopAppBar(
                title = {
                       Text(text = currentScreen.value.title )
                },
                navigationIcon = {
                    Icon(imageVector = currentScreen.value.icon,contentDescription = null)
                }
            )
        },
        bottomBar = {
            BottomAppBar {
                screens.forEach {screen:Screen->
                    NavigationBarItem(
                        selected = screen.route == currentScreen.value.route ,
                        onClick = {
                                  currentScreen.value = screen
                                  if(screen.route == Screen.RobotPage.route){
                                      val robotStr = Gson().toJson(currentRobot.value)
                                      navController.navigate(Screen.RobotPage.route+"/${robotStr}"){
                                          popUpTo(Screen.RobotListPage.route)
                                      }
                                  }else {
                                      navController.navigate(screen.route) {
                                          popUpTo(Screen.RobotListPage.route)
                                          launchSingleTop
                                      }
                                  }
                                  },
                        icon = {
                            Icon(imageVector = screen.icon,contentDescription = screen.title)
                        })
                }
            }
       },
       content={it:PaddingValues->
           Box(modifier = Modifier.padding(it)){
                NavigationGraphScreen(
                    navController = navController,
                    startDestination =Screen.RobotListPage.route )
           }
       })
}
在MainScreen中增加判断是否跳转到RobotDetailScreen界面路径的判断,如果是,就增加参数传递的处理。在上述代码中,增加了一个状态currentRobot来记住当前要显示的机器人对象。这里的处理并不是非常好,因为并没有提供处理修改currentRobot的状态值的操作。最好的方式,是将这个状态值提升,并通过机器人列表界面点击图片达到修改这个状态值的目的。在此处,就不再修改了,由读者自行调整。


 3592
3592


 被折叠的 条评论
为什么被折叠?
被折叠的 条评论
为什么被折叠?
 到【灌水乐园】发言


