


Activities
An Activity is an application component that provides a screen with which users can interact in order to do something. Each activity is given a window in which to draw its user interface. The window typically fills the screen, but may be smaller than the screen and float on top of other windows.
An application usually consists of multiple activities that are loosely bound to each other. Typically, one activity in an application is specified as the "main" activity, which is presented to the user when launching the application for the first time. Each activity can then start another activity in order to perform different actions. Each time a new activity starts, the previous activity is stopped, but the system preserves the activity in a stack (the "back stack"). When a new activity starts, it is pushed onto the back stack and takes user focus. The back stack abides to the basic "last in, first out" stack mechanism, so, when the user is done with the current activity and presses the Back button, it is popped from the stack (and destroyed) and the previous activity resumes.
When an activity is stopped because a new activity starts, it is notified of this change in state through the activity's lifecycle callback methods. There are several callback methods that an activity might receive, due to a change in its state --- whether the system is creating it, stopping it, resuming it, or destroying it --- and each callback provides we the opportunity to perform specific work that's appropriate to that state change.
Creating an Activity
To create an activity, we must create a subclass of activity(or an exist subclass of it).The tow most important callback methods are:
onCreate()
We must implements this method.The system calls this when creating our activity.Most importantly, this is where our must call setContentView() to define the layout for the activity's user interface.
onPause()
The system calls this method as the first indicate that the user is leaving our activity(though it does not always mean the activity is being destroyed).This is usually where we should commit any changes that should be persisted beyond the current user session (because the user might not come back).
Implementing a user interface.
The user interface for an activity is provided by a hierarchy of views --- objects derived from the View class. Each view controls a particular rectangular space within the activity's window and can respond to user interaction.
Android provides a number of ready-made views that we can use to design and organize our layout. "Widgets" are views that provide a visual (and interactive) elements for the screen. "Layouts" are views derived from ViewGroup that provide a unique layout model for its child views.
The most common way to define a layout using views is with an XML layout file saved in our application resources. However, we can also create new Views in our activity code and build a view hierarchy.
Declaring the activity in the manifest
We must declare our activity in the manifest in order for it to be accessible to the system. To declare our activity,open our manifest file and add an activity element as a child of the application element.
There are several other attributes that we can include in this element, to define properties for the activity. The android:name attribute is the only required attribute --- it specifies the class name of the activity. Once we publish our application, we should not change this name.
Using intent filters
An <activity> element can also specify various intent filters --- using the <intent-filter> element --- in order to declare how other application components may activate it.
When we create a new application using the Android SDK tools, the stub activity that's created for us automatically includes an intent filter that declares the activity responds to the "main" action and should be placed in the "launcher" category.
The <action> element specifies that this is the "main" entry point to the application. The <category> element specifies that this activity should be listed in the system's application launcher (to allow users to launch this activity).
If we intend for our application to be self-contained and not allow other applications to activate its activities, then we don't need any other intent filters. Only one activity should have the "main" action and "launcher" category. Activities that we don't want to make available to other applications should have no intent filters and we can start them ourself using explicit intents.
However, if we want our activity to respond to implicit intents that are delivered from other applications (and our own), then we must define additional intent filters for our activity. For each type of intent to which we want to respond, we must include an <intent-filter> that includes an <action> element and, optionally, a <category> element and/or a <data> element. These elements specify the type of intent to which our activity can respond.
Starting an activity
We can start another activity by calling startActivity(), passing it an Intent that describes the activity we want to start. An intent can also carry small amounts of data to be used by the activity that is started.
When working within our own application, we'll often need to simply launch a known activity. We can do so by creating an intent that explicitly defines the activity we want to start, using the class name.
However, our application might also want to perform some action. In this case, our application might not have its own activities to perform such actions, so we can instead leverage the activities provided by other applications on the device, which can perform the actions for us.
Starting an activity for a result
Sometimes, we might want to receive a result from the activity that we start. In that case, start the activity by calling startActivityForResult() (instead of startActivity()). To then receive the result from the subsequent activity, implement the onActivityResult() callback method. When the subsequent activity is done, it returns a result in an Intent to our onActivityResult() method.
Shutting down an activity
We can shut down an activity by calling its finish() method. We can also shut down a separate activity that we previously started by calling finishActivity().
In most cases, we should not explicitly finish an activity using these methods as Android system manages the life of an activity for us, so we do not need to finish our own activities. Calling these methods could adversely affect the expected user experience and should only be used when we absolutely do not want the user to return to this instance of the activity.
Managing the activity lifecycle
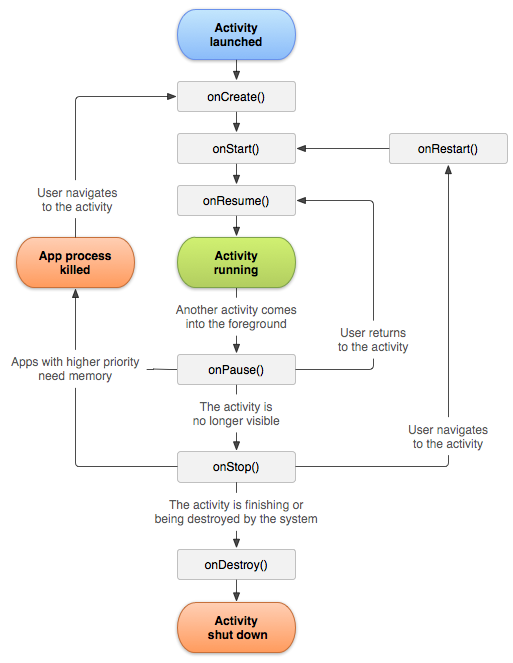
An activity can exist in essentially three states:
resumed:
The activity is in the foreground of the screen and has user focus.(This state is also sometimes referred to as "running".)
Pauses:
Another activity is in the foreground and has focus, but this one is still visible. A paused activity is completely alive (the Activity object is retained in memory, it maintains all state and member information, and remains attached to the window manager), but can be killed by the system in extremely low memory situations.
Stopped:
The activity is completely obscured by another activity(the activity is now in the "background"). A stopped activity is also still alive (the Activity object is retained in memory, it maintains all state and member information, but is not attached to the window manager). However, it is no longer visible to the user and it can be killed by the system when memory is needed elsewhere.
If an activity is paused or stopped, the system can drop it from memory either by asking it to finish(calling its finish() method), or simply killing its process.When the activity is opened again(after being finished or killed),it must be created all over.
Implementing the lifecycle callbacks
When an activity transitions into and out of the different states described above, it is notified through various callback methods.
Our implementation of these lifecycle methods must always call the superclass implementation before doing any work.
Taken together, these methods define the entire lifecycle of an activity.By implements these methods, we can monitor three nested loops in the activity lifecycle.
entire lifetime:
an activity happens between the call to onCreate() and the call to onDestroy(). Our activity should perform setup of "global" state in onCreate(), and release all remaining resources in onDestroy().
visible lifetime:
an activity happens between the call to onStart() and the call to onStop(). During this time, the user can see the activity on-screen and interact with it.
foreground lifetime:
an activity happens between the call to onResume() and the call to onPause(). During this time, the activity is in front of all other activities on screen and has user input focus.
Saving activity state
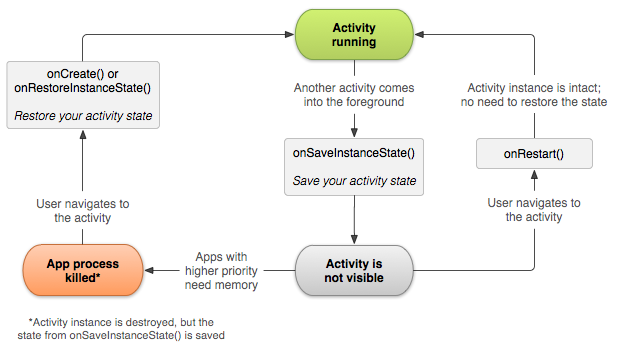
When an activity is paused or stopped, the state of the activity is retained. This is true because the activity object is still held in memory when it is paused or stopped----all information about its members and current state is still alive. Thus, any changes the user made within the activity are retained so that when the activity returns to the foreground (when it "resumes"), those changes are still there.
However, when the system destroys an activity in order to recover memory,the activity object is destroyed,so the system cannot simply resume it when its state intact. Instead, the system must recreate the activity object if the user navigates back to it. Yet, the user is unaware that the system destroyed the activity and recreated it and, thus, probably expects the activity to be exactly as it was. In this situation, we can ensure that important information about the activity state is preserved by implementing an additional callback method that allows we to save information about the state of our activity: onSaveInstanceState().
The system calls onSaveInstanceState() before making the activity vulnerable to destruction.Then, if the system kills our application process and the user navigates back to our activity,the system recreates the activity and passes the state via bundle to both onCreate() and onRestoreInstanceState(). Using either of these methods, we can extract our saved state from the Bundle and restore the activity state. If there is no state information to restore, then the Bundle passed to us is null (which is the case when the activity is created for the first time).
There's no guarantee that onSaveInstanceState() will be called before our activity is destroyed, because there are cases in which it won't be necessary to save the state(such as when the user leaves our activity using the Back button,as the user is explicitly closing the activity).It the system calls onSaveInstanceState(), it does so before onStop() and possibly before onPause().
However, even if we do nothing and do not implement onSaveInstanceState(),some of the activity state is restored by the activity class's default implementation of onSaveInstanceState().Specifically, the default implementation calls the corresponding onSaveInstanceState() method for every view in the layout,which allows each view to provide information about itself that should be saved.The only work required by us is to provide a unique ID(with the android:id attribute) for each widget we want to save its state.If a widget does not have an ID,then the system cannot save its state.
Although the default implementation of onSaveInstanceState() saves useful information about our activity's UI, we still might need to override it to save additional information (such as member values).
Because onSaveInstanceState() is not guaranteed to be called, we should use it only to record the transient state of the activity(the state of the UI)---we should never use it to store persistent data. Instead, we should use onPause() to store persistent data(such as data that should be saved to a database)when the user leaves the activity.
Handling configuration changes
Some device configurations can change during runtime (such as screen orientation, keyboard availability, and language). When such a change occurs, Android recreates the running activity (the system calls onDestroy(), then immediately calls onCreate()).
The best way to handle such a restart is to save and restore of our activity using onSaveInstanceState() and onRestoreInstanceState() (or onCreate()).
Coordinating activities
When one activity starts another, they both experience lifecycle transitions. The first activity pauses and stops, while the other activity is created.
The order of lifecycle callbacks is well defined, particularly when the two activities are in the same process and one is starting the other. Here's the order of operations that occur when Activity A starts Activity B:
1. Activity A's onPause() method executes.
2. Activity B's onCreate(),onStart(),and onResume() methods execute in sequence.(Activity B now has user focus.)
3. Then,if Activity A is no longer visible on screen,its onStop() method executes.


 2413
2413

 被折叠的 条评论
为什么被折叠?
被折叠的 条评论
为什么被折叠?
 到【灌水乐园】发言


