


突然想写这个的目的就是网上写的教程大多都不全,不够系统,想借此来进行系统的学习,让初学者不在迷茫,此外也可以当做自己的移动笔记,让自己对这些框架更加熟悉,如有疑问欢迎大家来交流。
接下来要写的主要是springMVC与jsp的交互,springMVC与安卓的交互,mybatis与数据库的交互,springMVC与mybatis整合与jsp的交互,与安卓的交互,在ssm中加入Redis,主要写这几大块,在接下来的时间完成,要做的事比较多,可能花的时间也比较长,我尽量写的详细点,让大家都能懂,都能看着博客把基本的程序跑通了。
框架的搭建
这篇博客将主要描述一下框架的搭建,搭建springMVC,mybits暂不涉及,如果自己已会请直接跳到下篇。
本人的环境为eclipse(Eclipse Java EE IDE for Web Developers. Version: Oxygen.1 Release (4.7.1)
Build id: 20170914-1200)+jdk1.8+tomcat7.0 。这些网上都有现成的,请自行百度,请相信你所有将遇到的问题都有人遇到过。
1
首先,打开eclipse file–>new–>Dynamic Web Project。由于图片不知怎么了贴不上来,文字代替,后面贴上。

找不到Dynamic Web Project就到other里面去搜。
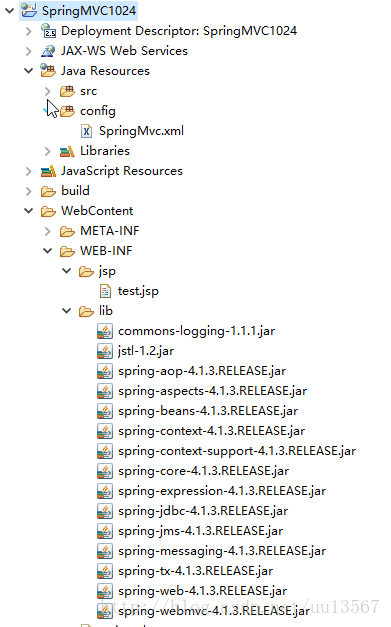
然后在WebContent–>WEB-INF–>lib导入spring的jar包,在后面会贴出来,自己想了解也可以去官网了解
2
再WEB-INF下建立一个jsp的文件夹,建立一个jsp文件test.jsp
<%@ page language="java" contentType="text/html; charset=UTF-8"
pageEncoding="UTF-8"%>
<!DOCTYPE html PUBLIC "-//W3C//DTD HTML 4.01 Transitional//EN" "http://www.w3.org/TR/html4/loose.dtd">
<html>
<head>
<meta http-equiv="Content-Type" content="text/html; charset=UTF-8">
<title>标题</title>
</head>
<body>
2333
</body>
</html>
src下右键建立一个包com.spring.test1,在包下建一个class SpringMVCTest1.java,添加相应的注解带@都是注解
package com.springmvc.test1;

import org.springframework.stereotype.Controller;
import org.springframework.web.bind.annotation.RequestMapping;
import org.springframework.web.servlet.ModelAndView;

@Controller
@RequestMapping("/tsetClass")
public class SpringMVCTest1 {

    @RequestMapping("/testMethod")
    public ModelAndView test() throws Exception{
        ModelAndView mv = new ModelAndView();
        mv.setViewName("test");
        System.out.println("hello springMVC");
        return mv;

    }

}
3
在java Resource文件夹下建立source folder文件夹config,建立SpringMvc.xml文件,写入以下代码,注释都已经写在上面了
<?xml version="1.0" encoding="UTF-8"?>
<beans xmlns="http://www.springframework.org/schema/beans"
    xmlns:xsi="http://www.w3.org/2001/XMLSchema-instance"
    xmlns:p="http://www.springframework.org/schema/p"
    xmlns:context="http://www.springframework.org/schema/context"
    xmlns:dubbo="http://code.alibabatech.com/schema/dubbo"
    xmlns:mvc="http://www.springframework.org/schema/mvc"
    xsi:schemaLocation="http://www.springframework.org/schema/beans
        http://www.springframework.org/schema/beans/spring-beans-4.0.xsd
http://www.springframework.org/schema/mvc
http://www.springframework.org/schema/mvc/spring-mvc-4.0.xsd
http://code.alibabatech.com/schema/dubbo
http://code.alibabatech.com/schema/dubbo/dubbo.xsd
http://www.springframework.org/schema/context
http://www.springframework.org/schema/context/spring-context-4.0.xsd">

<!-- 配置@Controller注解扫描,即定义装载扫描的包 -->
<context:component-scan base-package="com.springmvc.test1"></context:component-scan>

<!-- 如果没有显示的配置处理器映射器和处理器适配那么springMvc会去默认的dispatcherServlet.properties中查找,
对应的处理器映射器和处理器适配器去使用,这样每个请求都要扫描一次他的默认配置文件,效率非常低,会降低访问速度,所以要显示的配置处理器映射器和
处理器适配器 -->

<!-- 注解形式的处理器映射器 -->
<!-- <bean class="org.springframework.web.servlet.mvc.annotation.DefaultAnnotationHandlerMapping"></bean> -->
<!-- 注解形式的处理器适配器 -->
<!-- <bean class="org.springframework.web.servlet.mvc.annotation.AnnotationMethodHandlerAdapter"></bean> -->

<!-- 配置最新版的注解的处理器映射器 -->
<!-- <bean class="org.springframework.web.servlet.mvc.method.annotation.RequestMappingHandlerMapping"></bean> -->
<!-- 配置最新版的注解的处理器适配器 -->
<!-- <bean class="org.springframework.web.servlet.mvc.method.annotation.RequestMappingHandlerAdapter"></bean> -->

    <!-- 注解驱动:
        作用:替我们自动配置最新版的注解的处理器映射器和处理器适配器
     -->
    <mvc:annotation-driven></mvc:annotation-driven>


    <!-- 配置视图解析器
    作用:在controller中指定页面路径的时候就不用写页面的完整路径名称了,可以直接写页面去掉扩展名的名称
    -->
    <bean class="org.springframework.web.servlet.view.InternalResourceViewResolver">
        <!-- 真正的页面路径 =  前缀 + 去掉后缀名的页面名称 + 后缀 -->
        <!-- 前缀 -->
        <property name="prefix" value="/WEB-INF/jsp/"></property>
        <!-- 后缀 -->
        <property name="suffix" value=".jsp"></property>
    </bean>

</beans>
## 4 ##
然后在WebContent–>WEB-INF目录下web.xml文件中加入
<?xml version="1.0" encoding="UTF-8"?>
<web-app xmlns:xsi="http://www.w3.org/2001/XMLSchema-instance" xmlns="http://java.sun.com/xml/ns/javaee" xsi:schemaLocation="http://java.sun.com/xml/ns/javaee http://java.sun.com/xml/ns/javaee/web-app_2_5.xsd" id="WebApp_ID" version="2.5">
  <display-name>SpringMVC1024</display-name>
  <welcome-file-list>
<welcome-file>index.html</welcome-file>
<welcome-file>index.htm</welcome-file>
<welcome-file>index.jsp</welcome-file>
<welcome-file>default.html</welcome-file>
<welcome-file>default.htm</welcome-file>
<welcome-file>default.jsp</welcome-file>
  </welcome-file-list>

  <servlet>
    <servlet-name>springmvc</servlet-name>
    <servlet-class>org.springframework.web.servlet.DispatcherServlet</servlet-class>

        <!-- 如果没有指定springMvc核心配置文件那么默认会去找/WEB-INF/+<servlet-name>中的内容 +   -servlet.xml配置文件 -->
    <!-- 指定springMvc核心配置文件位置 -->
    <init-param>
        <param-name>contextConfigLocation</param-name>
        <param-value>classpath:SpringMvc.xml</param-value>
    </init-param>
  </servlet>
  <servlet-mapping>
    <servlet-name>springmvc</servlet-name>
    <url-pattern>*.action</url-pattern>
  </servlet-mapping>
</web-app>
## 5 ##
通过对比就知道加入的内容了,然后对项目右键 run on server就行了。注意访问的网址
http://localhost:8080/SpringMVC1024//tsetClass/testMethod.action。访问不正确一定要检查网址哦。
这就是运行成功的界面


 1429
1429

 被折叠的 条评论
为什么被折叠?
被折叠的 条评论
为什么被折叠?
 到【灌水乐园】发言


