


学习参考资源:https://www.gitbook.com/book/zhangqx/mini-weather/details
前面我们已经设置好了基本界面,并可以从网络上实时获取天气预报信息并解析,并更新到屏幕组件上,接下来我们要做一个选择城市的界面,并对一个按钮绑定切入该界面的动作
1)新建一个布局
我新建一个layout xml类型的文件,命名为select_city.xml

内容为:
<?xml version="1.0" encoding="utf-8"?>
<RelativeLayout xmlns:android="http://schemas.android.com/apk/res/android"
    android:layout_width="match_parent"
    android:layout_height="match_parent">
    <TextView
        android:layout_width="wrap_content"
        android:layout_height="wrap_content"
        android:text="选择城市布局"/>
</RelativeLayout>
显示为:

2)新建一个继承Activity的类,并加载刚才的select_city布局
我新建了一个SelectCity.java文件

加载布局
package com.example.xchen.mweather;

import android.app.Activity;
import android.os.Bundle;

/**
 * Created by xchen on 16/12/19.
 */

public class SelectCity extends Activity{
    @Override
    protected void onCreate(Bundle savedInstanceState) {
        super.onCreate(savedInstanceState);
        setContentView(R.layout.select_city);
    }
}
3)设置点击动作,借助intent切入新的Activity
在主界面工具栏中的选择城市图标

设置其ImageView变量,并绑定对应组件,设置监听器和点击动作


4)在Manifest中注册SelectCity这个Activity

运行一下!
点击选择城市图标

5)给选择城市界面加一个工具栏
修改select_city.xml
<?xml version="1.0" encoding="utf-8"?>
<RelativeLayout xmlns:android="http://schemas.android.com/apk/res/android"
    android:layout_width="match_parent"
    android:layout_height="match_parent"
    android:background="#FFFFFF">
    <RelativeLayout
        android:layout_width="fill_parent"
        android:layout_height="45.0dp"
        android:background="#000000">
        <ImageView
            android:id="@+id/title_selectCity_back"
            android:layout_width="45.0dp"
            android:layout_height="45.0dp"
            android:src="@drawable/selectCity_bar_back"/>
        <ImageView
            android:layout_width="1.0dp"
            android:layout_height="40.0dp"
            android:layout_toRightOf="@id/title_selectCity_back"
            android:background="#FFFFFF"/>
        <TextView
            android:id="@+id/title_selectCity_name"
            android:layout_width="fill_parent"
            android:layout_height="fill_parent"
            android:text="当前城市:北京"
            android:textColor="#FFFFFF"
            android:textSize="25.0sp"
            android:gravity="center">
        </TextView>
    </RelativeLayout>
</RelativeLayout>

6)为返回按钮添加返回主界面的动作
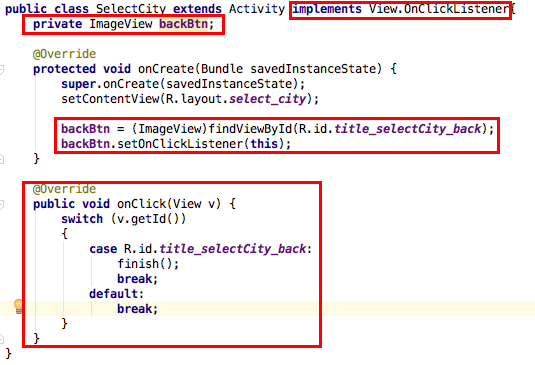
运行一下!
点击返回按钮,可以返回主界面。


 被折叠的 条评论
为什么被折叠?
被折叠的 条评论
为什么被折叠?
 到【灌水乐园】发言


