


代码地址与接口看总目录:【学习笔记】记录冷冷-pig项目的学习过程,大概包括Authorization Server、springcloud、Mybatis Plus~~~_清晨敲代码的博客-CSDN博客
之前只零碎的学习过spring-cloud-alibaba,并没有全面了解过,这次学习pig框架时,想着可以根据这个项目学习一下,练练手,于是断断续续的用了几天时间搭建了一下基础框架。目前就先重点记录一下遇到的问题吧,毕竟流程也不是特别复杂,就是有的东西没遇到过了解的也不深~
上篇文章:No6.从零搭建spring-cloud-alibaba微服务框架,实现fegin、gateway、springevent等(一)_清晨敲代码的博客-CSDN博客
上篇文章包括:
1.将服务系统注册到nacos注册中心;
2.通过nacos实现配置动态更新;
3.添加fegin服务,实现服务之间调用;
4.添加网关(学会使用webflux,学会添加过滤器);
5.添加log服务,通过springevent实现,并使用注解使用(使用AOP);
本篇文章包括:
6.添加 mysql 数据库调用,并使用mybatis-plus操作;
7.在认证模块添加用户认证,基于oauth2的自定义密码模式(已认证用户是基于自定义token加redis持久化,不是session);
剩余包括(会有变动):
8.在upms资源模块添加对accesstoken校验逻辑,使用spring-security-oauth2-resource-server的BearerTokenAuthenticationFilter逻辑加上自定义校验token逻辑;
9.添加用户权限校验等逻辑,需要考虑微服务内部调用不鉴权逻辑;
目录
A6.添加 mysql 数据库调用,并使用mybatis-plus操作;
A7.添加用户认证,基于oauth2的自定义密码模式(已认证用户是基于自定义token加redis持久化,不是session);
A6.添加 mysql 数据库调用,并使用mybatis-plus操作;
添加pig-common-mybatis模块,主要处理mybatis-plus的配置,不配置这个也是可以的。
具体的mysql数据库调用在pig-upms-biz模块。
先来看基本的使用步骤
1.导包
2.添加数据库实体类;
3.添加mapper接口,可以继承mps提供的BaseMapper,也可以添加自定义mapper.xml;并让其被扫描到
4.添加service类,自定义后可以继承mps提供的IService和ServiceImpl;并添加到容器中
5.在controller中使用;
6.在application.xml中配置mapper-locations来扫描Mapper接口对应的XML文件,和其他mps配置信息;
<!-- 1.导包 -->
        <!-- orm 模块-->
        <dependency>
            <groupId>com.baomidou</groupId>
            <artifactId>mybatis-plus-boot-starter</artifactId>
        </dependency>
       <!-- 数据库连接-->
        <dependency>
            <groupId>mysql</groupId>
            <artifactId>mysql-connector-java</artifactId>
        </dependency>
//2.基础实体类,类似于创建时间等内容
@Getter
@Setter
public class BaseEntity implements Serializable {
    /**
     * 创建者
     */
    @TableField(fill = FieldFill.INSERT)
    private String createBy;

    /**
     * 创建时间
     */
    @TableField(fill = FieldFill.INSERT)
    private LocalDateTime createTime;

    /**
     * 更新者
     */
    @TableField(fill = FieldFill.INSERT_UPDATE)
    private String updateBy;

    /**
     * 更新时间
     */
    @TableField(fill = FieldFill.INSERT_UPDATE)
    private LocalDateTime updateTime;
}


@Data
@EqualsAndHashCode(callSuper = true)
public class SysUser extends BaseEntity {

    private static final long serialVersionUID = 1L;

    /**
     * 主键ID
     */
    @TableId(value = "user_id", type = IdType.AUTO)
    private Long userId;

    /**
     * 用户名
     */
    private String username;

。。。

    /**
     * 0-正常,1-删除
     */
    @TableLogic(value = "0", delval = "4")
    private String delFlag;

}
//3.继承mps提供的 BaseMapper ,就可以使用他默认提供的方法。同时也可以添加 mapper.xml ,使用自定义的方法
//要么添加 @Mapper,要么添加@Mapperscan
@Mapper
public interface SysUserMapper extends BaseMapper<SysUser> {
/**
* @Description: 通过ID查询用户信息
* @param id
* @Return: com.pig4cloud.pig.admin.api.vo.UserVO
*/
UserVO getUserVoById(Long id);
/**
* @Description: 分页查询用户信息(含角色)
* @param page
* @param userDTO
* @Return: com.baomidou.mybatisplus.core.metadata.IPage<com.pig4cloud.pig.admin.api.vo.UserVO>
*/
IPage<UserVO> getUserVosPage(Page page, @Param("query") UserDTO userDTO);
}//4.添加service类,自定义后可以继承mps提供的IService和ServiceImpl;并添加到容器中
//接口类和impl实现类都需要实现mps提供的类,然后就可以使用mps的service提供的方法
public interface SysUserService extends IService<SysUser> {
/**
* @Description: 新增/保存用户信息
* @param userDto
* @Return: java.lang.Boolean
*/
Boolean saveUser(UserDTO userDto);
}
@Slf4j
@Service
@RequiredArgsConstructor
public class SysUserServiceImpl extends ServiceImpl<SysUserMapper, SysUser> implements SysUserService {
private static final PasswordEncoder ENCODER = new BCryptPasswordEncoder();
/**
* @Description: 新增/保存用户信息
* @param userDto
* @Return: java.lang.Boolean
*/
@Override
public Boolean saveUser(UserDTO userDto) {
SysUser sysUser = new SysUser();
BeanUtils.copyProperties(userDto, sysUser);
sysUser.setDelFlag(CommonConstants.STATUS_NORMAL);
sysUser.setPassword(ENCODER.encode(userDto.getPassword()));
//this.save(sysUser); 这俩有舍区别? service.save() 内部调用的也是 basesmapper.insert()
baseMapper.insert(sysUser);
//这里可以处理用户其他关联信息
return Boolean.TRUE;
}
}//5.在controller中使用;
@RestController
@RequiredArgsConstructor
@RequestMapping("/user")
public class UserController {
private final SysUserService userService;
/**
* @Description: 添加用户
* @param userDto
* @Return: com.pig4cloud.pig.common.core.util.R<java.lang.Boolean>
*/
@SysLog("添加用户")
@PostMapping
public R<Boolean> user(@RequestBody UserDTO userDto) {
SysUser sysUser = userService.getOne(Wrappers.<SysUser>lambdaQuery().eq(SysUser::getUsername,userDto.getUsername()));
if(sysUser != null){
return R.failed("用户名已存在");
}
sysUser = userService.getOne(Wrappers.<SysUser>lambdaQuery().eq(SysUser::getPhone,userDto.getPhone()));
if(sysUser != null){
return R.failed("手机号码已存在");
}
return R.ok(userService.saveUser(userDto));
}
}# 6.application.yml 或者 nacos 里面的配置文件里面,配置mybatis扫描mapper.xml文件
mybatis-plus:
# 默认和mapper接口所在的包名相同
mapper-locations: classpath:/mapper/*Mapper.xml
global-config:
banner: false
db-config:
# 主键类型 AUTO:"数据库ID自增" INPUT:"用户输入ID",ID_WORKER:"全局唯一ID (数字类型唯一ID)", UUID:"全局唯一ID UUID";
id-type: auto
# 表名是否使用驼峰转下划线命名,只对表名生效。
table-underline: true
# 逻辑已删除值,(逻辑删除下有效)。
logic-delete-value: 1
# 逻辑未删除值,(逻辑删除下有效)。
logic-not-delete-value: 0
configuration:
# 是否开启自动驼峰命名规则映射:从数据库列名到Java属性驼峰命名的类似映射
map-underscore-to-camel-case: true
最后使用 apifox 进行测试,完美实现。
需要记住的问题:
这里需要记住 mybatis-plus 里面的注解,例如 @TableId(value = "user_id", type = IdType.AUTO) @TableLogic(value = "0", delval = "4") @TableField(fill = FieldFill.INSERT) 等~还有配置文件里面的,需要详细的记住~
还有就是原理需要搞明白。
A7.添加用户认证,基于oauth2的自定义密码模式(已认证用户是基于自定义token加redis持久化,不是session);
使用oauth2的方式实现密码模式的用户授权认证,暂时只校验是否身份认证,不进行权限设置。
就是相当于用户通过密码模式获取到token ,测试时只需要测试这个接口即可。
主要步骤有:
1.导入oauth2依赖的包;
2.在pig-common-secuity中添加获取用户信息的UserDetailsService自定义类,同时需要添加UserDetails的实现类;然后在pig-upms-biz中添加fegin接口,以及其相关的mybatis业务类;将需要到的service类添加到 META-INF/string.factories 中,以便添加到容器中;
3.在pig-auth中添加用户身份认证provider(类似于DaoAuthenticationProvider),能够调用UserDetailsService,最终并返回已认证的Authentication;会使用到2.
4.在pig-common-secuity中添加自定义的oauth2认证管理OAuth2AuthorizationService,他的主要作用是记录已认证的用户信息及使用的客户端信息,通过redis持久化;【放这个模块是为了资源端也能共用】,将service类添加到 META-INF/string.factories 中,以便添加到容器中;
5.在pig-common-secuity中添加自定义的注册客户端的持久化管理 RegisteredClientRepository ,他的主要作用就是从数据库中获取已注册的客户端信息RegisteredClient;具体的增删改在pig-upms-biz业务中,这里只需要查询即可;将service类添加到 META-INF/string.factories 中,以便添加到容器中;
6.在pig-auth中添加自定义OAuth2TokenGenerator生成器,若需要增强可以自定义OAuth2TokenCustomizer类;
7.在pig-auth中添加oauth2资源端用户认证过程中需要的converter、provider、token,其中会使用到3.4.5.中的类;
8.在pig-auth中添加自定义的AuthenticationFailureHandler、AuthenticationSuccessHandler的认证失败成功处理器;
9.在pig-auth中添加认证服务器配置;
<!-- 1.在 pig-common-security 模块中添加认证模块 -->
       <dependency>
            <groupId>org.springframework.security</groupId>
            <artifactId>spring-security-oauth2-authorization-server</artifactId>
            <version>${spring.authorization.version}</version>
        </dependency>
//2.pig-common-secuity
com.pig4cloud.pig.common.security.service.PigUser extends User implements OAuth2AuthenticatedPrincipal
com.pig4cloud.pig.common.security.service.PigUserDetailsService extends UserDetailsService, Ordered
com.pig4cloud.pig.common.security.service.PigUserDetailsServiceImpl implements PigUserDetailsService
//然后将这个实现类添加到 /resources/META-INF/spring.factories 里面,就能自动注入到使用的启动模块中
org.springframework.boot.autoconfigure.EnableAutoConfiguration=\
com.pig4cloud.pig.common.security.service.PigUserDetailsServiceImpl
//--------------
//在 pig-upms-api 里面添加 openfegin 接口,也可以直接加到消费端 auth 里面;
//这个接口直接就用用户模块里面的 获取用户全部信息(包括权限) = /user/info/{username}
@FeignClient(contextId = "remoteUserService", value = ServiceNameConstants.UMPS_SERVICE)
com.pig4cloud.pig.admin.api.feign.auth.RemoteUserService
//3.在 pig-auth 模块里面添加 provider,这个接口直接继承 AbstractUserDetailsAuthenticationProvider ,只需要重写获取用户信息方法、校验密码方法

com.pig4cloud.pig.auth.support.core.PigDaoAuthenticationProvider extends AbstractUserDetailsAuthenticationProvider{
    会用到 PigUserDetailsServiceImpl 类型对象
}
//4.在pig-common-secuity中
com.pig4cloud.pig.common.security.service.PigRedisOAuth2AuthorizationService implements OAuth2AuthorizationService{
里面会用到 redis ,会将产生的 accesstoken、refreshtoken、code、state等信息存到 redis里面
private final RedisTemplate<String, Object> redisTemplate;
}
//然后将这个实现类添加到 /resources/META-INF/spring.factories 里面,就能自动注入到使用的启动模块中
org.springframework.boot.autoconfigure.EnableAutoConfiguration=\
com.pig4cloud.pig.common.security.service.PigUserDetailsServiceImpl,\
com.pig4cloud.pig.common.security.service.PigRedisOAuth2AuthorizationService,\
com.pig4cloud.pig.common.security.service.PigRemoteRegisteredClientRepository
//--------------
//用到了 redis 就得添加 RedisTemplate 到容器中,在 pig-common-core 中添加 redis 配置
com.pig4cloud.pig.common.core.config.RedisTemplateConfiguration{}
//然后将这个 configuration 添加到 /resources/META-INF/spring.factories 里面,就能自动注入到使用的启动模块中
org.springframework.boot.autoconfigure.EnableAutoConfiguration=\
com.pig4cloud.pig.common.core.config.JacksonConfiguration,\
com.pig4cloud.pig.common.core.util.SpringContextHolder,\
com.pig4cloud.pig.common.core.config.RedisTemplateConfiguration//5.在pig-common-secuity中
com.pig4cloud.pig.common.security.service.PigRemoteRegisteredClientRepository implements RegisteredClientRepository{
//从 upms 模块里面调用持久的客户端信息
private final RemoteClientDetailsService clientDetailsService;
}
//然后将这个实现类添加到 /resources/META-INF/spring.factories 里面,就能自动注入到使用的启动模块中
org.springframework.boot.autoconfigure.EnableAutoConfiguration=\
com.pig4cloud.pig.common.security.service.PigUserDetailsServiceImpl,\
com.pig4cloud.pig.common.security.service.PigRedisOAuth2AuthorizationService,\
com.pig4cloud.pig.common.security.service.PigRemoteRegisteredClientRepository
//--------------
//在 pig-upms-api 里面添加 openfegin 接口,也可以直接加到消费端 auth 里面;
//这个接口直接就用用户模块里面的 获取某个客户端信息 = /client/getClientDetailsById/{clientId}
@FeignClient(contextId = "remoteClientDetailsService", value = ServiceNameConstants.UMPS_SERVICE)
com.pig4cloud.pig.admin.api.feign.auth.RemoteClientDetailsService
//6. pig-auth

com.pig4cloud.pig.auth.support.core.CustomeOAuth2AccessTokenGenerator implements OAuth2TokenGenerator<OAuth2AccessToken>
com.pig4cloud.pig.auth.support.core.CustomeOAuth2AccessTokenGenerator.OAuth2AccessTokenClaims extends OAuth2AccessToken implements ClaimAccessor
com.pig4cloud.pig.auth.support.core.CustomeOAuth2TokenCustomizer implements OAuth2TokenCustomizer<OAuth2TokenClaimsContext>
//7.pig-auth
//基类
com.pig4cloud.pig.auth.support.base.OAuth2ResourceOwnerBaseAuthenticationToken extends AbstractAuthenticationToken{
private final AuthorizationGrantType authorizationGrantType;
//这里的是客户端认证信息
private final Authentication clientPrincipal;
private final Set<String> scopes;
private final Map<String, Object> additionalParameters;
}
com.pig4cloud.pig.auth.support.base.OAuth2ResourceOwnerBaseAuthenticationConverter< T extends OAuth2ResourceOwnerBaseAuthenticationToken> implements AuthenticationConverter
com.pig4cloud.pig.auth.support.base.OAuth2ResourceOwnerBaseAuthenticationProvider <T extends OAuth2ResourceOwnerBaseAuthenticationToken> implements AuthenticationProvider{
private final AuthenticationManager authenticationManager;
private final OAuth2AuthorizationService oAuth2AuthorizationService;
private final OAuth2TokenGenerator<? extends OAuth2Token> oAuth2TokenGenerator;
}
//实现类
com.pig4cloud.pig.auth.support.password.OAuth2ResourceOwnerPasswordAuthenticationToken extends OAuth2ResourceOwnerBaseAuthenticationToken
com.pig4cloud.pig.auth.support.password.OAuth2ResourceOwnerPasswordAuthenticationConverter extends OAuth2ResourceOwnerBaseAuthenticationConverter<OAuth2ResourceOwnerPasswordAuthenticationToken>
com.pig4cloud.pig.auth.support.password.OAuth2ResourceOwnerPasswordAuthenticationProvider extends OAuth2ResourceOwnerBaseAuthenticationProvider<OAuth2ResourceOwnerPasswordAuthenticationToken>
//8. pig-auth

com.pig4cloud.pig.auth.support.handler.PigAuthenticationSuccessEventHandler implements AuthenticationSuccessHandler
com.pig4cloud.pig.auth.support.handler.PigAuthenticationFailureEventHandler implements AuthenticationFailureHandler
//9. pig-auth 专门配置 oauth2认证的安全配置
@EnableWebSecurity(debug = true) //这个注解会触发创建 HttpSecurity bean ~
@RequiredArgsConstructor
com.pig4cloud.pig.auth.config.AuthorizationServerConfiguration{
private final OAuth2AuthorizationService authorizationService;
private final RegisteredClientRepository registeredClientRepository;
@Bean
@Order(Ordered.HIGHEST_PRECEDENCE)
SecurityFilterChain securityFilterChain(HttpSecurity http) throws Exception {
OAuth2AuthorizationServerConfigurer<HttpSecurity> authorizationServerConfigurer = new OAuth2AuthorizationServerConfigurer<>();
//配置个性化客户端认证(根据请求参数判断是否可以客户端认证)
http.apply(authorizationServerConfigurer.clientAuthentication((oAuth2ClientAuthenticationConfigurer) -> {
//配置授权失败的处理器
oAuth2ClientAuthenticationConfigurer.errorResponseHandler(new PigAuthenticationFailureEventHandler()); // 个性化客户端认证
}));
//配置个性化认证授权端点(获取 accestokende 的端点)
http.apply(authorizationServerConfigurer.tokenEndpoint(oAuth2TokenEndpointConfigurer -> {
oAuth2TokenEndpointConfigurer.accessTokenRequestConverter(accessTokenRequestConverter()) // 注入自定义的授权认证 Converter 转化器
.accessTokenResponseHandler(new PigAuthenticationSuccessEventHandler()) //配置认证失败的处理器
.errorResponseHandler(new PigAuthenticationFailureEventHandler());//配置认证成功的处理器
}));
//配置端点元数据统一发行路径,其中各个端点路径都有默认使用值(也可以自定义配置,例如使用.authorizationEndpoint()配置授权请求端点)
http.apply(authorizationServerConfigurer.providerSettings(ProviderSettings.builder().issuer(SecurityConstants.PROJECT_LICENSE).build()));
//配置自定义授权信息token持久化到redis的管理类(会放到http的share)
http.apply(authorizationServerConfigurer.authorizationService(authorizationService));
//配置已注册的客户端信息的管理类(会放到http的share)
http.apply(authorizationServerConfigurer.registeredClientRepository(registeredClientRepository));
//拿到aotuh2需要的endpoint端点
RequestMatcher endpoint = authorizationServerConfigurer.getEndpointsMatcher();
SecurityFilterChain securityFilterChain = http
//配置过滤链拦截的端点(过滤链默认是任意端点,可以通过这个设置,只有匹配中这写端点,才会进入这个过滤链)
.requestMatcher(endpoint)
//配置端点的权限(默认提供的oauth2的端点是需要认证权限的,例如/oauth2/introspect)
.authorizeRequests(authorizeRequests -> authorizeRequests.anyRequest().authenticated())
// .formLogin()
// .and()
.csrf().disable()
//build SecurityFilterChain
.build();
//注入所有自定义认证授权需要的 provider 对象
addCustomOAuth2GrantAuthenticationProvider(http);
return securityFilterChain;
}
/**
* @Description: request -> xToken 注入请求转换器
* 1、授权码模式(暂无)
* 2、隐藏式(暂无)
* 3、密码式(自定义的)
* 4、客户端凭证(暂无)
* @param
* @Return: org.springframework.security.web.authentication.AuthenticationConverter
*/
public AuthenticationConverter accessTokenRequestConverter(){
//new一个token转换器委托器,其中包含自定义密码模式认证转换器和刷新令牌认证转换器
return new DelegatingAuthenticationConverter(Arrays.asList(
new OAuth2ResourceOwnerPasswordAuthenticationConverter(),
// 访问令牌请求用于OAuth 2.0刷新令牌授权 ——刷新token
new OAuth2RefreshTokenAuthenticationConverter()
//有需要到就要添加上
// // 访问令牌请求用于OAuth 2.0授权码授权 ——授权码模式获取token
// new OAuth2AuthorizationCodeAuthenticationConverter(),
// // 授权请求(或同意)用于OAuth 2.0授权代码授权 ——授权码模式获取code
// new OAuth2AuthorizationCodeRequestAuthenticationConverter()
));
}
/**
* @Description: 注入所有自定义认证授权需要的 provider 对象
* 1. 密码模式 </br>
* 2. 短信登录 (暂无)</br>
* @param http
* @Return: void
*/
public void addCustomOAuth2GrantAuthenticationProvider(HttpSecurity http){
//从shareObject中获取到授权管理业务类(主要负责管理已认证的授权信息)
OAuth2AuthorizationService oAuth2AuthorizationService = http.getSharedObject(OAuth2AuthorizationService.class);
//从shareObject中获取到认证管理类
AuthenticationManager authenticationManager = http.getSharedObject(AuthenticationManager.class);
//new一个自定义处理密码模式的授权提供方,其中重点需要注入token生成器
OAuth2ResourceOwnerPasswordAuthenticationProvider oAuth2ResourceOwnerPasswordAuthenticationProvider =
new OAuth2ResourceOwnerPasswordAuthenticationProvider(authenticationManager, oAuth2AuthorizationService, oAuth2TokenGenerator());
// 将自定义处理密码模式的授权提供方添加到安全配置中
http.authenticationProvider(new PigDaoAuthenticationProvider());
// 将自定义用户认证提供方添加到安全配置中
http.authenticationProvider(oAuth2ResourceOwnerPasswordAuthenticationProvider);
}
/**
* @Description: 令牌生成规则实现
* @param
* @Return: OAuth2TokenGenerator
*/
@Bean
public OAuth2TokenGenerator oAuth2TokenGenerator(){
CustomeOAuth2AccessTokenGenerator customeOAuth2AccessTokenGenerator = new CustomeOAuth2AccessTokenGenerator();
customeOAuth2AccessTokenGenerator.setAccessTokenCustomizer(new CustomeOAuth2TokenCustomizer());
//new一个token生成器委托器,其中包含自定义accesstoken生成器和refreshtoken生成器
return new DelegatingOAuth2TokenGenerator(customeOAuth2AccessTokenGenerator,new OAuth2RefreshTokenGenerator());
}
}
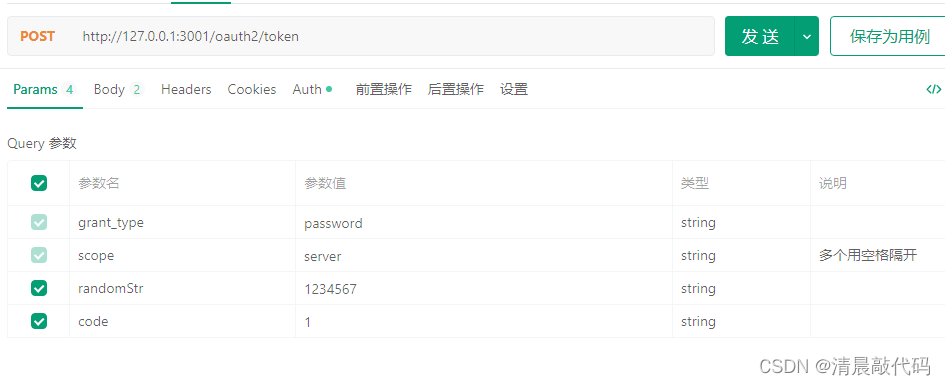
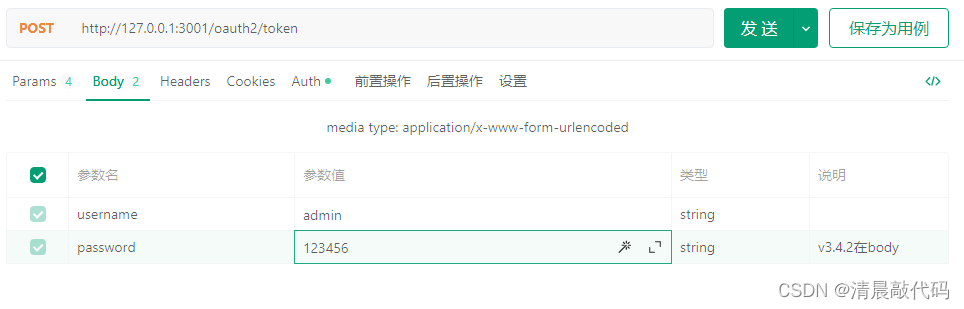
最终在apifox 里面进行访问,/oauth2/token是 authorization-server 默认的获取token端点:
1.请求:127.0.0.1:3001/oauth2/token
2.query:grant_type=password&scope=server&randomStr=1234567&code=1
3.body:username=admin ;password=YehdBPev
4.basic auth:Basic dGVzdDp0ZXN0
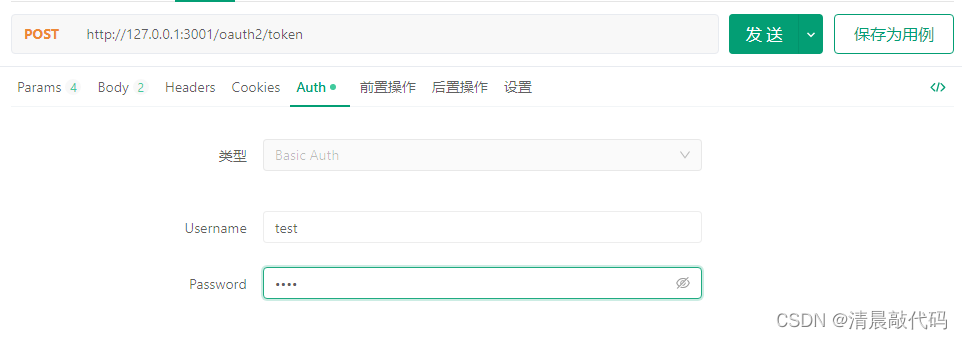
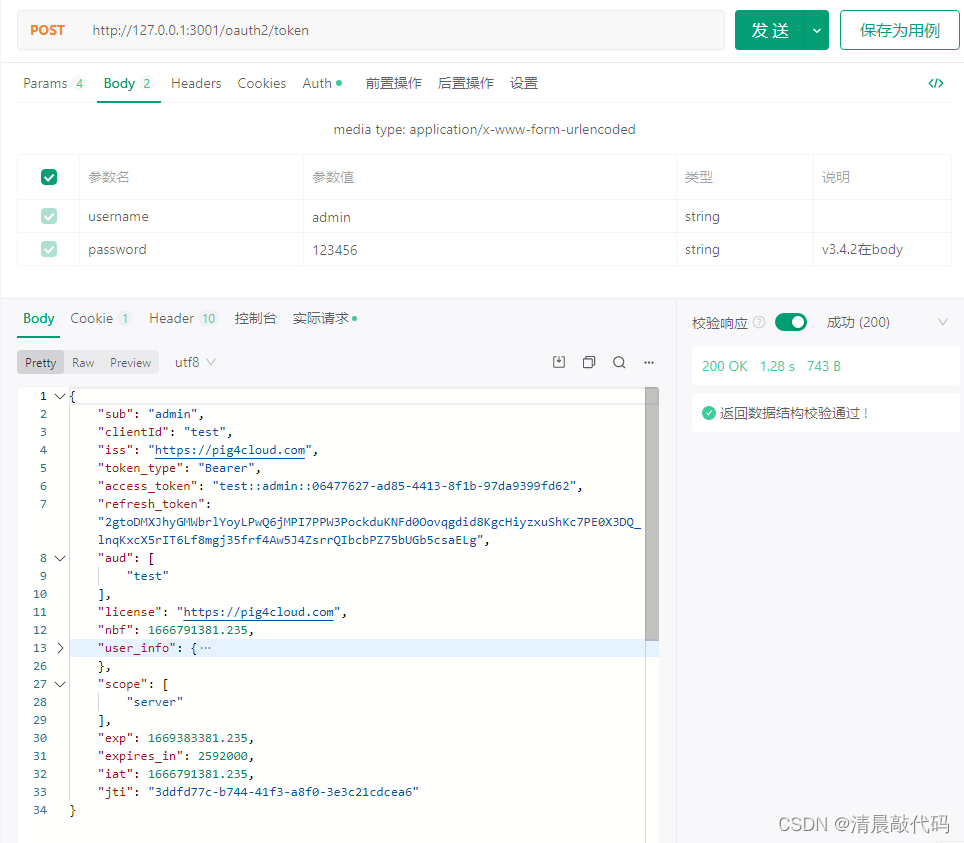 成功~
成功~
遇到的问题:
1.OAuth2Authorization的属性总记不住,要知道里面的token是存到 Map 类型里面的;
2.openfeign的使用,需要两个注解:@EnableFeignClients(basePackages="扫描注入@FeignClient注解对象")、@FeignClient。如果只添加@FeignClient注解而没有添加@EnableFeignClients,则@FeignClient注解的类就是个普通对象。
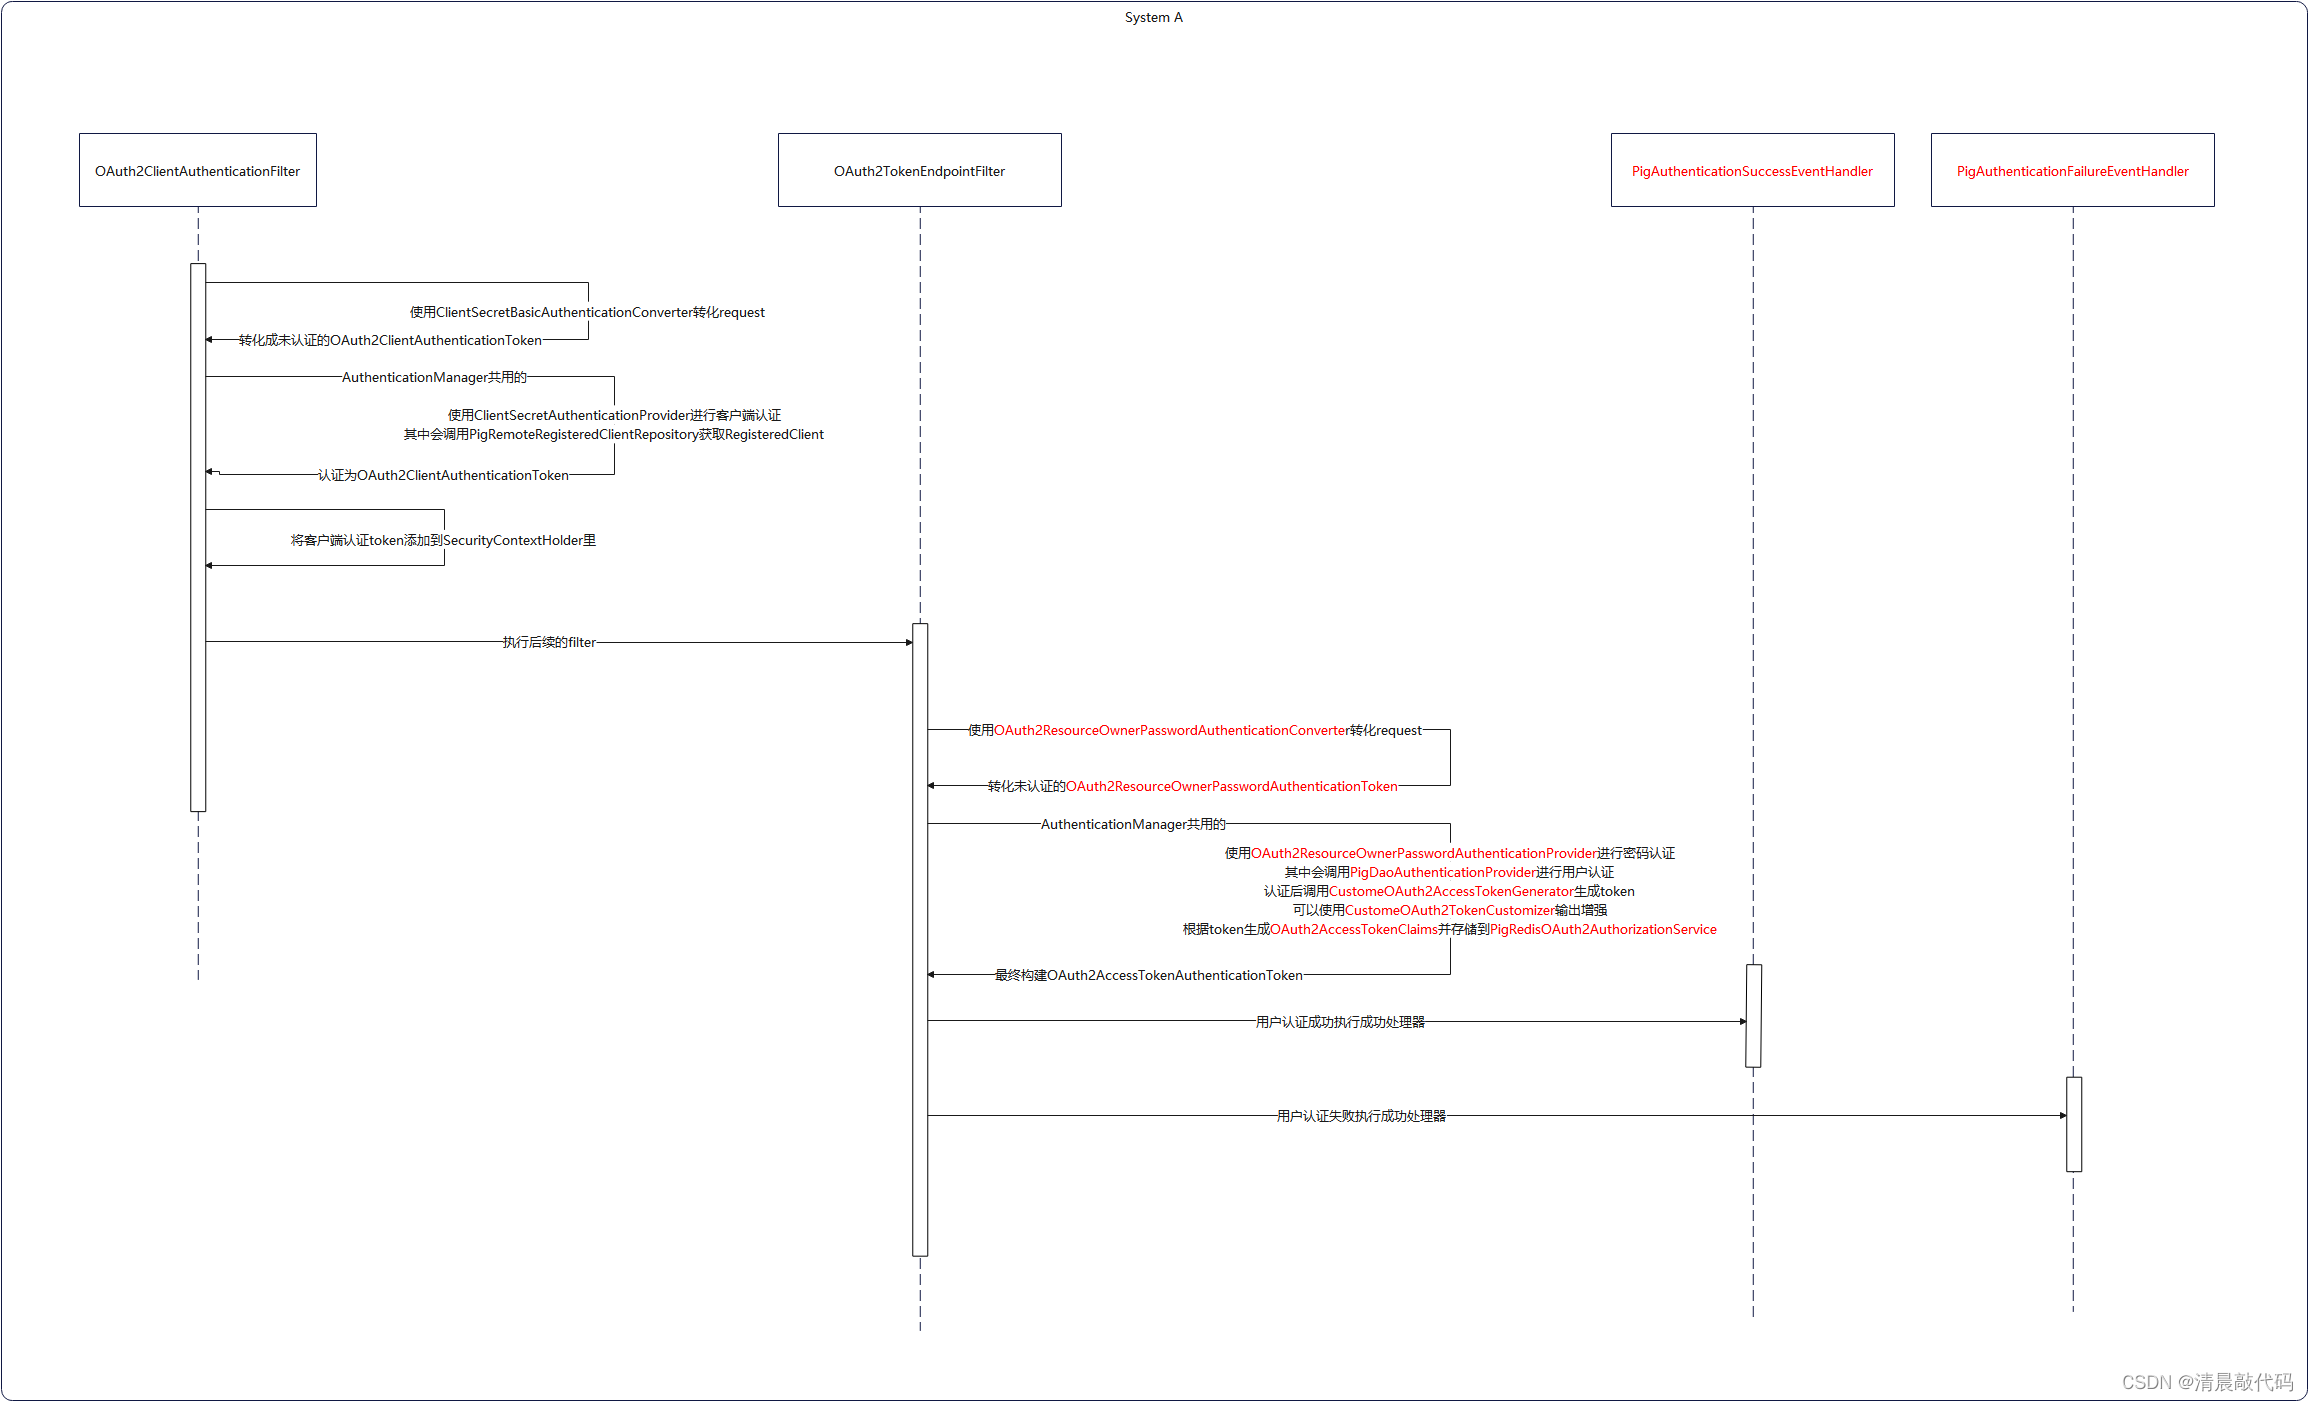
自定义密码认证过滤器的调用图:
防止忘记,写一下~


 785
785


 被折叠的 条评论
为什么被折叠?
被折叠的 条评论
为什么被折叠?
 到【灌水乐园】发言


