


仅涉及后端,全部目录看顶部专栏,代码、文档、接口路径在:
【Lilishop商城】记录一下B2B2C商城系统学习笔记~_清晨敲代码的博客-CSDN博客
上一篇已经看了项目的开发架构,都需要哪些技术,都按照哪些规范,都哪些模块涉及哪些架构。现在就先将需要的技术框架和工具搭建一下,方便后续开发。
先搭建基础的,后续有需要的会再进行添加的~
全篇只介绍重点架构逻辑,具体编写看源代码就行,读起来也不复杂~
谨慎:源代码中有一些注释是错误的,有的注释意思完全相反,有的注释对不上号,我在阅读过程中就顺手更新了,并且在我不会的地方添加了新的注释,所以在读源代码过程中一定要谨慎啊!
目录
B1.缓存(Spring集成Redis和Spring-Cache)
剩余笔记包括:定时任务、日志处理、接口规范、消息中间件AMQP等
A1.基础框架、MVC框架
在总的项目路径下的pom.xml中指定 spring-boot-starter-parent 作为当前项目 pom 的 parent,以依赖springboot包。
并且之后都在此pom.xml中的properties里设置包版本
/lilishop-master/pom.xml
    <parent>
        <groupId>org.springframework.boot</groupId>
        <artifactId>spring-boot-starter-parent</artifactId>
        <version>2.4.10</version>
        <relativePath/>
    </parent>

    <properties>
        <java.version>1.8</java.version>
        <revision>4.2.5</revision>
        <project.build.sourceEncoding>UTF-8</project.build.sourceEncoding>
        <project.reporting.outputEncoding>UTF-8</project.reporting.outputEncoding>
    </properties>
在 framework 项目路径下的 pom.xml 中指定使用的依赖包
/lilishop-master/framework/pom.xml

    <parent>
        <groupId>cn.lili</groupId>
        <artifactId>lili-shop-parent</artifactId>
        <version>${revision}</version>
        <relativePath>../pom.xml</relativePath>
    </parent>

    <dependencies>

        <!-- Spring Boot 2.x 升级迁移必备 -->
        <dependency>
            <groupId>org.springframework.boot</groupId>
            <artifactId>spring-boot-properties-migrator</artifactId>
            <scope>runtime</scope>
        </dependency>
        <!--springmvc web 配置-->
        <dependency>
            <groupId>org.springframework.boot</groupId>
            <artifactId>spring-boot-starter-web</artifactId>
            <exclusions>
                <exclusion>
                    <artifactId>log4j-to-slf4j</artifactId>
                    <groupId>org.apache.logging.log4j</groupId>
                </exclusion>
            </exclusions>
        </dependency>
        <!--test-->
        <dependency>
            <groupId>org.springframework.boot</groupId>
            <artifactId>spring-boot-starter-test</artifactId>
            <exclusions>
                <exclusion>
                    <artifactId>slf4j-api</artifactId>
                    <groupId>org.slf4j</groupId>
                </exclusion>
            </exclusions>
        </dependency>
    </dependencies>
在业务包里的 pom.xml 文件中依赖 framework 模块,例如管理api、店铺api中
/lilishop-master/manager-api/pom.xml

    <parent>
        <groupId>cn.lili</groupId>
        <artifactId>lili-shop-parent</artifactId>
        <version>${revision}</version>
        <relativePath>../pom.xml</relativePath>
    </parent>

    <dependencies>
        <dependency>
            <groupId>cn.lili</groupId>
            <artifactId>framework</artifactId>
            <version>${revision}</version>
        </dependency>
    </dependencies>
然后在业务包里的代码路径中添加启动类,在resource的配置文件application.xml中设置配置信息,例如manager-api模块中
cn.lili.ManagerApiApplication
/**
 * 运营后台 API
 *
 * @author Chopper
 * @since 2020/11/16 10:03 下午
 */
@SpringBootApplication
public class ManagerApiApplication {

    public static void main(String[] args) {
        SpringApplication.run(ManagerApiApplication.class, args);
    }

}
# /lilishop-master/manager-api/src/main/resources/application.yml

server:
  port: 8887
  servlet:
    context-path: /
  tomcat:
    uri-encoding: UTF-8
    threads:
      min-spare: 50
      max: 1000

spring:
  application:
    name: manager-api
  # 文件大小上传配置
  servlet:
    multipart:
      max-file-size: 20MB
      max-request-size: 20MB
  jackson:
    time-zone: GMT+8
    serialization:
      #关闭jackson 对json做解析
      fail-on-empty-beans: false
之后按照后端文档规范,使用@RestController等web注解就可以啦
A2.持久框架和分库分表
B1.持久框架
在 framework 项目路径下的 pom.xml 中指定使用的依赖包,并且在总项目路径中设置包的版本号
/lilishop-master/pom.xml

    <properties>
        <mybatis-plus-version>3.5.1</mybatis-plus-version>
        <druid-version>1.2.8</druid-version>
        <sharding-jdbc-version>4.0.0</sharding-jdbc-version>
    </properties>
/lilishop-master/framework/pom.xml
<dependencies>
<!-- MybatisPlus -->
<dependency>
<groupId>com.baomidou</groupId>
<artifactId>mybatis-plus-boot-starter</artifactId>
<version>${mybatis-plus-version}</version>
<exclusions>
<exclusion>
<artifactId>slf4j-api</artifactId>
<groupId>org.slf4j</groupId>
</exclusion>
</exclusions>
</dependency>
<!-- Mysql Connector ,他这里直接设置的版本号,我们使用时要注意,不要直接写在这儿哦-->
<dependency>
<groupId>mysql</groupId>
<artifactId>mysql-connector-java</artifactId>
<version>8.0.29</version>
</dependency>
<!--druid-->
<dependency>
<groupId>com.alibaba</groupId>
<artifactId>druid</artifactId>
<version>${druid-version}</version>
</dependency>
<!--sharding jdbc springboot-->
<dependency>
<groupId>org.apache.shardingsphere</groupId>
<artifactId>sharding-jdbc-spring-boot-starter</artifactId>
<version>${sharding-jdbc-version}</version>
<exclusions>
<exclusion>
<artifactId>groovy</artifactId>
<groupId>org.codehaus.groovy</groupId>
</exclusion>
<exclusion>
<artifactId>commons-collections4</artifactId>
<groupId>org.apache.commons</groupId>
</exclusion>
<exclusion>
<artifactId>antlr4-runtime</artifactId>
<groupId>org.antlr</groupId>
</exclusion>
<exclusion>
<artifactId>slf4j-api</artifactId>
<groupId>org.slf4j</groupId>
</exclusion>
</exclusions>
</dependency>
<dependency>
<groupId>org.apache.shardingsphere</groupId>
<artifactId>sharding-jdbc-spring-namespace</artifactId>
<version>${sharding-jdbc-version}</version>
<exclusions>
<exclusion>
<artifactId>slf4j-api</artifactId>
<groupId>org.slf4j</groupId>
</exclusion>
</exclusions>
</dependency>
</dependencies>然后在业务包里的resource的配置文件application.xml中设置配置信息,一个是数据库链接,因为我们添加了 shardingsphere 的分库分表,所以先使用他的数据库链接配置。例如manager-api模块中
如果我们 mps 的mapper.xml 和接口包路径不同,就需要配置mybatis.mapperLocations
# /lilishop-master/manager-api/pom.xml

spring:
  shardingsphere:
    datasource:
      #  数据库名称,可自定义,可以为多个,以逗号隔开,每个在这里定义的库,都要在下面定义连接属性
      names: default-datasource
      default-datasource:
        type: com.alibaba.druid.pool.DruidDataSource
        driverClassName: com.mysql.cj.jdbc.Driver
        url: jdbc:mysql://127.0.0.1:3306/lilishop?useUnicode=true&characterEncoding=utf-8&useSSL=false&allowPublicKeyRetrieval=true&serverTimezone=Asia/Shanghai
        username: username
        password: password
        maxActive: 20
        initialSize: 5
        maxWait: 60000
        minIdle: 5
        timeBetweenEvictionRunsMillis: 60000
        minEvictableIdleTimeMillis: 300000
        validationQuery: SELECT 1 FROM DUAL
        testWhileIdle: true
        testOnBorrow: false
        testOnReturn: false
        #是否缓存preparedStatement,也就是PSCache。在mysql下建议关闭。 PSCache对支持游标的数据库性能提升巨大,比如说oracle。
        poolPreparedStatements: false
        #要启用PSCache,-1为关闭 必须配置大于0,当大于0时,poolPreparedStatements自动触发修改为true  可以把这个数值配置大一些,比如说100
        maxOpenPreparedStatements: -1
        #配置监控统计拦截的filters,去掉后监控界面sql无法统计,'wall'用于防火墙
        filters: stat,wall,log4j2
        #通过connectProperties属性来打开mergeSql功能;慢SQL记录
        connectionProperties: druid.stat.mergeSql=true;druid.stat.slowSqlMillis=5000
        #合并多个DruidDataSource的监控数据
        useGlobalDataSourceStat: true
        loginUsername: druid
        loginPassword: druid
    #    sharding:
    #      default-data-source-name: default-datasource
    #      #需要拆分的表,可以设置多个  在 li_order 级别即可
    #      tables:
    #        #需要进行分表的逻辑表名
    #        li_order:
    #          #实际的表结点,下面代表的是li_order_为开头的所有表,如果能确定表的范围例如按月份分表,这里的写法是data2020.li_order_$->{2020..2021}_$->{01..12}  表示例如 li_order_2020_01 li_order_2020_03 li_order_2021_01
    #          actual-data-nodes: data2020.li_order_$->{2019..2021}_$->{01..12}
    #          table-strategy:
    #            # 分表策略,根据创建日期
    #            standard:
    #              sharding-column: create_time
    #              #分表策略
    #              precise-algorithm-class-name: cn.lili.mybatis.sharding.CreateTimeShardingTableAlgorithm
    #              #范围查询实现
    #              range-algorithm-class-name: cn.lili.mybatis.sharding.CreateTimeShardingTableAlgorithm
    props:
      #是否打印逻辑SQL语句和实际SQL语句,建议调试时打印,在生产环境关闭
      sql:
        show: false


# Mybatis-plus
mybatis-plus:
  # 如果mapper.xml文件和接口包路径不同,就需要mybatis.mapperLocations
  mapper-locations: classpath*:mapper/*.xml
  configuration:
    #缓存开启
    cache-enabled: true
    #日志
#    log-impl: org.apache.ibatis.logging.stdout.StdOutImpl
现在还需要配置 mps 其他设置,在 framework 模块里面
1.添加mapper接口的扫描@MapperScan;
2.创建数据库基础实体类,添加字段,例如创建人创建日期等大部分表都有得字段值;
3.创建MetaObjectHandler实现类,再插入或更新时自动设置字段指定默认值;作用就是自动处理基础字段,例如创建人创建日期等;
4.创建DefaultSqlInjector继承类,扩展BaseMapper,添加批量插入语句(IService自带的批量插入是单条插入性能较慢);之后使用时别忘了重写BaseMapper,或者重写一个类继承BaseMapper,然后添加 insertBatchSomeColumn() 方法,之后直接通过mapper调用就行;
5.添加分页查件,创建MybatisPlusInterceptor是就加入这个插件,之后直接通过 iservice 和 mapper 调用使用;
//1.添加mapper接口的扫描@MapperScan;

@Configuration
@MapperScan({"cn.lili.modules.*.*.mapper", "cn.lili.modules.*.mapper"})
public class MybatisPlusConfig {

}
//2.创建数据库基础实体类,添加字段,例如创建人创建日期等大部分表都有得字段值;
//具体看:cn.lili.mybatis.BaseEntity 适用于业务表有创建人等信息
//具体看:cn.lili.mybatis.BaseIdEntity 适用于附加表没有创建人等信息
//注意:使用了 @TableId、@TableField ,这里没有使用逻辑删除@TableLogic
//3.创建MetaObjectHandler实现类,再插入或更新时自动设置字段指定默认值;作用就是自动处理基础字段,例如创建人创建日期等;
//具体看:cn.lili.mybatis.mybatisplus.MyMetaObjectHandler
//主要是重写 insertFill() updateFill() 方法,这个看注释就可以了,挺简单的
//4.创建DefaultSqlInjector继承类,扩展BaseMapper,添加批量插入语句(IService自带的批量插入是单条插入性能较慢);之后使用时别忘了重写BaseMapper,或者重写一个类继承BaseMapper,然后添加 insertBatchSomeColumn() 方法,之后直接通过mapper调用就行;
//具体看cn.lili.mybatis.mybatisplus.external.SpiceSqlInjector,在里面将 InsertBatchSomeColumn 添加进去;
//之后创建一个接口SpiceBaseMapper,里面添加抽象方法,方法名按照首字母小写
//之后创建业务的mapper时,实现SpiceBaseMapper接口,然后调用方式执行就行啦
//例如
@Service
public class CustomWordsServiceImpl extends ServiceImpl<CustomWordsMapper, CustomWords> implements CustomWordsService {
@Override
public long insertBatchCustomWords(List<CustomWords> customWordsList) {
//这里用的是自定义的~
return this.baseMapper.insertBatchSomeColumn(customWordsList);
}
}//5.添加分页查件,创建MybatisPlusInterceptor是就加入这个插件,之后直接通过 iservice 和 mapper 调用使用;
@Configuration
@MapperScan({"cn.lili.modules.*.*.mapper", "cn.lili.modules.*.mapper"})
public class MybatisPlusConfig {
/**
* 向mps的过滤器中添加分页插件,自动识别数据库类型
*/
@Bean
public MybatisPlusInterceptor mybatisPlusInterceptor() {
PaginationInnerInterceptor pageInterceptor = new PaginationInnerInterceptor();
// 设置请求的页面大于最大页后操作,true调回到首页,false继续请求。默认false
pageInterceptor.setOverflow(true);
// 单页分页条数限制,默认无限制
pageInterceptor.setMaxLimit(500L);
// 设置数据库类型
pageInterceptor.setDbType(DbType.MYSQL);
MybatisPlusInterceptor interceptor = new MybatisPlusInterceptor();
// 添加分页插件
interceptor.addInnerInterceptor(pageInterceptor);
return interceptor;
}
}
因为使用的是 mps ,那么简单的增删改查就可以使用 mps 提供的类 BaseMapper<T>、IService<T> 、ServiceImpl<M extends BaseMapper<T>, T> ,进而使用他们提供的快捷调用方法,我们就不用在 mapper.xml 里面写对应的 sql 语句啦,只有很复杂的关联表操作的 sql 可能会用到。
B2.分库分表(待更新)
这个没有使用过,暂时也用不到,后面再添加~
A3.缓存
B1.缓存(Spring集成Redis和Spring-Cache)
在 framework 项目路径下的 pom.xml 中指定使用的依赖包,并且在总项目路径中设置包的版本号
/lilishop-master/pom.xml

    <properties>
        <redisson>3.15.6</redisson>
    </properties>
/lilishop-master/framework/pom.xml
<dependencies>
<!-- Redis-->
<dependency>
<groupId>org.springframework.boot</groupId>
<artifactId>spring-boot-starter-data-redis</artifactId>
</dependency>
<!-- https://mvnrepository.com/artifact/org.redisson/redisson-spring-boot-starter -->
<!--Redisson - 是一个高级的分布式协调Redis客服端-->
<dependency>
<groupId>org.redisson</groupId>
<artifactId>redisson</artifactId>
<version>${redisson}</version>
<exclusions>
<exclusion>
<artifactId>slf4j-api</artifactId>
<groupId>org.slf4j</groupId>
</exclusion>
</exclusions>
</dependency>
</dependencies>然后在业务包里的resource的配置文件application.xml中设置配置信息,配置redis连接。例如manager-api模块中
# /lilishop-master/manager-api/pom.xml

spring:
  cache:
    type: redis
  # Redis
  redis:
    host: 127.0.0.1
    port: 6379
#    password: lilishop
    lettuce:
      pool:
        # 连接池最大连接数(使用负值表示没有限制) 默认 8
        max-active: 200
        # 连接池最大阻塞等待时间(使用负值表示没有限制) 默认 -1
        max-wait: 20
        # 连接池中的最大空闲连接 默认 8
        max-idle: 10
        # 连接池中的最小空闲连接 默认 8
        min-idle: 8
操作 redis 有两种方式,一个是springcache一个是spring集成redis,各有各的优势
redisTemplate ,是Spring集成Redis,我们自己调用实现缓存操作
CacheManger,是Spring-Cache,通过注解方式实现缓存
为什么使用 springcache?可以看这篇文章:SpringCache整合Redis实现项目缓存解决方案_IT美男子的博客-CSDN博客_springcache整合redis
这两种,我们都使用,所以都进行配置,都在 framework 模块里面配置:
1.首先定义一个自定义的序列化,这样方便使用工具查看redis存储,避免乱码;
2.配置springcache的 CacheManager,之后直接使用 @Cacheable 等注解就行;
3.配置spring集成redis的RedisTemplate,为了方便使用redis,我们可以添加操作工具Cache类;之后直接使用 Cache 调用方法就行;同时还可以创建一个缓存前缀类专门存放缓存的key前缀;
//1.首先定义一个自定义的序列化,这样方便使用工具查看redis存储,避免乱码;
//详见:cn.lili.cache.config.redis.FastJsonRedisSerializer
//2.配置springcache的 CacheManager,
//详见:cn.lili.cache.config.redis.RedisConfig
@Slf4j
@Configuration
@ConditionalOnClass(RedisOperations.class)
@EnableConfigurationProperties(RedisProperties.class)
public class RedisConfig extends CachingConfigurerSupport {
private static final String REDIS_PREFIX = "redis://";
@Value("${lili.cache.timeout:7200}")
private Integer timeout;
/**
* 当有多个管理器的时候,必须使用@Primary该注解在一个管理器上注释:表示该管理器为默认的管理器
*
* @param connectionFactory 链接工厂
* @return 缓存
*/
@Bean
@Primary
public CacheManager cacheManager(RedisConnectionFactory connectionFactory) {
//初始化一个RedisCacheWriter
RedisCacheWriter redisCacheWriter = RedisCacheWriter.nonLockingRedisCacheWriter(connectionFactory);
//序列化方式2
FastJsonRedisSerializer<Object> fastJsonRedisSerializer = new FastJsonRedisSerializer<>(Object.class);
RedisSerializationContext.SerializationPair<Object> pair = RedisSerializationContext.SerializationPair.fromSerializer(fastJsonRedisSerializer);
RedisCacheConfiguration defaultCacheConfig = RedisCacheConfiguration.defaultCacheConfig().serializeValuesWith(pair);
//设置过期时间
defaultCacheConfig = defaultCacheConfig.entryTtl(Duration.ofSeconds(timeout));
RedisCacheManager cacheManager = new RedisCacheManager(redisCacheWriter, defaultCacheConfig);
//设置白名单---非常重要********
/*
使用fastjson的时候:序列化时将class信息写入,反解析的时候,
fastjson默认情况下会开启autoType的检查,相当于一个白名单检查,
如果序列化信息中的类路径不在autoType中,
反解析就会报com.alibaba.fastjson.JSONException: autoType is not support的异常
可参考 https://blog.csdn.net/u012240455/article/details/80538540
*/
ParserConfig.getGlobalInstance().addAccept("cn.lili.");
ParserConfig.getGlobalInstance().addAccept("cn.hutool.json.");
return cacheManager;
}
/**
* 自定义缓存key生成策略,默认将使用该策略
*/
@Bean
@Override
public KeyGenerator keyGenerator() {
return (target, method, params) -> {
Map<String, Object> container = new HashMap<>(3);
Class<?> targetClassClass = target.getClass();
//类地址
container.put("class", targetClassClass.toGenericString());
//方法名称
container.put("methodName", method.getName());
//包名称
container.put("package", targetClassClass.getPackage());
//参数列表
for (int i = 0; i < params.length; i++) {
container.put(String.valueOf(i), params[i]);
}
//转为JSON字符串
String jsonString = JSON.toJSONString(container);
//做SHA256 Hash计算,得到一个SHA256摘要作为Key
return DigestUtils.sha256Hex(jsonString);
};
}
@Bean
@Override
public CacheErrorHandler errorHandler() {
//异常处理,当Redis发生异常时,打印日志,但是程序正常走
log.info("初始化 -> [{}]", "Redis CacheErrorHandler");
return new CacheErrorHandler() {
@Override
public void handleCacheGetError(RuntimeException e, Cache cache, Object key) {
log.error("Redis occur handleCacheGetError:key -> [{}]", key, e);
}
@Override
public void handleCachePutError(RuntimeException e, Cache cache, Object key, Object value) {
log.error("Redis occur handleCachePutError:key -> [{}];value -> [{}]", key, value, e);
}
@Override
public void handleCacheEvictError(RuntimeException e, Cache cache, Object key) {
log.error("Redis occur handleCacheEvictError:key -> [{}]", key, e);
}
@Override
public void handleCacheClearError(RuntimeException e, Cache cache) {
log.error("Redis occur handleCacheClearError:", e);
}
};
}
}
//使用时,例如:cn.lili.modules.goods.serviceimpl.CategoryServiceImpl//3.配置spring集成redis的RedisTemplate,为了方便使用redis,我们可以添加操作工具类;
//详见:cn.lili.cache.config.redis.RedisConfig
//详见:cn.lili.cache.Cache
//详见:cn.lili.cache.impl.RedisCache
//详见:cn.lili.cache.CachePrefix
@Slf4j
@Configuration
@ConditionalOnClass(RedisOperations.class)
@EnableConfigurationProperties(RedisProperties.class)
public class RedisConfig extends CachingConfigurerSupport {
@Bean(name = "redisTemplate")
@ConditionalOnMissingBean(name = "redisTemplate")
public RedisTemplate<Object, Object> redisTemplate(LettuceConnectionFactory lettuceConnectionFactory) {
RedisTemplate<Object, Object> template = new RedisTemplate<>();
//使用fastjson序列化
FastJsonRedisSerializer<Object> fastJsonRedisSerializer = new FastJsonRedisSerializer<>(Object.class);
//value值的序列化采用fastJsonRedisSerializer
template.setValueSerializer(fastJsonRedisSerializer);
template.setHashValueSerializer(fastJsonRedisSerializer);
//key的序列化采用StringRedisSerializer
template.setKeySerializer(new StringRedisSerializer());
template.setHashKeySerializer(new StringRedisSerializer());
template.setConnectionFactory(lettuceConnectionFactory);
return template;
}
}
public interface Cache<T> {
T get(Object key);
。。。
}
@Slf4j
@Component
public class RedisCache implements Cache {
@Autowired
private RedisTemplate<Object, Object> redisTemplate;
@Override
public Object get(Object key) {
return redisTemplate.opsForValue().get(key);
}
。。。
}
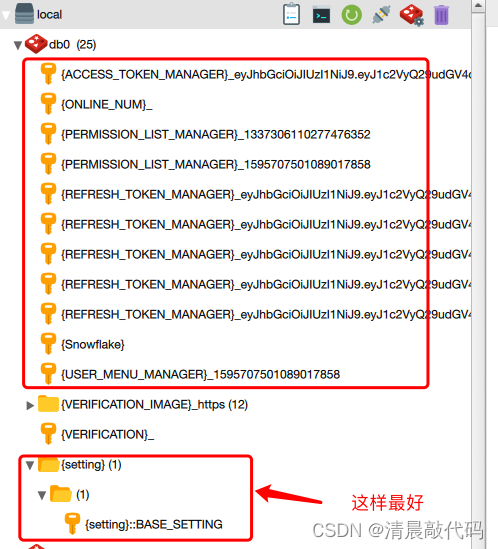
//使用时,例如:cn.lili.security.ManagerAuthenticationFilter在存储数据的时候,key值最好用 :: 分割开,这样使用工具查看时,会进行分组,可读性比较高,否则就是下面这种情况,就,挺乱的,要是数据多的话就更乱了:
B2.redis分布式缓存(待更新)
这个没有使用过,后面再添加~
A4.认证(认证工具)
整个项目使用 JWT 生成token,来记录用户登录信息。为了方便使用 JWT, 我们可以写一个生成 token 的工具类。
在 framework 项目路径下的 pom.xml 中指定使用的依赖包,并且在总项目路径中设置包的版本号
/lilishop-master/pom.xml

    <properties>
        <jwt-version>0.11.2</jwt-version>
    </properties>
/lilishop-master/framework/pom.xml
<dependencies>
<!-- token加密 -->
<dependency>
<groupId>io.jsonwebtoken</groupId>
<artifactId>jjwt-api</artifactId>
<version>${jwt-version}</version>
</dependency>
</dependencies>然后在业务包里的resource的配置文件application.xml中设置配置信息,例如manager-api模块中
# /lilishop-master/manager-api/pom.xml

lili:
  # jwt 细节设定
  jwt-setting:
    # token过期时间(分钟)
    tokenExpireTime: 60
先创建 JWT 工具类,这样方便后续操作;同时可以创建一个 Token 类,专门存放生成的token和refreshtoken;当有 jwt 配置项时,再创建token配置类。
//jwt工具详见:cn.lili.common.security.token.TokenUtil
//    里面有两个重要方法,构建token,刷新token。构建token会同时构建refreshtoken的;刷新token时会用到token里面保存的用户认证类AuthUser,所以正常流程可以先将逻辑写出,剩下的再在用户认证模块里面补充
//存放token类详见:cn.lili.common.security.token.Token
//token配置类详见:cn.lili.common.properties.JWTTokenProperties
//密钥配置成了类详见:cn.lili.common.security.token.SecretKeyUtil
密钥还是放在 yml 配置文件里面较好,这样较方便。
A5.安全框架(springsecurity)
B1.认证鉴权
C1.逻辑
使用spring框架时,配对最常见安全框架的就是springsecurity,该项目使用的也是springsecurity,借助于security的过滤链,在执行接口之前先拦截请求头。
用户登录使用自定义白名单接口,用户认证和用户鉴权使用自定义的认证拦截器,不使用 security 提供的。
提醒自己:用户登录、认证鉴权有很多种实现,这里是其中一种实现方式,实现起来逻辑较简单,涉及到的springsecurity的类较少。
有的实现方式是使用 security 提供的登录鉴权方式,几乎都是过滤器中处理的,学习起来逻辑较复杂,涉及到的类贼多,但是他提供的逻辑都是思考较全面的。
所以具体是用哪种方式可以实际情况实际考虑。光我知道的开源项目security实现方式就有好几种,在这里放一下,以免忘记:
用户登录逻辑:我们自定义用户登录接口进行登录,登录保存用户信息及权限信息,然后返回token;之后用户访问是携带token
用户认证鉴权逻辑是:在自定义认证过滤器中判断用户是否登录及登录后是否有权限,然后在FilterSecurityInterceptor里面判断当前请求是否需要用户认证。
注意:FilterSecurityInterceptor是用来判断当前认证用户所持有的权限,是否能够访问当前请求,不仅仅是能够判断当前请求是否需要用户认证哦~~~~可以看这篇文章:spring security——学习笔记(day06)-实现授权认证-FilterSecurityInterceptor
在自定义认证过滤器中需要判断:
1.如果有token并且有效就获取token对应的用户,再判断当前用户是否有该接口的操作权限,没有就抛403异常,有权限就将用户信息保存到security提供的holder里面(当前请求线程中国年会一直有效,底层用的ThreadLocal),之后继续执行后面过滤器;(后面一定会通过FilterSecurityInterceptor过滤器执行后面的过滤器)
2.如果没有token就直接执行后面过滤器(后面会在FilterSecurityInterceptor过滤器中判断是否需要认证,不需要认证就能执行后面过滤器,需要认证就会抛出异常)
3.如果token失效会给response绑定403输出信息,然后直接执行后面过滤器(后面会在FilterSecurityInterceptor过滤器中判断是否需要认证,不需要认证就能执行后面过滤器,需要认证就会抛出异常)
生成的token会存储在 redis 缓存里面哦,key值直接就是 登录端标识 + token
CachePrefix.ACCESS_TOKEN.getPrefix(userEnums) + accessTokenC2.操作
在 framework 项目路径下的 pom.xml 中指定使用的依赖包,并且在总项目路径中设置包的版本号
/lilishop-master/pom.xml

    <properties>
        <jwt-version>0.11.2</jwt-version>
    </properties>
然后在业务包里的resource的配置文件application.xml中设置配置信息,例如manager-api模块中
# /lilishop-master/manager-api/pom.xml

# 忽略鉴权url
ignored:
  urls:
    - /editor-app/**
    - /actuator**
    - /actuator/**
    - /MP_verify_qSyvBPhDsPdxvOhC.txt
    - /weixin/**
    - /source/**
    - /manager/passport/user/login
    - /manager/passport/user/refresh/**
    - /manager/other/elasticsearch
    - /manager/other/customWords
    - /druid/**
    - /swagger-ui.html
    - /doc.html
    - /swagger-resources/**
    - /swagger/**
    - /webjars/**
    - /v2/api-docs
    - /configuration/ui
    - /boot-admin
    - /**/*.js
    - /**/*.css
    - /**/*.png
    - /**/*.ico
记住,咱们有三个端,这三个端的登录认证逻辑都是一样的,只不过具体生成token的业务和token存储的key值等信息是不一样,所以是有公共模块的,例如 JWT 生成 token的工具类就是使用的统一的,只不过里面 cache 缓存时的 key 值会区分是哪个端,其余的同理。
现在开始搭建security使用的类,包括业务包的用户登录业务、安全配置类和过滤器,这一部分不是公共的,各个端是各自的逻辑;公共的包括用户认证信息类、用户上下文操作(非必须,但是更方便)、跨域配置(前后端分离的需要配置),等等。
//1. framework 模块中的公共部分
//用户认证信息类,专门存放用户认证信息,这里的字段一是要结合认证业务,二是要结合用户表。由于这是三个端共用的所以会有一些特殊字段,例如storeId、clerkId,这里并没有保存权限哦~详见:cn.lili.common.security.AuthUser
//security 基础的配置类,里面配置密码加密、跨域,详见:cn.lili.common.security.SecurityBean
//用户上下文操作类,这里逻辑是从RequestContextHolder里面拿到token然后从token里面拿到AuthUser,注意是拿到用户认证信息,不是Authentication哦,详见:cn.lili.common.security.context.UserContext
这里需要区分 RequestContextHolder、SecurityContextHolder,从RequestContextHolder里面拿到的token进而拿到的用户信息是我们自定义的用户认证类AuthUser,而从SecurityContextHolder里面拿到的是security提供的UsernamePasswordAuthenticationToken(是我们在自定义fiter里面存储),里面不进在details里面存储了AuthUser,还存储了当前用户的权限。所以要结合业务使用哦~
//2.业务包的用户登录业务、安全配置类和过滤器,以 manager-api 举例,店铺和买方的同理~

//用户登录业务,这一块儿先将涉及到的运营用户模块的controller、service、mapper写出来,用户登录是根据用户名从数据库中获取用户信息,拿到后进行密码等校验,然后根据用户获取到对应角色对应的权限并保存到redis,然后调用 TokenUtil 生成token,这一块儿涉及到的类挺多的,但逻辑都挺简单的,详见:cn.lili.modules.system.token.ManagerTokenGenerate、cn.lili.modules.permission.*、cn.lili.controller.*

//自定义的JWT认证过滤器,继承BasicAuthenticationFilter实现doFilterInternal()方法,逻辑就像上面说的,详见:cn.lili.security.ManagerAuthenticationFilter

//安全配置类,继承 WebSecurityConfigurerAdapter ,实现configure()方法,在里面配置安全信息,过滤白名单、跨域配置、session禁止等,也挺简单的,重点是在HttpSecurity最后面添加自定义的JWT认证过滤器详见:cn.lili.security.ManagerSecurityConfig
到这里就配置完毕了~
B2.XSS防御/敏感词过滤等(待更新)
还包括其余安全模块,后面再添加~
剩余笔记包括:定时任务、日志处理、接口规范、消息中间件AMQP等


 465
465


 被折叠的 条评论
为什么被折叠?
被折叠的 条评论
为什么被折叠?
 到【灌水乐园】发言


