


向您的项目添加 C 和 C++ 代码
搭配使用 Android Studio 2.2 或更高版本与 Android Plugin for Gradle 版本 2.2.0 或更高版本时,您可以将 C 和 C++ 代码编译到 Gradle 与 APK 一起打包的原生库中,将这类代码添加到您的应用中。您的 Java 代码随后可以通过 Java 原生接口 (JNI) 调用您的原生库中的函数。如果您想要详细了解如何使用 JNI 框架,请阅读 Android 的 JNI 提示。
Android Studio 用于构建原生库的默认工具是 CMake。由于很多现有项目都使用构建工具包编译其原生代码,Android Studio 还支持 ndk-build。如果您想要将现有的 ndk-build 库导入到您的 Android Studio 项目中,请参阅介绍如何配置 Gradle 以关联到您的原生库的部分。不过,如果您在创建新的原生库,则应使用 CMake。
本页面介绍的信息可以帮助您使用所需构建工具设置 Android Studio、创建或配置项目以支持 Android 上的原生代码,以及构建和运行应用。
注:如果您的现有项目使用已弃用的 ndkCompile 工具,则应先打开 build.properties 文件,并移除以下代码行,然后再将 Gradle 关联到您的原生库:
// Remove this line
android.useDeprecatedNdk = true
实验性 Gradle 的用户注意事项:如果您是以下任意一种情况,请考虑迁移到插件版本 2.2.0 或更高版本并使用 CMake 或 ndk-build 构建原生库:您的原生项目已经使用 CMake 或者 ndk-build;但是您想要使用稳定版本的 Gradle 构建系统;或者您希望支持插件工具,例如 CCache。否则,您可以继续使用实验性版本的 Gradle 和 Android 插件。
下载 NDK 和构建工具
要为您的应用编译和调试原生代码,您需要以下组件:
- Android 原生开发工具包 (NDK):这套工具集允许您为 Android 使用 C 和 C++ 代码,并提供众多平台库,让您可以管理原生 Activity 和访问物理设备组件,例如传感器和触摸输入。
- CMake:一款外部构建工具,可与 Gradle 搭配使用来构建原生库。如果您只计划使用 ndk-build,则不需要此组件。
- LLDB:一种调试程序,Android Studio 使用它来调试原生代码。
您可以使用 SDK 管理器安装这些组件:
- 在打开的项目中,从菜单栏选择 Tools > Android > SDK Manager。
- 点击 SDK Tools 标签。
- 选中 LLDB、CMake 和 NDK 旁的复选框,如图 1 所示。
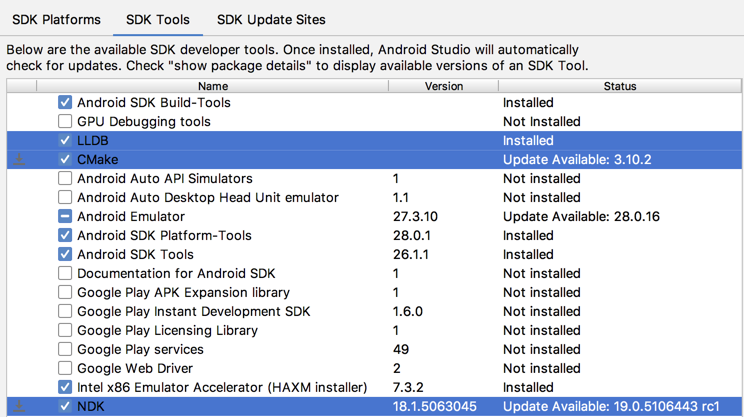
图 1. 从 SDK 管理器中安装 LLDB、CMake 和 NDK。
- 点击 Apply,然后在弹出式对话框中点击 OK。
- 安装完成后,点击 Finish,然后点击 OK。
创建支持 C/C++ 的新项目
创建支持原生代码的项目与创建任何其他 Android Studio 项目类似,不过前者还需要额外几个步骤:
- 在向导的 Configure your new project 部分,选中 Include C++ Support 复选框。
- 点击 Next。
- 正常填写所有其他字段并完成向导接下来的几个部分。
- 在向导的 Customize C++ Support 部分,您可以使用下列选项自定义项目:
- C++ Standard:使用下拉列表选择您希望使用哪种 C++ 标准。选择 Toolchain Default 会使用默认的 CMake 设置。
- Exceptions Support:如果您希望启用对 C++ 异常处理的支持,请选中此复选框。如果启用此复选框,Android Studio 会将
-fexceptions标志添加到模块级build.gradle文件的cppFlags中,Gradle 会将其传递到 CMake。 - Runtime Type Information Support:如果您希望支持 RTTI,请选中此复选框。如果启用此复选框,Android Studio 会将
-frtti标志添加到模块级build.gradle文件的cppFlags中,Gradle 会将其传递到 CMake。
- 点击 Finish。
在 Android Studio 完成新项目的创建后,请从 IDE 左侧打开 Project 窗格并选择 Android 视图。如图 2 中所示,Android Studio 将添加 cpp 和 External Build Files 组:
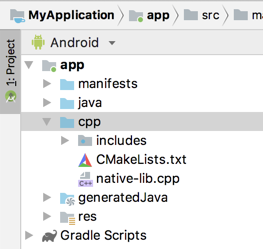
图 2. 您的原生源文件和外部构建脚本的 Android 视图组。
注:此视图无法反映磁盘上的实际文件层次结构,而是将相似文件分到一组中,简化项目导航。
- 在 cpp 组中,您可以找到属于项目的所有原生源文件、标头和预构建库。对于新项目,Android Studio 会创建一个示例 C++ 源文件
native-lib.cpp,并将其置于应用模块的src/main/cpp/目录中。本示例代码提供了一个简单的 C++ 函数stringFromJNI(),此函数可以返回字符串“Hello from C++”。要了解如何向项目添加其他源文件,请参阅介绍如何创建新的原生源文件的部分。 - 在 External Build Files 组中,您可以找到 CMake 或 ndk-build 的构建脚本。与
build.gradle文件指示 Gradle 如何构建应用一样,CMake 和 ndk-build 需要一个构建脚本来了解如何构建您的原生库。对于新项目,Android Studio 会创建一个 CMake 构建脚本CMakeLists.txt,并将其置于模块的根目录中。要详细了解此构建脚本的内容,请参阅介绍如何创建 Cmake 构建脚本的部分。
构建和运行示例应用
点击 Run  后,Android Studio 将在您的 Android 设备或者模拟器上构建并启动一个显示文字“Hello from C++”的应用。下面的概览介绍了构建和运行示例应用时会发生的事件:
- Gradle 调用您的外部构建脚本
CMakeLists.txt。 - CMake 按照构建脚本中的命令将 C++ 源文件
native-lib.cpp编译到共享的对象库中,并命名为libnative-lib.so,Gradle 随后会将其打包到 APK 中。 - 运行时,应用的
MainActivity会使用System.loadLibrary()加载原生库。现在,应用可以使用库的原生函数stringFromJNI()。 MainActivity.onCreate()调用stringFromJNI(),这将返回“Hello from C++”并使用这些文字更新TextView。
注:Instant Run 与使用原生代码的项目不兼容。Android Studio 会自动停用此功能。
如果您想要验证 Gradle 是否已将原生库打包到 APK 中,可以使用 APK 分析器:
- 选择 Build > Analyze APK。
- 从
app/build/outputs/apk/目录中选择 APK 并点击 OK。 - 如图 3 中所示,您会在 APK 分析器窗口的
lib/<ABI>/下看到libnative-lib.so。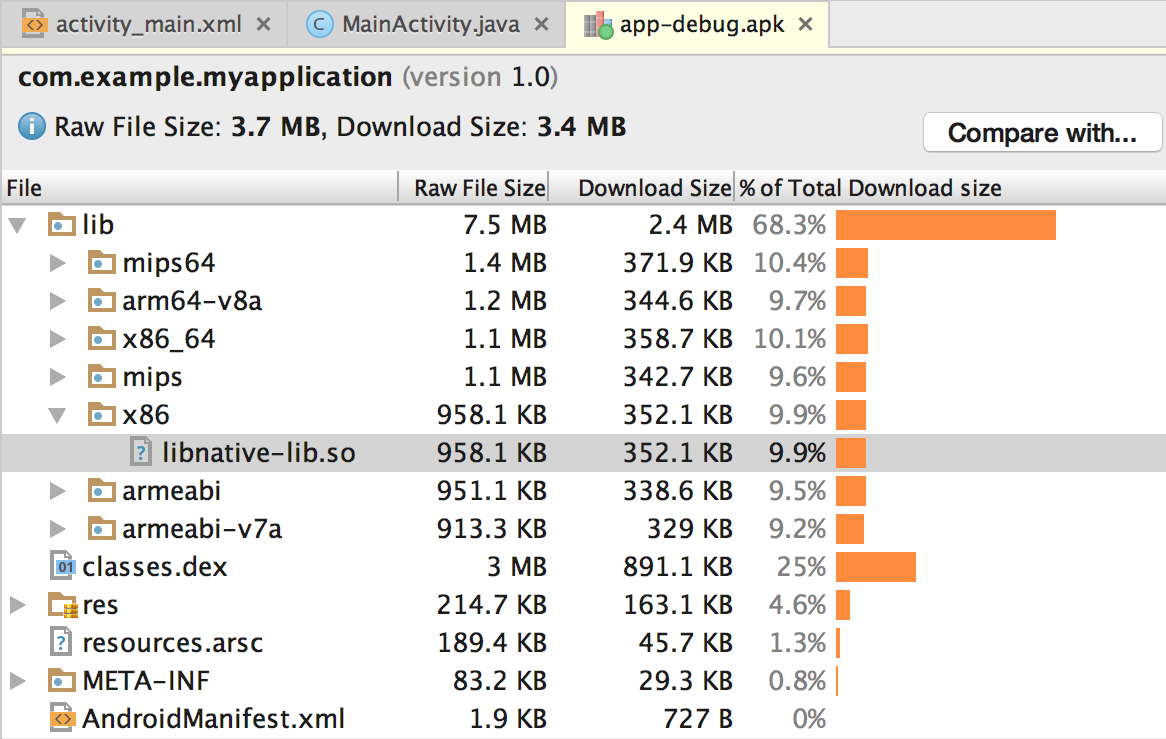
图 3. 使用 APK 分析器定位原生库。
提示:如果您想要试验使用原生代码的其他 Android 应用,请点击 File > New > Import Sample 并从 Ndk 列表中选择示例项目。
向现有项目添加 C/C++ 代码
如果您希望向现有项目添加原生代码,请执行以下步骤:
- 创建新的原生源文件并将其添加到您的 Android Studio 项目中。
- 如果您已经拥有原生代码或想要导入预构建的原生库,则可以跳过此步骤。
- 创建 CMake 构建脚本,将您的原生源代码构建到库中。如果导入和关联预构建库或平台库,您也需要此构建脚本。
- 如果您的现有原生库已经拥有
CMakeLists.txt构建脚本或者使用 ndk-build 并包含Android.mk构建脚本,则可以跳过此步骤。
- 如果您的现有原生库已经拥有
- 提供一个指向您的 CMake 或 ndk-build 脚本文件的路径,将 Gradle 关联到您的原生库。Gradle 使用构建脚本将源代码导入您的 Android Studio 项目并将原生库(SO 文件)打包到 APK 中。
配置完项目后,您可以使用 JNI 框架从 Java 代码中访问您的原生函数。要构建和运行应用,只需点击 Run 。Gradle 会以依赖项的形式添加您的外部原生构建流程,用于编译、构建原生库并将其随 APK 一起打包。
创建新的原生源文件
要在应用模块的主源代码集中创建一个包含新建原生源文件的 cpp/ 目录,请按以下步骤操作:
- 从 IDE 的左侧打开 Project 窗格并从下拉菜单中选择 Project 视图。
- 导航到 您的模块 > src,右键点击 main 目录,然后选择 New > Directory。
- 为目录输入一个名称(例如
cpp)并点击 OK。 - 右键点击您刚刚创建的目录,然后选择 New > C/C++ Source File。
- 为您的源文件输入一个名称,例如
native-lib。 - 从 Type 下拉菜单中,为您的源文件选择文件扩展名,例如
.cpp。- 点击 Edit File Types
 ,您可以向下拉菜单中添加其他文件类型,例如
 .cxx或.hxx。在弹出的 C/C++ 对话框中,从 Source Extension 和 Header Extension 下拉菜单中选择另一个文件扩展名,然后点击 OK。
- 点击 Edit File Types
- 如果您还希望创建一个标头文件,请选中 Create an associated header 复选框。
- 点击 OK。
创建 CMake 构建脚本
如果您的原生源文件还没有 CMake 构建脚本,则您需要自行创建一个并包含适当的 CMake 命令。CMake 构建脚本是一个纯文本文件,您必须将其命名为 CMakeLists.txt。本部分介绍了您应包含到构建脚本中的一些基本命令,用于在创建原生库时指示 CMake 应使用哪些源文件。
注:如果您的项目使用 ndk-build,则不需要创建 CMake 构建脚本。提供一个指向您的 Android.mk 文件的路径,将 Gradle 关联到您的原生库。
要创建一个可以用作 CMake 构建脚本的纯文本文件,请按以下步骤操作:
- 从 IDE 的左侧打开 Project 窗格并从下拉菜单中选择 Project 视图。
- 右键点击 您的模块 的根目录并选择 New > File。
注:您可以在所需的任意位置创建构建脚本。不过,在配置构建脚本时,原生源文件和库的路径将与构建脚本的位置相关。
- 输入“CMakeLists.txt”作为文件名并点击 OK。
现在,您可以添加 CMake 命令,对您的构建脚本进行配置。要指示 CMake 从原生源代码创建一个原生库,请将 cmake_minimum_required() 和 add_library() 命令添加到您的构建脚本中:
# Sets the minimum version of CMake required to build your native library.
# This ensures that a certain set of CMake features is available to
# your build.

cmake_minimum_required(VERSION 3.4.1)

# Specifies a library name, specifies whether the library is STATIC or
# SHARED, and provides relative paths to the source code. You can
# define multiple libraries by adding multiple add.library() commands,
# and CMake builds them for you. When you build your app, Gradle
# automatically packages shared libraries with your APK.

add_library( # Specifies the name of the library.
             native-lib

             # Sets the library as a shared library.
             SHARED

             # Provides a relative path to your source file(s).
             src/main/cpp/native-lib.cpp )
使用 add_library() 向您的 CMake 构建脚本添加源文件或库时,Android Studio 还会在您同步项目后在 Project 视图下显示关联的标头文件。不过,为了确保 CMake 可以在编译时定位您的标头文件,您需要将 include_directories() 命令添加到 CMake 构建脚本中并指定标头的路径:
add_library(...)

# Specifies a path to native header files.
include_directories(src/main/cpp/include/)
CMake 使用以下规范来为库文件命名:
lib库名称.so
例如,如果您在构建脚本中指定“native-lib”作为共享库的名称,CMake 将创建一个名称为 libnative-lib.so 的文件。不过,在 Java 代码中加载此库时,请使用您在 CMake 构建脚本中指定的名称:
static {
    System.loadLibrary(“native-lib”);
}
注:如果您在 CMake 构建脚本中重命名或移除某个库,您需要先清理项目,Gradle 随后才会应用更改或者从 APK 中移除旧版本的库。要清理项目,请从菜单栏中选择 Build > Clean Project。
Android Studio 会自动将源文件和标头添加到 Project 窗格的 cpp 组中。使用多个 add_library() 命令,您可以为 CMake 定义要从其他源文件构建的更多库。
添加 NDK API
Android NDK 提供了一套实用的原生 API 和库。通过将 NDK 库包含到项目的 CMakeLists.txt 脚本文件中,您可以使用这些 API 中的任意一种。
预构建的 NDK 库已经存在于 Android 平台上,因此,您无需再构建或将其打包到 APK 中。由于 NDK 库已经是 CMake 搜索路径的一部分,您甚至不需要在您的本地 NDK 安装中指定库的位置 - 只需要向 CMake 提供您希望使用的库的名称,并将其关联到您自己的原生库。
将 find_library() 命令添加到您的 CMake 构建脚本中以定位 NDK 库,并将其路径存储为一个变量。您可以使用此变量在构建脚本的其他部分引用 NDK 库。以下示例可以定位 Android 特定的日志支持库并将其路径存储在 log-lib 中:
find_library( # Defines the name of the path variable that stores the
              # location of the NDK library.
              log-lib

              # Specifies the name of the NDK library that
              # CMake needs to locate.
              log )
为了确保您的原生库可以在 log 库中调用函数,您需要使用 CMake 构建脚本中的 target_link_libraries() 命令关联库:
find_library(...)

# Links your native library against one or more other native libraries.
target_link_libraries( # Specifies the target library.
                       native-lib

                       # Links the log library to the target library.
                       ${log-lib} )
NDK 还以源代码的形式包含一些库,您在构建和关联到您的原生库时需要使用这些代码。您可以使用 CMake 构建脚本中的 add_library() 命令,将源代码编译到原生库中。要提供本地 NDK 库的路径,您可以使用 ANDROID_NDK 路径变量,Android Studio 会自动为您定义此变量。
以下命令可以指示 CMake 构建 android_native_app_glue.c,后者会将 NativeActivity 生命周期事件和触摸输入置于静态库中并将静态库关联到 native-lib:
add_library( app-glue
             STATIC
             ${ANDROID_NDK}/sources/android/native_app_glue/android_native_app_glue.c )

# You need to link static libraries against your shared native library.
target_link_libraries( native-lib app-glue ${log-lib} )
添加其他预构建库
添加预构建库与为 CMake 指定要构建的另一个原生库类似。不过,由于库已经预先构建,您需要使用 IMPORTED 标志告知 CMake 您只希望将库导入到项目中:
add_library( imported-lib
             SHARED
             IMPORTED )
然后,您需要使用 set_target_properties() 命令指定库的路径,如下所示。
某些库为特定的 CPU 架构(或应用二进制接口 (ABI))提供了单独的软件包,并将其组织到单独的目录中。此方法既有助于库充分利用特定的 CPU 架构,又能让您仅使用所需的库版本。要向 CMake 构建脚本中添加库的多个 ABI 版本,而不必为库的每个版本编写多个命令,您可以使用 ANDROID_ABI路径变量。此变量使用 NDK 支持的一组默认 ABI,或者您手动配置 Gradle 而让其使用的一组经过筛选的 ABI。例如:
add_library(...)
set_target_properties( # Specifies the target library.
                       imported-lib

                       # Specifies the parameter you want to define.
                       PROPERTIES IMPORTED_LOCATION

                       # Provides the path to the library you want to import.
                       imported-lib/src/${ANDROID_ABI}/libimported-lib.so )
为了确保 CMake 可以在编译时定位您的标头文件,您需要使用 include_directories() 命令,并包含标头文件的路径:
include_directories( imported-lib/include/ )
注:如果您希望打包一个并不是构建时依赖项的预构建库(例如在添加属于 imported-lib 依赖项的预构建库时),则不需要执行以下说明来关联库。
要将预构建库关联到您自己的原生库,请将其添加到 CMake 构建脚本的 target_link_libraries() 命令中:
target_link_libraries( native-lib imported-lib app-glue ${log-lib} )
在您构建应用时,Gradle 会自动将导入的库打包到 APK 中。您可以使用 APK 分析器验证 Gradle 将哪些库打包到您的 APK 中。如需了解有关 CMake 命令的详细信息,请参阅 CMake 文档。
将 Gradle 关联到您的原生库
要将 Gradle 关联到您的原生库,您需要提供一个指向 CMake 或 ndk-build 脚本文件的路径。在您构建应用时,Gradle 会以依赖项的形式运行 CMake 或 ndk-build,并将共享的库打包到您的 APK 中。Gradle 还使用构建脚本来了解要将哪些文件添加到您的 Android Studio 项目中,以便您可以从 Project 窗口访问这些文件。如果您的原生源文件没有构建脚本,则需要先创建 CMake 构建脚本,然后再继续。
将 Gradle 关联到原生项目后,Android Studio 会更新 Project 窗格以在 cpp 组中显示您的源文件和原生库,在 External Build Files 组中显示您的外部构建脚本。
注:更改 Gradle 配置时,请确保通过点击工具栏中的 Sync Project  应用更改。此外,如果在将 CMake 或 ndk-build 脚本文件关联到 Gradle 后再对其进行更改,您应当从菜单栏中选择 Build > Refresh Linked C++ Projects,将 Android Studio 与您的更改同步。
使用 Android Studio UI
您可以使用 Android Studio UI 将 Gradle 关联到外部 CMake 或 ndk-build 项目:
- 从 IDE 左侧打开 Project 窗格并选择 Android 视图。
- 右键点击您想要关联到原生库的模块(例如 app 模块),并从菜单中选择 Link C++ Project with Gradle。您应看到一个如图 4 所示的对话框。
- 从下拉菜单中,选择 CMake 或 ndk-build。
- 如果您选择 CMake,请使用 Project Path 旁的字段为您的外部 CMake 项目指定
CMakeLists.txt脚本文件。 - 如果您选择 ndk-build,请使用 Project Path 旁的字段为您的外部 ndk-build 项目指定
Android.mk脚本文件。如果Application.mk文件与您的Android.mk文件位于相同目录下,Android Studio 也会包含此文件。
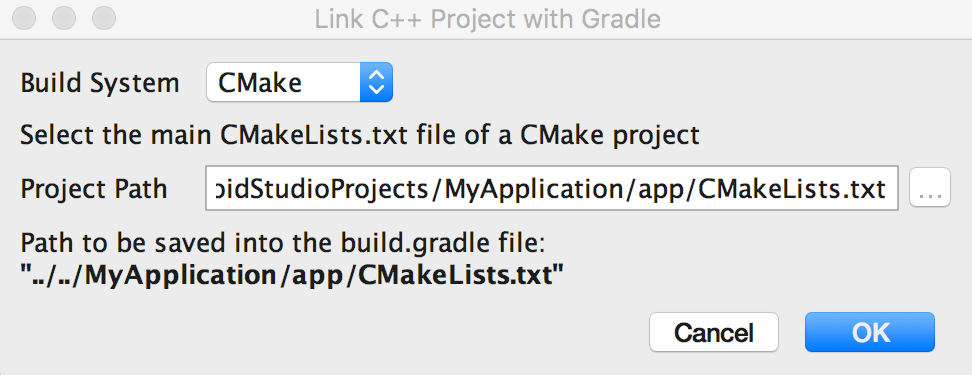
图 4. 使用 Android Studio 对话框关联外部 C++ 项目。
- 如果您选择 CMake,请使用 Project Path 旁的字段为您的外部 CMake 项目指定
- 点击 OK。
手动配置 Gradle
要手动配置 Gradle 以关联到您的原生库,您需要将 externalNativeBuild {} 块添加到模块级 build.gradle 文件中,并使用 cmake {} 或 ndkBuild {}对其进行配置:
android {
  ...
  defaultConfig {...}
  buildTypes {...}

  // Encapsulates your external native build configurations.
  externalNativeBuild {

    // Encapsulates your CMake build configurations.
    cmake {

      // Provides a relative path to your CMake build script.
      path "CMakeLists.txt"
    }
  }
}
注:如果您想要将 Gradle 关联到现有 ndk-build 项目,请使用 ndkBuild {} 块而不是 cmake {},并提供 Android.mk 文件的相对路径。如果 Application.mk 文件与您的 Android.mk 文件位于相同目录下,Gradle 也会包含此文件。
指定可选配置
您可以在模块级 build.gradle 文件的 defaultConfig {} 块中配置另一个 externalNativeBuild {} 块,为 CMake 或 ndk-build 指定可选参数和标志。与 defaultConfig {} 块中的其他属性类似,您也可以在构建配置中为每个产品风味重写这些属性。
例如,如果您的 CMake 或 ndk-build 项目定义多个原生库,您可以使用 targets 属性仅为给定产品风味构建和打包这些库中的一部分。以下代码示例说明了您可以配置的部分属性:
android {
  ...
  defaultConfig {
    ...
    // This block is different from the one you use to link Gradle
    // to your CMake or ndk-build script.
    externalNativeBuild {

      // For ndk-build, instead use ndkBuild {}
      cmake {

        // Passes optional arguments to CMake.
        arguments "-DANDROID_ARM_NEON=TRUE", "-DANDROID_TOOLCHAIN=clang"

        // Sets optional flags for the C compiler.
        cFlags "-D_EXAMPLE_C_FLAG1", "-D_EXAMPLE_C_FLAG2"

        // Sets a flag to enable format macro constants for the C++ compiler.
        cppFlags "-D__STDC_FORMAT_MACROS"
      }
    }
  }

  buildTypes {...}

  productFlavors {
    ...
    demo {
      ...
      externalNativeBuild {
        cmake {
          ...
          // Specifies which native libraries to build and package for this
          // product flavor. If you don't configure this property, Gradle
          // builds and packages all shared object libraries that you define
          // in your CMake or ndk-build project.
          targets "native-lib-demo"
        }
      }
    }

    paid {
      ...
      externalNativeBuild {
        cmake {
          ...
          targets "native-lib-paid"
        }
      }
    }
  }

  // Use this block to link Gradle to your CMake or ndk-build script.
  externalNativeBuild {
    cmake {...}
    // or ndkBuild {...}
  }
}
要详细了解配置产品风味和构建变体,请参阅配置构建变体。如需了解您可以使用 arguments 属性为 CMake 配置的变量列表,请参阅使用 CMake 变量。
指定 ABI
默认情况下,Gradle 会针对 NDK 支持的 ABI 将您的原生库构建到单独的 .so 文件中,并将其全部打包到您的 APK 中。如果您希望 Gradle 仅构建和打包原生库的特定 ABI 配置,您可以在模块级 build.gradle 文件中使用 ndk.abiFilters 标志指定这些配置,如下所示:
android {
  ...
  defaultConfig {
    ...
    externalNativeBuild {
      cmake {...}
      // or ndkBuild {...}
    }

    ndk {
      // Specifies the ABI configurations of your native
      // libraries Gradle should build and package with your APK.
      abiFilters 'x86', 'x86_64', 'armeabi', 'armeabi-v7a',
                   'arm64-v8a'
    }
  }
  buildTypes {...}
  externalNativeBuild {...}
}
在大多数情况下,您只需要在 ndk {} 块中指定 abiFilters(如上所示),因为它会指示 Gradle 构建和打包原生库的这些版本。不过,如果您希望控制 Gradle 应当构建的配置,并独立于您希望其打包到 APK 中的配置,请在 defaultConfig.externalNativeBuild.cmake {} 块(或 defaultConfig.externalNativeBuild.ndkBuild {} 块中)配置另一个 abiFilters 标志。Gradle 会构建这些 ABI 配置,不过仅会打包您在 defaultConfig.ndk{} 块中指定的配置。
为了进一步降低 APK 的大小,请考虑配置 ABI APK 拆分,而不是创建一个包含原生库所有版本的大型 APK,Gradle 会为您想要支持的每个 ABI 创建单独的 APK,并且仅打包每个 ABI 需要的文件。如果您配置 ABI 拆分,但没有像上面的代码示例一样指定 abiFilters 标志,Gradle 会构建原生库的所有受支持 ABI 版本,不过仅会打包您在 ABI 拆分配置中指定的版本。为了避免构建您不想要的原生库版本,请为 abiFilters 标志和 ABI 拆分配置提供相同的 ABI 列表。
创建 Android 库
Android 库在结构上与 Android 应用模块相同。它可以提供构建应用所需的一切内容,包括源代码、资源文件和 Android 清单。不过,Android 库将编译到您可以用作 Android 应用模块依赖项的 Android 归档 (AAR) 文件,而不是在设备上运行的 APK。与 JAR 文件不同,AAR 文件可以包含 Android 资源和一个清单文件,这样,除了 Java 类与方法外,您还可以捆绑布局和可绘制对象等共享资源。
库模块在以下情况下非常有用:
- 构建使用某些相同组件(例如 Activity、服务或 UI 布局)的多个应用。
- 构建存在多个 APK 变体(例如免费版本和付费版本)的应用并且需要在两种版本中使用相同的核心组件。
在任何一种情况下,只需要将您希望重用的文件移动到库模块中,然后以依赖项的形式为每个应用模块添加库。本页面将说明如何执行这两个操作。
创建库模块
要在您的项目中创建一个新的库模块,请按以下步骤操作:
- 点击 File > New > New Module。
- 在出现的 Create New Module 窗口中,依次点击 Android Library 和 Next。
还存在一个用于创建 Java 库的选项,可以构建传统的 JAR 文件。尽管 JAR 文件在大多数项目中都非常实用(尤其在您希望与其他平台共享代码时),但这种文件不允许您包含 Android 资源或清单文件,而后者对于 Android 项目中的代码重用非常有用。因此,本指南将侧重论述创建 Android 库。
- 为您的库命名,并为库中代码选择一个最低的 SDK 版本,然后点击 Finish。
在 Gradle 项目同步完成后,库模块将显示左侧的 Project 面板中。如果您未看到新模块文件夹,请确保将视图切换为 Android 视图。
将应用模块转换为库模块
如果您现有的应用模块包含您希望重用的所有代码,则可以按照以下步骤将其转换为库模块:
- 打开现有应用模块的
build.gradle文件。您应在顶部看到以下内容:apply plugin: 'com.android.application'
- 按照下面所示更改插件分配:
apply plugin: 'com.android.library'
- 点击 Sync Project with Gradle Files。
就这么简单。模块的整个结构仍然相同,但是现在它将作为 Android 库运行,构建也将创建一个 AAR 文件,而不是 APK。
以依赖项形式添加您的库
要在另一个应用模块中使用您的 Android 库的代码,请按以下步骤操作:
- 通过两种方式之一将库添加到您的项目(如果您是在相同项目中创建的库模块,则该模块已经存在,您可以跳过此步骤):
- 添加已编译的 AAR(或 JAR)文件:
- 点击 File > New Module。
- 依次点击 Import .JAR/.AAR Package 和 Next。
- 输入 AAR 或 JAR 文件的位置,然后点击 Finish。
- 将库模块导入到您的项目中:
- 点击 File > New > Import Module。
- 输入库模块目录的位置,然后点击 Finish。
库模块将复制到您的项目中,因此您可以尽管编辑库代码。如果您希望维护一个版本的库代码,则此方法可能不是您想要的,您应按照上文所述导入编译的 AAR 文件。
- 添加已编译的 AAR(或 JAR)文件:
- 确保库列在您
settings.gradle文件的顶部,如下面名为“my-library-module”的库所示:include ':app', ':my-library-module'
- 打开应用模块的
build.gradle文件,并向dependencies块中添加一行新代码,如下面的片段所示:dependencies { compile project(":my-library-module") }
- 点击 Sync Project with Gradle Files。
在上面的示例中,名为 my-library- module 的 Android 库模块成为 build.gradle 文件所在模块的构建依赖项。
您的应用模块现在可以访问 Android 库中的任何代码和资源,库 AAR 文件在构建时已捆绑到您的 APK 中。
不过,如果希望单独共享 AAR 文件,则可以在 项目名称/模块名称/build/outputs/aar/ 中找到它,也可以通过点击 Build > Make Project 的方式重新生成此文件。
选择要设为公开的资源
库中的所有资源在默认情况下均处于公开状态。要将所有资源隐式设为私有,您必须至少将一个特定的属性定义为公开。资源包括您项目的 res/ 目录中的所有文件,例如图像。要阻止您的库用户访问仅供内部使用的资源,您应通过声明一个或多个公开资源的方式来使用这种自动私有标识机制。
要删除某个公开资源,请将一个 声明添加到您的库的 public.xml 文件中。如果您之前尚未添加公开资源,则需要在您的库的 res/values/ 目录中创建 public.xml 文件。
下面的示例代码可以创建两个名称分别为 mylib_app_name 和 mylib_public_string 的公开字符串资源:
<resources>
    <public name="mylib_app_name" type="string"/>
    <public name="mylib_public_string" type="string"/>
</resources>
如果希望任何资源保持对使用您的库的开发者可见,您应当将其设为公开。例如,尽管 v7 appcompat 库中的大多数资源都是私有资源,但是为了支持 Material Design,控制工具栏小部件的属性应当公开。
将属性隐式设为私有不仅可以阻止您的库用户从内部库资源获得代码自动完成建议,还让您能够在不中断您的库客户端的情况下重命名或移除私有资源。私有资源不在代码自动完成和 Theme Editor 的作用范围内,并且如果您尝试引用私有资源,Lint 将显示警告。
开发注意事项
在开发您的库模块和相关应用时,请注意以下行为和限制。
将库模块引用添加至您的 Android 应用模块后,您可以设置它们的相对优先级。构建时,库会按照一次一个的方式与应用合并,并按照从低到高的优先级顺序。
-
资源合并冲突
构建工具会将库模块中的资源与相关应用模块的资源合并。如果在两个模块中均定义了给定资源 ID,将使用应用中的资源。
如果多个 AAR 库之间发生冲突,将使用依赖项列表首先列出(位于
dependencies块顶部)的库中的资源。为了避免常用资源 ID 的资源冲突,请使用在模块(或在所有项目模块)中具有唯一性的前缀或其他一致的命名方案。
-
库模块可以包含 JAR 库
您可以开发一个自身包含 JAR 库的库模块;不过,您需要手动编辑相关应用模块的构建路径,并添加 JAR 文件的路径。
-
库模块可以依赖外部 JAR 库
您可以开发一个依赖于外部库(例如 Maps 外部库)的库模块。在这种情况下,相关应用必须针对包含外部库(例如 Google API 插件)的目标构建。另外也要注意,库模块和相关应用都必须在其清单文件的
<uses- library>元素中声明外部库。 -
库模块不得包含原始资源
工具不支持在库模块中使用原始资源文件(保存在
assets/目录中)。应用使用的任何原始资源都必须存储在应用模块自身的assets/目录中。 -
应用模块的
minSdkVersion必须大于或等于库定义的版本库作为相关应用模块的一部分编译,因此,库模块中使用的 API 必须与应用模块支持的平台版本兼容。
-
每个库模块都会创建自己的 R 类
在您构建相关应用模块时,库模块将先编译到 AAR 文件中,然后再添加到应用模块中。因此,每个库都有其自己的
R类,并根据库的软件包名称命名。从主模块和库模块生成的R类会在所需的所有软件包(包括主模块的软件包和库的软件包)中创建。 -
库模块可能包含自己的 ProGuard 配置文件
通过将 ProGuard 配置文件添加到包含其 ProGuard 指令的库,您可以在自己的库上启用代码压缩。构建工具会为库模块将此文件嵌入到生成的 AAR 文件中。在您将库添加到应用模块时,库的 ProGuard 文件将附加至应用模块的 ProGuard 配置文件 (
proguard.txt)。通过将 ProGuard 文件嵌入到您的库模块中,您可以确保依赖于此库的应用模块不必手动更新其 ProGuard 文件即可使用库。当 ProGuard 在 Android 应用模块上运行时,它会同时使用来自应用模块和库的指令,因此您不应当只在库上运行 ProGuard。
要指定您的库的配置文件名称,请将其添加到
consumerProguardFiles方法中,此方法位于您的库的build.gradle文件的defaultConfig块内。例如,以下片段会将lib-proguard-rules.txt设置为库的 ProGuard 配置文件:android { defaultConfig { consumerProguardFiles 'lib-proguard-rules.txt' } ... }默认情况下,应用模块会使用库的发布构建,即使在使用应用模块的调试构建类型时亦是如此。要使用库中不同的构建类型,您必须将依赖项添加到应用的
build.gradle文件的dependencies块中,并在库的build.gradle文件中将publishNonDefault设置为true。例如,您应用的build.gradle文件中的以下代码段会使应用在应用模块于调试模式下构建时使用库的调试构建类型,以及在应用模块于发布模式下构建时使用库的发布构建类型:dependencies { debugCompile project(path: ':library', configuration: 'debug') releaseCompile project(path: ':library', configuration: 'release') }
您还必须在自己库的
build.gradle文件的android块内添加以下代码行,以便将此库的非发布配置展示给使用它的项目:android { ... publishNonDefault true }
不过请注意,设置
publishNonDefault会增加构建时间。为了确保您的库的 ProGuard 规则不会将意外的压缩副作用施加到应用模块,请仅包含适当规则,停用不适用于此库的 ProGuard 功能。尝试协助开发者的规则可能会与应用模块或它的其他库中的现有代码冲突,因此不应包含这些规则。例如,您的库的 ProGuard 文件可以指定在应用模块的压缩期间需要保留的代码。
注:Jack 工具链仅支持 ProGuard 的部分压缩和模糊选项。
AAR 文件详解
AAR 文件的文件扩展名为 .aar,Maven 工件类型也应当是 aar。文件本身是一个包含以下强制性条目的 zip 文件:
/AndroidManifest.xml/classes.jar/res//R.txt
此外,AAR 文件可能包含以下可选条目中的一个或多个:
/assets//libs/名称.jar/jni/abi 名称/名称.so(其中 abi 名称 是 Android 支持的 ABI 之一)/proguard.txt/lint.jar
Experimental Plugin User Guide
IntroductionThe new experimental plugin is based on Gradle’s new component model mechanism, while allows significant reduction in configuration time. It also includes NDK integration for building JNI applications. This user guides provides details on how to use it and highlights the difference between the new plugin and the original plugin.
CAVEAT: Note that this plugin
is a preview of the plugin for feedback on performance and NDK integration.
The Gradle API for the new component model is not final, which means each plugin will only work with a specific version of Gradle.
Additionally, the DSL may also change.
Requirements
|
| Plugin Version | Gradle Version |
| 0.1.0 | 2.5 |
| 0.2.0 | 2.5 |
| 0.3.0-alpha3 | 2.6 |
| 0.4.0 | 2.8 |
| 0.6.0-alpha1 | 2.8 |
| 0.6.0-alpha5 | 2.10 |
| 0.7.0-alpha1 | 2.10 |
| 0.7.0 | 2.10 |
| 0.7.3 | 2.14.1 |
Migrating from Traditional Android Gradle Plugin
A typical Android Studio project may have a directory structure as follows. File that needs to be change is highlighted in red:
There are some significant changes in the DSL between the new plugin and the traditional one.
.
├── app/
│ ├── app.iml
│ ├── build.gradle
│ └── src/
├── build.gradle
├── gradle/
│ └── wrapper/
│ ├── gradle-wrapper.jar
│ └── gradle-wrapper.properties
├── gradle.properties
├── gradlew*
├── gradlew.bat
├── local.properties
├── MyApplication.iml
└── settings.gradle
./gradle/wrapper/gradle-wrapper.properties
-
Each version of the new plugin supports a specific Gradle version. Consult Gradle Requirements for the Gradle version to use.
#Wed Apr 10 15:27:10 PDT 2013
distributionBase=GRADLE_USER_HOME
distributionPath=wrapper/dists
zipStoreBase=GRADLE_USER_HOME
zipStorePath=wrapper/dists
distributionUrl=https\://services.gradle.org/distributions/gradle-2.10-all.zip
./build.gradle
-
Classpath for the plugin is com.android.tools.build:gradle-experimental instead of com.android.tools.build:gradle.
// Top-level build file where you can add configuration options common to all sub-projects/modules.
buildscript {
repositories {
jcenter()
}
dependencies {
classpath "com.android.tools.build:gradle-experimental:0.7.0-alpha4"
// NOTE: Do not place your application dependencies here; they belong
// in the individual module build.gradle files
}
}
allprojects {
repositories {
jcenter()
}
}
./app/build.gradle
There are significant changes to the DSL of the plugin. We understand that many of the changes are frustrating and seem unnecessary, and our goal is to remove some of these current changes to minimize the migration process from the traditional plugin in the future.
DSL Changes:
-
Plugin name is com.android.model.application instead of com.android.application. Or use apply plugin: "com.android.model.library" if you want to create an Android aar library.
-
Configuration is wrapped with the model { } block
-
Adding elements to a Collection should be done using the add method.
Current DSL Limitations that will hopefully go away:
-
List properties are only set with their direct types only, with no way to accept other types and adapting them. For instance:
-
You can set a property of type File using a String, but a property of type List<File> accepts only File objects.
-
-
Creating a buildType or productFlavor requires calling the create method. Modifying an existing one such as the release and debug buildType can be done using the just the name.
-
The DSL for modifying variants and their tasks is very, very limited right now.
apply plugin: "com.android.model.application"
model {
android {
compileSdkVersion 23
buildToolsVersion "23.0.2"
defaultConfig {
applicationId "com.example.user.myapplication"
minSdkVersion.apiLevel 15
targetSdkVersion.apiLevel 22
versionCode 1
versionName "1.0"
buildConfigFields { create() { type "int" name "VALUE" value "1" } }
}
buildTypes {
release {
minifyEnabled false
proguardFiles.add(file("proguard-rules.pro"))
}
}
productFlavors {
create("flavor1") {
applicationId "com.app"
}
}
// Configures source set directory.
sources {
main {
java {
source {
srcDir "src"
}
}
}
}
}
}
dependencies {
compile fileTree(dir: "libs", include: ["*.jar"])
compile "com.android.support:appcompat-v7:22.2.0"
}
Signing Config
Ndk Integration
The experimental plugin comes with NDK integration for creating native applications. To use the NDK integration:
-
Use the SDK Manager inside Studio to download the NDK.
-
Set ndk.dir in local.properties or the ANDROID_NDK_HOME environment variable to the directory containing the NDK.
-
Add an android.ndk block to the model in build.gradle.
apply plugin: 'com.android.model.application'
model {
android {
compileSdkVersion 23
buildToolsVersion "23.0.2"
ndk {
moduleName "native"
}
}
}
*Note that the moduleName is required. It determines the name of the resulting native library.
Source Set
By default, it will look in src/main/jni for C/C++ file. Configure android.sources to change the source directory.
model {
android {
compileSdkVersion 23
buildToolsVersion "23.0.2"
ndk {
moduleName "native"
}
sources {
main {
jni {
source {
srcDir "src"
}
}
}
}
}
}
The JNI source set may contain both C and C++ files. All files in the sub-directories are included. Files with extension '.c' is considered as C files, whereas C++ files has may have any of the following extensions: '.C', '.CPP', 'c++', '.cc, '.cp', '.cpp', '.cxx'. Files may be excluded with the exclude method, whereas include is ignored:
model {
android.sources {
main {
jni {
source {
include "someFile.txt" // This is ignored.
exclude "**/excludeThisFile.c"
}
}
}
}
}
Other Build Options
Various build options can be set within the android.ndk { } block. For example,
model {
android {
compileSdkVersion 23
buildToolsVersion "23.0.2"
ndk {
// All configurations that can be changed in android.ndk.
moduleName "native"
toolchain "clang"
toolchainVersion "3.5"
// Note that CFlags has a capital C, which is inconsistent with
// the naming convention of other properties. This is a
// technical limitation that will be resolved
CFlags.add("-DCUSTOM_DEFINE")
cppFlags.add("-DCUSTOM_DEFINE")
ldFlags.add("-L/custom/lib/path")
ldLibs.add("log")
stl "stlport_static"
}
buildTypes {
release {
ndk {
debuggable true
}
}
}
productFlavors {
create("arm") {
ndk {
// You can customize the NDK configurations for each
// productFlavors and buildTypes.
abiFilters.add("armeabi-v7a")
}
}
create("fat") {
// If ndk.abiFilters is not configured, the application
// compile and package all suppported ABI.
}
}
}
// You can modify the NDK configuration for each variant.
components.android {
binaries.afterEach { binary ->
binary.mergedNdkConfig.cppFlags.add(
"-DVARIANT=\"" + binary.name + "\"")
}
}
}
ABI Specific Configurations
You can configure the settings for a specific ABI.
model {android {
compileSdkVersion 23
}
Known Limitations
- No support for using a NDK modules like cpu_features
- No support for integrating external build systems.
Samples
Additional samples can be found at https://github.com/googlesamples/android-ndk .Multiple NDK Projects
Plugin 0.4.0 added the preliminary support for NDK dependencies and the ability to create just a native library. Please be aware this is a preview of the direction we are going and the implementation is not complete. Note that while it is possible to compile the native project for Gradle, editing and debugging support in Android Studio is not yet implemented.
Standalone NDK Plugin
In gradle-experimental:0.4.0, a new plugin is created to allow creation of just the native library without creating an Android application or library. The DSL is similar to the application/library plugin. The following example build.gradle can create a libhello.so from sources in "src/main/jni"
apply plugin: "com.android.model.native"
model {
android {
compileSdkVersion 23
ndk {
moduleName "hello"
}
}
}
Known Issues
-
Editing support for the standalone plugin is not yet implemented in Android Studio
-
Modifying a source file in the library does not automatically cause the application to re-link the new library when building an application.
NDK Dependencies
The syntax for specifying dependency follows the style of Gradle's future dependency system. You can set a dependency on an Android project or a specific file.
For example, let say you have a subproject in "lib" using the standalone NDK plugin:
lib/build.gradle:
apply plugin: "com.android.model.native"
model {
android {
compileSdkVersion 23
ndk {
moduleName "hello"
}
sources {
main {
jni {
exportedHeaders {
srcDir "src/main/headers"
}
}
}
}
}
}
Any projects with a JNI dependency will include the directories specified in the exportedHeaders.. You can add dependency on the lib project from your application for your JNI code:
app/build.gradle:
apply plugin: "com.android.model.application"
model {
android {
compileSdkVersion 23
buildToolsVersion "23.0.2"
sources {
main {
jni {
dependencies {
project ":lib1"
}
}
}
}
}
}
You can specify a build type and/or product flavor of your target project. Otherwise, the plugin will try to find the same build types and product flavor as your application. You can also specify the linkage type if you would like the native library to be linked statically. E.g.
model {
android.sources {
main {
jni {
dependencies {
project ":lib1" buildType "debug" productFlavor "flavor1" linkage "static"
}
}
}
}
}
To declare a dependency on a file, create a prebuilt library and add dependency on the library. E.g.,
model {
repositories {
libs(PrebuiltLibraries) {
prebuilt {
headers.srcDir "path/to/headers"
binaries.withType(SharedLibraryBinary) {
sharedLibraryFile = file("lib/${targetPlatform.getName()}/prebuilt.so")
}
}
}
}
android.sources {
main {
jniLibs {
dependencies {
library "prebuilt"
}
}
}
}
}
You can add native dependency to either 'jniLibs' or 'jni' source set. When dependency is added to "jniLibs" the native library will be package into the application/library, but it will not be used for compiling the JNI code. E.g.
model {
android.sources {
main {
jniLibs {
dependencies {
library "prebuilt"
}
}
}
}
}
DSL Change
The plugin is still in experimental stage. DSL will change throughout the development of the plugin. This section documents the changes that occurs between different versions to help with migration.
0.6.0-alpha1 -> 0.6.0-alpha5
- Plugin now requires Gradle 2.10, which brings significant improvements to DSL
- Configurations can now be nested. E.g. you can write
buildTypes {
...
...
}
- File type now accepts a string, but String cannot be added to List<File> at the moment.
- -Dorg.gradle.model=true is now the default. This allows references to other model, but the model being referred to must be in a separate block.
- The equal sign '=' is no longer required for most properties.
- The DSL for specifying dependencies on a specific library files have changed to follow Gradle's native dependency DSL. (see https://github.com/gradle/gradle/blob/master/subprojects/docs/src/samples/native-binaries/prebuilt/build.gradle)
model {
android.sources {
main {
jniLibs {
dependencies {
library file("lib/x86/prebuilt.so") abi "x86"
library file("lib/armeabi-v7a/prebuilt.so") abi "armeabi-v7a"
library file("lib/mips/prebuilt.so") abi "mips"
}
}
}
}
}
is replaced by:
model {
repositories {
prebuilt(PrebuiltLibraries) {
binaries.withType(SharedLibraryBinary) {
sharedLibraryFile = file("lib/${targetPlatform.getName()}/prebuilt.so")
}
}
}
android.sources {
main {
jniLibs {
dependencies {
library "prebuilt"
}
}
}
}
}
0.2.x -> 0.4.0
- += no longer works for collections. Adding items to the list can be done with the 'add' or 'addAll' method. e.g. CFlags += "-DCUSTOM_DEFINE" can be replaced with CFlags.add("-DCUSTOM_DEFINE")
- jniDebuggable is removed from build type configuration and moved to the ndk block. e.g.
release {jniDebuggable = true}
becomesrelease {
ndk.with {
debuggable = true}}
Change Log
0.6.0-alpha3
- DSL for specifying prebuilt libraries dependency has been changed.
- Updated to Gradle 2.8.
- Fixed various issues with native library dependency resolution.
0.4.0
- Fixed issue with using jni code in experimental library plugin.
- Allow platform version to be set separately from compileSdkVersion.
- Allow ABI specific configurations in a variant that contains multiple ABI.
- Added support for dependencies on NDK plugin and shared object/static library files.
- A preview version of an standalone plugin for compiling just native code is now available. It can be use to build application with Gradle, but support in Android Studio is not yet implemented.
配置构建
视频
新的 Android SDK 构建系统
Android 构建系统编译应用资源和源代码,然后将它们打包成可供您测试、部署、签署和分发的 APK。Android Studio 使用 Gradle 这一高级构建工具包来自动化执行和管理构建流程,同时也允许您定义灵活的自定义构建配置。每个构建配置均可自行定义一组代码和资源,同时对所有应用版本共有的部分加以重复利用。Android Plugin for Gradle 与这个构建工具包协作,共同提供专用于构建和测试 Android 应用的流程和可配置设置。
Gradle 和 Android 插件独立于 Android Studio 运行。这意味着,您可以在 Android Studio 内、使用计算机上的命令行工具或在未安装 Android Studio 的计算机(例如持续性集成服务器)上构建 Android 应用。如果您不使用 Android Studio,可以学习如何从命令行构建和运行您的应用。无论您是从命令行、在远程计算机上还是使用 Android Studio 构建项目,构建的输出都相同。
注:由于 Gradle 和 Android 插件独立于 Android Studio 运行,您需要单独更新构建工具。请阅读版本说明,了解如何更新 Gradle 和 Android 插件。
Android 构建系统非常灵活,让您能够在不修改应用核心源文件的情况下执行自定义构建配置。本章帮助您了解 Android 构建系统的工作原理,以及它如何帮助您对多个构建配置进行自定义和自动化处理。如果您只想了解有关部署应用的更多信息,请参阅在 Android Studio 中构建和运行项目。要立即开始使用 Android Studio 创建自定义构建配置,请参阅配置构建变体。
构建流程
构建流程涉及许多将您的项目转换成 Android 应用软件包 (APK) 的工具和流程。构建流程非常灵活,因此了解它的一些底层工作原理会很有帮助。

图 1. 典型 Android 应用模块的构建流程。
如图 1 所示,典型 Android 应用模块的构建流程通常依循下列步骤:
- 编译器将您的源代码转换成 DEX(Dalvik Executable) 文件(其中包括运行在 Android 设备上的字节码),将所有其他内容转换成已编译资源。
- APK 打包器将 DEX 文件和已编译资源合并成单个 APK。不过,必须先签署 APK,才能将应用安装并部署到 Android 设备上。
- APK 打包器使用调试或发布密钥库签署您的 APK:
- 如果您构建的是调试版本的应用(即专用于测试和分析的应用),打包器会使用调试密钥库签署您的应用。Android Studio 自动使用调试密钥库配置新项目。
- 如果您构建的是打算向外发布的发布版本应用,打包器会使用发布密钥库签署您的应用。要创建发布密钥库,请阅读在 Android Studio 中签署您的应用。
- 在生成最终 APK 之前,打包器会使用 zipalign 工具对应用进行优化,减少其在设备上运行时的内存占用。
构建流程结束时,您将获得可用来进行部署、测试的调试 APK,或者可用来发布给外部用户的发布 APK。
自定义构建配置
Gradle 和 Android 插件可帮助您完成以下方面的构建配置:
-
构建类型
- 构建类型定义 Gradle 在构建和打包您的应用时使用的某些属性,通常针对开发生命周期的不同阶段进行配置。例如,调试构建类型支持调试选项,使用调试密钥签署 APK;而发布构建类型则可压缩、混淆 APK 以及使用发布密钥签署 APK 进行分发。您必须至少定义一个构建类型才能构建应用 - Android Studio 默认情况下会创建调试和发布构建类型。要开始为应用自定义打包设置,请学习如何 配置构建类型。 产品风味
- 产品风味代表您可以发布给用户的不同应用版本,例如免费和付费的应用版本。您可以将产品风味自定义为使用不同的代码和资源,同时对所有应用版本共有的部分加以共享和重复利用。产品风味是可选项,并且您必须手动创建。要开始创建不同的应用版本,请学习如何 配置产品风味。 构建变体
- 构建变体是构建类型与产品风味的交叉产物,是 Gradle 在构建应用时使用的配置。您可以利用构建变体在开发时构建产品风味的调试版本,或者构建已签署的产品风味发布版本进行分发。您并不直接配置构建变体,而是配置组成变体的构建类型和产品风味。创建附加构建类型或产品风味也会创建附加构建变体。要了解如何创建和管理构建变体,请阅读 配置构建变体概览。 清单条目
- 您可以为构建变体配置中清单文件的一些属性指定值。这些构建值会替换清单文件中的现有值。如果您想为模块生成多个 APK,让每一个 APK 文件都具有不同的应用名称、最低 SDK 版本或目标 SDK 版本,便可运用这一技巧。存在多个清单时,Gradle 会 合并清单设置。 依赖项
- 构建系统管理来自您的本地文件系统以及来自远程存储区的项目依赖项。这样一来,您就不必手动搜索、下载依赖项的二进制文件包以及将它们复制到项目目录内。要了解更多信息,请学习如何 声明依赖项。 签署
- 构建系统让您能够在构建配置中指定签署设置,并可在构建过程中自动签署您的 APK。构建系统通过使用已知凭据的默认密钥和证书签署调试版本,以避免在构建时提示密码。除非您为此构建显式定义签署配置,否则,构建系统不会签署发布版本。如果您没有发布密钥,可以按 签署您的应用中所述生成一个。 ProGuard
- 构建系统让您能够为每个构建变体指定不同的 ProGuard 规则文件。构建系统可在构建过程中运行 ProGuard 对类进行压缩和混淆处理。 APK 拆分
- 构建系统让您能够自动构建不同的 APK,并且每个 APK 只包含特定屏幕密度或应用二进制界面 (ABI) 所需的代码和资源。如需了解详细信息,请参阅 配置 APK 拆分。
构建配置文件
创建自定义构建配置需要您对一个或多个构建配置文件(或 build.gradle 文件)进行更改。这些纯文本文件使用域特定语言 (DSL) 以 Groovy 语言描述和操作构建逻辑,后者是一种适用于 Java 虚拟机 (JVM) 的动态语言。您无需了解 Groovy 便可开始配置构建,因为 Android Plugin for Gradle 引入了您需要的大多数 DSL 元素。如需了解有关 Android 插件 DSL 的更多信息,请阅读 DSL 参考文档。
开始新项目时,Android Studio 会自动为您创建其中的部分文件(如图 2 所示),并为它们填充合理的默认值。

图 2. Android 应用模块的默认项目结构。
有几个 Gradle 构建配置文件是 Android 应用标准项目结构的组成部分。您必须了解其中每一个文件的范围和用途及其应定义的基本 DSL 元素,才能着手配置构建。
Gradle 设置文件
settings.gradle 文件位于项目根目录,用于指示 Gradle 在构建应用时应将哪些模块包括在内。对大多数项目而言,该文件很简单,只包括以下内容:
include ‘:app’
不过,多模块项目需要指定应包括在最终构建之中的每个模块。
顶级构建文件
顶级 build.gradle 文件位于项目根目录,用于定义适用于项目中所有模块的构建配置。默认情况下,这个顶级构建文件使用 buildscript {} 代码块来定义项目中所有模块共用的 Gradle 存储区和依赖项。以下代码示例描述的默认设置和 DSL 元素可在新建项目后的顶级 build.gradle 文件中找到。
/**
 * The buildscript {} block is where you configure the repositories and
 * dependencies for Gradle itself--meaning, you should not include dependencies
 * for your modules here. For example, this block includes the Android plugin for
 * Gradle as a dependency because it provides the additional instructions Gradle
 * needs to build Android app modules.
 */

buildscript {

    /**
     * The repositories {} block configures the repositories Gradle uses to
     * search or download the dependencies. Gradle pre-configures support for remote
     * repositories such as JCenter, Maven Central, and Ivy. You can also use local
     * repositories or define your own remote repositories. The code below defines
     * JCenter as the repository Gradle should use to look for its dependencies.
     */

    repositories {
        jcenter()
    }

    /**
     * The dependencies {} block configures the dependencies Gradle needs to use
     * to build your project. The following line adds Android Plugin for Gradle
     * version 2.3.3 as a classpath dependency.
     */

    dependencies {
        classpath 'com.android.tools.build:gradle:2.3.3'
    }
}

/**
 * The allprojects {} block is where you configure the repositories and
 * dependencies used by all modules in your project, such as third-party plugins
 * or libraries. Dependencies that are not required by all the modules in the
 * project should be configured in module-level build.gradle files. For new
 * projects, Android Studio configures JCenter as the default repository, but it
 * does not configure any dependencies.
 */

allprojects {
   repositories {
       jcenter()
   }
}
模块级构建文件
模块级 build.gradle 文件位于每个 <project>/<module>/ 目录,用于配置适用于其所在模块的构建设置。您可以通过配置这些构建设置来提供自定义打包选项(例如附加构建类型和产品风味),以及替换 main/ 应用清单或顶级 build.gradle 文件中的设置。
以下这个示例 Android 应用模块 build.gradle 文件概述了您应该了解的部分基本 DSL 元素和设置。
/**
 * The first line in the build configuration applies the Android plugin for
 * Gradle to this build and makes the android {} block available to specify
 * Android-specific build options.
 */

apply plugin: 'com.android.application'

/**
 * The android {} block is where you configure all your Android-specific
 * build options.
 */

android {

  /**
   * compileSdkVersion specifies the Android API level Gradle should use to
   * compile your app. This means your app can use the API features included in
   * this API level and lower.
   *
   * buildToolsVersion specifies the version of the SDK build tools, command-line
   * utilities, and compiler that Gradle should use to build your app. You need to
   * download the build tools using the SDK Manager.
   */

  compileSdkVersion 26
  buildToolsVersion "26.0.1"

  /**
   * The defaultConfig {} block encapsulates default settings and entries for all
   * build variants, and can override some attributes in main/AndroidManifest.xml
   * dynamically from the build system. You can configure product flavors to override
   * these values for different versions of your app.
   */

  defaultConfig {

    /**
     * applicationId uniquely identifies the package for publishing.
     * However, your source code should still reference the package name
     * defined by the package attribute in the main/AndroidManifest.xml file.
     */

    applicationId 'com.example.myapp'

    // Defines the minimum API level required to run the app.
    minSdkVersion 15

    // Specifies the API level used to test the app.
    targetSdkVersion 26

    // Defines the version number of your app.
    versionCode 1

    // Defines a user-friendly version name for your app.
    versionName "1.0"
  }

  /**
   * The buildTypes {} block is where you can configure multiple build types.
   * By default, the build system defines two build types: debug and release. The
   * debug build type is not explicitly shown in the default build configuration,
   * but it includes debugging tools and is signed with the debug key. The release
   * build type applies Proguard settings and is not signed by default.
   */

  buildTypes {

    /**
     * By default, Android Studio configures the release build type to enable code
     * shrinking, using minifyEnabled, and specifies the Proguard settings file.
     */

    release {
        minifyEnabled true // Enables code shrinking for the release build type.
        proguardFiles getDefaultProguardFile('proguard-android.txt'), 'proguard-rules.pro'
    }
  }

  /**
   * The productFlavors {} block is where you can configure multiple product
   * flavors. This allows you to create different versions of your app that can
   * override defaultConfig {} with their own settings. Product flavors are
   * optional, and the build system does not create them by default. This example
   * creates a free and paid product flavor. Each product flavor then specifies
   * its own application ID, so that they can exist on the Google Play Store, or
   * an Android device, simultaneously.
   */

  productFlavors {
    free {
      applicationId 'com.example.myapp.free'
    }

    paid {
      applicationId 'com.example.myapp.paid'
    }
  }

  /**
   * The splits {} block is where you can configure different APK builds that
   * each contain only code and resources for a supported screen density or
   * ABI. You'll also need to configure your build so that each APK has a
   * different versionCode.
   */

  splits {
    // Screen density split settings
    density {

      // Enable or disable the density split mechanism
      enable false

      // Exclude these densities from splits
      exclude "ldpi", "tvdpi", "xxxhdpi", "400dpi", "560dpi"
    }
  }
}

/**
 * The dependencies {} block in the module-level build configuration file
 * only specifies dependencies required to build the module itself.
 */

dependencies {
    compile project(":lib")
    compile 'com.android.support:appcompat-v7:26.0.0'
    compile fileTree(dir: 'libs', include: ['*.jar'])
}
Gradle 属性文件
Gradle 还包括两个属性文件,位于项目根目录,可用于指定适用于 Gradle 构建工具包本身的设置:
- 您可以在其中配置项目范围 Gradle 设置,例如 Gradle 后台进程的最大堆大小。如需了解详细信息,请参阅 构建环境。
- 为构建系统配置本地环境属性,例如 SDK 安装路径。由于该文件的内容由 Android Studio 自动生成并且专用于本地开发者环境,因此您不应手动修改该文件,或将其纳入您的版本控制系统。
gradle.properties
local.properties
将项目与 Gradle 文件同步
当您在项目中对构建配置文件进行更改时,Android Studio 会要求您同步项目文件,以便其导入您的构建配置更改并执行一些检查来确保您的配置不会造成构建错误。
要同步项目文件,您可以点击做出更改后出现的通知栏中的 Sync Now(如图 3 所示),或者点击菜单栏中的 Sync Project 。如果 Android Studio 通知配置出现错误,例如:您的源代码使用了只有在 compileSdkVersion 以上的 API 级别中才会提供的 API 功能,会显示 Messages 窗口,具体描述该问题。

图 3. 在 Android Studio 中将项目与构建配置文件同步。
源集
Android Studio 按逻辑关系将每个模块的源代码和资源分组为源集。模块的 main/ 源集包括其所有构建变体共用的代码和资源。其他源集目录为可选项,在您配置新的构建变体时,Android Studio 不会自动为您创建这些目录。不过,创建类似于 main/ 的源集有助于让 Gradle 只应在构建特定应用版本时使用的文件和资源井然有序:
- 此源集包括所有构建变体共用的代码和资源。
- 创建此源集可加入特定构建类型专用的代码和资源。
- 创建此源集可加入特定产品风味专用的代码和资源。
- 创建此源集可加入特定构建变体专用的代码和资源。
src/main/
src/<buildType>/
src/<productFlavor>/
src/<productFlavorBuildType>/
例如,要生成应用的“完整调试”版本,构建系统需要合并来自以下源集的代码、设置和资源:
src/fullDebug/(构建变体源集)src/debug/(构建类型源集)src/full/(产品风味源集)src/main/(主源集)
注:当您在 Android Studio 中使用 File > New 菜单选项新建文件或目录时,可以针对特定源集进行创建。可供您选择的源集取决于您的构建配置,如果所需目录尚不存在,Android Studio 会自动创建。
如果不同源集包含同一文件的不同版本,Gradle 将按以下优先顺序决定使用哪一个文件(左侧源集替换右侧源集的文件和设置):
构建变体 > 构建类型 > 产品风味 > 主源集 > 库依赖项
这样一来,Gradle 便可使用专用于您试图构建的构建变体的文件,同时对与其他应用版本共用的 Activity、应用逻辑和资源加以重复利用。在合并多个清单时,Gradle 使用同一优先顺序,这样每个构建变体都能在最终清单中定义不同的组件或权限。如需了解有关创建自定义源集的更多信息,请转至创建用于构建变体的源集。


 9507
9507


 被折叠的 条评论
为什么被折叠?
被折叠的 条评论
为什么被折叠?
 到【灌水乐园】发言


