


原址:https://blog.csdn.net/lizuobin2/article/details/51828594
一、PCI 概念介绍
PCI是CPU和外围设备通信的高速传输总线。PCI规范能够实现32位并行数据传输,工作频率为 33MHz 或 66MHz ,最大吞吐率高达266MB/s,PCI的衍生物包括 CardBus、mini-PCI、PCI-Express、cPCI等。
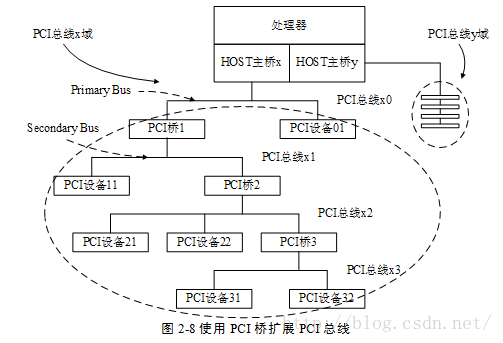
PCI总线体系结构是一种层次式的体系结构。在这种层次体系结构中,PCI桥设备占据着重要的地位,它将父总线与子总线连接在一起,从而使整个系统看起来像一个倒置的树状结构,树的顶端是CPU,它通过一个较为特殊的CPI桥设备-Host/PCI桥设备与根PCI总线连接起来。
作为特殊的PCI设备,PCI桥包括以下几种:
HOST/PCI桥,用于连接CPU与PCI根总线,第一个根总线的编号为0。在PC中,内存控制器也通常被集成到Host/PCI桥设备芯片中,因此,Host/PCI桥也通常被称为“北桥”芯片组。
PCI/ISA桥,用作连接旧的ISA总线,通常,PCI中的类似的i8359A中断控制器这样的设备也会被集成到PCI/ISA桥设备中,因此,PCI/ISA桥通常也被称作“南桥”芯片组。
PCI-to-PCI桥,用于连接PCI主总线与次总线,PCI桥所处的总线被称作“主总线”(父总线),PCI桥设备所连接的总线为“次总线”(子总线)。
二、PCI设备与配置空间
在i386系统结构中,对内存的访问和对输入/输出寄存器的访问通过两套不同的指令完成,所有的存储器和IO两个不同的地址空间。一般而言,内存的物理地址以及输入/输出寄存器的地址是由硬件决定的,不过对于内存的物理地址还可以通过地址映射机制来一次转换(I/O也可以映射)。可是,怎样处理外设的存储空间呢?理想的办法是系统软件自动设置,思路是:
1、外设通过某种途径告诉系统,它有几个存储区间以及I/O地址空间,每个区间是多大,以及各自在本地的地址,显然这些地址都是局部的内部的,都从0开始算起。
2、系统软件在知道了一共有多少外设,各自又有什么样的存储区间以后,就可以为这些区间分配“物理地址”,并且建立起这些区间与总线之间的连接,以后就可以通过这些地址来访问。显然,这里所谓的“物理地址”与真正的物理地址还是有些区别的,它实际上也是一种逻辑地址,所以常成为“总线地址”,因为这是CPU在总线上所看到的地址。可想而知,外设上一定有着某种地址映射机制。所谓的“为外设分配地址”,就是为其分配总线地址,并建立起映射。
PCI设备上存在许多完成上述工作的寄存器(配置空间),那么系统初始化的时候如何访问这些寄存器该何如?对于i386结构的处理器,PCI总线的设计者在I/O地址空间保留了8个字节用于这个目的,那就是0xCF8~0xCFF,这8个字节的地址空间构成了两个32位的寄存器,第一个是“地址寄存器”0xCF8,第二个是“数据寄存器”0xCFC,要访问配置空间的寄存器时,CPU先向地址寄存器写入目标地址,然后通过数据寄存器进行读写数据。不过,写入地址寄存器的目标地址是一种包括总线号、设备号、功能号以及配置寄存器地址的综合地址。每个PCI设备最多有8个功能,所以设备号和功能号组合在一起又被称作“逻辑设备”号。
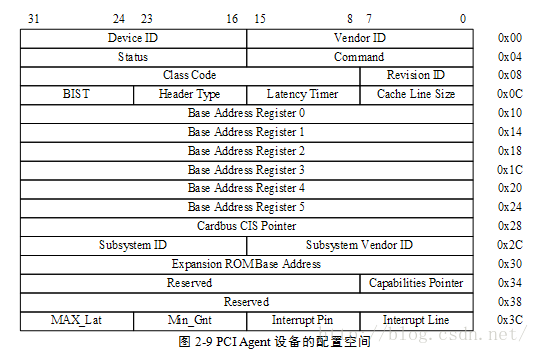
如上图所示,PCI标准规定每个设备的配置寄存器组最多可以有256字节的连续空间,其中开头的64字节的用途和格式是标准的,成为配置寄存器组的“头部”,这样的头部又有两种,“0型”头部用于一般的PCI设备,“1型”头部用于PCI桥,无论是“0型”还是“1型”,其开头的16个字节的用途和格式是共同的。
三、PCI驱动框架分析
在内核中与PCI相关的结构体大概有pci_driver 、pci_bus_type 、pci_dev 、pci_bus ,我们前边所说的所有的PCI总线都是指的 pci_bus 。
3.1 pci_bus
-
struct pci_bus {
-
struct list_head node; /* node in list of buses */
-
struct pci_bus *parent; /* parent bus this bridge is on */
-
struct list_head children; /* list of child buses */
-
struct list_head devices; /* list of devices on this bus */
-
struct pci_dev *self; /* bridge device as seen by parent */
-
struct list_head slots; /* list of slots on this bus */
-
struct resource *resource[PCI_BUS_NUM_RESOURCES];
-
/* address space routed to this bus */
-
-
struct pci_ops *ops; /* configuration access functions */
-
void *sysdata; /* hook for sys-specific extension */
-
struct proc_dir_entry *procdir; /* directory entry in /proc/bus/pci */
-
-
unsigned char number; /* bus number */
-
unsigned char primary; /* number of primary bridge */
-
unsigned char secondary; /* number of secondary bridge */
-
unsigned char subordinate; /* max number of subordinate buses */
-
-
char name[ 48];
-
-
unsigned short bridge_ctl; /* manage NO_ISA/FBB/et al behaviors */
-
pci_bus_flags_t bus_flags; /* Inherited by child busses */
-
struct device *bridge;
-
struct device dev;
-
struct bin_attribute *legacy_io; /* legacy I/O for this bus */
-
struct bin_attribute *legacy_mem; /* legacy mem */
-
unsigned int is_added: 1;
-
};
children: PCI桥可以使当前总线得到扩展,当前总线上有几个PCI桥,那么当前总线就会拥有几个子总线,子总线会连接到父总线的children链表中。
device: 连接在这条总线上的设备链表。
ops: 当前总线访问总线上设备配置空间的 read、write 方法。
在内核启动的过程中,首先会创建0级总线,然后枚举探测0级总线上的设备,如果是PCI桥,那么还要进入下一级子总线,最终所有的连接的PCI设备都将被探测到,详细的探测过程,我们在后边分析。
3.2 pci_bus_type
看到 bus_type 显然这是个设备总线驱动模型里的“总线”,与前边提到的 pci_bus ,完全是两码事,那么pci_driver 和 pci_dev 就是注册到 pci_bus_type 的驱动和设备。分析总线设备驱动模型的时候,总要分析一下它的 match 函数(匹配规则)。
-
static int pci_bus_match(struct device *dev, struct device_driver *drv)
-
{
-
struct pci_dev *pci_dev = to_pci_dev(dev);
-
struct pci_driver *pci_drv = to_pci_driver(drv);
-
const struct pci_device_id *found_id;
-
-
found_id = pci_match_device(pci_drv, pci_dev);
-
if (found_id)
-
return 1;
-
-
return 0;
-
}
-
static const struct pci_device_id *pci_match_device(struct pci_driver *drv,
-
struct pci_dev *dev)
-
{
-
struct pci_dynid *dynid;
-
-
/* Look at the dynamic ids first, before the static ones */
-
spin_lock(&drv->dynids.lock);
-
list_for_each_entry(dynid, &drv->dynids. list, node) {
-
if (pci_match_one_device(&dynid->id, dev)) {
-
spin_unlock(&drv->dynids.lock);
-
return &dynid->id;
-
}
-
}
-
spin_unlock(&drv->dynids.lock);
-
-
return pci_match_id(drv->id_table, dev);
-
}
-
static inline const struct pci_device_id *
-
pci_match_one_device (const struct pci_device_id *id, const struct pci_dev *dev)
-
{
-
if ((id->vendor == PCI_ANY_ID || id->vendor == dev->vendor) &&
-
(id->device == PCI_ANY_ID || id->device == dev->device) &&
-
(id->subvendor == PCI_ANY_ID || id->subvendor == dev->subsystem_vendor) &&
-
(id->subdevice == PCI_ANY_ID || id->subdevice == dev->subsystem_device) &&
-
!((id->class ^ dev->class) & id->class_mask))
-
return id;
-
return NULL;
-
}
-
const struct pci_device_id *pci_match_id(const struct pci_device_id *ids,
-
struct pci_dev *dev)
-
{
-
if (ids) {
-
while (ids->vendor || ids->subvendor || ids->class_mask) {
-
if (pci_match_one_device(ids, dev))
-
return ids;
-
ids++;
-
}
-
}
-
return NULL;
-
}
至于 pci_driver->dynids ,它是通过用户空间给驱动增加匹配条件的一种方法(还记得I2C可以在用户空间创建设备吗,一样的)。
-
error = pci_create_newid_file(drv);
-
static int
-
pci_create_newid_file (struct pci_driver *drv)
-
{
-
int error = 0;
-
if (drv->probe != NULL)
-
error = driver_create_file(&drv->driver, &driver_attr_new_id);
-
return error;
-
}
内核帮助文档有说明:
New PCI IDs may be added to a device driver pci_ids table at runtime as shown below:
echo "vendor device subvendor subdevice class class_mask driver_data" > \
/sys/bus/pci/drivers/{driver}/new_id
对于这种方法不在详细分析。
分析完设备总线驱动模型,我想整个PCI驱动的框架就非常清楚了,内核启动时,通过pci_bus之间的关系枚举出所有的 PCI 设备,并为每一个 PCI 设备创建一个 pci_dev ,根据配置空间的信息填充 pci_dev 之后,注册到pci_bus_type 。而,我们写的 pci_driver 在 idtable 里指定它所支持的设备信息,同样也注册到 pci_bus_type中去,信息一致匹配成功则调用 driver->probe 函数,然后你可以注册字符设备、块设备等等。
四、PCI设备的枚举探测过程
在内核启动过程中,PCI设备的探测过程是完全自动的,内核已经集成好了方法,我们无需更改,在这里还是分析一边代码作为了解。
分析之前,先看一下全部的函数调用关系,大致了解一下
-
<span style= "font-size:10px;">pci_arch_init /* 判断host/pci桥的类型 */
-
pci_direct_probe
-
pci_check_type1
-
pci_sanity_check
-
-
pci_direct_init
-
raw_pci_ops = &pci_direct_conf1;
-
raw_pci_ext_ops = &pci_direct_conf1;
-
-
/* 第二个过程,枚举各级总线上的设备 */
-
pci_subsys_init
-
pci_legacy_init
-
pcibios_scan_root
-
pci_scan_bus_parented(NULL, busnum, &pci_root_ops, sd);
-
pci_create_bus(parent, bus, ops, sysdata); // 创建 0 级总线
-
pci_scan_child_bus(b); // 探测当前总线设备以及子总线、子总线设备
-
pci_scan_slot(bus, devfn); // 探测当前总线的设备
-
pci_scan_single_device(bus, devfn); // 探测单功能设备
-
pci_scan_single_device(bus, devfn + fn); //探测多功能设备
-
pci_scan_device(bus, devfn); //通过配置空间 枚举设备
-
pci_setup_device //根据配置空间信息,设置pci_dev
-
pci_device_add(dev, bus);
-
list_add_tail(&dev->bus_list, &bus->devices); // 将探测到的设备加入到当前总线的设备链表
-
pci_scan_bridge //此时已经完成当前总线设备的探测,如果这些设备里有PCI桥,那么进入下一级,探测桥下的设备
-
child = pci_add_new_bus(bus, dev, busnr);
-
pci_scan_child_bus(child); // 进入下一级探测
-
pci_bus_add_devices // 全部设备探测完毕,注册设备。
-
pci_bus_add_device(dev);
-
device_add // 将设备注册到 pci_bus_type
-
pci_bus_add_devices(child); //它最终也会调用到 device_add 将各个子总线上的设备注册到 pci_bus_type
-
-
static __ init int pci_arch_init(void)
-
{
-
-
int type = 0;
-
type = pci_direct_probe();
-
-
-
-
pci_pcbios_init();
-
-
-
-
pci_direct_init(type);
-
-
-
dmi_check_pciprobe();
-
-
dmi_check_skip_isa_align();
-
-
return 0;
-
}
-
arch_initcall(pci_arch_init);
-
int __ init pci_direct_probe(void)
-
{
-
struct resource *region, *region2;
-
/* 申请IO资源 */
-
region = request_region( 0xCF8, 8, "PCI conf1");
-
-
/* 探测那种类型 ,0型(PCI设备)和1型(PCI桥) */
-
if (pci_check_type1()) {
-
raw_pci_ops = &pci_direct_conf1;
-
port_cf9_safe = true;
-
return 1;
-
}
-
release_resource(region);
-
-
return 0;
-
}
-
static int __ init pci_check_type1(void)
-
{
-
unsigned long flags;
-
unsigned int tmp;
-
int works = 0;
-
-
local_irq_save(flags);
-
-
/* i386 pci地址寄存器 0xcfb 写 0x01 */
-
outb( 0x01, 0xCFB);
-
tmp = inl( 0xCF8);
-
outl( 0x80000000, 0xCF8);
-
/* 判断设备类型 */
-
if (inl( 0xCF8) == 0x80000000 && pci_sanity_check(&pci_direct_conf1)) {
-
works = 1;
-
}
-
outl(tmp, 0xCF8);
-
local_irq_restore(flags);
-
-
return works;
-
}
-
static int __ init pci_sanity_check(struct pci_raw_ops *o)
-
{
-
u32 x = 0;
-
int year, devfn;
-
-
/* Assume Type 1 works for newer systems.
-
This handles machines that don't have anything on PCI Bus 0. */
-
dmi_get_date(DMI_BIOS_DATE, &year, NULL, NULL);
-
if (year >= 2001)
-
return 1;
-
-
for (devfn = 0; devfn < 0x100; devfn++) {
-
/* 读 CLASS_DEVICE ,PCI_CLASS_DEVICE 是片内偏移地址 */
-
if (o->read( 0, 0, devfn, PCI_CLASS_DEVICE, 2, &x))
-
continue;
-
/* 如果 CLASS_DEVICE 为 HOST-PCI桥(北桥),PCI-PCI桥,PCI-ISA桥(南桥)正确返回 */
-
if (x == PCI_CLASS_BRIDGE_HOST || x == PCI_CLASS_DISPLAY_VGA)
-
return 1;
-
/* 读 VENDOR_ID 制造商ID */
-
if (o->read( 0, 0, devfn, PCI_VENDOR_ID, 2, &x))
-
continue;
-
/* 如果 VENDOR_ID 为 INTEL 或 COMPAQ 正常返回 */
-
if (x == PCI_VENDOR_ID_INTEL || x == PCI_VENDOR_ID_COMPAQ)
-
return 1;
-
}
-
-
DBG(KERN_WARNING "PCI: Sanity check failed\n");
-
return 0;
-
}
-
/* 地址是由 总线编号、设备号、片内地址 组成 */
-
-
-
-
-
static int pci_conf1_read(unsigned int seg, unsigned int bus,
-
unsigned int devfn, int reg, int len, u32 *value)
-
{
-
unsigned long flags;
-
/* 最多256个总线 ,256个设备 片内寄存器范围 0~4095 */
-
if ((bus > 255) || (devfn > 255) || (reg > 4095)) {
-
*value = -1;
-
return -EINVAL;
-
}
-
-
spin_lock_irqsave(&pci_config_lock, flags);
-
-
/* 向地址寄存器 写要读取的地址 */
-
outl(PCI_CONF1_ADDRESS(bus, devfn, reg), 0xCF8);
-
-
/* 从数据寄存器读取数据 */
-
switch (len) {
-
case 1:
-
*value = inb( 0xCFC + (reg & 3));
-
break;
-
case 2:
-
*value = inw( 0xCFC + (reg & 2));
-
break;
-
case 4:
-
*value = inl( 0xCFC);
-
break;
-
}
-
-
spin_unlock_irqrestore(&pci_config_lock, flags);
-
-
return 0;
-
}
-
-
struct pci_raw_ops {
-
int (*read)( unsigned int domain, unsigned int bus, unsigned int devfn,
-
int reg, int len, u32 *val);
-
int (*write)( unsigned int domain, unsigned int bus, unsigned int devfn,
-
int reg, int len, u32 val);
-
};
-
struct pci_raw_ops *raw_pci_ops;
-
/* 设置全局的 配置空间读写函数 */
-
void __ init pci_direct_init(int type)
-
{
-
if (type == 1) {
-
raw_pci_ops = &pci_direct_conf1;
-
-
raw_pci_ext_ops = &pci_direct_conf1;
-
return;
-
}
-
}
-
int __ init pci_subsys_init(void)
-
{
-
-
pci_numaq_init();
-
-
-
pci_acpi_init();
-
-
-
pci_visws_init();
-
-
pci_legacy_init();
-
pcibios_fixup_peer_bridges();
-
pcibios_irq_init();
-
pcibios_init();
-
-
return 0;
-
}
-
subsys_initcall(pci_subsys_init);
-
struct pci_bus *pci_root_bus;
-
static int __ init pci_legacy_init(void)
-
{
-
pci_root_bus = pcibios_scan_root( 0); //创建0级总线
-
if (pci_root_bus)
-
pci_bus_add_devices(pci_root_bus);
-
-
return 0;
-
}
-
extern struct list_head pci_root_buses; /* list of all known PCI buses */
-
struct pci_bus * __devinit pcibios_scan_root(int busnum)
-
{
-
struct pci_bus *bus = NULL;
-
struct pci_sysdata *sd;
-
/* 在全局 pci_root_buses 链表寻找 总线编号为 busnum 的总线 */
-
while ((bus = pci_find_next_bus(bus)) != NULL) {
-
if (bus->number == busnum) {
-
/* 如果已经存在,返回它 */
-
return bus;
-
}
-
}
-
-
/* 如果这个总线编号不存在, 那么创建这个Bus */
-
sd = kzalloc( sizeof(*sd), GFP_KERNEL);
-
sd->node = get_mp_bus_to_node(busnum);
-
-
bus = pci_scan_bus_parented( NULL, busnum, &pci_root_ops, sd);
-
-
return bus;
-
}
-
struct pci_bus * __devinit pci_scan_bus_parented(struct device *parent,
-
int bus, struct pci_ops *ops, void *sysdata)
-
{
-
struct pci_bus *b;
-
/* 创建 Bus */
-
b = pci_create_bus(parent, bus, ops, sysdata);
-
if (b)
-
b->subordinate = pci_scan_child_bus(b);
-
return b;
-
}
-
unsigned int __ devinit pci_scan_child_bus(struct pci_bus *bus)
-
{
-
unsigned int devfn, pass, max = bus->secondary;
-
struct pci_dev *dev;
-
-
/* 探测总线上的设备 */
-
for (devfn = 0; devfn < 0x100; devfn += 8)
-
pci_scan_slot(bus, devfn);
-
-
/* Reserve buses for SR-IOV capability. */
-
max += pci_iov_bus_range(bus);
-
-
/*
-
* After performing arch-dependent fixup of the bus, look behind
-
* all PCI-to-PCI bridges on this bus.
-
*/
-
if (!bus->is_added) {
-
pr_debug( "PCI: Fixups for bus %04x:%02x\n",
-
pci_domain_nr(bus), bus->number);
-
pcibios_fixup_bus(bus);
-
if (pci_is_root_bus(bus))
-
bus->is_added = 1;
-
}
-
/* 探测 pci 桥上的设备,创建子Bus,挂到父 bus->child */
-
for (pass= 0; pass < 2; pass++)
-
list_for_each_entry(dev, &bus->devices, bus_list) {
-
if (dev->hdr_type == PCI_HEADER_TYPE_BRIDGE ||
-
dev->hdr_type == PCI_HEADER_TYPE_CARDBUS)
-
max = pci_scan_bridge(bus, dev, max, pass);
-
}
-
-
/*
-
* We've scanned the bus and so we know all about what's on
-
* the other side of any bridges that may be on this bus plus
-
* any devices.
-
*
-
* Return how far we've got finding sub-buses.
-
*/
-
pr_debug( "PCI: Bus scan for %04x:%02x returning with max=%02x\n",
-
pci_domain_nr(bus), bus->number, max);
-
return max;
-
}
-
int pci_scan_slot(struct pci_bus *bus, int devfn)
-
{
-
int fn, nr = 0;
-
struct pci_dev *dev;
-
-
dev = pci_scan_single_device(bus, devfn);
-
-
/* 如果是多功能设备 */
-
if (dev && dev->multifunction) {
-
for (fn = 1; fn < 8; fn++) {
-
dev = pci_scan_single_device(bus, devfn + fn);
-
if (dev) {
-
if (!dev->is_added)
-
nr++;
-
dev->multifunction = 1;
-
}
-
}
-
}
-
-
return nr;
-
}
-
struct pci_dev *__ref pci_scan_single_device(struct pci_bus *bus, int devfn)
-
{
-
struct pci_dev *dev;
-
/* 遍历 bus->devices 设备链表,查找是否有 devfn 号设备存在 */
-
dev = pci_get_slot(bus, devfn);
-
/* 如果已经存在,返回它 */
-
if (dev) {
-
pci_dev_put(dev);
-
return dev;
-
}
-
/* 通过访问配置空间,探测设备 */
-
dev = pci_scan_device(bus, devfn);
-
/* 探测失败 返回Null */
-
if (!dev)
-
return NULL;
-
/* 探测成功 */
-
pci_device_add(dev, bus);
-
-
return dev;
-
}
-
static struct pci_dev *pci_scan_device(struct pci_bus *bus, int devfn)
-
{
-
struct pci_dev *dev;
-
u32 l;
-
int delay = 1;
-
-
/* 读 PCI_VENDOR_ID 制造商ID */
-
if (pci_bus_read_config_dword(bus, devfn, PCI_VENDOR_ID, &l))
-
return NULL;
-
-
/* id 等于这些值,认为探测失败 ,返回 */
-
if (l == 0xffffffff || l == 0x00000000 ||
-
l == 0x0000ffff || l == 0xffff0000)
-
return NULL;
-
....
-
-
/* 探测成功,分配一个 pci_dev 结构 */
-
dev = alloc_pci_dev();
-
-
dev->bus = bus;
-
dev->devfn = devfn;
-
dev->vendor = l & 0xffff;
-
dev->device = (l >> 16) & 0xffff;
-
/* 读取配置空间,更详细的设置,指定 dev->bus 等 */
-
if (pci_setup_device(dev)) {
-
kfree(dev);
-
return NULL;
-
}
-
-
return dev;
-
}
-
int pci_setup_device(struct pci_dev *dev)
-
{
-
u32 class;
-
u8 hdr_type;
-
struct pci_slot *slot;
-
-
-
dev->sysdata = dev->bus->sysdata;
-
dev->dev.parent = dev->bus->bridge;
-
-
/* 设置 dev 所属的总线 */
-
dev->dev.bus = &pci_bus_type;
-
dev->hdr_type = hdr_type & 0x7f;
-
dev->multifunction = !!(hdr_type & 0x80);
-
dev->error_state = pci_channel_io_normal;
-
set_pcie_port_type(dev);
-
-
-
list_for_each_entry(slot, &dev->bus->slots, list)
-
if (PCI_SLOT(dev->devfn) == slot->number)
-
dev->slot = slot;
-
-
-
dev->dma_mask = 0xffffffff;
-
/* 设备名 */
-
dev_set_name(&dev->dev, "%04x:%02x:%02x.%d", pci_domain_nr(dev->bus),
-
dev->bus->number, PCI_SLOT(dev->devfn),
-
PCI_FUNC(dev->devfn));
-
/* 设备类型 */
-
pci_read_config_dword(dev, PCI_CLASS_REVISION, &class);
-
dev->revision = class & 0xff;
-
class >>= 8; /* upper 3 bytes */
-
dev-> class = class;
-
class >>= 8;
-
-
-
/* need to have dev->class ready */
-
dev->cfg_size = pci_cfg_space_size(dev);
-
-
-
/* "Unknown power state" */
-
dev->current_state = PCI_UNKNOWN;
-
-
-
/* Early fixups, before probing the BARs */
-
pci_fixup_device(pci_fixup_early, dev);
-
/* device class may be changed after fixup */
-
class = dev->class >> 8;
-
-
-
switch (dev->hdr_type) { /* header type */
-
case PCI_HEADER_TYPE_NORMAL: /* standard header */
-
...
-
case PCI_HEADER_TYPE_BRIDGE: /* bridge header */
-
/* 设置 dev->irq */
-
pci_read_irq(dev);
-
dev->transparent = ((dev->class & 0xff) == 1);
-
/* 设置 dev->rom_base_reg */
-
pci_read_bases(dev, 2, PCI_ROM_ADDRESS1);
-
set_pcie_hotplug_bridge(dev);
-
break;
-
-
-
case PCI_HEADER_TYPE_CARDBUS: /* CardBus bridge header */
-
...
-
break;
-
-
return 0;
-
}
-
void pci_device_add(struct pci_dev *dev, struct pci_bus *bus)
-
{
-
device_initialize(&dev->dev);
-
dev->dev.release = pci_release_dev;
-
pci_dev_get(dev);
-
-
dev->dev.dma_mask = &dev->dma_mask;
-
dev->dev.dma_parms = &dev->dma_parms;
-
dev->dev.coherent_dma_mask = 0xffffffffull;
-
-
pci_set_dma_max_seg_size(dev, 65536);
-
pci_set_dma_seg_boundary(dev, 0xffffffff);
-
-
/* Fix up broken headers */
-
pci_fixup_device(pci_fixup_header, dev);
-
-
/* Clear the state_saved flag. */
-
dev->state_saved = false;
-
-
/* Initialize various capabilities */
-
pci_init_capabilities(dev);
-
-
/* 将设备挂入 bus->devices链表 */
-
down_write(&pci_bus_sem);
-
list_add_tail(&dev->bus_list, &bus->devices);
-
up_write(&pci_bus_sem);
-
}
-
void pci_bus_add_devices(const struct pci_bus *bus)
-
{
-
struct pci_dev *dev;
-
struct pci_bus *child;
-
int retval;
-
/* 遍历当前总线的 dev ,注册设备 */
-
list_for_each_entry(dev, &bus->devices, bus_list) {
-
/* Skip already-added devices */
-
if (dev->is_added)
-
continue;
-
retval = pci_bus_add_device(dev);
-
if (retval)
-
dev_err(&dev->dev, "Error adding device, continuing\n");
-
}
-
/* 遍历子总线的dev,注册设备 */
-
list_for_each_entry(dev, &bus->devices, bus_list) {
-
BUG_ON(!dev->is_added);
-
-
child = dev->subordinate;
-
/*
-
* If there is an unattached subordinate bus, attach
-
* it and then scan for unattached PCI devices.
-
*/
-
if (!child)
-
continue;
-
if (list_empty(&child->node)) {
-
down_write(&pci_bus_sem);
-
list_add_tail(&child->node, &dev->bus->children);
-
up_write(&pci_bus_sem);
-
}
-
pci_bus_add_devices(child);
-
-
/*
-
* register the bus with sysfs as the parent is now
-
* properly registered.
-
*/
-
if (child->is_added)
-
continue;
-
retval = pci_bus_add_child(child);
-
if (retval)
-
dev_err(&dev->dev, "Error adding bus, continuing\n");
-
}
-
}
-
int pci_bus_add_device(struct pci_dev *dev)
-
{
-
int retval;
-
-
/* 将设备注册到 pci_bus_type */
-
retval = device_add(&dev->dev);
-
if (retval)
-
return retval;
-
-
dev->is_added = 1;
-
pci_proc_attach_device(dev);
-
pci_create_sysfs_dev_files(dev);
-
return 0;
-
}


 85
85


 被折叠的 条评论
为什么被折叠?
被折叠的 条评论
为什么被折叠?
 到【灌水乐园】发言


