Android Studio上传Library库到JCenter,并同步到Maven Central

如果你想在Android Studio中引入一个library到你的项目中,你只需添加如下一行代码到模块的build.gradle文件中:

dependencies {
    compile 'com.wx.wheelview:wheelview:1.3.3'
}

就这么简单,读完本篇文章后你就可以把自己写好的library发布出去,分享给世界各地的开发者。
JCenter 和 Maven Central 是两个不同的公共仓库。JCenter是由JFrog公司提供的Bintray中的Maven仓库,Maven Central 则是由sonatype.org维护的Maven仓库。两者维护在不同的服务器上,由不同的人提供内容,两者相互之间没有任何关系。下面我将详细介绍如何将Library上传到这两个仓库。

JCenter

1.注册Bintray帐号

https://bintray.com

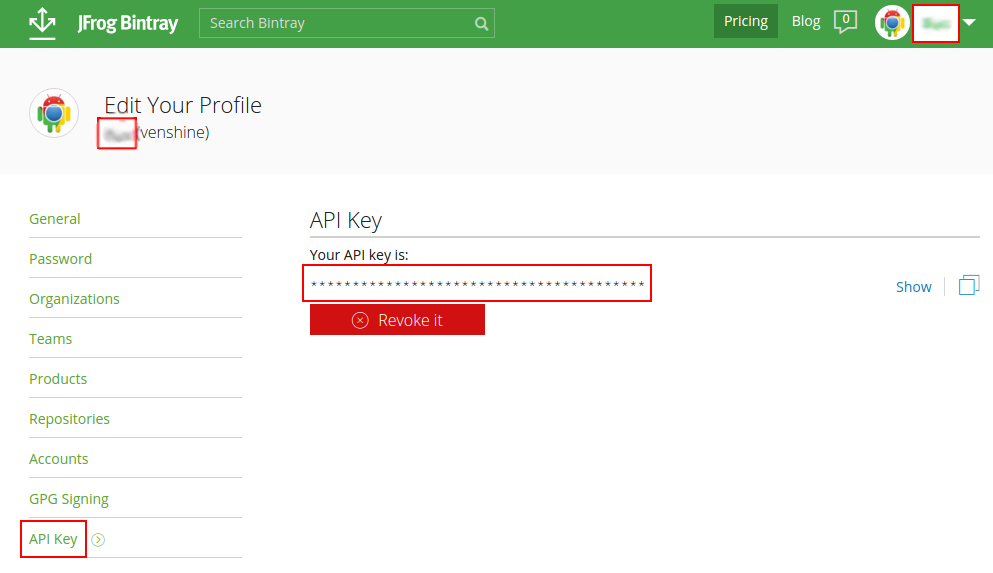
2.记录UserID和API Key

https://bintray.com/profile/edit

获取UserID和API Key

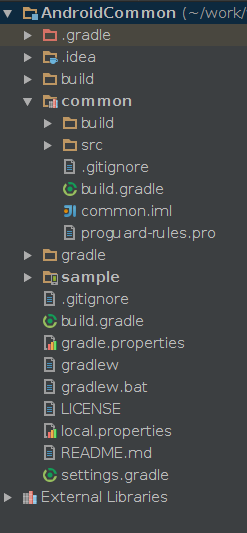
3.创建工程

工程目录结构

4.配置项目

修改项目里的build.gradle(注意是项目不是库),增加以下两个dependencies:

classpath 'com.jfrog.bintray.gradle:gradle-bintray-plugin:1.2'
classpath 'com.github.dcendents:android-maven-gradle-plugin:1.3'
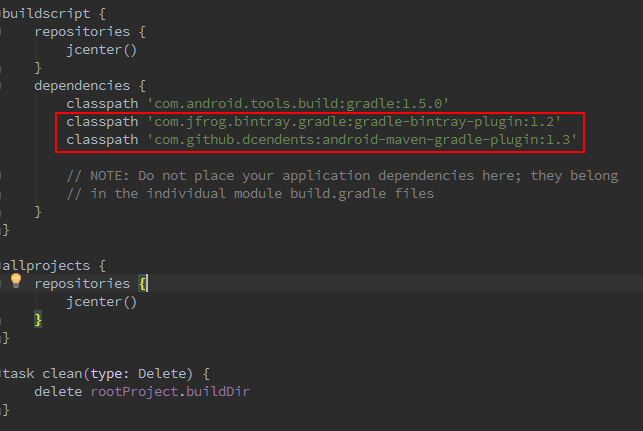
配置项目

具体参考:https://github.com/venshine/gradle-bintray-upload

5.配置Library

修改Library库的build.gradle文件,详情如下:

apply plugin: 'com.android.library'
apply plugin: 'com.github.dcendents.android-maven'
apply plugin: 'com.jfrog.bintray'

// This is the library version used when deploying the 
artifactversion = "1.0.1"

android {
    compileSdkVersion 23
    buildToolsVersion "23.0.2"
    resourcePrefix "wx__"

    defaultConfig {
        minSdkVersion 14
        targetSdkVersion 23
        versionCode 1
        versionName "1.0"
    }    
    buildTypes {
        release {
            minifyEnabled false
            proguardFiles getDefaultProguardFile('proguard-android.txt'), 'proguard-rules.pro'
        }
    }}

dependencies {
    compile fileTree(dir: 'libs', include: ['*.jar'])
    compile 'com.google.code.gson:gson:2.6.1'
    compile 'com.wx.logger:logger:1.0.1'
}

def siteUrl = 'https://github.com/venshine/AndroidCommon'      // Homepage URL of the library
def gitUrl = 'https://github.com/venshine/AndroidCommon.git'   // Git repository URL
group = "com.wx.android.common"        // Maven Group ID for the artifact

install {
    repositories.mavenInstaller {
        // This generates POM.xml with proper parameters
        pom {
            project {
                packaging 'aar'                // Add your description here                          
                name 'AndroidCommon'                
                description 'Android Common Library'
                url siteUrl                // Set your license
                licenses {
                    license {
                        name 'The Apache Software License, Version 2.0'
                        url 'http://www.apache.org/licenses/LICENSE-2.0.txt'
                    }
                }
                developers {
                    developer {
                        id 'venshine'
                        name 'venshine'
                        email 'venshine.cn@gmail.com'
                    }
                }
                scm {
                    connection gitUrl
                    developerConnection gitUrl
                    url siteUrl
                }
            }
        }
    }
}

task sourcesJar(type: Jar) {
    from android.sourceSets.main.java.srcDirs
    classifier = 'sources'
}

task javadoc(type: Javadoc) {
    source = android.sourceSets.main.java.srcDirs
    classpath += project.files(android.getBootClasspath().join(File.pathSeparator))
}

task javadocJar(type: Jar, dependsOn: javadoc) {
    classifier = 'javadoc'
    from javadoc.destinationDir
}

javadoc {
    options {
        encoding "UTF-8"
    }
}

artifacts {
    archives javadocJar
    archives sourcesJar
}

Properties properties = new Properties()
properties.load(project.rootProject.file('local.properties').newDataInputStream())

bintray {
    user = properties.getProperty("bintray.user")
    key = properties.getProperty("bintray.apikey")

    configurations = ['archives']
    pkg {
        repo = "maven"        // it is the name that appears in bintray when logged
        name = "AndroidCommon"
        websiteUrl = siteUrl
        vcsUrl = gitUrl
        licenses = ["Apache-2.0"]
        publish = true
    }
}

具体参考:https://github.com/venshine/gradle-bintray-upload

6.配置UserID和API Key

这两个值就是第2步记录下来的值。
打开项目的local.properties文件,加入以下两句:

bintray.user=your_bintray_user_name
bintray.apikey=your_bintray_api_key

注:这个文件必须忽略掉,切勿上传到github上去。
具体参考:https://github.com/venshine/gradle-bintray-upload

7.执行命令
./gradlew install
./gradlew bintrayUpload


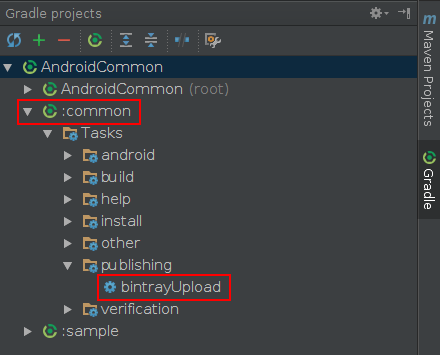
点击工具栏中的Sync projects with Gradle files按钮对项目进行重建,然后可以看到Gradle视图中的Task中出现了bintrayUpload,双击即可将项目上传到Bintray中。

上传项目

8.审核

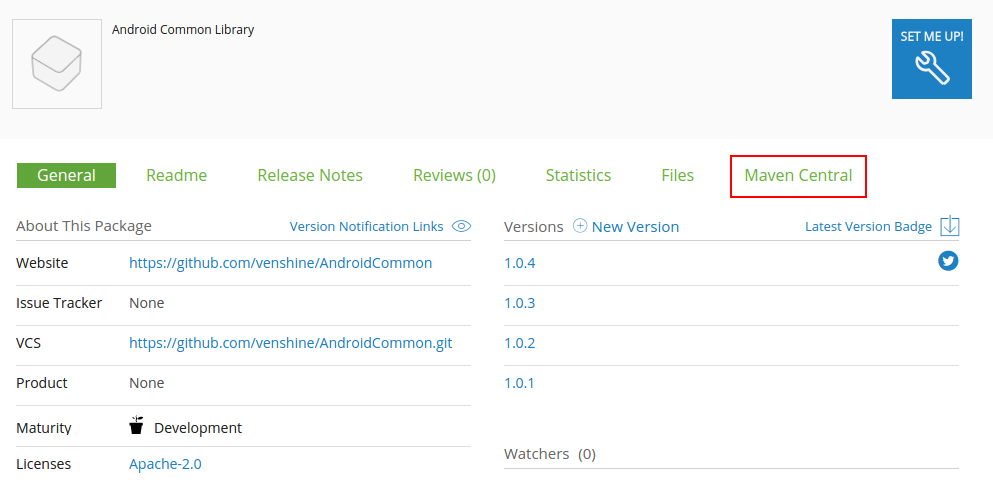
登录Bintray网站,去自己的仓库首页(https://bintray.com/**/maven) ,找到该库,点击Add to JCenter按钮,然后发送消息,等待审核结果,一般几个小时的时间就会审核通过。以后再更新项目上传到Bintray就不需要再次审核了。

加入jcenter仓库

9.使用

审核通过后,我们即可在其他项目中方便引入这个库。

compile 'com.wx.android.common:common:1.0.4'

Maven Central

1.注册帐号

https://issues.sonatype.org

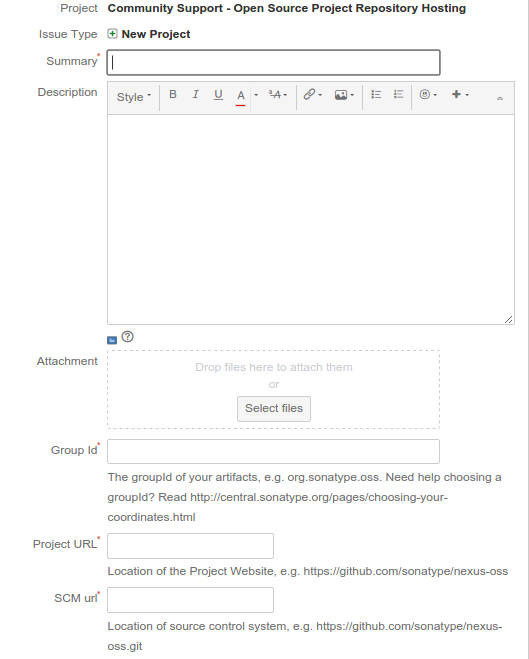
2.创建Issue

https://issues.sonatype.org/secure/CreateIssue!default.jspa
Summary:填写名称
Description:填写描述
Group Id:域名反转(有效域名),如果没有域名,可以直接使用自己的github反转(如github.com/venshine反转后是com.github.venshine,其中venshine是你的github用户名。为了规范化,建议全小写。)
Project URL:项目的url,可以是项目的github地址
其他的条目可以不填,然后提交审核即可,一般2天以内即可审核通过。(审核通过前,你的仓库是无法使用的)

创建Issue

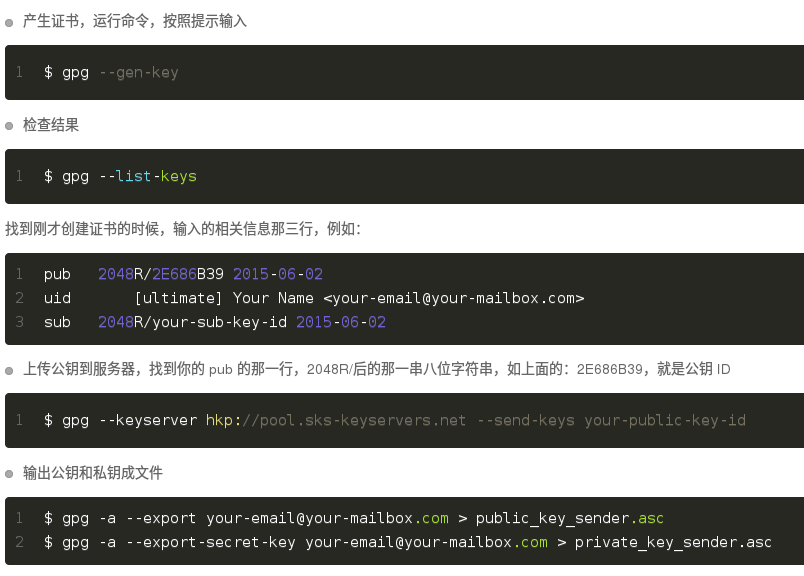
3.创建 GPG 签名

安装GPG生成工具,然后按照下面的步骤操作:

创建 GPG 签名

注:创建的GPG证书密码一定保存好

4.配置GPG

打开项目的local.properties文件,加入以下三句:

bintray.gpg.password=your_pgp_password
bintray.oss.user=your_maven_central_user_name
bintray.oss.password=your_maven_central_password

具体参考:https://github.com/venshine/gradle-bintray-upload

5.执行命令
./gradlew install
./gradlew bintrayUpload
6.发布到Maven Central

发布到Maven Central

项目主页:https://github.com/venshine/gradle-bintray-upload

  • 2
    点赞
  • 2
    收藏
    觉得还不错? 一键收藏
  • 0
    评论
一个简单的开源Android工具类库,提供许多常用的类帮助我们开发程序。 AndroidCommon 一个简单的开源Android工具类库,提供许多常用的类帮助我们开发程序。 These are the Android Common Utils. Class Introduction AnimationUtils Animation Unility Class AppUtils App Unility Class ArrayUtils Array Unility Class AssetsUtils Assets Unility Class BASE64Utils Base64 Unility Class BitmapUtils Bitmap Unility Class BlurUtils Blur Unility Class ByteUtils Byte Unility Class CalendarUtils Calendar Unility Class ClipboardUtils Clipboard Unility Class CollectionUtils Collection Unility Class CommonUtils Common Unility Class CpuUtils Cpu Unility Class DeviceUtils Device Unility Class DisplayUtils Display Unility Class FileUtils File Unility Class FragmentUtils Fragment Unility Class HandlerUtils Handler Unility Class IOUtils IO Unility Class ImageUtils Image Unility Class InputMethodUtils InputMethod Unility Class IntentUtils Intent Unility Class JsonUtils Json Unility Class LogUtils Log Unility Class MD5Utils Md5 Unility Class MapUtils Map Unility Class MemoryUtils Memory Unility Class NetworkUtils Network Unility Class NumberUtils Number Unility Class ObjectUtils Object Unility Class PackageUtils Package Unility Class PropertyUtils Property Unility Class RandomUtils Random Unility Class ResourceUtils Resource Unility Class SHA1Utils Sha1 Unility Class SerializableUtils Serializable Unility Class SharedPreferencesUtils SharedPreferences Unility Class ShellUtils Shell Unility Class StringUtils String Unility Class SystemUtils System Unility Class TelephonyUtils Telephony Unility Class ThreadUtils Thread Unility Class TimeUtils Time Unility Class ToastUtils Toast Unility Class UrlUtils Url Unility Class VibratorUtils Vibrator Unility Class ViewUtils View Unility Class Permission <uses-permission android:name="android.permission.INTERNET" /> <uses-permission android:name="android.permission.WRITE_EXTERNAL_STORAGE" /> <uses-permission android:name="android.permission.READ_EXTERNAL_STORAGE" /> <uses-permission android:name="android.permission.ACCESS_NETWORK_STATE" /> <uses-permission android:name="android.permission.READ_PHONE_STATE" /> <uses-permission android:name="android.permission.VIBRATE" /> <uses-permission android:name="android.permission.SYSTEM_ALERT_WINDOW" /> Proguard -keep class com.wx.android.common.** { *; } -keepclassmembers class com.wx.android.common.** { *; } -dontwarn com.wx.android.common.** Setup Download the project from GitHub Import it to your Eclipse workspace or IntelliJ IDEA project Set your project properties, then add a android project library, and select AndroidCommon Usage Gradle: compile 'com.wx.android.common:common:1.0.1' Author venshine venshine.cn@gmail.com License Copyright (C) 2015 venshine.cn@gmail.com Licensed under the Apache License, Version 2.0 (the "License"); you may not use this file except in compliance with the License. You may obtain a copy of the License at http://www.apache.org/licenses/LICENSE-2.0 Unless required by applicable law or agreed to in writing, software distributed under the License is distributed on an "AS IS" BASIS, WITHOUT WARRANTIES OR CONDITIONS OF ANY KIND, either express or implied. See the License for the specific language governing permissions and limitations under the License.

“相关推荐”对你有帮助么?

  • 非常没帮助
  • 没帮助
  • 一般
  • 有帮助
  • 非常有帮助
提交
评论
添加红包

请填写红包祝福语或标题

红包个数最小为10个

红包金额最低5元

当前余额3.43前往充值 >
需支付:10.00
成就一亿技术人!
领取后你会自动成为博主和红包主的粉丝 规则
hope_wisdom
发出的红包
实付
使用余额支付
点击重新获取
扫码支付
钱包余额 0

抵扣说明:

1.余额是钱包充值的虚拟货币,按照1:1的比例进行支付金额的抵扣。
2.余额无法直接购买下载,可以购买VIP、付费专栏及课程。

余额充值