


你还在代码的出错而烦恼吗,今天将带你学习java测试,从而更有效减少代码出错。
junit4与junit3区别
JUnit3:不支持注解,必须继承junit.framework.TestCase这个类,且命名必须是test开头
JUnit4:只要加上@Test注解即可,不需要继承任何类,命名没有限制。
JUnit4:只要加上@Test注解即可,不需要继承任何类,命名没有限制。
junit4创建与使用
- 首先先到官网下载jar。
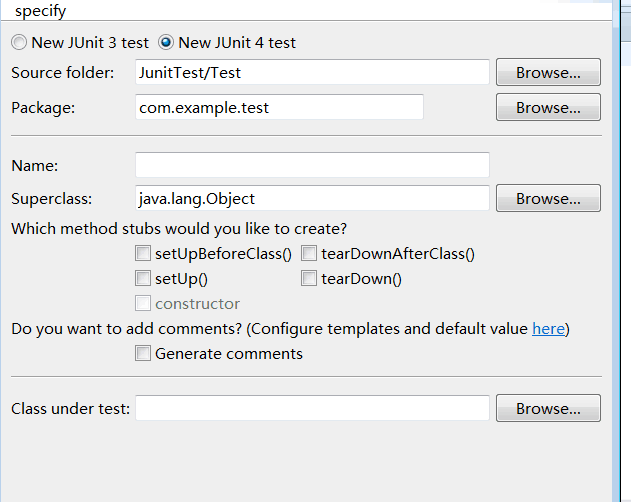
- 创建自己的测试类,通过new junit case,并且选择需要测试的类,从而自动选择需要测试的类以及相应的方法。
@Test
	public void testAdd() {
		assertEquals(4,new Maths().add(3, 4));
	}
assertEquals这个方法包含两个参数,第一个是真实值,第二个参数是程序计算值。
程序测试右击测试类run as junit test。
规范测试类
1.测试方法上必须使用@Test进行修饰
2.测试方法必须使用public void 进行修饰,不能待任何的参数
3.新建一个源代码目录
4.测试类的爆应该和被测试类保持一致
5.测试单元中的每个方法必须可以独立测试,测试方法间不能有任何的依赖
6.测试类使用Test作为类名的后缀
7.测试方法使用test作为方法名的前缀
2.测试方法必须使用public void 进行修饰,不能待任何的参数
3.新建一个源代码目录
4.测试类的爆应该和被测试类保持一致
5.测试单元中的每个方法必须可以独立测试,测试方法间不能有任何的依赖
6.测试类使用Test作为类名的后缀
7.测试方法使用test作为方法名的前缀
测试失败两种情况
1、Failure一般由单元测试使用的断言方法判断失败所引起的,这经表示测试点发现了问题, 就是说程序输出的结果和我们预期的不一样
2、error是由代码异常引起的,它可以产生于测试代码本身的错误,也可以是被测试代码中的一个隐藏的BUG
3、测试用例不是用来证明你是对的,而是用来证明你没有错
junit运行流程
public class LifeTest {

	@BeforeClass
	public static void setUpBeforeClass() throws Exception {
		System.out.println("BeforeClass");
	}

	@AfterClass
	public static void tearDownAfterClass() throws Exception {
		System.out.println("AfterClass");
	}

	@Before
	public void setUp() throws Exception {
		System.out.println("Before");
	}

	@After
	public void tearDown() throws Exception {
		System.out.println("After");
	}

	@Test
	public void test() {
		System.out.println("test");

	}
	@Test
	public void test1() {
		System.out.println("test1");

	}

}
运行结果:
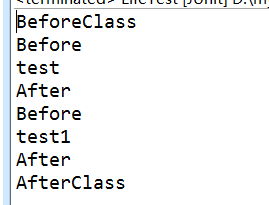
由此可以总结出:
- beforeclass方法修饰会在所有方法调用前执行,并且该方法随着测试类加载而加载,在内存一份实例,比较适合加载配置文件。
- afterclass 方法通常用来关闭资源。
- before和after在测试方法执行的时候各执行一次。
junit常用注解
@Test: 将一个 普通的方法修饰成为一个测试方法,其中两个属性,可以指定该类处理的类,以及方法超时设置。
@BeforeClass: 他会在所有的方法运行前被执行,static修饰
@AfterClass 他会在所有方法运行结束后被执行,static修饰
@Before:会在每一个测试方法被运行前执行一次
@After 会在每个测试方法被运行后执行一次
@Ignore 所修饰的测试方法会被测试运行器忽略
@RunWith: 可以修改测试运行器 org.junit.runner.Runner
junit测试套件
主要解决当项目大了,测试类多了一个一个测试比较麻烦,所以有了测试套件。主要实现方法就是通过定义一个测试类,添加注解。具体代码如下:
import static org.junit.Assert.*;

import org.junit.AfterClass;
import org.junit.Test;
import org.junit.runner.RunWith;
import org.junit.runners.Suite;
import org.junit.runners.Suite.SuiteClasses;
@RunWith(Suite.class)
@Suite.SuiteClasses({MathsTest.class,fMathsTest1.class})//添加需要测试的代码
 class SuitTest {


}
总结:
1.测试套件就是组织测试类一起运行的
2.写一个作为测试套件的入口类,这个类里不包含其他的方法。
3.更改测试运行器Suite.class.
4.将要测试的类作为数组传入到Suite.SuiteClasses({})
2.写一个作为测试套件的入口类,这个类里不包含其他的方法。
3.更改测试运行器Suite.class.
4.将要测试的类作为数组传入到Suite.SuiteClasses({})
junit参数化设置
就是在测试的数据,先传入一个数组的集合中,可以采用多组数据进行测试。
import static org.junit.Assert.*;

import java.util.ArrayList;
import java.util.Collection;

import org.junit.AfterClass;
import org.junit.Test;
import org.junit.runner.RunWith;
import org.junit.runners.Parameterized;
import org.junit.runners.Parameterized.Parameters;
import org.omg.Dynamic.Parameter;

import com.example.math.Maths;
@RunWith(Parameterized.class)
public class ParameterTest {
	private int really;
	private int parameter1;
	private int parameter2;
	@Parameters
	public static Collection<Integer[]> parametervalue(){
	    Collection<Integer[]> c = new ArrayList<Integer[]>();
	    c.add(new Integer[]{3,1,2});
	    c.add(new Integer[]{4,1,3});

	    return c;
	}


	public ParameterTest(int really, int parameter1, int parameter2) {
		super();
		this.really = really;
		this.parameter1 = parameter1;
		this.parameter2 = parameter2;
	}


	@Test
	public void test() {
		assertEquals(really, new Maths().add(parameter1, parameter2));
	}

}
1:更改默认的测试运行器为 Parameterized.class
2:声明变量来存放预期值
3:声明一个返回值为Collection的公共静态方法 并用@Parameterized 进行修饰
4:为测试类声明一个带有参数的公共构造器,并在其中为之声明变量赋值
junit与Spring整合
import static org.junit.Assert.*;

import org.junit.BeforeClass;
import org.junit.Test;
import org.springframework.context.ApplicationContext;
import org.springframework.context.support.ClassPathXmlApplicationContext;

public class SpringTest {
	private static ApplicationContext context = null;

	@BeforeClass
	public static void setUpBeforeClass() throws Exception {
		context =  new ClassPathXmlApplicationContext("applicationContext.xml");//加载spring配置文件。
	}

	@Test
	public void test() {
	TestInterfaceImpl ti = (TestInterfaceImpl) context.getBean("TestInterface");

	}

}
小伙伴们,今天的junit就结束啦,还是挺简单的吧,哎,路漫漫兮其修远,我将上下而求索!!!!!!!!!!!!!
* 1.测试方法上必须使用@Test进行修饰
* 2.测试方法必须使用public void 进行修饰,不能待任何的参数
* 3.新建一个源代码目录
* 4.测试类的爆应该和被测试类保持一致
* 5.测试单元中的每个方法必须可以独立测试,测试方法间不能有任何的依赖
* 6.测试类使用Test作为类名的后缀
* 7.测试方法使用test作为方法名的前缀
* 2.测试方法必须使用public void 进行修饰,不能待任何的参数
* 3.新建一个源代码目录
* 4.测试类的爆应该和被测试类保持一致
* 5.测试单元中的每个方法必须可以独立测试,测试方法间不能有任何的依赖
* 6.测试类使用Test作为类名的后缀
* 7.测试方法使用test作为方法名的前缀


 1万+
1万+

 被折叠的 条评论
为什么被折叠?
被折叠的 条评论
为什么被折叠?
 到【灌水乐园】发言


