


 本文档详细介绍了如何使用YaST模块手动设置SUSE Linux Enterprise High Availability Extension集群,包括定义通信渠道、设置认证、同步配置文件、配置conntrackd服务以及启动集群服务。此外,还提供了关于冗余通信通道、Csync2同步工具和conntrackd的配置方法。
The YaST cluster module allows you to set up a cluster manually (from scratch) or to modify options for an existing cluster.
However, if you prefer an automated approach for setting up a cluster, refer to Installation and Setup Quick Start. It describes how to install the needed packages and leads you to a basic two-node cluster, which is set up with the scripts. ha-cluster-bootstrap
You can also use a combination of both setup methods, for example: set up one node with YaST cluster and then use one of the bootstrap scripts to integrate more nodes (or vice versa).
4.1 Definition of Terms REPORT DOCUMENTATION BUG#EDIT SOURCE
Several key terms used in the YaST cluster module and in this chapter are defined below.
Bind Network Address (bindnetaddr)
The network address the Corosync executive should bind to. To simplify sharing configuration files across the cluster, Corosync uses network interface netmask to mask only the address bits that are used for routing the network. For example, if the local interface is with netmask , set to . If the local interface is with netmask , set to . 192.168.5.92255.255.255.0bindnetaddr192.168.5.0192.168.5.92255.255.255.192bindnetaddr192.168.5.64
If with is explicitly configured in , is not strictly required. nodelistringX_addr/etc/corosync/corosync.confbindnetaddr
Note: Network Address for All Nodes
As the same Corosync configuration will be used on all nodes, make sure to use a network address as , not the address of a specific network interface. bindnetaddr
conntrack Tools
Allow interaction with the in-kernel connection tracking system for enabling stateful packet inspection for iptables. Used by the High Availability Extension to synchronize the connection status between cluster nodes. For detailed information, refer to conntrack-tools: Netfilter's connection tracking userspace tools.
Csync2
A synchronization tool that can be used to replicate configuration files across all nodes in the cluster, and even across Geo clusters. Csync2 can handle any number of hosts, sorted into synchronization groups. Each synchronization group has its own list of member hosts and its include/exclude patterns that define which files should be synchronized in the synchronization group. The groups, the host names belonging to each group, and the include/exclude rules for each group are specified in the Csync2 configuration file, . /etc/csync2/csync2.cfg
For authentication, Csync2 uses the IP addresses and pre-shared keys within a synchronization group. You need to generate one key file for each synchronization group and copy it to all group members.
For more information about Csync2, refer to http://oss.linbit.com/csync2/paper.pdf
Existing Cluster
The term “existing cluster” is used to refer to any cluster that consists of at least one node. Existing clusters have a basic Corosync configuration that defines the communication channels, but they do not necessarily have resource configuration yet.
Multicast
A technology used for a one-to-many communication within a network that can be used for cluster communication. Corosync supports both multicast and unicast.
Note: Switches and Multicast
To use multicast for cluster communication, make sure your switches support multicast.
Multicast Address (mcastaddr)
IP address to be used for multicasting by the Corosync executive. The IP address can either be IPv4 or IPv6. If IPv6 networking is used, node IDs must be specified. You can use any multicast address in your private network.
Multicast Port (mcastport)
The port to use for cluster communication. Corosync uses two ports: the specified for receiving multicast, and for sending multicast. mcastportmcastport -1
Redundant Ring Protocol (RRP)
Allows the use of multiple redundant local area networks for resilience against partial or total network faults. This way, cluster communication can still be kept up as long as a single network is operational. Corosync supports the Totem Redundant Ring Protocol. A logical token-passing ring is imposed on all participating nodes to deliver messages in a reliable and sorted manner. A node is allowed to broadcast a message only if it holds the token.
When having defined redundant communication channels in Corosync, use RRP to tell the cluster how to use these interfaces. RRP can have three modes (): rrp_mode
-
If set to , Corosync uses both interfaces actively. However, this mode is deprecated.
active -
If set to , Corosync sends messages alternatively over the available networks.
passive -
If set to , RRP is disabled.
none
Unicast
A technology for sending messages to a single network destination. Corosync supports both multicast and unicast. In Corosync, unicast is implemented as UDP-unicast (UDPU).
4.2 YaST Cluster Module REPORT DOCUMENTATION BUG#EDIT SOURCE
Start YaST and select High Availability › Cluster. Alternatively, start the module from command line:
<span style="color:#000000"><span style="background-color:#ffffff"><span style="background-color:#ebfaf5"><span style="background-color:#e3f8f1"><span style="color:#0c322c">sudo yast2 cluster</span></span></span></span></span>The following list shows an overview of the available screens in the YaST cluster module. It also mentions whether the screen contains parameters that are required for successful cluster setup or whether its parameters are optional.
Communication Channels (required)
Allows you to define one or two communication channels for communication between the cluster nodes. As transport protocol, either use multicast (UDP) or unicast (UDPU). For details, see Section 4.3, “Defining the Communication Channels”.
Important: Redundant Communication Paths
For a supported cluster setup two or more redundant communication paths are required. The preferred way is to use network device bonding as described in Chapter 14, Network Device Bonding.
If this is impossible, you need to define a second communication channel in Corosync.
Security (optional but recommended)
Allows you to define the authentication settings for the cluster. HMAC/SHA1 authentication requires a shared secret used to protect and authenticate messages. For details, see Section 4.4, “Defining Authentication Settings”.
Configure Csync2 (optional but recommended)
Csync2 helps you to keep track of configuration changes and to keep files synchronized across the cluster nodes. For details, see Section 4.5, “Transferring the Configuration to All Nodes”.
Configure conntrackd (optional)
Allows you to configure the user space . Use the conntrack tools for conntrackdstateful packet inspection for iptables. For details, see Section 4.6, “Synchronizing Connection Status Between Cluster Nodes”.
Service (required)
Allows you to configure the service for bringing the cluster node online. Define whether to start the Pacemaker service at boot time and whether to open the ports in the firewall that are needed for communication between the nodes. For details, see Section 4.7, “Configuring Services”.
If you start the cluster module for the first time, it appears as a wizard, guiding you through all the steps necessary for basic setup. Otherwise, click the categories on the left panel to access the configuration options for each step.
Note: Settings in the YaST Cluster Module
Some settings in the YaST cluster module apply only to the current node. Other settings may automatically be transferred to all nodes with Csync2. Find detailed information about this in the following sections.
4.3 Defining the Communication Channels REPORT DOCUMENTATION BUG#EDIT SOURCE
For successful communication between the cluster nodes, define at least one communication channel. As transport protocol, either use multicast (UDP) or unicast (UDPU) as described in Procedure 4.1 or Procedure 4.2, respectively. If you want to define a second, redundant channel (Procedure 4.3), both communication channels must use the same protocol.
Note: Public Clouds: Use Unicast
For deploying SUSE Linux Enterprise High Availability Extension in public cloud platforms, use unicast as transport protocol. Multicast is generally not supported by the cloud platforms themselves.
All settings defined in the YaST Communication Channels screen are written to . Find example files for a multicast and a unicast setup in . /etc/corosync/corosync.conf/usr/share/doc/packages/corosync/
If you are using IPv4 addresses, node IDs are optional. If you are using IPv6 addresses, node IDs are required. Instead of specifying IDs manually for each node, the YaST cluster module contains an option to automatically generate a unique ID for every cluster node.
PROCEDURE 4.1: DEFINING THE FIRST COMMUNICATION CHANNEL (MULTICAST) REPORT DOCUMENTATION BUG#
When using multicast, the same , , and will be used for all cluster nodes. All nodes in the cluster will know each other by using the same multicast address. For different clusters, use different multicast addresses. bindnetaddrmcastaddrmcastport
-
Start the YaST cluster module and switch to the Communication Channels category.
-
Set the Transport protocol to .
Multicast -
Define the Bind Network Address. Set the value to the subnet you will use for cluster multicast.
-
Define the Multicast Address.
-
Define the Port.
-
To automatically generate a unique ID for every cluster node keep Auto Generate Node ID enabled.
-
Define a Cluster Name.
-
Enter the number of Expected Votes. This is important for Corosync to calculate quorum in case of a partitioned cluster. By default, each node has vote. The number of
1Expected Votes must match the number of nodes in your cluster. -
Confirm your changes.
-
If needed, define a redundant communication channel in Corosync as described in Procedure 4.3, “Defining a Redundant Communication Channel”.
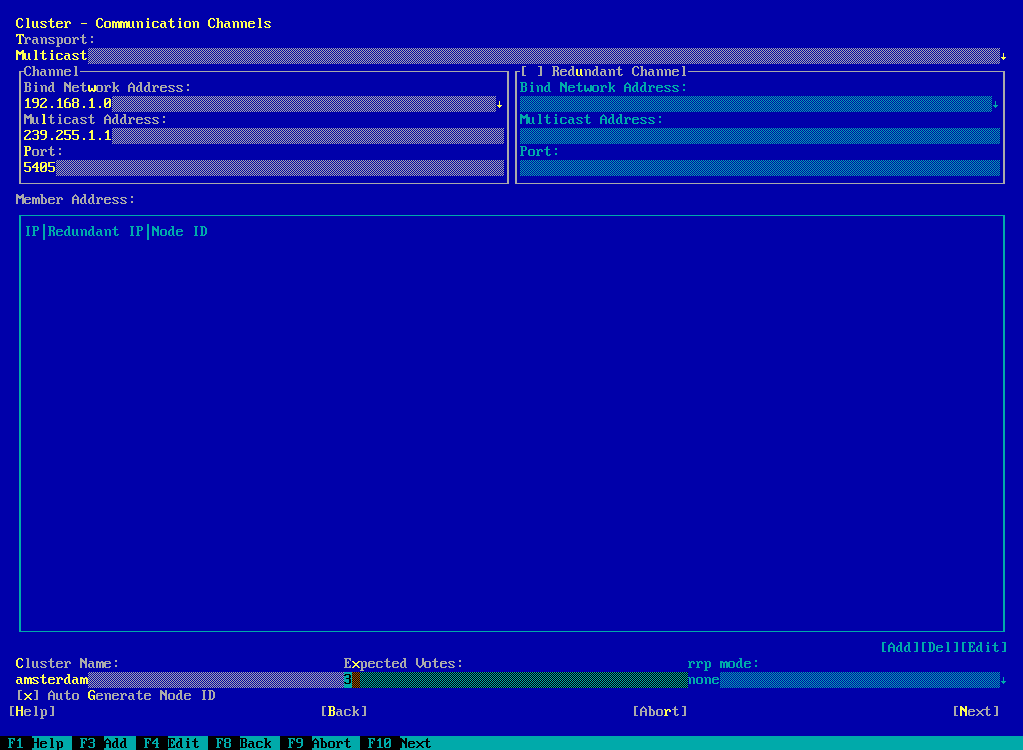
FIGURE 4.1: YAST CLUSTER—MULTICAST CONFIGURATION REPORT DOCUMENTATION BUG#
If you want to use unicast instead of multicast for cluster communication, proceed as follows.
PROCEDURE 4.2: DEFINING THE FIRST COMMUNICATION CHANNEL (UNICAST) REPORT DOCUMENTATION BUG#
-
Start the YaST cluster module and switch to the Communication Channels category.
-
Set the Transport protocol to .
Unicast -
Define the Port.
-
For unicast communication, Corosync needs to know the IP addresses of all nodes in the cluster. For each node that will be part of the cluster, click Add and enter the following details:
-
IP Address
-
Redundant IP Address (only required if you use a second communication channel in Corosync)
-
Node ID (only required if the option Auto Generate Node ID is disabled)
To modify or remove any addresses of cluster members, use the Edit or Del buttons.
-
-
To automatically generate a unique ID for every cluster node keep Auto Generate Node ID enabled.
-
Define a Cluster Name.
-
Enter the number of Expected Votes. This is important for Corosync to calculate quorum in case of a partitioned cluster. By default, each node has vote. The number of
1Expected Votes must match the number of nodes in your cluster. -
Confirm your changes.
-
If needed, define a redundant communication channel in Corosync as described in Procedure 4.3, “Defining a Redundant Communication Channel”.
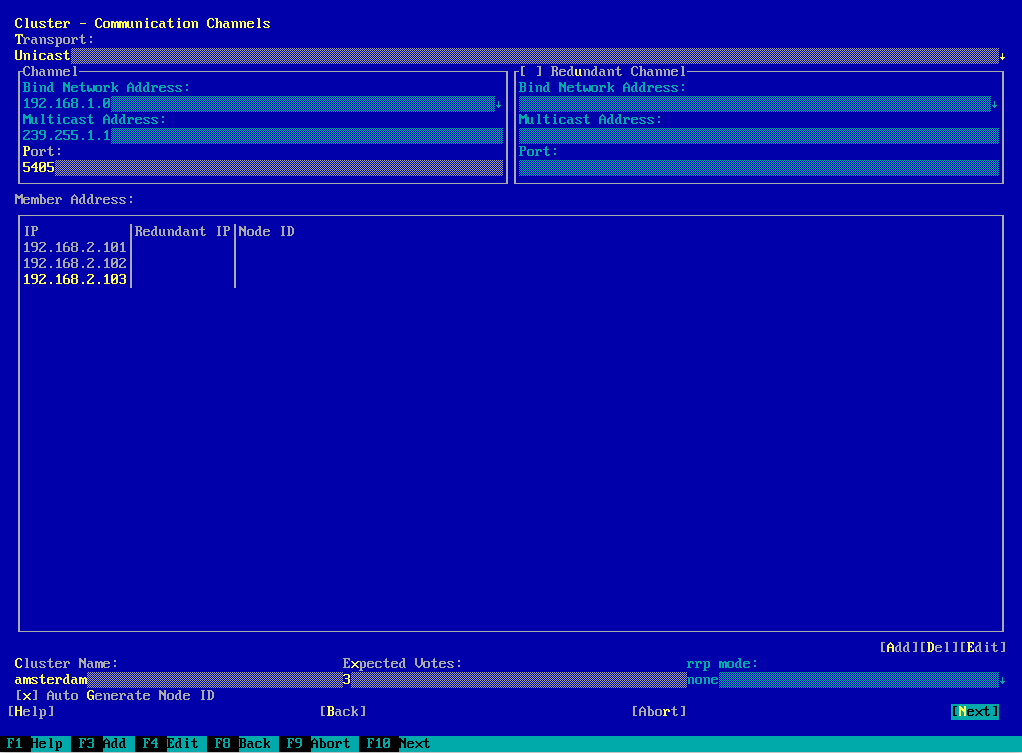
FIGURE 4.2: YAST CLUSTER—UNICAST CONFIGURATION REPORT DOCUMENTATION BUG#
If network device bonding cannot be used for any reason, the second best choice is to define a redundant communication channel (a second ring) in Corosync. That way, two physically separate networks can be used for communication. If one network fails, the cluster nodes can still communicate via the other network.
The additional communication channel in Corosync will form a second token-passing ring. In , the first channel you configured is the primary ring and gets the ring number . The second ring (redundant channel) gets the ring number . /etc/corosync/corosync.conf01
When having defined redundant communication channels in Corosync, use RRP to tell the cluster how to use these interfaces. With RRP, two physically separate networks are used for communication. If one network fails, the cluster nodes can still communicate via the other network.
RRP can have three modes:
-
If set to , Corosync uses both interfaces actively. However, this mode is deprecated.
active -
If set to , Corosync sends messages alternatively over the available networks.
passive -
If set to , RRP is disabled.
none
PROCEDURE 4.3: DEFINING A REDUNDANT COMMUNICATION CHANNEL REPORT DOCUMENTATION BUG#
Important: Redundant Rings and /etc/hosts
If multiple rings are configured in Corosync, each node can have multiple IP addresses. This needs to be reflected in the file of all nodes. /etc/hosts
-
Start the YaST cluster module and switch to the Communication Channels category.
-
Activate Redundant Channel. The redundant channel must use the same protocol as the first communication channel you defined.
-
If you use multicast, enter the following parameters: the Bind Network Address to use, the Multicast Address and the Port for the redundant channel.
If you use unicast, define the following parameters: the Bind Network Address to use, and the Port. Enter the IP addresses of all nodes that will be part of the cluster.
-
To tell Corosync how and when to use the different channels, select the rrp_mode to use:
-
If only one communication channel is defined, rrp_mode is automatically disabled (value ).
none -
If set to , Corosync uses both interfaces actively. However, this mode is deprecated.
active -
If set to , Corosync sends messages alternatively over the available networks.
passive
When RRP is used, the High Availability Extension monitors the status of the current rings and automatically re-enables redundant rings after faults.
Alternatively, check the ring status manually with . View the available options with .
corosync-cfgtool-h -
-
Confirm your changes.
4.4 Defining Authentication Settings REPORT DOCUMENTATION BUG#EDIT SOURCE
To define the authentication settings for the cluster, you can use HMAC/SHA1 authentication. This requires a shared secret used to protect and authenticate messages. The authentication key (password) you specify will be used on all nodes in the cluster.
PROCEDURE 4.4: ENABLING SECURE AUTHENTICATION REPORT DOCUMENTATION BUG#
-
Start the YaST cluster module and switch to the Security category.
-
Activate Enable Security Auth.
-
For a newly created cluster, click Generate Auth Key File. An authentication key is created and written to .
/etc/corosync/authkeyIf you want the current machine to join an existing cluster, do not generate a new key file. Instead, copy the from one of the nodes to the current machine (either manually or with Csync2).
/etc/corosync/authkey -
Confirm your changes. YaST writes the configuration to .
/etc/corosync/corosync.conf
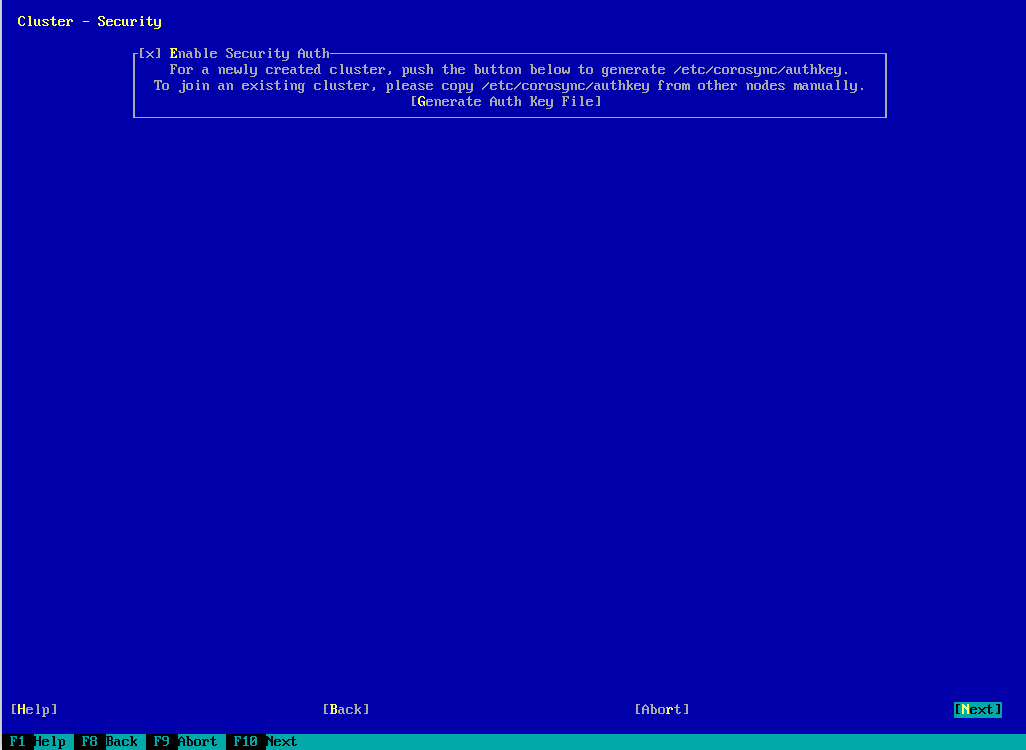
FIGURE 4.3: YAST CLUSTER—SECURITY REPORT DOCUMENTATION BUG#
4.5 Transferring the Configuration to All Nodes REPORT DOCUMENTATION BUG#EDIT SOURCE
Instead of copying the resulting configuration files to all nodes manually, use the tool for replication across all nodes in the cluster. csync2
This requires the following basic steps:
Csync2 helps you to keep track of configuration changes and to keep files synchronized across the cluster nodes:
-
You can define a list of files that are important for operation.
-
You can show changes to these files (against the other cluster nodes).
-
You can synchronize the configured files with a single command.
-
With a simple shell script in , you can be reminded about unsynchronized changes before logging out of the system.
~/.bash_logout
Find detailed information about Csync2 at LINBIT Software Download Page For LINSTOR And DRBD Linux Driver and http://oss.linbit.com/csync2/paper.pdf.
4.5.1 Configuring Csync2 with YaST REPORT DOCUMENTATION BUG#EDIT SOURCE
-
Start the YaST cluster module and switch to the Csync2 category.
-
To specify the synchronization group, click Add in the Sync Host group and enter the local host names of all nodes in your cluster. For each node, you must use exactly the strings that are returned by the command.
hostnameTip: Host Name Resolution
If host name resolution does not work properly in your network, you can also specify a combination of host name and IP address for each cluster node. To do so, use the string HOSTNAME@IP such as , for example. Csync2 will then use the IP addresses when connecting.
alice@192.168.2.100 -
Click Generate Pre-Shared-Keys to create a key file for the synchronization group. The key file is written to . After it has been created, it must be copied manually to all members of the cluster.
/etc/csync2/key_hagroup -
To populate the Sync File list with the files that usually need to be synchronized among all nodes, click Add Suggested Files.
-
To Edit, Add or Remove files from the list of files to be synchronized use the respective buttons. You must enter the absolute path name for each file.
-
Activate Csync2 by clicking Turn Csync2 ON. This will execute the following command to start Csync2 automatically at boot time:
COPY<span style="color:#000000"><span style="background-color:#ffffff"><span style="background-color:#e3f8f1"><span style="background-color:#ebfaf5"><span style="background-color:#90ebcd"><span style="color:#0c322c"><code>root # </code><code>systemctl</code> enable csync2.socket</span></span></span></span></span></span> -
Confirm your changes. YaST writes the Csync2 configuration to .
/etc/csync2/csync2.cfg -
To start the synchronization process now, proceed with Section 4.5.2, “Synchronizing Changes with Csync2”.
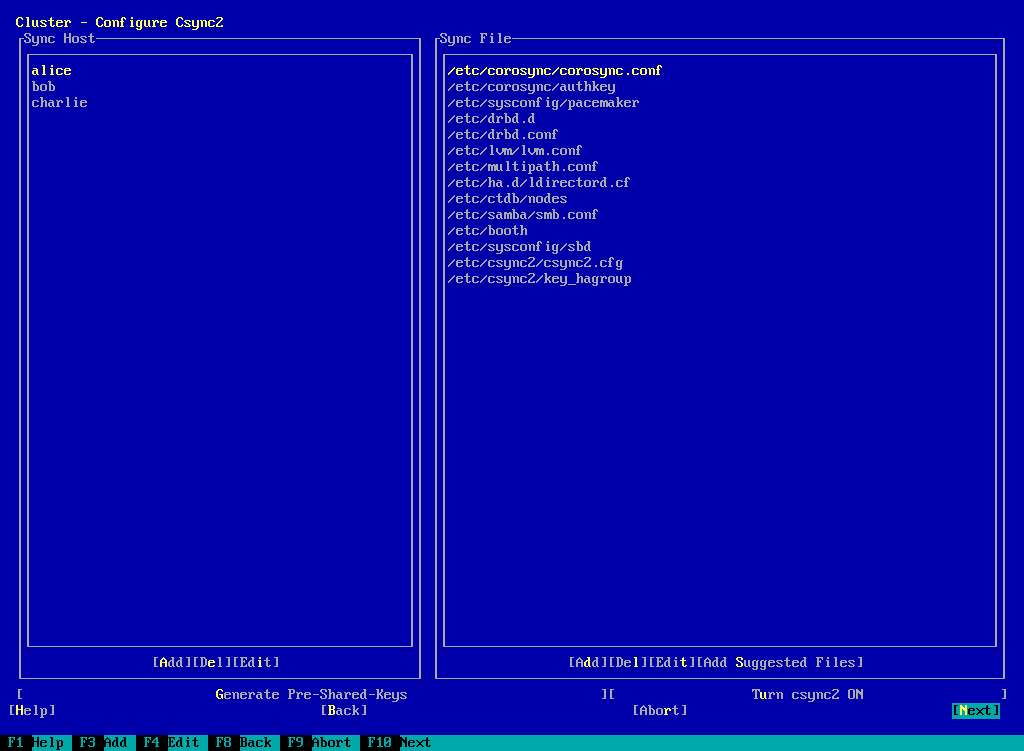
FIGURE 4.4: YAST CLUSTER—CSYNC2 REPORT DOCUMENTATION BUG#
4.5.2 Synchronizing Changes with Csync2 REPORT DOCUMENTATION BUG#EDIT SOURCE
To successfully synchronize the files with Csync2, the following requirements must be met:
-
The same Csync2 configuration is available on all cluster nodes.
-
The same Csync2 authentication key is available on all cluster nodes.
-
Csync2 must be running on all cluster nodes.
Before the first Csync2 run, you therefore need to make the following preparations:
PROCEDURE 4.5: PREPARING FOR INITIAL SYNCHRONIZATION WITH CSYNC2 REPORT DOCUMENTATION BUG#
-
Copy the file manually to all nodes after you have configured it as described in
/etc/csync2/csync2.cfgSection 4.5.1, “Configuring Csync2 with YaST”. -
Copy the file that you have generated on one node in
/etc/csync2/key_hagroupStep 3 of Section 4.5.1 to all nodes in the cluster. It is needed for authentication by Csync2. However, do not regenerate the file on the other nodes—it needs to be the same file on all nodes. -
Execute the following command on all nodes to start the service now:
COPY<span style="color:#000000"><span style="background-color:#ffffff"><span style="background-color:#e3f8f1"><span style="background-color:#ebfaf5"><span style="background-color:#90ebcd"><span style="color:#0c322c"><code>root # </code><code>systemctl</code> start csync2.socket</span></span></span></span></span></span>
PROCEDURE 4.6: SYNCHRONIZING THE CONFIGURATION FILES WITH CSYNC2 REPORT DOCUMENTATION BUG#
-
To initially synchronize all files once, execute the following command on the machine that you want to copy the configuration from:
COPY<span style="color:#000000"><span style="background-color:#ffffff"><span style="background-color:#e3f8f1"><span style="background-color:#ebfaf5"><span style="background-color:#90ebcd"><span style="color:#0c322c"><code>root # </code><code>csync2</code> <code>-xv</code></span></span></span></span></span></span>This will synchronize all the files once by pushing them to the other nodes. If all files are synchronized successfully, Csync2 will finish with no errors.
If one or several files that are to be synchronized have been modified on other nodes (not only on the current one), Csync2 reports a conflict. You will get an output similar to the one below:
COPY<span style="color:#000000"><span style="background-color:#ffffff"><span style="background-color:#e3f8f1"><span style="background-color:#ebfaf5"><span style="background-color:#90ebcd"><span style="color:#0c322c">While syncing file /etc/corosync/corosync.conf: ERROR from peer hex-14: File is also marked dirty here! Finished with 1 errors.</span></span></span></span></span></span> -
If you are sure that the file version on the current node is the “best” one, you can resolve the conflict by forcing this file and resynchronizing:
COPY<span style="color:#000000"><span style="background-color:#ffffff"><span style="background-color:#e3f8f1"><span style="background-color:#ebfaf5"><span style="background-color:#90ebcd"><span style="color:#0c322c"><code>root # </code><code>csync2</code> <code>-f</code> /etc/corosync/corosync.conf <code>root # </code><code>csync2</code> <code>-x</code></span></span></span></span></span></span>
For more information on the Csync2 options, run
<span style="color:#000000"><span style="background-color:#ffffff"><span style="background-color:#ebfaf5"><span style="background-color:#e3f8f1"><span style="color:#0c322c">csync2 -help</span></span></span></span></span>Note: Pushing Synchronization After Any Changes
Csync2 only pushes changes. It does not continuously synchronize files between the machines.
Each time you update files that need to be synchronized, you need to push the changes to the other machines: Run on the machine where you did the changes. If you run the command on any of the other machines with unchanged files, nothing will happen. csync2 -xv
4.6 Synchronizing Connection Status Between Cluster Nodes REPORT DOCUMENTATION BUG#EDIT SOURCE
To enable stateful packet inspection for iptables, configure and use the conntrack tools. This requires the following basic steps:
PROCEDURE 4.7: CONFIGURING THE WITH YAST conntrackdREPORT DOCUMENTATION BUG #
Use the YaST cluster module to configure the user space (see conntrackdFigure 4.5, “YaST Cluster—”conntrackd). It needs a dedicated network interface that is not used for other communication channels. The daemon can be started via a resource agent afterward.
-
Start the YaST cluster module and switch to the Configure conntrackd category.
-
Define the Multicast Address to be used for synchronizing the connection status.
-
In Group Number, define a numeric ID for the group to synchronize the connection status to.
-
Click Generate /etc/conntrackd/conntrackd.conf to create the configuration file for .
conntrackd -
If you modified any options for an existing cluster, confirm your changes and close the cluster module.
-
For further cluster configuration, click Next and proceed with Section 4.7, “Configuring Services”.
-
Select a Dedicated Interface for synchronizing the connection status. The IPv4 address of the selected interface is automatically detected and shown in YaST. It must already be configured and it must support multicast.
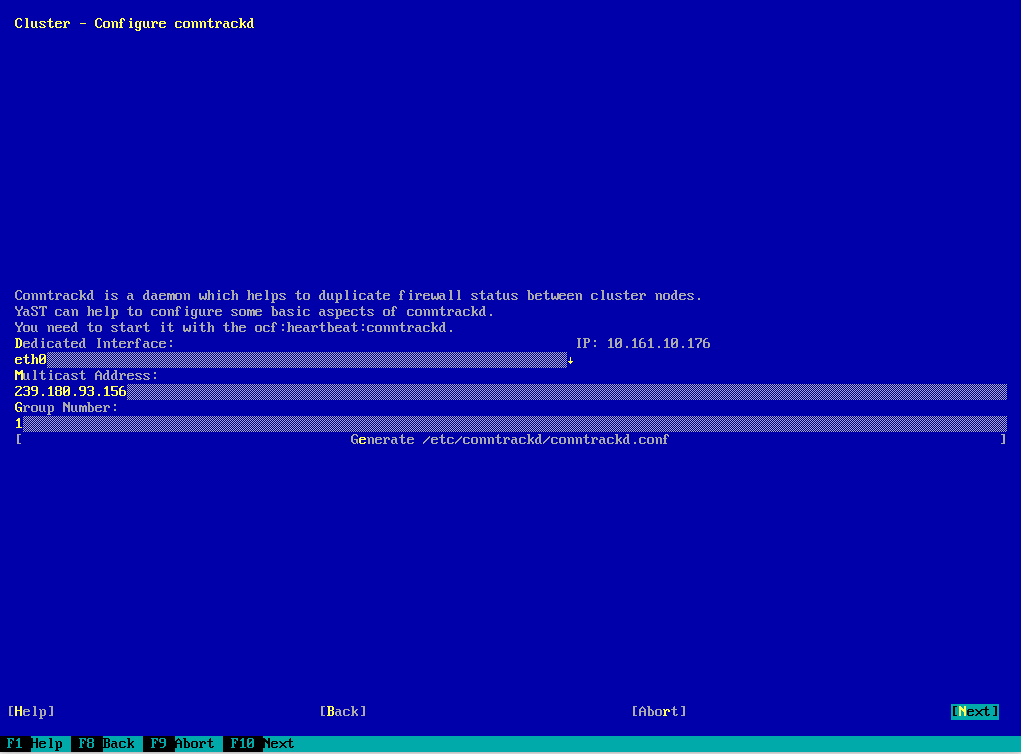
FIGURE 4.5: YAST CLUSTER—conntrackd REPORT DOCUMENTATION BUG#
After having configured the conntrack tools, you can use them for Linux Virtual Server, see Load Balancing.
4.7 Configuring Services REPORT DOCUMENTATION BUG#EDIT SOURCE
In the YaST cluster module define whether to start certain services on a node at boot time. You can also use the module to start and stop the services manually. To bring the cluster nodes online and start the cluster resource manager, Pacemaker must be running as a service.
PROCEDURE 4.8: ENABLING PACEMAKER REPORT DOCUMENTATION BUG#
-
In the YaST cluster module, switch to the Service category.
-
To start Pacemaker each time this cluster node is booted, select the respective option in the Booting group. If you select Off in the Booting group, you must start Pacemaker manually each time this node is booted. To start Pacemaker manually, use the command:
COPY<span style="color:#000000"><span style="background-color:#ffffff"><span style="background-color:#e3f8f1"><span style="background-color:#ebfaf5"><span style="background-color:#90ebcd"><span style="color:#0c322c"><code>root # </code><code>crm</code> cluster start</span></span></span></span></span></span> -
To start or stop Pacemaker immediately, click the respective button.
-
To open the ports in the firewall that are needed for cluster communication on the current machine, activate Open Port in Firewall.
-
Confirm your changes. Note that the configuration only applies to the current machine, not to all cluster nodes.
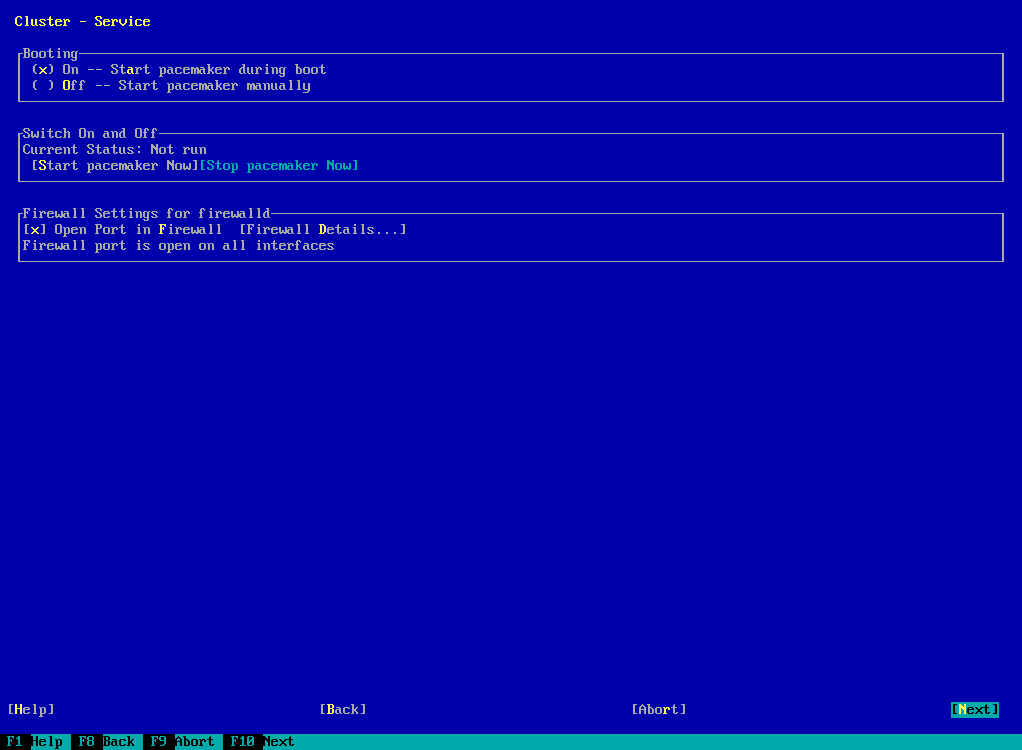
FIGURE 4.6: YAST CLUSTER—SERVICES REPORT DOCUMENTATION BUG#
4.8 Bringing the Cluster Online Node by Node REPORT DOCUMENTATION BUG#EDIT SOURCE
After the initial cluster configuration is done, start the cluster services on each cluster node to bring the stack online:
PROCEDURE 4.9: STARTING CLUSTER SERVICES AND CHECKING THE STATUS REPORT DOCUMENTATION BUG#
-
Log in to an existing node.
-
Check if the service is already running:
COPY<span style="color:#000000"><span style="background-color:#ffffff"><span style="background-color:#e3f8f1"><span style="background-color:#ebfaf5"><span style="background-color:#90ebcd"><span style="color:#0c322c"><code>root # </code><code>crm</code> cluster status</span></span></span></span></span></span>If not, start the cluster services now:
COPY<span style="color:#000000"><span style="background-color:#ffffff"><span style="background-color:#e3f8f1"><span style="background-color:#ebfaf5"><span style="background-color:#90ebcd"><span style="color:#0c322c"><code>root # </code><code>crm</code> cluster start</span></span></span></span></span></span> -
Repeat the steps above for each of the cluster nodes.
-
On one of the nodes, check the cluster status with the command. If all nodes are online, the output should be similar to the following:
crm status
COPY<span style="color:#000000"><span style="background-color:#ffffff"><span style="background-color:#e3f8f1"><span style="background-color:#ebfaf5"><span style="background-color:#90ebcd"><span style="color:#0c322c"><code>root # </code>crm status Cluster Summary: * Stack: corosync * Current DC: alice (version ...) - partition with quorum * Last updated: ... * Last change: ... by hacluster via crmd on bob * 2 nodes configured * 1 resource instance configured Node List: * Online: [ alice bob ] ...</span></span></span></span></span></span>This output indicates that the cluster resource manager is started and is ready to manage resources.
After the basic configuration is done and the nodes are online, you can start to configure cluster resources. Use one of the cluster management tools like the crm shell (crmsh) or Hawk2. For more information, see Chapter 8, Configuring and Managing Cluster Resources (Command Line) or Chapter 7, Configuring and Managing Cluster Resources with Hawk2.
转载至https://documentation.suse.com/sle-ha/15-SP2/html/SLE-HA-all/cha-ha-ycluster.html


 3122
3122

 被折叠的 条评论
为什么被折叠?
被折叠的 条评论
为什么被折叠?
 到【灌水乐园】发言


