


安装环境
- 第一步:通过yum命令安装svnserve服务
yum -y install subversion

    此命令会全自动安装svn服务器相关服务和依赖,安装完成会自动停止命令运行
若需查看svn安装位置,可以用以下命令:

rpm -ql subversion- 第二步:创建版本库目录(该目录为后面创建版本库提供存放位置)
选择在var路径下创建版本库,当前处于根目录下一次性创建如下

mkdir /var/svnrepos- 第三步:创建svn版本库
在第二部创建的目录中,创建版本库

svnadmin create /var/svnrepos/xxxx

其中xxxx为你要创建版本库目录名称

进入创建的版本目录

cd /var/svnrepos/xxxx

该目录有如下文件
- 第四步:配置修改
进入创建的SVN版本库目录中的Conf文件夹

cd /var/svnrepos/xxxx/conf

该文件夹中存在三个重要的文件,主要用于对SVN版本库的用户,权限,配置
其中 authz 为用户及权限的配置文件:vim authz(注意当前目录位置)
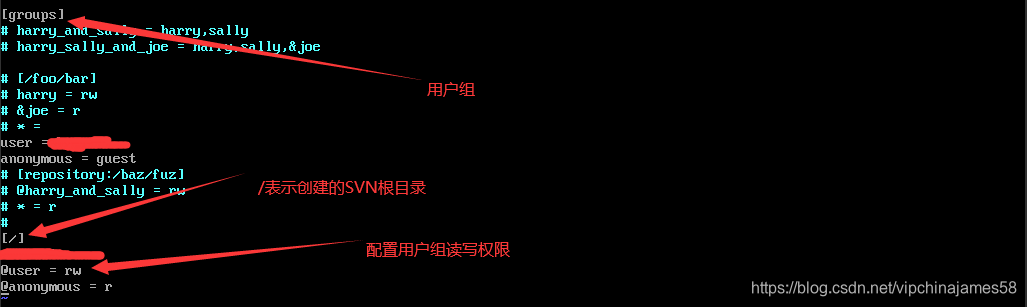
passwd为用户密码配置文件:vim passwd (注意当前目录位置)

svnserve.conf 配置 svn 对设置的用户以及密码文件的使用:vim svnserve.conf

在编辑配置文件时要注意顶格写
- 第五步:防火墙开启
在很多时候SVN服务搭建完成却无法连接,应多检查防火墙是否有屏蔽(使用阿里云服务器还需在安全组添加端口开启规则)
vi /etc/sysconfig/iptables

添加配置信息

-A INPUT -p tcp -m state --state NEW -m tcp --dport 3690 -j ACCEPT

保存退出

systemctl restart iptables.service #重启防火墙使配置生效

【扩展:centos 7防火墙是firewalld】
#关闭firewalld
#systemctl stop firewalld.service
#或者:
#systemctl stop firewalld,systemctl disable firewalld- 第六步:启动svn服务,在客户端访问svn服务器
启动svn服务

svnserve -d -r /var/svnrepos

启动成功后,可用ps -aux查看服务启动是否成功

ps -ef | grep 'svnserve'

【在windows客户端】输入地址:svn://ip地址:3690/xxxx (iP地址为你linux的ip,xxxx为前文创建的版本库名称,3690为svn默认端口)

或者

telnet 8.8.8.8 3690

测试连接是否成功

【在linux服务器输入命令】

svn co svn://8.8.8.8:3690/xxxx

第一次连接成功是会让你保存密码输入:yes- 第七步:搭建HTTP服务支持
安装Apache Httpd Server
yum install httpd
设置开机启动 chkcofing httpd on
启动Apache service httpd start
查看Apache版本 httpd -version
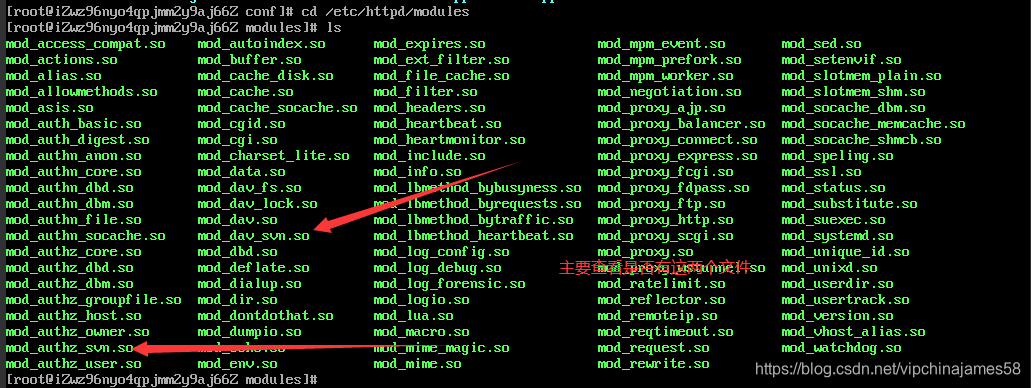
安装Apache支持服务
yum install mod_dav_svn
查看是否安装成功
cd /etc/httpd/modules/
可以使用:systemctl start httpd(restart / status 重启及查看服务状态),来启动Apache http server服务
如果启动Apache提示错误:
httpd:httpd: Could not reliably determine the server's fully qualif domain name, using ::1 for ServerName
解决办法:
vim /etc/httpd/conf/httpd.conf #编辑
ServerName www.example.com:80 #去掉前面的注释
:wq! #保存退出
配置http协议认证文件

htpasswd -c /var/svnrepos/http_passwd ***** (在 SVN 配置文件authz 中配置的用户名)

http_passwd(可自定义)是我创建的http服务认证文件名称,username是我创建的第一个用户,因为是第一个用户,所以需要加 -c 参数,以后创建账户不需要加-c命令。

在Apache Http Server服务中,新增svn的配置(类似在http服务中新增一个站点)加入以下配置
命令如下

进入httpd配置目录

cd /etc/httpd/conf.d

vim svn.conf

在文件中编辑以下命令

重新启动httpd服务:systemctl restart httpd
测试连接:http://8.8.8.8/svn/flowplatform(flowplatform: 是你在SVN根目录下创建的SVN版本库目录)

- 第八步:配置HTTPS
下载openssl与mod_ssl模块

[root@localhost ~]# yum install -y openssl mod_ssl

[root@localhost ~]# mkdir /etc/httpd/conf/ssl/

[root@localhost ~]# cd /etc/httpd/conf/ssl/

[root@localhost ssl]# ll
总用量 0
[root@localhost ssl]# openssl genrsa -des3 -out server.key 1024
Generating RSA private key, 1024 bit long modulus
............++++++
...............++++++
e is 65537 (0x10001)
Enter pass phrase for server.key:
Verifying - Enter pass phrase for server.key:
生成csr
[root@localhost ssl]# openssl req -new -key server.key > server.csr
Enter pass phrase for server.key:
You are about to be asked to enter information that will be incorporated
into your certificate request.
What you are about to enter is what is called a Distinguished Name or a DN.
There are quite a few fields but you can leave some blank
For some fields there will be a default value,
If you enter '.', the field will be left blank.
-----
Country Name (2 letter code) [XX]:CN                             #国家名称(2个字母代码)
State or Province Name (full name) []:gd                         #省份
Locality Name (eg, city) [Default City]:sz                       #城市
Organization Name (eg, company) [Default Company Ltd]:xx         #公司名称
Organizational Unit Name (eg, section) []:xx                     #公司部门
Common Name (eg, your name or your server's hostname) []:bugwfq  #主机名
Email Address []:bugwfq@163.com                                  #邮件地址
Please enter the following 'extra' attributes
to be sent with your certificate request
A challenge password []:123456                                   #密码
An optional company name []:bugwfq                               #可选的公司名称
...
#生成证书
[root@localhost ssl]# openssl req -x509 -days 2048 -key server.key -in server.csr > server.crt
Enter pass phrase for server.key:
[root@localhost ssl]# ll
总用量 12
-rw-r--r-- 1 root root 997 1月  21 23:27 server.crt
-rw-r--r-- 1 root root 729 1月  21 23:26 server.csr
-rw-r--r-- 1 root root 963 1月  21 23:22 server.key

[root@localhost ssl]# cd /etc/httpd/conf.d

编辑 ssl.conf配置文件
[root@localhost ssl]# vim ssl.conf
重启httpd:systemctl restart httpd
测试:https://8.8.8.8/svn/flowplatform/

9.【扩展】
如果使用的阿里云服务器,并且有域名则找到对应的域名管理,开启ssl证书然后下载apache 对应的证书

选中 Apache 并下载生成以下文件
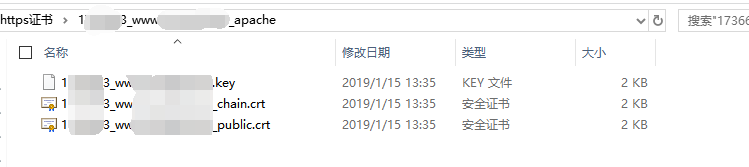
将这些文件放到 /etc/httpd/conf/ssl 目录下。OK !


 1607
1607


 被折叠的 条评论
为什么被折叠?
被折叠的 条评论
为什么被折叠?
 到【灌水乐园】发言


