


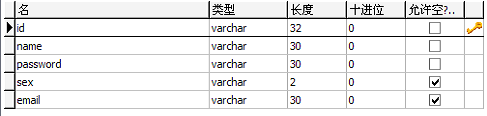
准备:建表
用MySQL在名为STMS数据库中建表person
在MyEclipse中建连接数据库的连接名为MySQL_localhost,在Driver JARS中导入MySQL的驱动程序mysql-connector-java-5.1.6-bin.jar

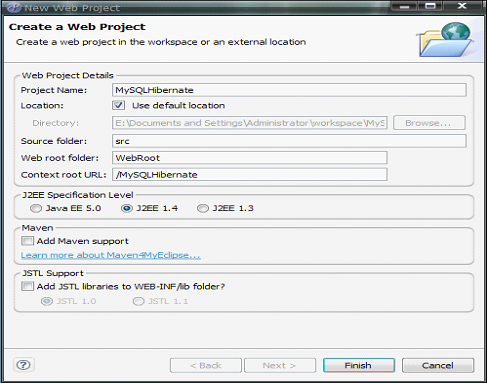
一.新建名为MySQLHibernate的Web Project
File—new—project—MyEclipse—Java Enterprice Projects—Web Project(Optional Maven Support)
在Project Name中输入MySQLHibernate---点击Finsh完成
 xml version='1.0' encoding='UTF-8' ?>
 2
DOCTYPE hibernate-configuration PUBLIC3
"-//Hibernate/Hibernate Configuration DTD 3.0//EN"4
"http://hibernate.sourceforge.net/hibernate-configuration-3.0.dtd" > 5
6
7
< hibernate-configuration > 8
9
< session-factory > 10
11
< property name ="connection.username" > root
property > 12
13
14
< property name ="connection.url" > 15
jdbc:mysql://localhost:3306/STMS?useUnicode=true & characterEncoding=GBK16
property > 17
18
19
< property name ="dialect" > 20
org.hibernate.dialect.MySQLDialect21
property > 22
23
24
< property name ="myeclipse.connection.profile" > 25
MySql_localhost26
property > 27
28
29
< property name ="connection.password" > root
property > 30
31
32
< property name ="connection.driver_class" > 33
com.mysql.jdbc.Driver34
property > 35
36
37
< property name ="show_sql" > true
property > 38
39
40
< mapping resource ="org/lxh/hibernate/demo01/Person.hbm.xml" /> 41
42
session-factory > 43
44
hibernate-configuration >
二:给项目加入Hibernate支持
选中刚刚新建的项目—MyEcplipse—Project Capabilites—Add Hibernate Capabilites

Next—Next—选择连接数据库的连接名—Next--


点击Finash完成
三:建立Person表的POJO类

package
org.lxh.hibernate.demo01;2
3
 /**
/** 
4
 * @author ∪∩BUG E-mail: tidelgl@163.com
5
* @version Aug 30, 2008 8:05:41 AM6
* @person表的POJO类,类名与表名相同7
 */
*/
8
public
class
Person
{
9
10
// 以下的 属性与Person表中的字段名相同 11
private String id;12
private String name;13
private String password;14
private String sex;15
private String email;16
17
 public String getId() {
 public String getId()
 18
return id;19
 }
} 20
21
public void setId(String id) {22
this .id = id;23
} 24
25
public String getName() {26
return name;27
} 28
29
public void setName(String name) {30
this .name = name;31
} 32
33
public String getPassword() {34
return password;35
} 36
37
public void setPassword(String password) {38
this .password = password;39
} 40
41
public String getSex() {42
return sex;43
} 44
45
public void setSex(String sex) {46
this .sex = sex;47
} 48
49
public String getEmail() {50
return email;51
} 52
53
public void setEmail(String email) {54
this .email = email;55
} 56
57
}
58
四:通过Hibernate反向工程建立person表与Person类的映射
首先调出DB Browser视图(Windows—view show—other—MyEclipse datebase—DB Browser)—展开MySQL_localhost至表person—右键表person—Hibernate Reverse Engineering

Finash完成
xml version="1.0" encoding="utf-8" ?> 2
DOCTYPE hibernate-mapping PUBLIC "-//Hibernate/Hibernate Mapping DTD 3.0//EN"3
"http://hibernate.sourceforge.net/hibernate-mapping-3.0.dtd" > 4
7
< hibernate-mapping > 8
13
< class name ="Dao.Student" table ="student" catalog ="stms" > 14
< id name ="sno" type ="java.lang.String" > 15
< column name ="Sno" length ="20" /> 16
17
< generator class ="increment" /> 18
id > 19
< property name ="sname" type ="java.lang.String" > 20
< column name ="Sname" length ="20" not-null ="true" /> 21
property > 22
< property name ="password" type ="java.lang.String" > 23
< column name ="Password" length ="20" /> 24
property > 25
class > 26
hibernate-mapping > 27
五:建立具体操作Hibernate的类
src/org.lxh.hibernate.demo01.PersonOperate.java
package
org.lxh.hibernate.demo01;2
3
import
java.util.Iterator;4
import
java.util.List;5
6
import
org.hibernate.Query;7
import
org.hibernate.Session;8
import
org.hibernate.SessionFactory;9
import
org.hibernate.Transaction;10
import
org.hibernate.cfg.Configuration;11
12
/** 13
* @author ∪∩BUG E-mail: tidelgl@163.com14
* @version Aug 30, 2008 8:27:53 AM 15
* @ 具体操作Hibernate的类 16
* @ 功能:增加,删除,个性,按ID查询,模糊查询,查询全部操作17
* @注意导入的包:从org.hibernate.*;18
*/
19
public
class
PersonOperate
{20
// 在 Hibernate中所有的操作都是通过Session来完成 21
private Session session = null ;22
23
// Session 是 一个接口,必须实例化24
// 在构 造方法中实例实化Session对象 25
public PersonOperate() {26
// 找 到Hibernate配置文件 27
Configuration config = new Configuration().configure();28
29
// 从 全局配置文件中取出SessionFactory 30
SessionFactory factory = config.buildSessionFactory();31
32
// 从 SessionFactory中取出一个Session 33
this .session = factory.openSession();34
35
} 36
37
// 所有 的操作都是通过Session进行38
// (1) 实现向数据库中插入数据 39
public void insert(Person p) {40
// 1. 开始事务 41
Transaction tran = this .session.beginTransaction();42
43
// 2. 执行语句 44
this .session.save(p);45
46
// 提 交事务 47
tran.commit();48
} 49
50
// (2) 实现修改数据库的数据 51
public void update(Person p) {52
// 1. 开始事务 53
Transaction tran = this .session.beginTransaction();54
55
// 2. 执行语句 56
this .session.update(p);57
58
// 提 交事务 59
tran.commit();60
61
} 62
63
// (3) 实现查询数据库的数据64
// 使用 HQL按ID查询 65
public Person queryById(String id) {66
Person p = null ;67
68
// 使 用Hibernate查询语句(HQL) 69
String hql = " From Person as p where p.id=? " ; // 从Person类中对象p的 id查70
71
// 通 过Query接口查询 72
Query q = this .session.createQuery(hql);73
q.setString( 0 , id); // 下标从0开始 (id是第一个属性) 74
List l = q.list(); // 导入的包是 java.util.List; 75
Iterator iter = l.iterator();76
if (iter.hasNext()) {77
p = (Person) iter.next();78
} 79
return p;80
} 81
82
// (4) 实现删除数据库的数据 83
public void delete(Person p) {84
// 1. 开始事务 85
Transaction tran = this .session.beginTransaction();86
87
// 2. 执行语句 88
this .session.delete(p);89
90
// 提 交事务 91
tran.commit();92
93
} 94
95
// 通过 HQL语句实现删除数据库的数据(推荐) 96
public void delete(String id) {97
String hql = " delete Person where id=? " ;98
Query q = this .session.createQuery(hql);99
// 设 置参数 100
q.setString( 0 , id); 101
// 执 行更新语句 102
q.executeUpdate(); 103
// 提 交事务处理 104
this .session.beginTransaction().commit();105
106
} 107
108
// 通过 HQL查询全部数据 109
public List queryAll() {110
List l = null ;111
String hql = " From Person as p " ;112
Query q = this .session.createQuery(hql);113
l = q.list();114
return l;115
} 116
117
// 通过 HQL查询全部数据 118
public List queryByLike(String cond) {119
List l = null ;120
// 条 件 121
String hql = " From Person as p where p.name like ? " ;122
Query q = this .session.createQuery(hql);123
// 设 置参数 124
q.setString( 0 , " % " + cond + " % " );125
l = q.list();126
return l;127
} 128
129
}
130
六:建立测试类
src/org.lxh.hibernate.demo01.TestPO.java
package
org.lxh.hibernate.demo01;2
3
import
java.util.Iterator;4
import
java.util.List;5
6
/** 7
* @author ∪∩BUG E-mail: tidelgl@163.com8
* @version Aug 29, 2008 9:53:52 PM9
* @POJO类的测试类10
*/
11
public
class
TestPO
{12
13
/** 14
* @param args15
*/ 16
public static void main(String[] args) {17
18
// 生 成POJO类实例化对象 19
Person p = new Person();20
21
// p.setId("Hibernate");22
// p.setId("MySQL");23
// p.setName(" 学习笔记"); 24
p.setName( " 使用用Hibernate " );25
p.setPassword( " 123 " );26
p.setEmail( " tidelgl@163.com " );27
p.setSex( " 男 " );28
29
// 实 例化PersonOperate对象 30
PersonOperate po = new PersonOperate();31
32
// 1. 插入数据33
// po.insert(p);34
35
// 2. 修改数据36
// po.update(p);37
38
// 3. 查询数据39
// Person p = po.queryById("Hibernate");40
// System.out.println(p.getName());41
42
// 通 过HQL查询全部数据43
// List l = po.queryAll();44
// 通 过HQL模糊查询45
// List l = po.queryByLike(" 用");46
// Iterator iter = l.listIterator();47
// while(iter.hasNext()){48
// Person p = (Person)iter.next();49
// System.out.println(p.getName());50
// 51
// }52
53
// 4. 删除数据54
// po.delete(p); // 通过查询结果删除55
// po.delete("Hibernate"); // 通过HQL语句删除 56
57
58
} 59
60
}
61
例子结构:


 160
160


 被折叠的 条评论
为什么被折叠?
被折叠的 条评论
为什么被折叠?
 到【灌水乐园】发言


